
There is nothing like a forthcoming campaign to inspire me to put together new terrain, miniatures or game elements. We are about to embark on a new campaign using Chain of Command where we will play through two of the Pint-Sized Campaigns which are linked to each other - Operation Martlet which is then followed by The Scottish Corridor. It's the perfect excuse to add more to the collection.

Both campaigns are set in Normandy and while I do have plenty of suitable terrain I've always wanted to add more. In particular I've wanted to be able to make the bigger farms that are such a feature of the area and which play a prominent role in these campaigns.
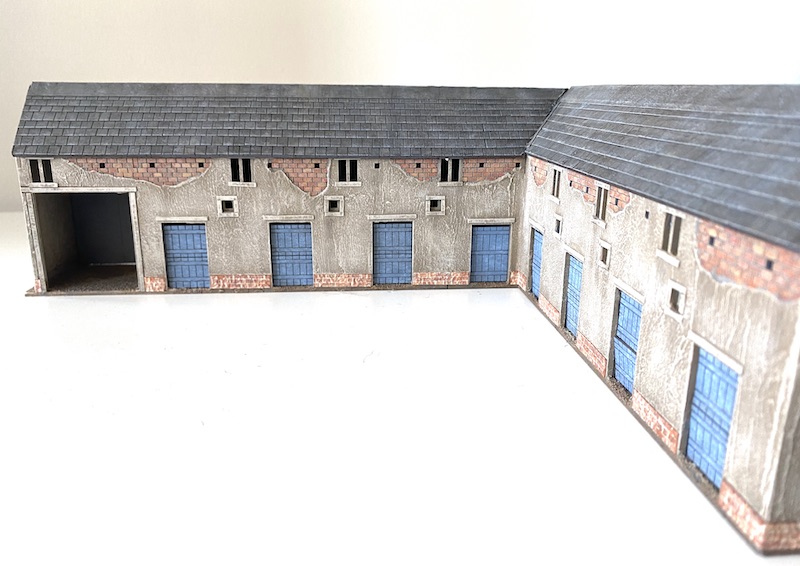
Sarissa Precision offer a good selection of suitable buildings in MDF and so I picked up two more - Decoster's house and the stables from their La Haye Sainte set. Both were given the same treatment with roof tiles from Charlie Foxtrot Models; texturing with household filler, and the addition of embossed brick wallpaper for the lower brick work.
Below is Decoster's house:


The farm is designed around the newly made Decoster's house and one of the barns from Charlie Foxtrot.


The La Haye Sainte stable lends itself to something similar but for now it's a stand alone piece:


A calvary is a feature on the map of the opening game of Operation Martlet. The campaign is such that there's a high chance the map is fought over more than once, so it is likely to make more than a single appearance. They are common enough in other parts of France so that this is an addition that should see a lot more use beyond this particular campaign. This is a 3D print from Sabotag3D.


A list two support option for the Germans is an entrenchment for one of their tanks. In the Martlet campaign the first German platoon receives a PzIV as an automatic support for their first platoon so that's the tank most likely to end up in the entrenchment. Now it just so happened that I had a spare model of a PzIV from one of the Plastic Soldier Company sets that was part painted. I decided to carry out a bit of surgery and make one in the entrenched position. More about how I did it in this post.


Just to be complete I have also made an 'empty' tank scrape. While this seems like an indulgence it can serve several purposes. The most obvious is for use when the PzIV vacates it in a game, but given each game in the campaign occurs only hours later we will play that any tank scrape will remain in place if we play successive games on the same map.


I've been giving some thought to my shock and casualty markers. While the 8mm mini-dice do a good job of recording the amount of shock I still find them intrusive on the table with 20mm figures. With that in mind I'm going to try something slightly different going forward. In the case of my most common multi-based weapon crews like light machine gun teams with only two figures I will stop using a red dice to indicate a crew casualty, after all it's only ever going to be a 1, instead I've made up a marker with a first aid satchel and bloodied bandages to mark that casualty. These are almost identical to the markers I use to record wounded senior leaders.


A note about rules modifications in the Campaign
- The main armament has a maximum range of 30” and may only fire while the Churchill is stationary and uses no other weapons.
- To reload the main armament the tank commander must activate and then order the gunner to reload, which takes a full phase. The tank commander may not activate any other position but can rally off shock.
- The gunner cannot reload if the tank is within close range of small arms (0-18"). In order to reload in these circumstances the AVRE must first move out of range.
- The AVRE may target a building regardless of whether an enemy has been identified as occupying it.
- If fire from the AVRE causes a building to collapse this is treated as impassable terrain and blocks line of sight.
- If shooting at walls, only two 6’s are needed to collapse and breach a 6” stretch of wall. Any units within 6” of the wall when it collapses will take 1D6 hits as if in the open. After collapsed/breached treat as difficult ground. It offers light cover to troops behind it.
- If shooting at enemy armour then add +3 to hit.
- Increase the support cost to list 5.
- The FOO can be activated only on a 1 (not by a senior leader).
- Calling for the barrage was the first action of the Barrage such that if the turn ended even before the first round had landed, then the barrage ends.
- Troops on the ground floor of a two storey building that provides hard cover are immune to hits.
- To move a barrage the FOO must activate and request the move, which takes place on the next phase when the FOO activates. During the phase when the request is made to move the barrage troops under the barrage don’t take hits.
- The Barrage can only be moved forwards, backwards or sideways. No diagonal moves. The move distance will be random. The distance will be either one or two D6’s at the choice of the owning player.
- Surrounding the barrage is a “Beaten/Danger Zone” of 6” – any FRIENDLY troops in this area will roll for possible hits for any misses from the barrage (note: enemy units will NOT roll for hits).
I have these two campaign booklets and hope to run them soon - my collection was geared to providing most of what's in the OOBs. Really looking forward to the upcoming AARs even if the accompanying photos will make my games look second rate by comparison.
ReplyDeleteI use small pieces of padding (from the wife's quilting box) sprayed brown as shock markers - dice as markers don't work for me - the idea was that they should look like spurts of dirt thrown up by incoming fire but as the shock builds up it can look a bit odd. I must give some thought to doing something better like your first aid markers.
PS I really like the tank scrape comparison photos shows it's really worth the effort.
ReplyDeleteSplendid work Mark, your farm complex is the most splendid of all. Looking forward to following the upcoming campaign, although detailed your narrative is never long winded and carries one along with the action in fine style.
ReplyDeleteExcellent terrain pieces. That tank scrape looks realistic. Looking forward to the AARs.
ReplyDeleteYou have done wonderful work with the SP buildings. The texture of the walls and the exposed brick look great.
ReplyDeleteI'm looking forward to reading these game reports.
ReplyDeleteLovely work Mark
ReplyDeleteGreat work on all of it. I have the calvary from Sabotag3d and it is a wonderful and evocative piece. They are in many locations in Normandy / France so could be a drop in piece for otherr games as well.
ReplyDeleteRichard
Great stuff - looking forward to following along with campaign AARs.
ReplyDeleteI repeat my query after your post about placing terrain pieces on "stands":
ReplyDeleteDick Bryant19 August 2023 at 01:04
Great stuff as we have all come to expect! How about a couple of photos of your storage system? Please, That is the major limitation of scenery, I find.
Thanks
I use plastic storage tubs, nothing particularly fancy I'm afraid, my only 'skill' is I have become a master at fitting all these in the smallest of spaces with as little wasted space as possible. It's a constant juggling act - how I long for a dedicated gaming space with room for everything!
DeleteAh! the 'Gamer's Nirvana!
DeleteHello, I just stumbled on this video on FB, depicting how an AVRE Petard loaded its gun. It doesn't look as if you had to get out of the tank to load. ;)
ReplyDeletehttps://fb.watch/AWmEIn8w2r/
Thanks for that, I actually discovered the same video last year and came to the same conclusion. While sticking his hands out of the hatch was potentially hazardous it’s nowhere near as hazardous as climbing right out to reload. What struck me the most was how quickly they reloaded. Those AVRE rules were draft playtest versions and since then the Lardys have made it much simpler and much closer to what happens in the video. I think in CoC v1 the AVRE was abused by players, firing at unlimited range and often at AFVs. That’s changed, but the speed of loading is now no different to a tank and no need to withdraw out of close range to do so.
Delete