

Talking of scale, there is no specific scale for Chain of Command. The rules writer, Richard Clarke has said that 15mm most accurately reflects the ground scale around which the rules were written, although Rich himself plays the game in 28mm. As mentioned, I play in 20mm. Much depends on what you have in your collection and what those who you are likely to play against have in theirs. Alternatively, you can take my approach, which has been to create forces for both sides in 20mm with terrain to match. That way I'm ready for a game, regardless of what scale my opponent may collect.
Most seem to play with figures based individually, but if you have a collection built for a rule set like Flames of War, with multiple figures to a base, Chain of Command will work just as well. All you need to do is devise a suitable method to record casualties. I began playing with 20mm figures with three to a base and had no problem.
Chain of Command is at heart a platoon level skirmish game, at the very basic level you will need an infantry platoon for each side. The composition of many of these platoons are outlined in the main rule book. They reflect the structure of actual historical platoons and are not specific or exclusive to Chain of Command. That means you don't need to build this platoon using points, as in some other WWII rules. Most platoons comprise approximately 30-40 figures and will include riflemen, light machine gun teams, squad/section leaders and the platoon leaders. Exactly what figures you will need will depend on the force you want to create. There is much more detail on how this works in this article about building force lists and supports.
I have created the boards you see below to help me organise figures for a game (a bit more about them later). Here you can see how the British Airborne Platoon is composed for a Chain of Command campaign set on D-Day.

Here below, is the one for a standard British infantry platoon from the second edition rule book. It follows a format that is used in the rules to describe a variety of different platoons.
This tells you the platoon is made up of a headquarters with two senior leaders and two teams - a PIAT team and a 2" mortar team. It also tells you there are three sections ('section' being the British term for a squad) giving you the number of men and their weapons.
As you can see for this platoon, you would require 37 figures in total. For the headquarters you would need:
The LMG teams each contain a Bren gun crew. This is described as 'Bren gun Three crew' which means one figure with a Bren gun and two figures to represent the men who act as loaders and ammunition carriers. In Chain of Command a man designated as 'crew' does not fire his personal weapon, his job is to service the team's main weapon and, if need be, to step up and fire that weapon if the other members of the crew are killed.
In total for the three sections you would need:

It's not always practical to place a figure on a 20mm round base and with prone figures I simply make up a base to match the size of the figure.

You will want to be able to identify leaders and key support weapons quickly and people use a variety of different methods for doing this. Much depends on the scale at which you game - a 28mm miniature is much easier to identify from a distance than a 15mm figure. Most methods seem to revolve around basing - larger bases, coloured rings around the bottom of the base or different shapes. Originally I used different sized bases to do this, but I began to find that the bigger footprint created crowding problems when playing games.
Now, my Junior Leaders are based on 20mm round bases, like my other individual figures. To distinguish them, I like to use a figure with a suitable leader's pose and I've added a few rocks to the base to help them stand out.


For Senior Leaders I have chosen a different shape and these figures are on rectangular bases approximately 20mmx25mm. You will notice in the picture below I have two options for the British Lieutenant, one with a pistol and one with a Sten gun. This is because the support lists for the British in the second edition allows for an 'upgrade' to give him the submachine gun (the same applies for several other army lists).


This makes them easy to distinguish from junior leaders.


To help crewed weapons like a light machine gun stand out, I like to have two figures on a base. Originally I kept the basing consistent at 40 x 40mm squares, but like my leader figures I found that this large base size wasn't always practical, particularly if you are playing in dense terrain or in buildings. So I decided to maintain the idea of two figures on a base, but to vary the base size according to the figures, with the aim to keep the footprint as small as possible.


You may ask, why not put all three members of the LMG team on the same base? Aside from creating a less flexible way of arranging figures on the table, I want the option to remove figures as they become casualties. So this is a compromise. One that allows me to identify quickly where weapons teams are on the table, but allows for casualties to be removed. The third member of the team is made up simply by using an individual figure.


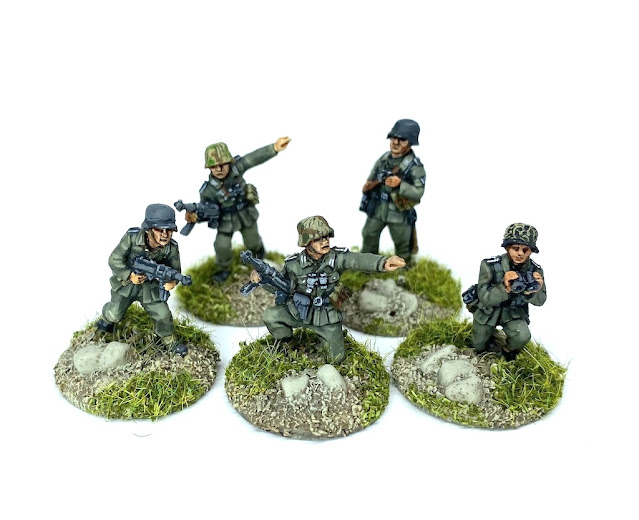
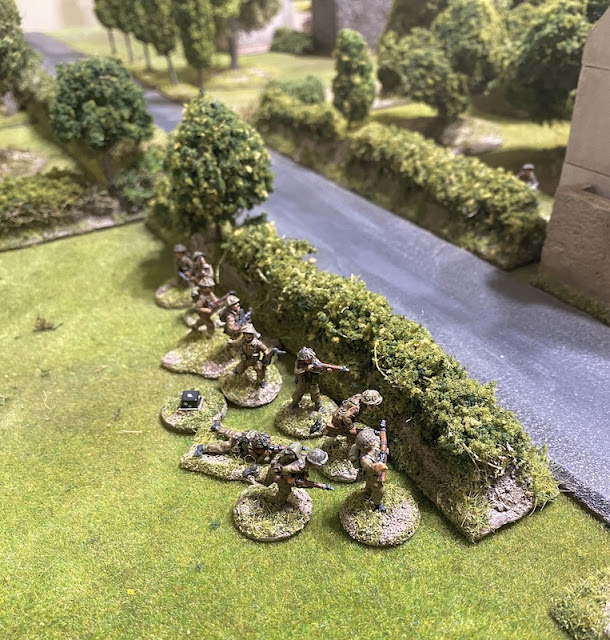
This then gives us the core basing for a platoon. Here is a German rifle squad for a standard 1944 platoon as listed in the second edition rules. It is made up of a rifle team of five men, an MG42 team of four men and their junior leader.

A British section is made up of the same number of men, but the size of each team varies slightly compared to the German equivalent.

The British platoon headquarters is made up of two senior leaders and two weapons teams - a PIAT team and a 2" mortar team (note that the second edition rule book now includes a third member of this team, perviously it was a two man team).


The important thing is to be able to glance at the table and know what is what.
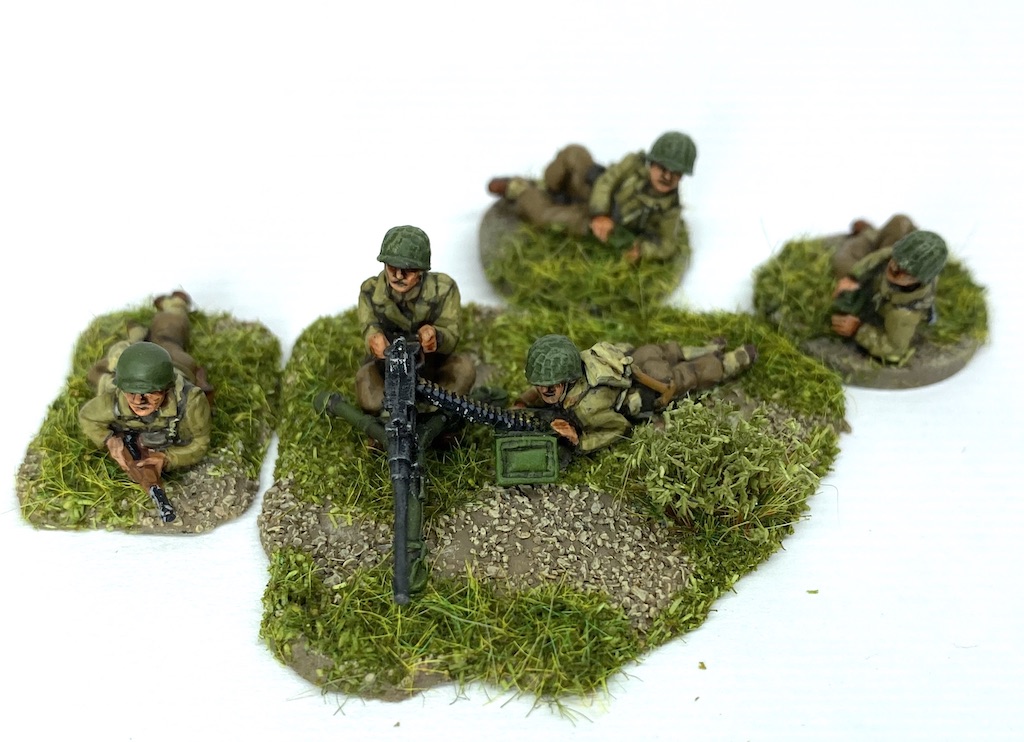
Weapons that have a crew larger than three men have the additional crew figures mounted on single bases, the same as the riflemen. That allows the individual figures to be the first to be removed as casualties. I will cover how I deal with casualties when they occur to the multi-figure bases later in this post.


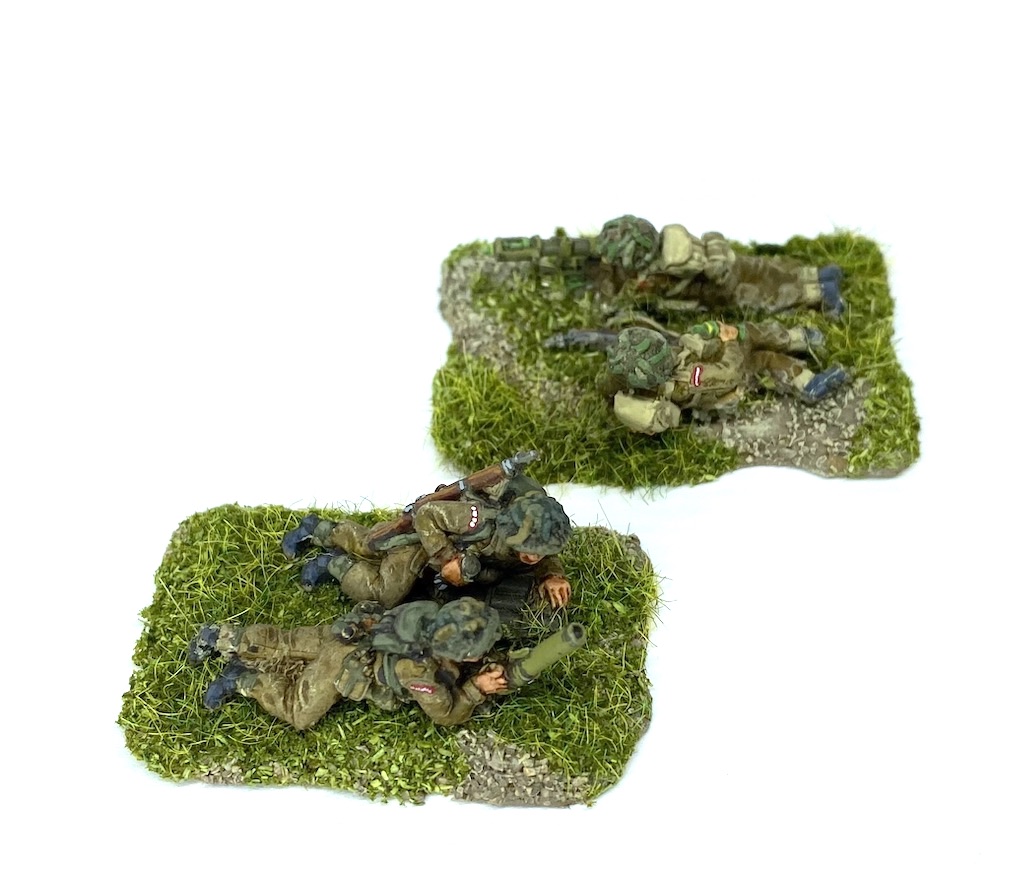
Teams for the PIAT, Panzerschreck and other similar weapons, like the British 2" mortar, are normally based with two figures like the LMG teams. However rules are made to be broken. Practical experience has shown that some weapons teams, like a panzerschreck team that very often will be firing from cover, benefit from having figures individually mounted. I like to keep my options open.
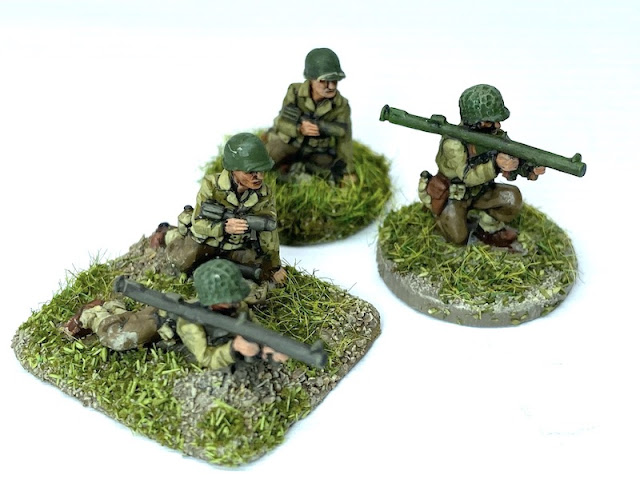
These figures below give me a number of options for panzerschreck teams depending on the terrain into which they deploy or move.


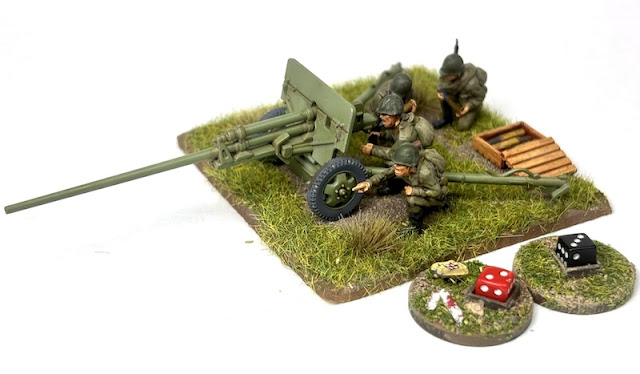
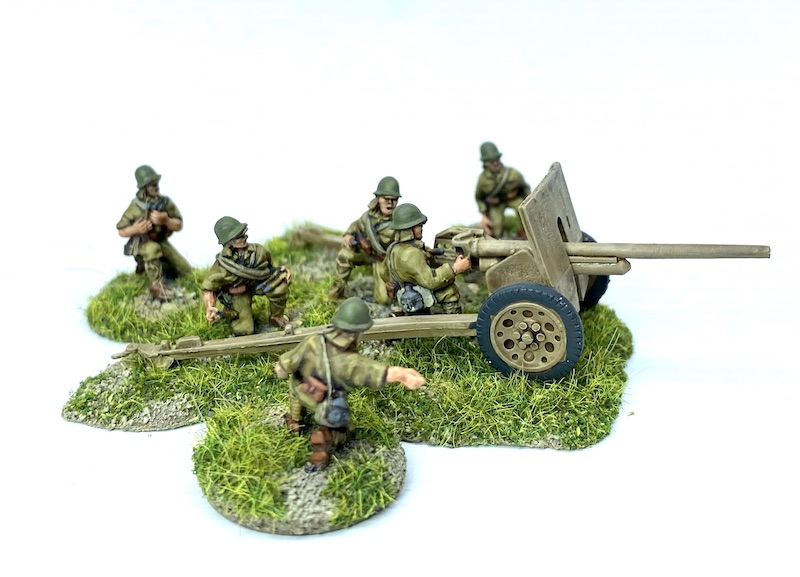
Of course there are times you just want to break the rules for aesthetic reasons, like this gun with its large crew. It seems a shame to break them up onto individual bases when they make such a nice mini-diorama like this.

Talking of guns, there is no fixed basing convention for these in Chain of Command and you will see a variety of styles. Some prefer to base all the crew individually and then stand them around the gun on the table. This certainly makes it easier to deal with casualties, but essentially it is down to whatever you prefer. I tend to base to suit the size of the gun and crew and I like to have a mix of some crew with the gun and some based individually to remove as casualties.


Once you have gathered your forces you will want to start playing a Chain of Command scenario, so here are some items that you might find useful for keeping track of what is happening on the table.
For general game play there are a few essentials. Starting with the patrol phase you will need a set of patrol markers. You can use any marker you think appropriate to represent these. I downloaded these great patrol markers from John Bond's Wargaming Stuff, if you are not familiar with John's work he makes some of the most inspiring terrain and scenery (and his miniature painting rises to the same level). You can find a file for his Patrol Markers here.

After printing them out I then paste them onto 40mm diameter round MDF bases. These have a print for the reverse to indicate when a marker has been locked down in the patrol phase.


I then use the same size base to make Jump Off Points. I've raided the spare parts box for material here, mainly stowage items from AFVs, Oil drums and other similar accessories. For most scenarios you will need three jump off points for each side, however some scenarios require a fourth jump off point to mark specific objectives, so I'd suggest having enough for four for each side.


I also like the idea of adding figures to jump-off-points to make them more atmospheric. Below is one I've made for my Japanese platoon:


I made these two below for my American platoon using spare figures carrying jerry cans and distributing ammunition:


A spare radio operator and ammunition carrier worked well for my British:


Jump-off-points can also serve as resupply points for weapons that have limited ammunition, such as hand grenades or light mortars. The rules also provide for a Replen Point as a support option, this allows you to bring the resupply to the unit, rather than have the unit travel back to a jump-off-point. These are marked on the table in some way and so I've created small, themed bases for this. I've used a size that I don't use for regular units and a different shape from jump-off-points. Spare figures in suitable poses, with equipment from my spares box, were used to identify what they are. Here are two I've made for my British and German forces.


Some quite elaborate ones exist. I was fortunate enough to be given these two below when I ran participation scenarios of a Chain of Command game set on Saipan featuring Japanese and US Marines. They are made by Battlefield Accessories, you can order them from here. There are plenty of options out there.


You may ask, why go to the bother of making a base just for the dice, why not just place the dice on the table? It's a good point, but I've found small dice are easy to leave behind when a unit moves and more importantly, too easy to knock over to a different number if not held in place in some way. I think if you don't want to use a dice frame then you need to use larger dice and I feel you can start to clutter the table with unsightly dice if you're not careful. If nothing else the dice frames just look better on the table and my feeling is, if it looks good, then it's worth doing.

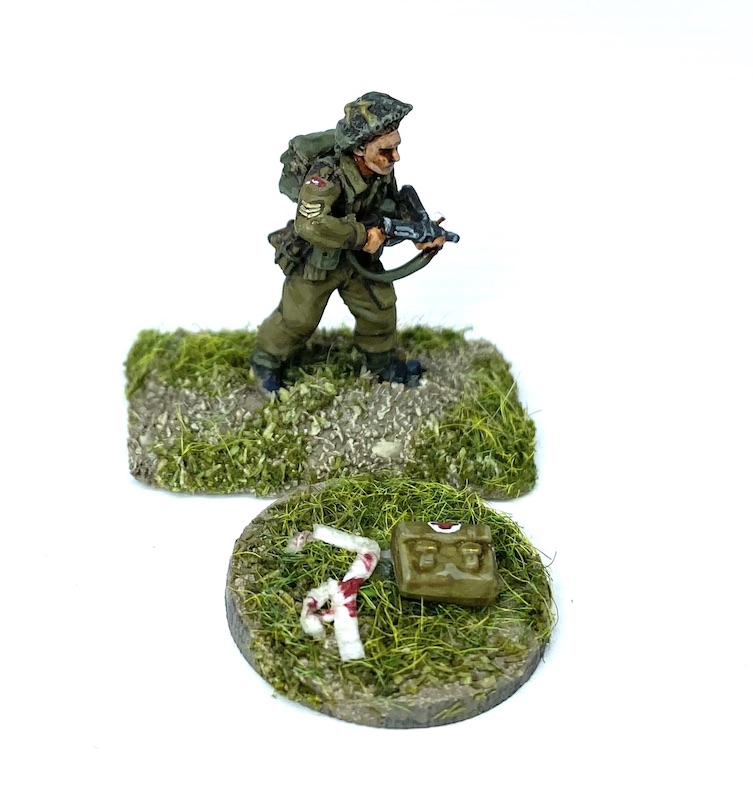
Most casualties are simply removed from play, however wounded leaders are an exception. I've tried to find a way to identify these, particularly those who will have their command initiative reduced for the remainder of the scenario. I've gone down a few paths to work out how best to do this. Initially, I created replacement wounded figures for this, like the one on the left below.


However, it's time consuming and it's not always possible to find the right figures for your nationality or units. Over time I've tried a few different methods. More recently, I've tried to produce something flexible that can be used for all nationalities. These are small, sabot style bases into which the wounded leader can be inserted. You can read more about how I made these in this post about Wounded Leader Markers.


Alternatively, I can use the two separate frames, so they can be very versatile.
Units that are taking Tactical positions or placed on Overwatch need to be marked, as do those that have become Pinned or Broken. The sets sold by Too Fat Lardies, mentioned earlier, include markers that you can use. My regular opponent bought an alternative set from Olympian Games and they inspired me to take them one step further.

Having these is my one real concession to having markers on the table where function is more important than form. Nonetheless I've been trying to make them blend in more with the table and acquired a set of the markers from Olympian Games that come in plain MDF.

I added texture using sand and PVA and then painted and flocked them as I would my figure bases.

I think these blend in well with the table and you can read more about them here.


If you don't want to go to all this effort yourself, Too Fat Lardies sell a set of game markers that serve these functions


While by no means essential, these two laser pointers are great for working out placement of Jump of Points during the Patrol Phase and assisting with determining if enemy units fall within a unit's arc when firing on overwatch, or using React Fire. Unlike a laser pointer, each of these projects a laser line onto the table and so the two of them make it very easy to work out the relevant arcs behind the patrol markers. They are also very handy for determining line of sight. You don't need them, but you know you want them.


There are several great sources of additional information you can explore. Too Fat Lardies run an online Forum for all their games including a folder for Chain of Command.
There is also a Facebook group specifically for CoC. On X (Twitter) and now on Bluesky there is a feed using #chainofcommand and #spreadthelard.
The player community also has several great blogs and YouTube channels which feature the game in action and I would recommend Storm of Steel Wargaming, Tabletop CP and Beasts of War.

The Lardies themselves have ventured into the video medium and produce a regular podcast - the Oddcast and YouTube videos on Lard TV.
I also have a number of AARs in this blog. Just one word of caution with all of these, we all make mistakes sometimes and miss the odd rule in the heat of the action. If while you are watching or reading these something strikes you as not quite correct, chances are you are right. These are the not the final word on the rules but a wonderful way to get a feel for how the game flows. Even Rich Clarke, the author of the rules who features in the Beasts of War videos, has been known to confuse a rule with another one of the rule sets he has written. If in doubt refer back to the rule book and the FAQ as the correct source.
I have a number of articles about tactics and other game aspects of Chain of Command and these can all be found on the CoC Tactics page.
I hope this is a useful guide for anyone just getting into Chain of Command. While I list a lot of home made extras here they are by no means essential for enjoying the game, I just can't help making and painting stuff. It's a sickness, I'm sure!
I wish I could take credit for much of this, but my thanks go out to the many fine folk out there producing great terrain and gaming tools and sharing them with us via their blogs, forums and social media.
 |
| Copyright TooFatLardies |
As you can see for this platoon, you would require 37 figures in total. For the headquarters you would need:
- Two figures, one with a pistol for the Lieutenant and one with a rifle for the Platoon Sergeant. These two are the platoon's senior leaders.
- Two figures for the PIAT team - one with a PIAT and another as the loader/assistant.
- Three figures for the 2" mortar team - one with a 2" mortar and another two for the loader and assistant.
The LMG teams each contain a Bren gun crew. This is described as 'Bren gun Three crew' which means one figure with a Bren gun and two figures to represent the men who act as loaders and ammunition carriers. In Chain of Command a man designated as 'crew' does not fire his personal weapon, his job is to service the team's main weapon and, if need be, to step up and fire that weapon if the other members of the crew are killed.
In total for the three sections you would need:
- Three figures with Sten guns to represent the Corporals, the junior leaders that lead each section.
- Three figures with Bren guns, one for each of the LMG teams
- Six figures for the remaining men that make up each of the three Bren gun crews
- Eighteen figures with rifles for the rifle teams in Sections One to Three
- An additional rifle squad or section (10 or so figures, depending on the nationality and type of unit)
- A sniper (1 figure)
- A medium machine gun team (5 figures)
- An engineer team (3 figures)
- An infantry anti-tank team (2 figures for a bazooka, PIAT or panzerschreck)
- An anti-tank gun (gun and five figures plus commander)
- An armoured car or similar
- One or two of the most common types of tanks for the force and period of the war you are collecting (for example if you are collecting the British for 1944 in Europe then a Sherman and a Churchill might be useful choices to get you started).


You will want to be able to identify leaders and key support weapons quickly and people use a variety of different methods for doing this. Much depends on the scale at which you game - a 28mm miniature is much easier to identify from a distance than a 15mm figure. Most methods seem to revolve around basing - larger bases, coloured rings around the bottom of the base or different shapes. Originally I used different sized bases to do this, but I began to find that the bigger footprint created crowding problems when playing games.
Now, my Junior Leaders are based on 20mm round bases, like my other individual figures. To distinguish them, I like to use a figure with a suitable leader's pose and I've added a few rocks to the base to help them stand out.


For Senior Leaders I have chosen a different shape and these figures are on rectangular bases approximately 20mmx25mm. You will notice in the picture below I have two options for the British Lieutenant, one with a pistol and one with a Sten gun. This is because the support lists for the British in the second edition allows for an 'upgrade' to give him the submachine gun (the same applies for several other army lists).


This makes them easy to distinguish from junior leaders.


To help crewed weapons like a light machine gun stand out, I like to have two figures on a base. Originally I kept the basing consistent at 40 x 40mm squares, but like my leader figures I found that this large base size wasn't always practical, particularly if you are playing in dense terrain or in buildings. So I decided to maintain the idea of two figures on a base, but to vary the base size according to the figures, with the aim to keep the footprint as small as possible.


You may ask, why not put all three members of the LMG team on the same base? Aside from creating a less flexible way of arranging figures on the table, I want the option to remove figures as they become casualties. So this is a compromise. One that allows me to identify quickly where weapons teams are on the table, but allows for casualties to be removed. The third member of the team is made up simply by using an individual figure.


This then gives us the core basing for a platoon. Here is a German rifle squad for a standard 1944 platoon as listed in the second edition rules. It is made up of a rifle team of five men, an MG42 team of four men and their junior leader.


The important thing is to be able to glance at the table and know what is what.


These figures below give me a number of options for panzerschreck teams depending on the terrain into which they deploy or move.

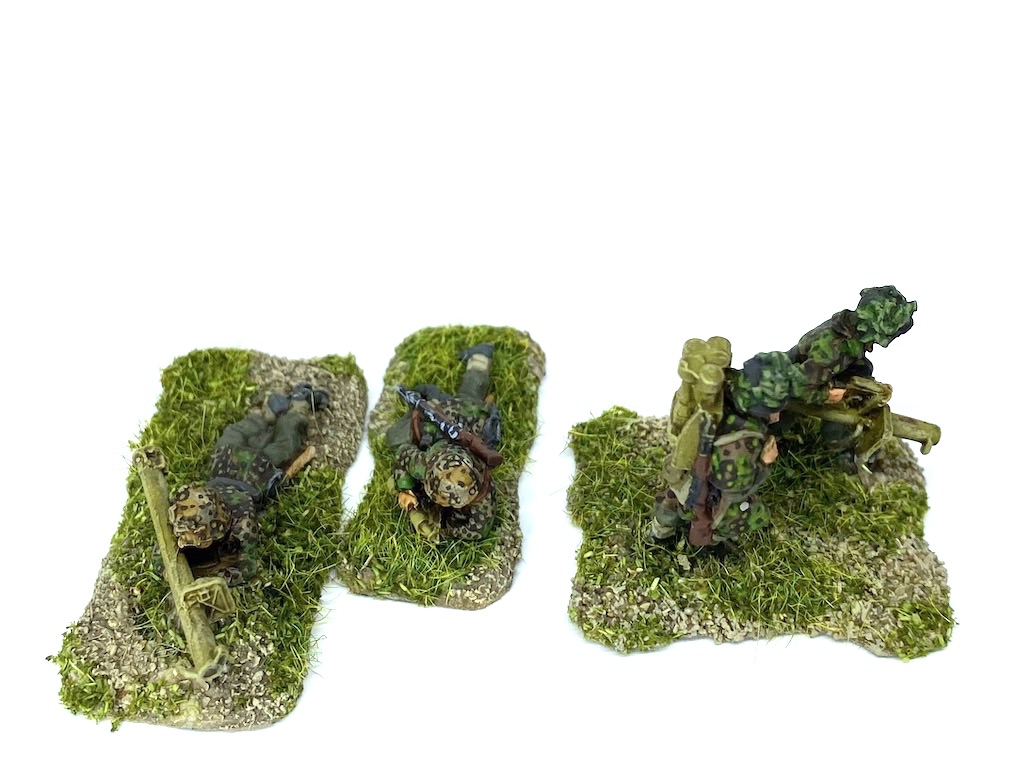
Of course there are times you just want to break the rules for aesthetic reasons, like this gun with its large crew. It seems a shame to break them up onto individual bases when they make such a nice mini-diorama like this.

Talking of guns, there is no fixed basing convention for these in Chain of Command and you will see a variety of styles. Some prefer to base all the crew individually and then stand them around the gun on the table. This certainly makes it easier to deal with casualties, but essentially it is down to whatever you prefer. I tend to base to suit the size of the gun and crew and I like to have a mix of some crew with the gun and some based individually to remove as casualties.

As your platoon starts the game off the table it helps to have the figures arranged into their teams and squads until they are ready to deploy. Even as an experienced player I like to have my platoon organised in this way, so I created platoon boards. These make it very easy to display the figures in their respective units while they are off the table awaiting deployment. You can see how I made the Platoon Boards here.


On the subject of platoon structures you will find that the Chain of Command rule book contains a set of army lists for platoons for various nationalities, but these generally cover the more common types of platoons seen in the European theatre and on the Eastern front. If you are looking to play the Pacific, or say Poland in 1939, you will be able to find army lists in a number of places, many of them available free of charge.
In 2018 Too Fat Lardies published Blitzkrieg 1940 a specific Chain of Command handbook for playing France and the Low Countries in 1940 and this is the first of a series of handbooks that will eventually cover the entire war. Each handbook will contain lists for nationalities and the various platoon structures for infantry units from paratroopers to armoured infantry depending on the period of the war and the nation. They also include background history, scenarios and theatre specific rules.
In 2024 the Far East Handbook was published with very detailed lists to cover the British Empire, Japan and the Dutch East Indies. It also includes a raft of additional rules to cover jungle terrain, Japanese national characteristics as well as new scenarios. This will allow games to be played in place like Malaya, Burma, Hong Kong and Java. It is intended that this will be followed by a further handbook to cover the Pacific and include the Americans as well as Australian and Japanese units that were specific to this theatre.
Additional lists can be found in some of the Lardy Specials (downloadable pdf magazines sold from the TFL website), for example the Christmas Special 2016 contains a range of mid-war lists for the Eastern Front. I think it is hoped the various handbooks will help to consolidate many of these lists into easily accessible books.
In my opinion there is one feature of this system that really enhances game play and that is the Pint Sized Campaigns (so called because the pdf versions sell for about the same price as a pint of beer). There are a number of these covering actions from Normandy to Kursk to Malaya and they are available to purchase and download as a pdf from the Too Fat Lardies website. They all offer a linked series of games that follow a particular action. This adds a whole new dimension, where players need to take into consideration the longer term implications of each game - how many casualties can your core platoons handle? When should you concede ground? They are often fought over five or six tables involving anywhere from six to ten games. The Campaign AAR page on this blog has over eighty game reports on a dozen campaigns that hopefully give you a good idea of how these can add to the overall gaming experience.

For general game play there are a few essentials. Starting with the patrol phase you will need a set of patrol markers. You can use any marker you think appropriate to represent these. I downloaded these great patrol markers from John Bond's Wargaming Stuff, if you are not familiar with John's work he makes some of the most inspiring terrain and scenery (and his miniature painting rises to the same level). You can find a file for his Patrol Markers here.

After printing them out I then paste them onto 40mm diameter round MDF bases. These have a print for the reverse to indicate when a marker has been locked down in the patrol phase.


I then use the same size base to make Jump Off Points. I've raided the spare parts box for material here, mainly stowage items from AFVs, Oil drums and other similar accessories. For most scenarios you will need three jump off points for each side, however some scenarios require a fourth jump off point to mark specific objectives, so I'd suggest having enough for four for each side.


I also like the idea of adding figures to jump-off-points to make them more atmospheric. Below is one I've made for my Japanese platoon:


I made these two below for my American platoon using spare figures carrying jerry cans and distributing ammunition:


A spare radio operator and ammunition carrier worked well for my British:

If you don't want to make your own jump of points or patrol markers Too Fat Lardies produce a set of resin Jump off Points that will do the trick and you can see these below and order them from TFL here. If, like me, you play in 20mm or a smaller scale you should just note that the jump off points have been scaled for 28mm.

The patrol phase is one of the very innovative mechanics in Chain of Command and so I've written a post about Playing the Patrol Phase aimed at helping those getting started with the rules to understand how to approach playing this important phase of the game. You may also find this post on Deploying in Chain of Command useful in helping to understand how to use this mechanic in a game.


Several of the Missions in the v2 rule book include the capture of objectives. These feature on the table as Objective Markers placed in key locations like bridges, buildings or road junctions. There are many ways these could be marked and the rule book suggests several, including using patrol markers once that phase is completed. Depending on the terrain, you could use a vehicle wreck or a small supply dump, making up something similar to a jump-off-point.

I think there is scope to be quite imaginative here and come up with objective markers that suit the narrative of the mission. That said, there will be times when something relatively discrete is needed and for that I've made simple markers using images from 1:50,000 British war office maps of Normandy.

These are mounted on either 20x20mm or 40x40mm MDF bases and can be placed anywhere, but I thought they'd work particularly well in buildings and more dense terrain (which is why I've opted for two different sizes). Perhaps, most usefully, they won't interfere with figure placement where space is limited.

The other essential is a device for tracking the all important Force Morale for each side. These are available from the Too Fat Lardies website.


Pictured below is one I use. They come in two colours, grey and khaki, and I bought mine at a local wargame convention in Sydney. They are made by Olympian Games. A quick Google search will throw up something similar, see this option from Warbases.
I use large coloured dice to track points on the Chain of Command dice and an old counter from the Axis and Allies board game as markers to track Force Morale for each nationality.


The second edition rules also include mechanics that were first introduced in the 1940 and Far East Handbooks. These include an additional command dice, referred to as a Red Dice (although it can be any colour you like, as long as you can differentiate it from the other command dice). While these provide additional command options, they are lost once a platoon's force morale drops to a certain level (this will vary according to troop quality or historical circumstances). Similarly, there can come a point where units are compelled to pull back to the nearest jump-off-point. At what point this may occur for any particular platoon are included in the army lists and force rosters. I find it handy to mark when this will happen on the force morale tracker, so they are not forgotten in the heat of a game.

Combat will result in your units taking shock, losing men as casualties and suffering wounded leaders. I've tried to come up with simple ways to show this on the table.
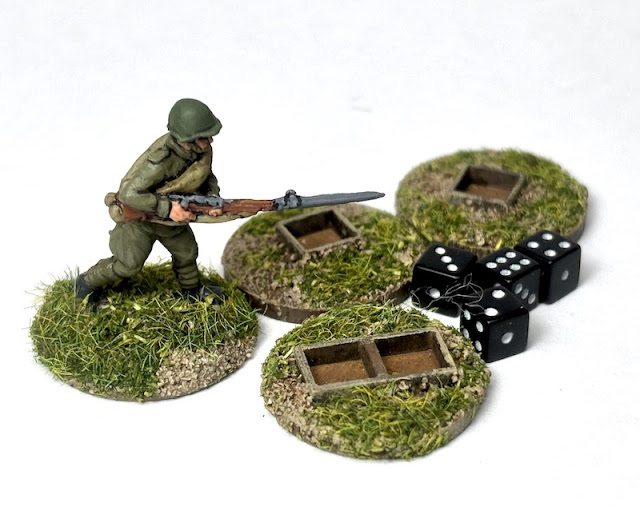
Shock levels will rise and fall during play and so you need a simple and flexible way to record this. I'm not a fan of too many markers on the table and levels of shock on units can sometimes be as high as 10 or more. For this I use micro dice with matching dice frames in MDF which I sourced from Minibits. I have these mounted on small, scenic bases into which a dice showing the relevant level of shock can be inserted. My personal preference is to use a black dice to record shock.

They are 20mm round bases, the same size as my individual figures and I've flocked them in the same way.
Shock levels will rise and fall during play and so you need a simple and flexible way to record this. I'm not a fan of too many markers on the table and levels of shock on units can sometimes be as high as 10 or more. For this I use micro dice with matching dice frames in MDF which I sourced from Minibits. I have these mounted on small, scenic bases into which a dice showing the relevant level of shock can be inserted. My personal preference is to use a black dice to record shock.


You may ask, why go to the bother of making a base just for the dice, why not just place the dice on the table? It's a good point, but I've found small dice are easy to leave behind when a unit moves and more importantly, too easy to knock over to a different number if not held in place in some way. I think if you don't want to use a dice frame then you need to use larger dice and I feel you can start to clutter the table with unsightly dice if you're not careful. If nothing else the dice frames just look better on the table and my feeling is, if it looks good, then it's worth doing.


Most casualties are simply removed from play, however wounded leaders are an exception. I've tried to find a way to identify these, particularly those who will have their command initiative reduced for the remainder of the scenario. I've gone down a few paths to work out how best to do this. Initially, I created replacement wounded figures for this, like the one on the left below.

This is an attractive way to do this and one that plays strongly to a key narrative in the game.

However, it's time consuming and it's not always possible to find the right figures for your nationality or units. Over time I've tried a few different methods. More recently, I've tried to produce something flexible that can be used for all nationalities. These are small, sabot style bases into which the wounded leader can be inserted. You can read more about how I made these in this post about Wounded Leader Markers.

For senior leaders with the more irregular rectangular bases I have a generic 'casualty' base that I can use.
While it's an advantage to have support weapons based differently, there is then a need to find a way to identify how many crew survive once they start taking casualties. This is one reason I have no more than three figures attached to a single base, so that I can at least remove individually mounted figures first.
In the majority of cases, I have two figures to a base for the most common weapons, like light machine guns, infantry anti-tank weapons, or, light mortars. For these I use a variation of the markers I use for wounded leaders, with a small base showing a medical kit and bandages. For a team with casualties and shock, I have a similar base with a dice frame to hold a shock dice.


For a base holding a gun with a larger crew, where there will be more than one casualty that needs to be recorded on the base, then I make use of the casualty dice frame but use a red dice to indicate the number of crew who have been lost.

If the crew are suffering shock as well as casualties I can use the dice in a double frame as below.

Alternatively, I can use the two separate frames, so they can be very versatile.

This is a method that would work if you have your miniatures based for another rules set like Flames of War or Crossfire. I started playing Chain of Command with my infantrymen based with three to a stand and other then needing to record casualties it works just fine.

Having these is my one real concession to having markers on the table where function is more important than form. Nonetheless I've been trying to make them blend in more with the table and acquired a set of the markers from Olympian Games that come in plain MDF.

I added texture using sand and PVA and then painted and flocked them as I would my figure bases.

I think these blend in well with the table and you can read more about them here.


If you don't want to go to all this effort yourself, Too Fat Lardies sell a set of game markers that serve these functions
Now I know this might sound obvious to any wargamer, but you will also need some dice - D6 to be exact. One thing I would suggest is that you find a way to differentiate your command dice from the dice you will use for things like firing and moving. It is incredibly easy in the heat of the moment to pick up the nearest dice and roll them to resolve an action, but you don't want to find you just did this with your remaining command dice (believe me, I've done it more than once). So I have a set of different coloured dice and then set these aside once rolled while I work through my activations. As you don't have to declare all your activations at the start of the phase I will keep my command dice to one side and use them as I see fit and subject to what unfolds in the phase.

There are those that view the command phase dice rolls as something of a lottery and see Chain of Command as a game driven solely by luck. Naturally, I beg to differ. Those of you new to the game might find this post useful in helping to understand the role of the command dice in the game Luck or Skill? The command dice in Chain of Command.
The second edition rules have retained overwatch, but also added the option for infantry to React Fire to movement in their line of sight by expending CoC points. However, when firing using either of these, the unit's fire arc of fire is limited to 90 degrees from its front facing. Units firing out of building windows have a similarly limited arc of fire. You might find handy a device to measure those covered arcs. This inexpensive perspex marker, pictured below, came from Charlie Foxtrot Models.
The second edition rules have retained overwatch, but also added the option for infantry to React Fire to movement in their line of sight by expending CoC points. However, when firing using either of these, the unit's fire arc of fire is limited to 90 degrees from its front facing. Units firing out of building windows have a similarly limited arc of fire. You might find handy a device to measure those covered arcs. This inexpensive perspex marker, pictured below, came from Charlie Foxtrot Models.


As time has progressed I have found I need to refer to the few charts in the rules less and less. Nonetheless there are a couple of rules mechanics that come up regularly that I simply cannot memorise. These are the force morale table and the close combat table. My solution has been to make a couple of small, playing card size reference cards that I can keep handy during a game. I simply cropped them from the pdf of the sheets above and laminated them. I've found them well worth the (short) time it took to make them. The ones below I made for the first edition rules, but I intend making something very similar for the second edition.


There are a few other items you might want to consider. Smoke is something you will use often, particularly if you are playing the British with their 2" Mortar. I found ready made blank MDF coasters at a local craft store that were very conveniently 3" in diameter, the perfect size for smoke. All these needed were some texture and flock and the addition of synthetic cushion stuffing (from the same craft store). I don't use cotton wool, mainly because, well it tends to look like cotton wool. The synthetic stuff holds its shape well and looks better in my opinion.


For some reason I can never remember the direction for drift when a smoke round fails to land on target, so as a memory aid I've printed a label and marked the underside of the base. So 1 is 6" right, 2 is 6" left, 3 is 6" over the target, 4 is 6" short.


Certain weapons, like the British 2" mortar have limited smoke and HE rounds. Similarly, there is a limit to the number of grenades a section or squad carries, or the amount of fuel carried in a man pack flamethrower. To help keep track of that sort of specialist ammunition I have made up some simple markers that blend in with the table. You can read more about how I made this and use then in the post on Making Ammunition Markers.

I find Suppressing Fire very useful in suppressing an enemy in an uneven firefight, particularly when your target is in hard cover and your chance of inflicting casualties or shock is reduced. So I have made up some simple markers that I can leave in play to mark where I have laid down suppressing fire. I've gone for a slightly Hollywood effect with the simulated gun fire, but they work well enough. You can see how I made them in this post.


One of the more notable changes in CoC v2 has been to the way an off-table mortar barrage operates. There is no longer a need to have figures for a forward observer on the table (it was a sensible alteration to the rules, as the forward observer was, not unnaturally, a prime target). However, there is a need to record the number of phases still remaining for the barrage and so a forward observer figure with a micro dice is a good way to do this. They can be placed on the table as a marker, even if they can't be targeted.

A mortar barrage can have a huge impact on the table and so you will want to have a way to mark out the area covered by it. This can make for quite a spectacular visual effect and so I thought it well worth going to the effort of making some really nice ones. There is more on how I made these here.

Using a similar technique I created blaze markers to show destroyed AFVs.


For fortifications from the support list, I have created sections of wire, minefields and entrenchments. I made up generic entrenchment terrain pieces, one style to hold a support team and another to hold up to eight riflemen. You can see how these were made in this post.


I have also made up other foxholes using half figures converted from Plastic Soldier Company figures and with foxholes sculpted from Milliput. You can see more about how I made those in this post.

As you may have noticed, I'm a big fan of AB figures WWII range and they do some great half figures and entrenchments to match. A bit indulgent, but they do look great on the table. Again you can see more about how I made these in this post.


Minefields are another thing you will want to find a way to mark on the table. In Chain of Command they are an area 6"x6" and so I initially made these from a piece of MDF with a simple wire fence around them and warning signs made from images I sourced from the web.

However these are not always functional when you need to place them in terrain, like a wood for example and so I copied an idea from John Bond to make 'hollow' minefields that were simply wooden coffee stirrers glued together.


Using a similar technique I made up 6" sections of barbed wire, this wire was an eBay purchase and I can't recall the supplier.

There are several great sources of additional information you can explore. Too Fat Lardies run an online Forum for all their games including a folder for Chain of Command.
There is also a Facebook group specifically for CoC. On X (Twitter) and now on Bluesky there is a feed using #chainofcommand and #spreadthelard.
The player community also has several great blogs and YouTube channels which feature the game in action and I would recommend Storm of Steel Wargaming, Tabletop CP and Beasts of War.

The Lardies themselves have ventured into the video medium and produce a regular podcast - the Oddcast and YouTube videos on Lard TV.
I also have a number of AARs in this blog. Just one word of caution with all of these, we all make mistakes sometimes and miss the odd rule in the heat of the action. If while you are watching or reading these something strikes you as not quite correct, chances are you are right. These are the not the final word on the rules but a wonderful way to get a feel for how the game flows. Even Rich Clarke, the author of the rules who features in the Beasts of War videos, has been known to confuse a rule with another one of the rule sets he has written. If in doubt refer back to the rule book and the FAQ as the correct source.
I have a number of articles about tactics and other game aspects of Chain of Command and these can all be found on the CoC Tactics page.
I hope this is a useful guide for anyone just getting into Chain of Command. While I list a lot of home made extras here they are by no means essential for enjoying the game, I just can't help making and painting stuff. It's a sickness, I'm sure!
I wish I could take credit for much of this, but my thanks go out to the many fine folk out there producing great terrain and gaming tools and sharing them with us via their blogs, forums and social media.
If you've find this page useful and would like to Buy Me a Coffee to help cover some of the costs of running the blog you can click through at the link or on the tab in the right hand column of this page.
Splendid primer for the tyro player, or even us grizzled old vets, Mark.
ReplyDeleteThank you so much for putting this together; I'm one of the newbies who was asking the questions and this is so helpful for me.
ReplyDeleteYou've discovered a great set of rules, hope you really enjoy playing them.
DeleteThanks for these tips. Will going to use a lot of them. Great painting by the way.
ReplyDeleteThanks, hope you find them useful.
DeleteThe force morale tracker we use comes from Olympian Games (based in Canberra).
ReplyDeleteAh thanks, I'll edit the post and put in a link for them.
DeleteI think you have covered it all Mark, Great starting point for beginners, love the markings on the underside of the smoke marker, I always forget if its left or right first.
ReplyDeletecheers John
Thanks John,I don't know why I have a mental block with that, but I do, those labels have been very useful.
Deletethat's a great summary, and some good ideas. i am slowly building my CoC forces and this is really helpful
ReplyDeleteThanks, glad you've found it helpful.
DeleteVery nice work, I do both things very similarly but I need to get some of the white stuffing it looks much better than cotton wool.
ReplyDeleteJohn
Cotton wool has two problems, the first being it just looks like cotton wool, secondly it tends to sag over time and become limp, the synthetic stuff is much more durable.
DeleteThe synthetic stuff also seems to take paint better than cotton.
DeleteYes Marc I agree, it takes acrylic paint well. To make some black smoke I simply soaked some of it in a diluted mix of artists' acrylic, gave it a squeeze to get rid of excess and left it to dry and it came out looking great.
DeleteGreat article! I hope it’s ok that I shared this to my page.
ReplyDeleteAbsolutely, feel free, glad you think it's useful!
DeleteTravis, I've updated the post to include links to a few useful sites and I've included Tabletop CP (I hope you don't mind!).
DeleteNot at all! I appreciate it.
DeleteGreat post and an impressive display of gaming aids. Some really good ideas as well. Makes me want to break out my CoC forces for a game. 😀
ReplyDeleteThanks Stew, it's a great game and any excuse will do!
DeleteA useful primer indeed! I wish I had this when I started out ;-)
ReplyDeleteRich has made my post in the TFL forum a sticky and the first one in the CoC folder, so hopefully others can add their tips and advice and it becomes a good resource for new players.
DeleteGreat post Mark! Copying your casualty-shock markers now!
ReplyDeleteGood stuff, copy away!
DeleteI created a useful aid for the patrol phase. Take a 4 foot wooden dowel (mine is 1/4 inch across) and chop it into a 1 foot section and two 18" sections. The 1 foot dowel I use to move patrol markers and check for proximity.
ReplyDeleteThe two 18" dowels I use to determine the angles for the JOPs. I put them on the two closest enemy patrol markers and across the friendly marker. Because they are 18" long, typically all I need to do is put the JOP in the angle between the two dowels but beyond the length of the dowel, which should be 6" beyond the patrol marker.
Top bannana! I do some things the same and some similar to you but top tip on the smoke, will be looking out for some of that stuff you use. Cheers.
ReplyDeleteReally enjoyed reading this. Thank you! :)
ReplyDeleteGreat advice and very helpful. Thanks.
ReplyDeleteSome very useful ideas that translate across a variety of scales and rule sets - especially the dice frames from Minibits/Pendragon. Just order a load of single, double and triple frames and 5mm mini dice, plus bases.
ReplyDeletePlatoon boards look very good. Use coins for bases, so add some magnetic tape and they become secure for transport. Grateful if you could send me the files also as others have asked
Outstanding post! I like your platoon boards a lot.
ReplyDeleteJust ordered the rules and your blog is a veritable mine of information for a newbie.
ReplyDeleteThank you so much for going to the trouble, it's very much appreciated!
I'll certainly be following your blog from now on!
Thanks again.
Thanks Keith, that’s great to hear. Enjoy the rules, you’ve made a great investment!
DeleteHi Tactical Painter! Using some of my enforced "lockdown" time to re-deploy my Soviet Bolt Action forces to Chain of Command. Can't believe I ever got into Bolt Action now I've read CofC. This guide to getting started is absolutely brilliant and some of the resources, or links to them, are already making a difference to how I am getting organised ready for post lockdown gaming. When you first start a new project in wargaming, there are endless questions you stress about but this has answered just about all of them. Thanks for taking the time and making the effort it is much appreciated. Cheers, Phil
ReplyDeleteThanks Phil, really glad to hear you’ve found it so useful. It’s become the most visited page on the blog, so I’d like to think you are joining an ever growing band of CoC players.
DeleteHey there, just wanted to say this is super super helpful for a newbie to CoC like me, so thanks for taking to the time to write this up! I am looking at starting to collect miniatures in 1/72, however I have been left a little underwhelmed by what is available on the market.
ReplyDeleteApologies if I have missed this on your blog, but what miniature manufacturers do you tend to go for? Currently I have a mix of old Revell figures from eBay and new Italeri (Winter/Bulge loadouts) however I am trying not to have multiples of the same models/poses if I can help it.
Zvezda look good for their German HQ (winter) range however finding much in the way of winter US is proving difficult! Cheers, Jon
Thanks John I'm glad you've found it useful. In terms of finding miniatures in 1/72 scale (also referred to as 20mm). For plastic figures check out the Plastic Soldier Review, it's an excellent source for seeing what's available in plastic. You can find all the reviews for WWII figures here http://www.plasticsoldierreview.com/PeriodList.aspx?period=1
DeleteThere is also a lot on offer in metal. My personal favourites are from AB Figures (available through Eureka Miniatures) https://abfigures.com/3-world-war-ii-20mm. Other 20mm metal ranges include SHQ https://shqltd.com/ which has a very large range. I'd suggest you Google 20mm miniatures WWII or similar to see what else is out there.
I haven't tried to collect winter US so I'm not sure what might be available, but good luck and happy hunting!
Thanks so much for the reply, again that has been super helpful! I have to say, I didn't realise that 1/72 was also known as 20mm so that alone has opened up a whole tranche of things to explore.
DeleteReally appreciate the info 👍🏻
Sorry to ask, maybe you have already answered this...
ReplyDeleteFrom what company did you buy the infantry?
There's so many talented people who does this, but I find it hard to pin-point where to get the different figures...
...is it basically 'this lot from this company, that lot from the other - what you need you find and buy'?
Or do you have a company you prefer?
It will depend on what scale you want to play in, but the answer is generally the same, the figures will come from a mix of manufacturers. I collect 20mm (1/72 scale) and I particularly like the range from AB Figures, however the range does not cover everything. For example they don’t (yet) do a range of Japanese figures and so I have sourced those from other manufacturers. In the case of the Japanese I don’t have all my figures from the same manufacturer, the bulk have come from Eureka Miniatures but their range doesn’t include gun crews or a forward observer and so I have found those elsewhere.
DeleteThere are several ways to find figures and manufacturers. One is a simple Google search using terms like ‘20mm German miniatures’, you can get very specific too like ‘20mm Wehrmacht in zeltbahn’. Otherwise ask questions in various miniatures groups and forums like Facebook, or online forums like Lead Adventure Forum or The Miniatures Page. In some scales, like 28mm you will find a big manufacturer like Warlord Games carries a very comprehensive range that might meet all your needs. To be honest I like searching around and seeing what is out there. There are many small producers doing great work and often producing figures for less well known units and theatres that the larger manufacturers won’t touch. Ne f the best ways to see a wide range of what is available is to attend me of the large wargame shows or conventions where many manufacturers have trade stands where you can look and buy. Sadly while we are stuck with the Covid virus these are not running at the moment which is a great shame. I hope that helps.
I can provide more specific information on 20mm ranges if that’s the scale you are interested in, so feel free to ask more questions. I’m happy to help.
Very useful articles to CoC players. I was wondering if I can get your permission to translate some of your CoC articles to Traditional Chinese? I will link it back to your site. I think it would be really helpful to new players in Taiwan. Please let me know if it is okay to do so.
ReplyDeleteHi Erich, yes, that's absolutely fine, thanks for asking first.
DeleteThis is such a good primer, thanks for putting this together!
ReplyDeleteThanks, glad you've found it useful.
ReplyDeleteI'm late to the party but this is a SUPER helpful blog for new CoC players. Lots of good advice, useful resources and hobbying inspiration. Thanks for all the time you have put into this!
ReplyDeleteThank you for your great work. A lot of useful information for players new in CoC as i am. Fantastic job.
ReplyDeleteThank you, I’m glad you’ve found it useful and I hope you get as much enjoyment out of the rules as I have.
DeleteThis is literally my hitchhikers guide to chain of command!! Though i am struggling with getting all the game markers nicky into shape, its always my aim to built a series of markers and aid as good as tactical painter!! The funny thing is due to operability i created a platoon with support option for scifi/steampunk gaming and hence i need to be "flexible" with the armylist and national arsenal table (like putting plasma cannon on par with the 17 pdr). My lack of hobby skill meant i have to make do with whats in the market or simply print them out and stick the tokens and markers on a piece of plastic! Its going to take a while before i reach the level as tactical painter here. I have the army ready now i am working on terrain and a foldable table.....(6x4) folding table is hard to built especially with my complete lack of carpenters skills..... anyway. I will cease ranting! I got the army just about ready...... the rest will fall into place!!, Thanks for writing such a detail and informative guide!!! @johnyankee083
ReplyDeleteReally great article. My only quibble is that your Paras are all wrong. haven't you ever watch a war movie? They always wear their berets! How dare you sensibly cover their heads with helmets in the thick of battle. How does anyone know how cool they are if they aren't wearing their berets?
ReplyDeleteThe markers and counters are all top notch. Very nice stuff. I hate counters on a table and these blend nicely, doing their job without being too obvious and cluttering the table. Well done.
great article on Chain of Command
ReplyDeleteWow. Very comprehensive description of what is needed to play this great game. Well done.
ReplyDeleteThanks. It's been very popular, so was well worth revising in the light of v2.
DeleteGreat update on a classic article. You highlight the force moral trackers you got when you ran participation scenarios of a Chain of Command game set on Saipan featuring Japanese and US Marines. They are striking! Who makes them? I’d be quite keen to buy some.
ReplyDeleteThanks. They were made by Battlefield Accessories and gifted to each of the game organisers. You can order direct from their website https://www.battlefieldaccessories.com.au/products/force-morale-tracker-chain-of-command-ttr?variant=42134241017922
DeleteA very welcome update to a great article. Well done!
ReplyDeleteGreat work on the update, this still remains my go to article when introducing people to CoC. Thank you for maintaining it Mark!
ReplyDelete