Wednesday 20 March 2024

Operation Martlet: German Counterattack at St Nicholas Farm

Having driven the British off in the previous game the Germans now mount a local counterattack that brings us back to St Nicholas Farm. At the very least this will allow the Germans to impose further delay on the British. At best they could push them back to Fontenay village, which would put an end to any prospects of an outright campaign victory.


My initial thoughts are this could well be a short game. I doubt Dave will want to risk many casualties to his core platoon and so I'm expecting a limited spoiling attack that seeks to delay the British, but no more. He can't call on any further infantry as support and so I envisage this carried out by German armour. That said, I can't risk any complacency. He could have a Panther and so I'll want to ensure my platoon is well supported by anti-tank weapons.

The Germans patrol phase opens with two free moves and they concentrate all their efforts on gaining jump-off-points in the orchards. The British cover the farm buildings, but also the right flank. The threat of an anti-tank gun from that direction will mean German armour will need to avoid any rash moves down the road. The Germans have twelve support points, allowing enough for a Panther or even a couple of PzIV.


The British platoon from the Royal Scots Fusiliers has suffered a number of casualties and is short eight men.


The British have twenty one support points and I could call on additional support to boost my infantry strength. However, I'm more concerned I'll need to beat off an attack with armour so instead I'll call on a Sherman, a Sherman Firefly, a 17 pounder anti-tank gun and an additional PIAT team. 

I'm fairly confident that equips me to handle any German armour. The same combination of supports served me well when faced with the earlier counter attack from the Panthers of the 1st battalion of Max Wunsche's 12th SS Panzer Regiment.


We both start with force morale at nine and the British have the initiative.

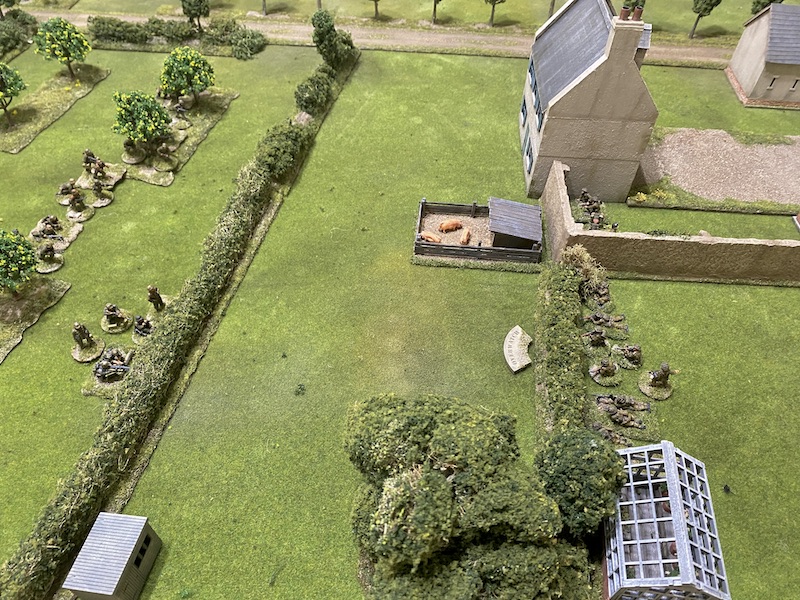
With German jump-off-points in the orchards I'm keen to establish a defensive firing line and a section deploys behind the hedgerow to the left of the farm buildings.


The section corporal puts both teams on overwatch. From there they can cover any move by the Germans to the hedgerow opposite.


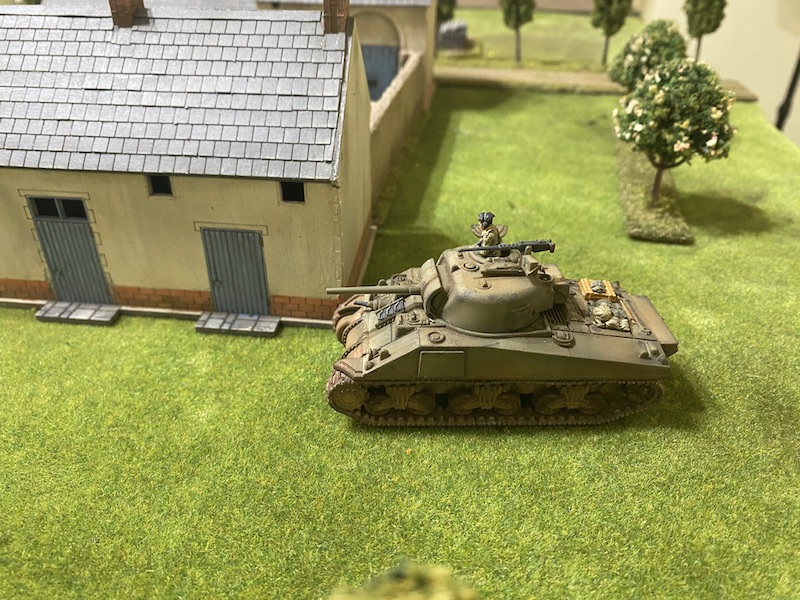
A Sherman arrives to the left of the road behind the farm. I want to bring that into a position to provide fire support for the defending infantry. 


In the German phase an MG42 MMG team deploys into the orchard. 


They arrive with a senior leader who has been called in for additional support. He puts the team on overwatch.


This tells me a few things. The Germans won't have a Panther in support, the extra senior leader and the MMG team have used up six of their support points. So I wonder, is this going to be an all infantry attack? Possibly, although the remaining support points may have been used for a PzIV, so it's not yet clear what Dave has planned.

In the British phase the Sherman makes its way forward very slowly.


The platoon's 2” mortar team deploy into the farmyard behind one of the high walls. If the Germans have any unwelcome surprises a few rounds of smoke from the mortar might come in useful.


The German build up continues and two squads deploy into the orchard and take up tactical positions.


My assumptions that Dave would not risk casualties to his core platoon may appear unfounded.


The Sherman moves forward cautiously and positions itself at the edge of a small orchard behind the farm.


The following German command roll is 66443 and a double phase. While I'm pleased I have a section on overwatch at the hedgerow ready to respond to any German advance what I haven't factored on is the appearance of a Pak40 anti-tank gun in the orchard. 


It's within 6" of the edge and so has a line of sight out and over the hedgerows to the Sherman. It's a partially obscured target but the Pak40 commander has laid the gun well.


The 75mm AP round slams into the Sherman inflicting eight AP strikes. There's no way the tank's armour can cope with that and the Sherman explodes in flames. 
 

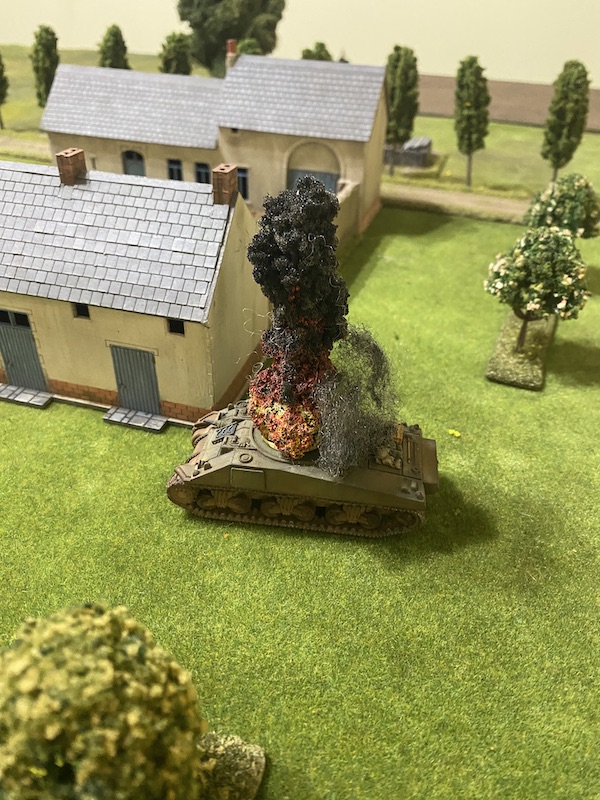
I make the worst possible rolls for the loss of the tank commander and the tank itself and British force morale tumbles from nine to five in one fell swoop. That's a disaster in more ways than one. I've equipped my platoon to deal with enemy armour and it's clear I'll be facing an infantry assault for which my weakened platoon is now ill prepared. The game has only just begun but it's clear I'm in a bit of trouble.

The recently arrived oberscharführer (senior leader) orders the nearest squad to move through the orchard towards the hedgerow. 


They move a little slower than he would like. 


When he orders the second squad to also move towards the hedgerow he's equally disappointed to see they move no further than the first squad.


He then orders the MMG team to advance with him and, unlike the two squads, they cover the distance quickly. 


That puts them right in the sights of the waiting British section who have been placed on overwatch for just such an eventuality.


They open fire immediately. 


The intitial burst of fire is deadly, killing two of the MMG team and inflicting two points of shock.


The Germans have the next phase and a roll of 66652 means the momentum will stay with them. For this phase there are not many command options and one of the squads makes its way forward to the hedgerow to join the MMG team.


In the subsequent German phase the second squad moves up to the hedgerow. They join the squad and MMG team to create a powerful and daunting firing line. 


The squad already at the hedge returns fire at the British section opposite. 


Despite the high volume of fire there are no casualties but the section suffers five points of shock.


Premature as it might seem I can already feel this game slipping away from me. I see no point engaging in a firefight with the Germans in the orchard. Even if I deploy into the farmhouse I doubt the advantage of hard cover will even up the odds. 

I need to bring what firepower I can to bear and so deploy the 17 pounder on the flank. It has reasonable high explosive rounds and may be able to inflict casualties from a distance. 


Despite a few hits it only manages to inflict a couple of points of shock on one of the panzer grenadier teams.


I see little to be gained by having the lone section hold the hedgerow. The alternative is to reinforce the firing line by deploying into the farmhouse, but that seems very unwise. For one thing it would allow the Germans to concentrate all their fire on the section in light cover at the hedgerow. That's potentially over fifty fire dice! On average results I could expect four dead and eight shock, which would effectively sweep away that section in a single fire phase. Not a good idea.


The section corporal rallies off a point of shock.
 

He then orders them to withdraw to the farm. They waste no time and fall back quickly. 


The German platoon makes no move in their phase, instead they focus all their firepower on the 17 pounder crew. 


It may be at effective range but the combination of four MG42s generates an awful lot of firepower.


The crew are struck by a hail of gunfire. Three are killed and the gun commander is lightly wounded. They also suffer four points of shock, which is enough to see the crew pinned down. 


I can't seem to roll less than a six for checks on force morale and so the wounding of the gun commander sees British morale slump to three. Things are really not going well and it's not helped with the removal of the jump-off-point near the farmhouse.


Meanwhile the Pak40 crew manhandle their gun to the hedgerow. 


Last the MMG team also target the 17 pounder crew. 


Yet again the German fire proves deadly. Another member of the crew is killed and a further point of shock which is enough to see the remaining men break. They withdraw and move so fast that they leave the table. The breaking of a support unit and the sight of a junior leader routing from the table is sufficient to drop British morale to one. 


By now I think it's abundantly clear how this is going to end. With the arrival of the British phase I announce a withdrawal and begrudgingly cede this map to the Germans. The lost jump-off-point means the 2” mortar team have trouble withdrawing and one of the men is dispersed and will miss the next game.

What a setback for the campaign, the more so for being so unexpected. The Germans made a well conceived infantry assault that took me by surprise. It certainly didn't help that British force morale fell so rapidly, but the real issue lay with my choice of supports for this engagement.


Naturally, with the benefit of hindsight, I could consider what may have been done differently. Certainly a forward observer directing a 3" mortar barrage could have put an immediate stop to the German infantry, but would it have been enough to stop armour had it arrived? 

It's comes as no surprise to learn that Dave intends to continue counterattacking while he holds the initiative. It makes perfect sense as it puts the Germans very much in control of the campaign. The clock is ticking against the British and the best they can hope for now is a draw, which assumes they win the next three games. It was all looking so optimistic only two games ago, how the worm has turned!

So the British will retrace their steps and we will return to Fontenay village for the next game. You can read what happens next in this post. You can find all the game reports for this campaign and for many others on the Chain of Command AAR page.

Tuesday 5 March 2024

Second World War Early War German armour in 20mm

I don't have a collection of German infantry for the early war (well, not yet anyway) but for various reasons I seem to have gathered a small collection of armour for those years. At this stage I'm probably more interested in playing 1942 on the eastern front and a part of this collection has been put together with Fall Blau and the Stalingrad campaign in mind. It’s by no means comprehensive. I’ve tended to acquire models as I’ve needed them for other games or campaigns. 

First though, we start at the very beginning with a PzIa. The two below are from S-Models. They were bought originally for my Sino-Japanese war project but somehow I’d acquired more kits than I needed, so when we came to play the Many Rivers to Cross the campaign set in the Netherlands in 1940 I made these up and painted them for the Germans instead.

They saw action in several games in that campaign.

Not long after I made them I came across the picture below. While my tanks may appear a slightly lighter grey than those in the picture I am pleased with the way my weathering matches up, in particular the way the running gear and tracks are noticeably dustier than the hull and the turret.

While I've been fortunate to visit many museums and see a fair amount of German armour the one tank that has alluded me so far has been the Panzer I. I suspect not many survived. 

The Pz38t was one of a couple of Czech designs that saw service right up to the Barbarossa campaign. Not a bad tank for its time with a decent mix of speed, armour and armament although by 1941/42 it was obsolete. That said the chassis was to see future use. This is a Pz38t from the Plastic Soldier Company set. While it's a sturdy model I think PSC have gone a bit overboard with detail like the rivets which appear over-scale. Unfortunately I've only exacerbated the issue by highlighting them with the paint job.

Here is one in the collection at the Australian Armour and Artillery Museum and while the rivets are a noticeable feature of the tank they are not as pronounced as they appear in the PSC models.

Before I returned to miniature gaming I made a lot of models in 1/35 scale and the Pz38t was one of those. As you can see with this kit the rivets are more in scale and closer to the look of the original tank.


Although never intended as a main battle tank the PzII took part in numerous operations in the early war and were still present in some units as late as 1942. This is another from S-Models and was made with our Netherlands 1940 campaign in mind.

Unlike the Panzer I, I've seen several PzII in various museums. The one below is at the Tank Museum at Bovington and it's in the early war two tone brown and grey colour scheme.


There is another in the Canadian War Museum's fine collection of vehicles and AFVs.


The Musee des Blindes in Saumur also has one.


The main battle tank of the panzer divisions during this period was the PzIII. These are two Ausf G from S-Models.


There is a PzIII Ausf J at the Australian Armour and Artillery Museum.


Also one at Musee des Blindes.

This is a later model ausf L from one of the PSC sets.

The Panzer IV originally provided infantry support with a short barrelled 75mm gun. By 1942 the design was taking on a much more prominent role and was up armoured and up gunned. These are both Ausf D versions from Armourfast.

The Armourfast models are inexpensive and quick to build but they do suffer from a shortage of detail. I have several kits from them and I've often found with a bit of additional detail like stowage they come up well. Unfortunately these are one of their most basic kits and I think have the least detail I've seen on any of their models. The AB crew figures are my best attempt at improving them.


The Australian Armour and Artillery Museum has an Ausf D.


Later models were up gunned and replaced the Panzer III as the main battle tank of the panzer divisions in the mid years of the war. This is an Ausf F from PSC.


Those later models are covered in a second post on the blog featuring late war German armour. I chose February 1943 (the time when German tanks went from grey to a base colour of dark yellow) as the watershed to cover the armour of the later part of the war.

The history of assault guns in the Wehrmacht is interesting and talks much to the rivalries within the army. The StuG III Ausf A provided close fire support for the infantry and after much internal wrangling was not classed as part of the tank force but rather of the artillery. Crew members did not wear the distinctive black uniforms of the panzerwaffe with the pink piping on collar and shoulder patches, instead they wore the artillery uniform with its white piping. These two StuG III Ausf A are from Trumpeter.

They have one of these early variants at the Australian Armour and Artillery Museum.


A more rare assault gun, also mounted on the same chassis as the StuG III, was the Sturm-Infanteriegeschütz 33B which carried the sIG33/1 gun. Only twenty four were made and the first twelve were sent to Stalingrad. The second batch of twelve were also intended for units serving in Stalingrad but by the time they were ready for delivery the 6th Army had been surrounded and so they were assigned to other units. Given this early war collection has been put together with the fighing in Russia in 1942 in mind, this model from Armourfast was an addition I couldn't resist.


Manufacture of the chassis for the Czech Pz38t continued after the original tank was considered obsolete and came to serve many uses, one of these was as the chassis for the Marder series of self propelled guns. The PSC sets give you the option to make up the Pz38t tank or to make them up as two version of the Marder III tank destroyer.


One of my initial reactions to the models was to think that once again PSC had gone over-scale with the muzzle brakes on the guns, although having seen the two Marders pictured below at the Musee des Blindes I'm less inclined to think that's the case.


The eight wheeled Sdkfz231 Schwerer Panzerspähwagen series of armoured cars were intended mainly for reconnaisance units. The Plastic Soldier Company make a set that allows you to build several of the variants, including the one below armed with a 20mm autocannon.

And one with an open top with the short barrelled 7.5cm gun.

While the Sdkfz 251 half track might be an iconic German vehicle they were not as numerous as one might imagine nor available in the sorts of quantities the Wehrmacht would have preferred. Nonetheless they were present in several panzer divisions from 1939. The Australian Armour and Artillery Museum has a variant of one of these that was built in Czechoslovakia after the war.


The Musee des Blindes have an engineer variant.


These models below come from the Plastic Soldier Company sets which allow for a few variants. I've kept mine mostly as Sdkfz251/1.


They supply a figure manning the light machine gun. It is easy to hold him in place when the MG is placed in the gun shield and so I haven't attached him permanently so I can remove him during a game.


It's also possible to create the Sdkfz251/10, the platoon leader's vehicle, which mounted the 3.7cm anti-tank gun.


At the moment these have given me enough to play several early war games and given us the vehicles we needed to play the Many Rivers to Cross campaign in the Netherlands. I suspect the collection will grow on an 'as needs' basis but it's always very satisfying to think about playing a game set in a particular theatre and to know you already have the models ready and waiting.....