
A scenario will normally involve a skirmish sized encounter between two forces of platoon strength, each bolstered with additional support. The composition of that platoon is made up according to the actual historical structure used by each nationality and these are laid out in the various lists available for Chain of Command. Unlike some rule sets, you don't build this platoon up by using a points system. You simply select which period of the war you wish to play and then use an appropriate platoon.
The list below is from the second edition rule book for Chain of Command and it details the composition of a Soviet SMG platoon.
 |
| Copyright TooFatLardies |
You will see the platoon is broken down into a number of different elements. This tells you how many figures you will need and what weapons they carry (or support as crew). It then tells you how the separate teams that make up the platoon are composed.
For the Platoon Headquarters you will need a:
- Leytenant, a Senior Leader in Chain of Command terms, armed with a PPSH41 SMG
- Sergeant, an Inferior Senior Leader, also armed with a PPSH41 SMG
- Sniper team (this can be composed of one or two figures, it makes no difference in terms of the rules)

Then there are two Light Sections. Each of these is made up of a Serzhant (the Junior Leader who commands the section) with a SMG Team of six men armed with submachine guns and a LMG Team with three crew.

There is also a third section, the Heavy Section, which differs from the first two in that it is composed of two LMG teams. In the case of the Heavy Section each of those teams also has a man armed with a PPSH41 SMG. Like the other sections, they are under the command of a Serzhant (a Junior Leader).

This last section highlights a key point to note about the Chain of Command lists. Where a soldier is described as 'crew' that means his sole task is to service the team's main weapon. They do not fire a personal weapon, their role is to act as loaders and ammunition carriers and to take over the main weapon if the other crew members are killed. The men described as armed with PPSH41 SMG may fire their weapons when the team fires. However, when an LMG crew is reduced to one figure it fires with a lower firepower dice. In order to fire the LMG at full effect the SMG man would not fire his personal weapon, instead he would assist the LMG gunner. Should the last member of the crew die then the SMG man would take up the LMG. He cannot fire both weapons at the same time.
Lists exist to cover most nationalities, troop types and theatres of war, leaving players free to use any platoon type that existed during WWII (links to many of these can be found in this article). If you decided to field a German infantry platoon in 1944 you could use the list below, which can be found in the main rule book:
Here is one of the sections:

Here is a four figure LMG team. As with the Russian teams, these figures are all designated as 'crew' which means they only service the MG42 light machine gun, they do not fire their personal weapons.

The lists also assign one panzerfaust to each of the junior leaders. How you choose to represent this is up to you. The leader can assign any man in his section to fire the weapon and, as it's a one shot weapon, it effectively disappears after it's been used. You don't need to represent it at all if you don't wish, you'll just need to remember or record when it has been used. What I like to do, is replace one rifleman in each section with a figure with a panzerfaust and when the panzerfaust is fired, I remove that figure and return the original rifleman. In effect I use that figure as a marker, just to keep a record of which section still has a panzerfaust to fire.
I have created platoon boards like the one below so that I can visualise the composition of my platoon, you can see more about how I made them here. They are a good way to introduce new players to the game as well as keep track of what remains of your platoon to deploy to the table.

The platoon is the main element of your force in a game of Chain of Command, however it is not the only unit you may command. Each Mission will allot a number of support points to each side and from this you will be able to add additional units or attributes that will help you best achieve the objective.
 |
| Copyright TooFatLardies |
This tells you the platoon is made up of a small HQ and three identical sections each composed of two teams - a rifle team and an LMG team. It then details how many men make up those teams and how the leaders are assigned.
From here you can work out how many miniatures you will need. For the platoon HQ you will need just one senior leader figure to represent the Unterfeldwebel.
You will need three junior leader figures to represent the Obergefreiters, the section leaders. Each section is made up of two teams - a five man rifle team (five figures armed with rifles) and a four man LMG team (the ‘crew’ are made up of one figure with a MG34 or MG42 and three figures who represent the loader, and ammunition carriers). A total of thirty one figures in all.
Here is one of the sections:


I have created platoon boards like the one below so that I can visualise the composition of my platoon, you can see more about how I made them here. They are a good way to introduce new players to the game as well as keep track of what remains of your platoon to deploy to the table.

The platoon is the main element of your force in a game of Chain of Command, however it is not the only unit you may command. Each Mission will allot a number of support points to each side and from this you will be able to add additional units or attributes that will help you best achieve the objective.
Those supports will be drawn from a list of options that reflect the sorts of units and assets that would have been available historically. The choice is left to you to decide what will assist your platoon achieve their objective. This is something players often like to keep secret from their opponent as it adds to the fog of war.
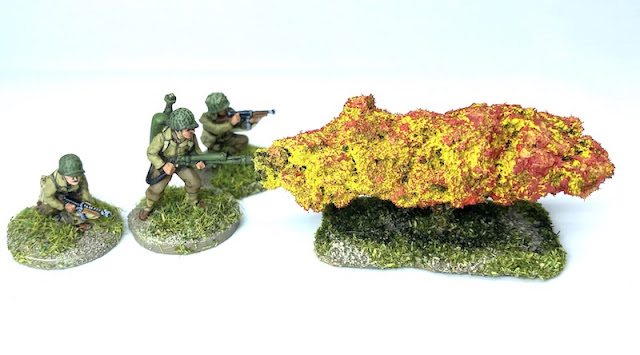
Depending on the scenario support could come in the form of armour.

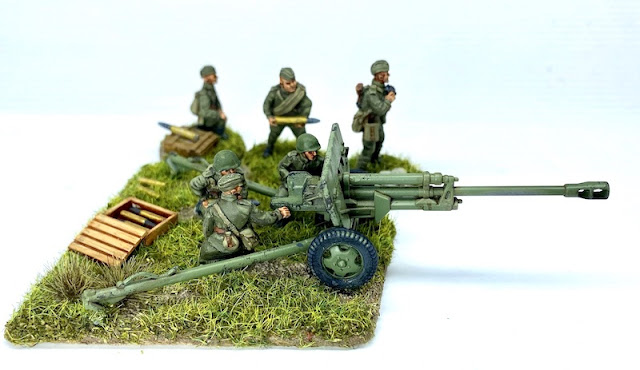
An artillery piece that can fire both armour piercing and high explosive rounds could prove useful in countering whatever your opponent might throw against you.
At other times it's just handy to have extra boots on the ground and another rifle section is the sort of support to help bolster your platoon.
The amount of support allocated by the Mission can vary. Usually the attacking side will benefit from more support points than the defender. This information is included in the notes for the Mission under the heading Support. It will describe the value of supports that you can draw from the support lists for the side you are playing.

On the other hand an attacker might want to consider an engineer flamethrower team. It can make a very potent support.

An artillery piece that can fire both armour piercing and high explosive rounds could prove useful in countering whatever your opponent might throw against you.
At other times it's just handy to have extra boots on the ground and another rifle section is the sort of support to help bolster your platoon.
The amount of support allocated by the Mission can vary. Usually the attacking side will benefit from more support points than the defender. This information is included in the notes for the Mission under the heading Support. It will describe the value of supports that you can draw from the support lists for the side you are playing.
 |
| Copyright TooFatLardies |
If there is any difference between the Platoon Force Ratings for either side then that may also influence the amount of available support. As you can see in the example of the German infantry platoon, a Regular platoon is rated -1, where as a Green platoon is rated -5.
This rating would be compared with that of your opponent's platoon and the side with the lower rating would add the difference to their support allocation. So for example if one side has a force rating of +3 and the other has one of 0 then the side with the 0 rating would receive an addition 3 support points (the difference between +3 and 0).
In essence your force will be made up of your core platoon, to which you will add support units to the value assigned by the scenario plus any calculated from the difference in force ratings between the two opposing platoons.
This might be sounding like it's all getting a bit complicated, but in practice it is very straightforward and can be best illustrated with an example.
So let's imagine we want to play Mission 2 'The Probe' from the Chain of Command 2 main rule book. We decide it is set in Normandy where a Regular British platoon is probing the area held by an inexperienced platoon of German Osttruppen who are rated as Green.
The British platoon will be made up of figures as per the list below from the second edition rule book. You will note that it has more men than the German platoon and has the added advantage of two senior leaders (but as platoons in Chain of Command are not made up using a points system this larger section does not 'cost' more). This is how it was historically and so there is no cost in points to have this different platoon structure.
Also notice how in this case the LMG team (the Bren gun team) is made up of three crew. This means the team is composed of three figures - one with the bren gun and two others. These other two are normally represented by riflemen, however they service the Bren gun and, as with any figures identified as 'crew', do not fire their rifles.

In a very similar way, the PIAT team is crewed by two figures and the 2" mortar teams by three. Here is the British platoon HQ, with two senior leaders and the PIAT and 2" Mortar teams.


The German platoon is made up from the figures in their platoon list as I detailed previously. You can also see from the lists that a regular British platoon has a force rating of 0 and that the German Green platoon has a force rating of -5. This is something we will need keep in mind when calculating the supports levels.

Looking at The Probe mission we can see that support is determined by the attacker receives 1D6+4 support points, the defender selects one third.
Let's imagine the British roll five on the D6, that gives them a total of nine points. In that case, the German defender receives one third and so has three points of support. In addition, because the defending German force is Green and rated -5 and the British platoon which is Regular is rated 0 the Germans will receive a further five support points. So this will give the Germans a total of eight support points (3+5) against the nine support points available to the British.
Note that if the British were facing a platoon with a force rating of 0, instead of a Green one, then this final calculation would not be necessary as there is no difference in force ratings between the two platoons.

In our example the attacking force (the British) ends up with with only one more support point than the defender (the German). This is simply a balancing mechanism that will give both players a reasonably even chance of victory. If that doesn't suit your style of play or the historical event you are trying to represent, then you are under no obligation to use it.
Having determined the levels of support for each side, it is not necessary to make your decision on which supports to use until you have had a chance to assess the terrain and see how well your patrol phase has gone. Once you have completed that phase then you can consult the support lists and begin to select the options you hope will work best for the given mission. While most players like to keep their specific choices secret from their opponent the full choice of supports that are available to both sides is not kept secret. This allows a degree of intelligence prior to a game, for example, you don't know for certain if your opponent will have armour support but you do know it is available as a choice, with that possibility in mind you may want to select some sort of anti-tank weapon as insurance.
Having established the make up of the core platoon and worked out the support levels for each side in the selected scenario, players will then be able to select which supports they think will best help their platoon carry out the mission. Here is a support list that is based on a range of weapons available to 21st Panzer Division in Normandy in June 1944. The division was amply equipped with converted French vehicles and so the Unix P107 SPW half track is available at only two support points to reflect this relative abundance.


The scenarios in the main rule book are designed to assist players create a game from scratch, however in the various Pint Sized Campaigns the scenarios will often be very specific and this may or may not vary from the levels of support in the main rule book. For obvious reasons this has been done to tailor the campaign and the scenarios to the historical situation they represent, in those instances players follow the platoon structure and support levels as specified in the campaign booklet as these supersede those in the main rule book. The rule system is flexible and allows you to design the scenario to best suit the situation you are trying to recreate.
In the case of the pint sized campaigns the design has already taken into consideration force ratings and so this calculation becomes unnecessary. You simply use your core platoon and then add the appropriate supports for each scenario.
For example the German Panzergrenadiers featured in the Kampfgruppe Von Luck campaign are based on the historical platoon structure, but as you can see from below there is no Force Rating. This is because it has been calculated into the way the supports are allocated for each of the campaign scenarios. This allows variations to be made if historically a particular weapon may have been more plentiful than would normally have been the case or if other factors apply.

 |
| Copyright TooFatLardies |
In essence your force will be made up of your core platoon, to which you will add support units to the value assigned by the scenario plus any calculated from the difference in force ratings between the two opposing platoons.
This might be sounding like it's all getting a bit complicated, but in practice it is very straightforward and can be best illustrated with an example.
So let's imagine we want to play Mission 2 'The Probe' from the Chain of Command 2 main rule book. We decide it is set in Normandy where a Regular British platoon is probing the area held by an inexperienced platoon of German Osttruppen who are rated as Green.
The British platoon will be made up of figures as per the list below from the second edition rule book. You will note that it has more men than the German platoon and has the added advantage of two senior leaders (but as platoons in Chain of Command are not made up using a points system this larger section does not 'cost' more). This is how it was historically and so there is no cost in points to have this different platoon structure.
 |
| Copyright TooFatLardies |


The German platoon is made up from the figures in their platoon list as I detailed previously. You can also see from the lists that a regular British platoon has a force rating of 0 and that the German Green platoon has a force rating of -5. This is something we will need keep in mind when calculating the supports levels.

Looking at The Probe mission we can see that support is determined by the attacker receives 1D6+4 support points, the defender selects one third.
|
| Copyright TooFatLardies |
Note that if the British were facing a platoon with a force rating of 0, instead of a Green one, then this final calculation would not be necessary as there is no difference in force ratings between the two platoons.

Having determined the levels of support for each side, it is not necessary to make your decision on which supports to use until you have had a chance to assess the terrain and see how well your patrol phase has gone. Once you have completed that phase then you can consult the support lists and begin to select the options you hope will work best for the given mission. While most players like to keep their specific choices secret from their opponent the full choice of supports that are available to both sides is not kept secret. This allows a degree of intelligence prior to a game, for example, you don't know for certain if your opponent will have armour support but you do know it is available as a choice, with that possibility in mind you may want to select some sort of anti-tank weapon as insurance.
Having established the make up of the core platoon and worked out the support levels for each side in the selected scenario, players will then be able to select which supports they think will best help their platoon carry out the mission. Here is a support list that is based on a range of weapons available to 21st Panzer Division in Normandy in June 1944. The division was amply equipped with converted French vehicles and so the Unix P107 SPW half track is available at only two support points to reflect this relative abundance.


So how does the support list work?
You will see from this sample list that various weapons and units are grouped together under headings starting with List One. Each unit in List One is available for one support point; each unit in List Two is available for two points and so on. What this means is that each unit listed in that group requires that number of support points from your available number. So, for example, if the scenario says “take supports up to List 5” or “you have 5 support points available” it means you can add supports up to this number. It could be one unit from List 2 and one from List 3, or just one from List 5. The combination is entirely up to you as long as you don't exceed the total number of support points available (or if the rules restrict the number of a particular type of support in any given scenario). There is no reason why you couldn't choose to select the same five types of support from List 1 (rules permitting, of course).
While having a large number of support points available can seem very attractive there is one very important point to keep in mind when selecting what you will choose - how will you be able to command them all? A large number of support points does not come with a greater number of command dice, which means your ability to command a large number of units will become difficult. There are some things to keep in mind when making those choices:
- an infantry senior leader is very effective at commanding a number of units by using a single command dice (ie a 4), but keep in mind that they cannot activate a tank.
- not all supports need a command dice - so consider options like a pre-game barrage; an adjutant; entrenchments, or, barbed wire.
- several AFVs will consume a lot of command dice and may actually hinder your ability to command your platoon effectively. Consider the option to take an AFV senior leader for two support points, if available, as this will give more command options.
If a mission does not specify the list of supports available then you should consider restricting the lists to what you know was available historically. The rule book contains extensive support lists for the major nationalities but these cover the entire war, so if you want your scenario to be set during 1940 you may not want to let the Germans select Panthers or Tigers for example.
If you are trying to recreate an action representative of a particular stage of the war like Normandy or Stalingrad, then it would make sense to restrict the choice of support to the types of vehicles and guns that were actually present in those battles or campaigns. You will find in the many campaigns for Chain of Command that there are specific support lists that reflect only what was available historically. In a mission or scenario of your own creation you can decide what is appropriate (and the models in your collection may play a big part in determining that!).
If you are trying to recreate an action representative of a particular stage of the war like Normandy or Stalingrad, then it would make sense to restrict the choice of support to the types of vehicles and guns that were actually present in those battles or campaigns. You will find in the many campaigns for Chain of Command that there are specific support lists that reflect only what was available historically. In a mission or scenario of your own creation you can decide what is appropriate (and the models in your collection may play a big part in determining that!).
As the selection of supports is kept secret from each opponent this will give you something to ponder. You may have enough limited intelligence and know the type of supports that are available to your opponent, but not which ones are chosen. Will you be faced with a predominantly infantry force, or will there be armour? You will need to plan for every contingency or take a gamble that it will be one or the other.
This adds to the fog of war. You may know the type of support your enemy could bring at this stage of the war, but you won’t know exactly. But don’t worry too much, your opponent is in exactly the same position.
Aside from wanting to keep your opponent in the dark you will need to select supports that you think will best help you achieve your mission.
In the case of the pint sized campaigns the design has already taken into consideration force ratings and so this calculation becomes unnecessary. You simply use your core platoon and then add the appropriate supports for each scenario.
For example the German Panzergrenadiers featured in the Kampfgruppe Von Luck campaign are based on the historical platoon structure, but as you can see from below there is no Force Rating. This is because it has been calculated into the way the supports are allocated for each of the campaign scenarios. This allows variations to be made if historically a particular weapon may have been more plentiful than would normally have been the case or if other factors apply.

I hope this has been a useful introduction to understanding how opposing forces are made up for a game of Chain of Command. Exploring different platoon structures and types of leadership is just one of the fascinating insights that the rules can offer into how platoons operated during the Second World War.
If you've found this post useful and would like to Buy Me a Coffee to help cover some of the costs of running the blog you can click through at the link or on the tab in the right hand column of this page.
Nice Mark, good for newbies.
ReplyDeletecheers John
Thanks John.
DeleteNever hurts for experienced players to revisit core concepts such as this - often we take for granted our presumed knowledge only to find out we've been playing it "wrong" for ages.
ReplyDeleteVery true, guilty of that myself!
DeleteThank you so much, this really is helpful! I got quite confused in the beginning with the 'crews' for weapons and vehicles and the vehicles from the support list coming without crew.
ReplyDeleteGlad you found it useful, I might add a bit more detail about crews as it’s a topic that comes up often.
ReplyDeleteAnother excellent post for beginners Mark, should be stickied on the forum.
ReplyDeleteOne minor point , perhaps worth adding a line or two making the number of crew,/use of other weapons part of it crystal clear?
Prob one of the most common beginner questions is " how many men are in the 3 crew plus LMG (3 or 4)and can the crew use their rifles?"
Good point, you’re not the first to make the observation. I’ve gone back and tried to make that more clear in reference to both the German LMG team and how it differs with British LMG team. I’d forgotten how often that question comes up, so thanks for the reminder.
DeleteGreat articly, very useful indeed.
ReplyDeleteThank you for the clarification, while the difference in FR and rolling for support was explained, I think the rules were particularly unclear in the simple matter of:
ReplyDelete"List One == 1 Support Point/Each",
"List Two == 2 Support Points/Each",
etc.
Scenario rules such as: "On a roll of 3 or 4, both sides may select from list 2" implied to me at least that ONLY list 2 was available - and even then did not make it clear how much of list 2 could be taken or if it was all.
Thanks again
I really struggled with grasping the basics of this game but it's slowly coming to me. Thanks for helping to make it clearer and easier.
ReplyDeleteThat's an excellent summery of the rules.
ReplyDeleteWhen selecting your support I'd advise three considerations (Two of which you stated in the article).
* Extras to support the mission.
* Extras to counter likely enemy moves.
The third consideration is keeping it all under control.
While you could select 3 or 4 low cost support weapons, your hand of dice makes it very unlikely that you can manage them all during the coming battle.
There's a risk that your lovely carriers or machineguns will lay idle, possibly not even deployed on table, while battle rages between a couple of squads on each side.
Sometimes one big support (A Tiger, Churchill of IS-152) provides that one-shot focus to complete the mission.
At other times, buffs for existing troops (extra SMGs, Panzerfausts, anti-tank grenades or automatic rifles) give a bit more punch without stretching your command structure.
That’s a good point and something I’ve touched on in the other articles on tactics but it’s probably worth adding a paragraph in this article given how popular it is with new players. Thanks for taking the time to comment, much appreciated.
DeleteI am building a force while reading the rules. This article helped me to start. Thx a lot.
ReplyDeleteThanks, I’m really glad to hear you found it useful. Enjoy the rules!
DeleteI am sorry to ask such a noob question but what does the "CI" stand for under your leader's profile ?
ReplyDeleteNo problem, happy to help. CI stands for Command Initiative. You’ll see junior leaders have 2 and senior leaders have 3.
DeleteThanks for your fat reply. I really need to get the printed version of the book. It's easier to read.
DeleteCan you explain when a squad carries a bolt-action reflex rifle, automatic rifle, or semi-automatic rifle?
ReplyDelete