Tuesday 15 June 2021

Making buildings in 12mm

A new scale has called for new terrain. In several instances I've considered how I can use my existing terrain which was initially created with 20mm in mind. While a few elements might be usable in 12mm there are certain things, like buildings for example, that clearly will not work for a smaller scale.

For me buildings have to be practical for gaming. I like to be able to put my figures inside, which means the roofs have to come off and the building dimensions need to be such that the figures and their bases can fit. Having looked at what is commercially available for 10/12mm and not seen anything that will work for me I've decided to begin by scratch building what I need. 

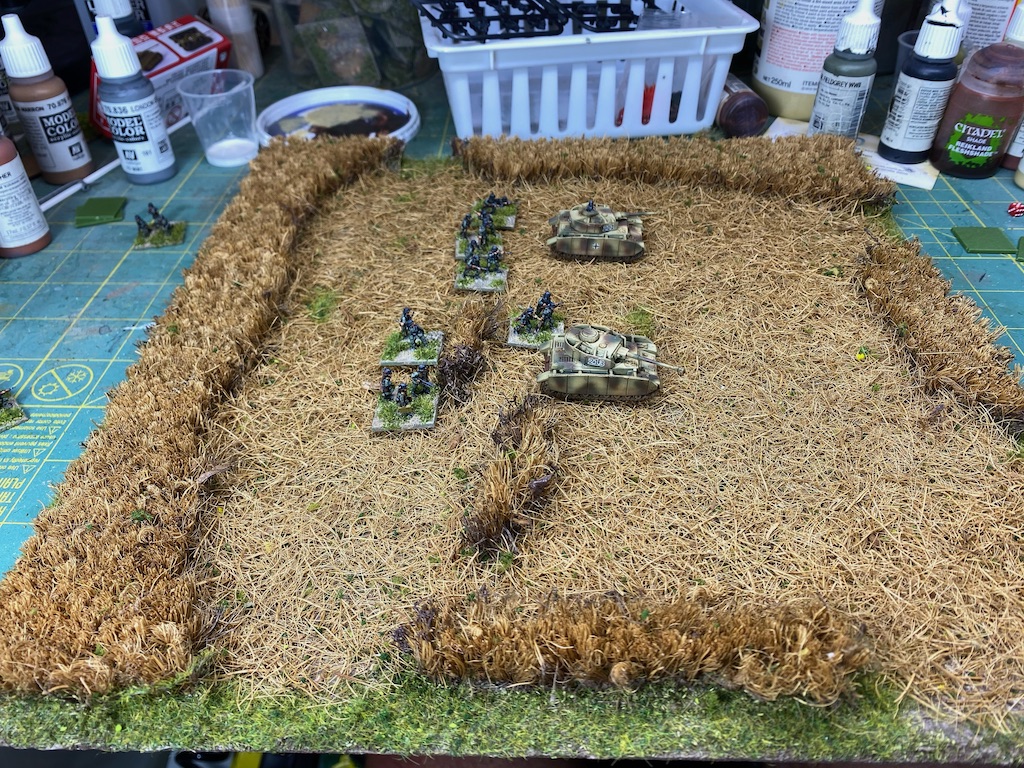
There are a few reasons for this. Firstly, I can build the terrain to fit the specifications and basing size I am using and secondly, I can ensure the building interiors are accessible. I like the way the O Group rules abstract the use of buildings so that a given area is classified as a Built Up Area (BUA) and as long as figures are anywhere within that area all that matters is the direction they are facing. It's assumed the men will take up the best available positions and it doesn't need you to micromanage the placement of figures to windows and doors. In many ways this is similar to the way Crossfire treats what it calls Building Sectors. After all, if you are supposed to be playing the battalion commander it should be safe to assume that an order to a platoon or company to 'hold the village' will see the commanders of those units do the job of assigning their units to the best defensive position for the job.

This allows for a bit of creativity in the way the BUAs are made. The way I've approached it is to consider the base size as representing the entire footprint of the BUA, so that as long as a unit is placed on that base it is considered 'in the building/s' or taking advantage of the cover they offer.

I thought 3mm foam core would work well for this job and constructed a quick test building as a proof of concept. Rather than make detachable roofs I've taken the lazy option and decided all my buildings will be ruins. The test building worked well and the base size was sufficient to house my figures on their 20mm square bases.


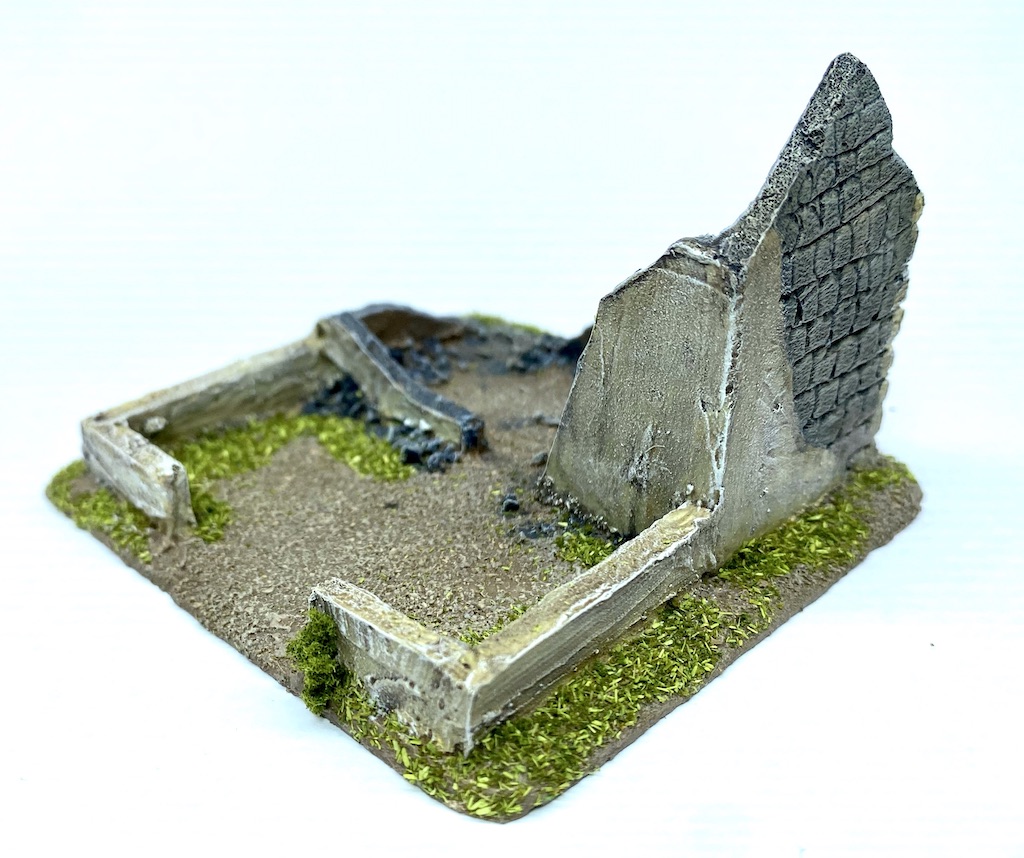
With that decided I set about making a selection of buildings to represent farms or sections of a village. For the bases I used pre-cut MDF coasters that are sold in craft shops and the first thing I do is take my Dremel and roughly chamfer the edges to give a more natural look.


The building dimensions are created to fit my figures and bases. These are marked out on the foamcore and then cut out with a craft knife.


The pieces are glued into place with PVA, all the while checking to make sure the dimensions will work with the figure bases. As you can see the buildings do not have to fill the entire base, you can create walls and gardens as additional features to give each base an individual character.


Foamcore is easy to work and you can cut out pieces to represent the damaged walls (which serves the additional function of making it easier for clumsy, fat-fingered wargamers to place figures during a game). By stripping back the paper and exposing the foam in the core you can then score it with a blade or similar tool to make brickwork.


Here I've used strips of greyboard to add external features. You'll note that I have not cut windows at ground level on any of the buildings. It's tricky to do at this scale without weakening the foamcore and I've decided to add shuttered windows made from thin card once the buildings are textured and painted.


Pieces of cork, cut from cork floor tiles, are useful for making extra features.


The next task is to bind everything together with a coat of filler that also adds texture to the exterior and fills any gaps in the foamcore joins.


You can use this to create the effect of flaking and broken plaster around the carved brick work.


Once the filler has dried the bases are textured using PVA and sand.


Once everything has dried the entire base and buildings are given a coat of dark brown acrylic paint as a primer and base coat. At this stage you begin to see the buildings come together and start to look the part.


The next job is to paint the bases and buildings as you would normally. I put down base colours, give the buildings a wash and then dry brush to pick out the highlights.

At this point you can bring out the features like the carved bricks and the nice thing about using the broken plaster effect is that it doesn't matter if this looks roughly done, as that is part of the effect you are looking for anyway.

The shutter windows are cut from a thin piece of card and added after the walls had been painted.


Despite saying I wasn't going to make roofs this hasn't been completely true. I liked the idea of a farmhouse with an adjacent barn. This roof, made from corrugated cardboard, is not detachable and the barn itself too small to fit a base of figures, however the entire building base is large enough to take the number of figure bases needed. I simply wanted to add diversity to the types of buildings and their appearance.


The last stage was to add flock to the bases.


A late addition was an advertising sign for Dubonnet. This was inspired by a post on Twitter. It involves adjusting an existing jpeg image to the correct size and flipping it to the reverse. Print it out on an inkjet printer and glue it face down to the building exterior with watered down PVA glue. Once the glue has started to dry wet the paper and slowly rub it away with your finger to reveal the image on the wall. It won't look perfect but gives the aged look that you see here. It's a very effective technique that makes the sign look like it has been painted on and gives it a pleasing weathered appearance.


As I mentioned earlier, the only key requirement for the placing of units in a built up area for the O Group rules is that they face in a particular direction. It's not necessary for all bases to be inside the buildings just as long as it's clear that they are occupying the built up area.


The two other terrain types that need to be created are trees and hedgerows. I'm hoping I can do those in a way where they might also work as small items of 20mm terrain and so be as versatile as possible. With most of my miniatures now painted and based it's only a matter of finishing off the final terrain pieces before I can start to play. I'm getting there!


Wednesday 9 June 2021

12mm Second World War project rolling along

This is an update to my earlier post about the 12mm project for the Second World War where I'm aiming to have a collection that will work for company and battalion level actions across several rule sets. These include Crossfire; I Ain't Been Shot Mum (IABSM), and the newly released O Group. At the moment the project is focussed on a German and British force for Normandy.

The first task was to complete the stands for the core platoons and companies. In the picture below you can see a group of German bases that could be used as a company for either Crossfire or O Group where one stand represents one squad. Alternatively it could be a platoon for I Ain't Been Shot Mum where the figures are represented at 1:1. As I want to remove individual casualties for IABSM I have some bases with three figures and some with two. I have also made up a handful of bases with a single figure (not pictured here) and they serve as the 'loose change' to make the appropriate adjustments for casualties. The only difference between the platoon and company would be to replace the company commander base with an individually mounted figure for a platoon commander (a Big Man as the IABSM rules like to refer to them).

To these core platoons and companies I've been adding various support units and HQs. O Group doesn't require the battalion HQ to be present on the table however it is useful to have a place to record the number of HQ orders that are available to be issued by them. I've followed a similar practice for the HQ as I have for off-table mortars and artillery - in effect a mini diorama that features a micro dice that records the fire missions (in the case of artillery) or HQ orders (in the case of the battalion HQ). Below is the German mortar/artillery base plus HMG, company commander and panzerschreck stand.

The HQ stands feature a suitable grouping of figures around a map table. This is the British HQ with the mortar/artillery base behind.


Here is the German HQ. The sandbags were scratch built from Milliput.


Below we have the core battalion command elements with the British artillery and HQ stand plus the three company commanders and a forward observation officer.


Both IABSM and O Group feature an introductory scenario in the main rule book and so I have focussed on putting together all of the units that I would need to play those. With that in mind I've added the most common anti-tank guns. Where as the infantry are from Victrix these support weapons are from Pendraken (as are the battalion HQ figures). While the sculpting style is very different from Victrix the sizes match well and at this scale I don't think the differences are even noticeable. 

The British have 17 pounders and six pounders.


The Germans have Pak38 and Pak40.


I'm still adjusting to painting in this small scale and while the 12mm (1/144 scale) tanks are a reasonable size, something like a Universal Carrier is another matter. Painting the passengers was an interesting task but I keep reminding myself to paint for the table not for a close-up photograph.


The various AFVs I covered in the earlier post but here are a few photographs anyway. 


That now gives me all the figures, guns and vehicles I need to start playing the introductory games. However (there's always a 'however' in this hobby isn't there?), I will need terrain before the miniatures can get into action and finalising that is the next stage of the project. I have already been experimenting with scratch building some ruins with foam core. This one was quick and easy to do and so for now I plan to make up all the buildings I will need this way (more on how I make these in a future post).


I'm also experimenting with various pieces of my existing terrain to see what might work at this scale. These grain fields were made with 20mm in mind. They've seen action in 28mm, but could they pass in 12mm? Hmmm, perhaps.