The
opening scenario of the campaign saw the Japanese exert pressure on the Australian flank and force the platoon back. Casualties were light and so the Australians have fallen back in good order ready to form a new defensive screen. The next game
Find the Enemy is a probe scenario with the Japanese continuing to push hard to break through the Australian positions.
This game takes place where two roads run through the jungle. The Japanese have the option to choose several avenues of advance, which means the Australians must be careful to avoid letting the Japanese slip through without a fight. We make rolls for random terrain and this sees two huts, a paddy field and a rubber plantation (a palm plantation in our case) all in the centre of the table near the Australian base line.


The support roll is a three, giving the Japanese three support points and the Australians four (one for the scenario and three more for the difference in platoon ratings). I suspect Dave is expecting to see a Ha Go tank as a Japanese support thinking I might aim for an opportune moment to try a coup de main and rush this across the table for victory. However, given the unsuitable terrain I've decided this is a job for infantry alone. Instead my element of surprise will come from the use of the Ruse characteristic to push a jump-off-point forward on one of the flanks. That requires two supports, so my final support is to provide one of the Gocho squad leaders with a Type 100 submachine gun. Dave's support choices will remain a mystery for now.
Force Morale rolls see the Japanese with eight and the Australians with ten. A good start for the Aussies who will begin with the initiative. Once again the patrol phase is brief and ends with both sides placing JoPs to cover the centre and both flanks.

Dave's placement of a roadblock before play begins is evidence that he was expecting to see Japanese armour. It's a sensible choice as the jungle restricts the Japanese tanks to the road and so this automatically closes one of those options. Just as well that I've decided against bringing any armour as support. Not that Dave knows this.
With that we start and the Australians decline to deploy anything in their opening phase. The Japanese waste no time and deploy a rifle squad in the centre accompanied by the grenade discharger squad. As with the previous scenario I hope to hold Australian attention in the centre while I try an outflanking move.
The Australians continue to sit and watch how things develop. Japanese command options are limited but the rifle squad in the centre pushes forward cautiously towards the tree line.
Once again the Australians choose to bide their time and remain concealed. The Japanese rifle squad continues to move towards the tree line while the grenade discharger squad follows on their left.
This puts the rifle squad within a possible move that could close down the central Australian JoP. The move is not guaranteed but Dave has to work out whether that's a risk he's prepared to take.

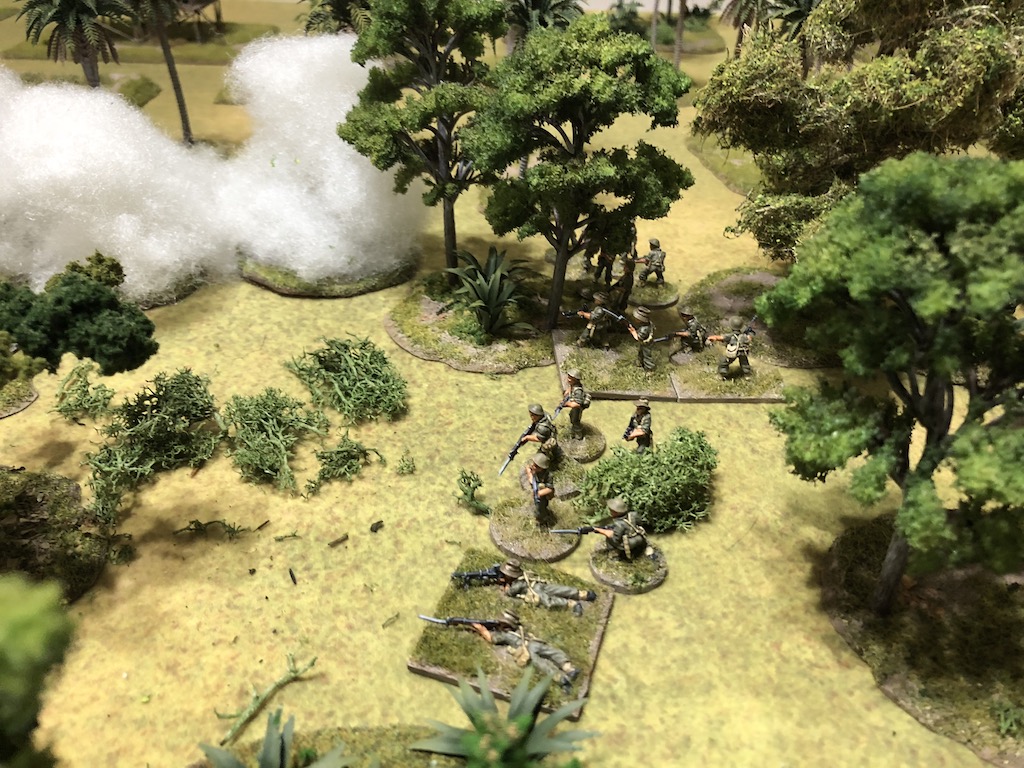
In the end he decides he has to respond and with that takes a very aggressive stance against the Japanese. In order to bring as much fire to bear as possible two Australian sections deploy in the centre and within 12" of the Japanese. This puts the Thompson machine guns in range and Dave makes extremely effective use of the command dice and his leaders to really optimise his fire.
One of the section Corporals uses both his command initiatives to have the rifle team fire five rounds rapid. The section's Bren team is activated to join the firefight using a command dice of 1. In addition to the riflemen each Australian section has a Thompson SMG which was given historically to the man in the section most likely to use it aggressively, rather than to the section Corporal. These men have the added advantage that they can re-roll half of their fire dice if they wish. In the previous game the Australians deployed beyond SMG range and this element of their firepower was under utilised, this time they have decided to really take the fight to the Japanese.
To add to this weight of fire the corporal of the other section uses a command initiative to have all the men under his command fire and uses the remaining command initiative to order a man to throw a grenade.
The grenade misses but fourteen hits are made from the fire from both sections. The Japanese benefit from the hard cover in the jungle and are lucky to escape with a single casualty and two points of shock. Nonetheless I'm suddenly faced with a very formidable Australian firing line. This time they are eager to hit the Japanese as hard as possible right from the start.


The Japanese phase offers considerably less options and so to maximise what can be achieved the Gunso joins the two squads. The Gunso is the platoon sergeant, a second senior leader but of slightly inferior quality. He is limited to only two command initiatives.
He orders the rifle squad to return fire and the grenade discharger squad to move to the tree line. The rifle fire takes its toll and the Australians lose two men and accumulate shock.
In the Australian phase they increase their options by deploying the platoon sergeant and once again making creative use of the command dice to have units deliver as much fire as possible. In this instance one of the corporals remove a point of shock from his bren team and orders them to fire. The section on the left all open fire together, while the Sergeant uses two command initiatives to have the rifle team fire
five rounds rapid. That's a large volume of fire which is only made heavier by the Thompson SMGs. The Japanese come off relatively lightly considering the amount of fire receiving ten hits from thirty dice. The rifle squad suffers two points of shock and the grenade discharger squad lose a man and take a point of shock.
So far Dave has been very effective in getting the most out of his teams, he's just been a bit unfortunate that he hasn't scored more hits. Nonetheless it's a good lesson in making best tactical use of the command dice, your leaders, the available weapons and national characteristics.
Lastly, the platoon 2” mortar deploys in a vegetable garden and fires a round of smoke at the tree line masking off the Japanese LMG team.
The Japanese command roll is disappointing - 65411. It is too soon to deploy the Platoon Rikugun (SL) and so I'm left with limited options. The squad fires, but with the LMG obscured in smoke the riflemen make little impact on the opposing Australian sections.
The Australian command dice offer considerably more options and once again Dave makes shrewd use of Australian National Characteristics to maximise their fire power. The Sergeant orders the two bren teams to fire, while the Corporals focus on getting the rifle teams to fire five rounds rapid. The ten hits on the Japanese result in two casualties and further shock that takes the total on the squad up to six.
With his last remaining CI the Sergeant orders the 2” mortar to fire smoke to screen off the grenade discharger squad, which it does effectively.

The Japanese command roll (65441) is even more limiting than the previous and effectively means I have to let the phase pass without taking any actions. I could bring on the Rikugun, but it would mean the two remaining squads may have trouble deploying and that could really hamper my plans for using the Ruse to try to outflank the Australians. Reluctantly I hand the phase back to Dave.
Once again he rolls a very useful combination of command dice that he exploits to the full. The Corporals order another five rounds rapid from the rifle teams, while the Sergeant has the bren teams fire. He uses his remaining CI to have a man throw a grenade. The end result is an attack with 29 dice, that results in 15 hits. The Japanese take four casualties, one of whom is the squad Gocho who is stunned, while the squad takes a further two points of shock. The wounding of the leader takes Japanese force morale down to seven and the squad is now starting to carry a lot of shock.

Finally the 2" mortar team fire one of their few HE rounds which results in yet another Japanese casualty and a further point of shock. I'm fortunate that all this Australian fire hasn't been more effective, but some real damage is starting to accumulate and that has reduced the effectiveness of the squad.
Things continue to go poorly for the Japanese with a command roll of 44412, which once again really limits the options available.
The Gunso activates and order the grenade discharger team to fire. While the smoke blocks their line of sight the riflemen in the squad can direct their fire and despite their reduced chance of hitting, they manage to score three hits that result in one Australian casualty and a point of shock. It's not all going the Australians' way. With his final CI the Gunso orders the squad to pull back from the treeline, but with all that shock they fail to move.

In the following phase the Australian Sergeant rallies off some shock and orders the squad to keep up its fire on the Japanese riflemen. This time, despite nine hits, the Japanese emerge unscathed, but this firefight is only heading in one direction and I need to pull my men back as soon as I can.
Despite the fire that Dave is putting down he's also wanting to avoid Australian casualties, so feeling that he may have done enough for now the 2” mortar fires a round of smoke and that completely screens off the Japanese.
The Gunso uses the next Japanese phase to rally shock off the squad and they finally manage to pull back a short distance. They are very close to pinning so I need to get them somewhere I can rally off more shock in case the Australians are considering closing in for the kill.

While my squad in the centre has taken quite a few casualties we have drawn in two Australian sections and now that I know he has a roadblock I'm aware he can only have one section left to deploy. If I can hold the sections in the centre of the table I may be able to consider playing my Ruse and making a move on one of the flanks. At this stage my left looks like the best option as his two squads will have the furthest to move to try to counter any Japanese deployment. So with that in mind the grenade discharger squad are ordered to move forward to the paddy field. From there they have the options to lay down a smoke screen; to respond to any Australian deployment from the huts, or intercept any move to my left flank from the two deployed sections.


I'm a little surprised in the Australian phase when both sections move forwards into the jungle. I suspect Dave is keen to try to finish off my squad and inflict maximum casualties. It will also put him in a position to capture one of my JoPs and push my force morale further down.
The grenade discharger squad are not totally ignored and the 2" mortar tries to block their line of sight with a round of smoke, but it drifts off to the left and mingles with the existing smoke.
With the two Australian sections fully committed chasing my squad into the jungle, now seems the ideal time to try to use the Ruse, so at the start of the phase I announce this is what I am going to do with the JoP on my left.
I think this really takes Dave by surprise, I suspect he was fully expecting me to have brought in a Ha Go in an attempt to rush down one of the roads and make a breakthrough. The Ruse allows the Japanese to move one JoP 18” in any direction as long as it doesn't end up within 12" of an Australian unit or JoP. I move mine directly forward 18" which brings it up level with the paddy field and roadblock and then I deploy one of my squads and place them at the edge of the jungle in overwatch.
Between that squad and the grenade discharger squad I can put fire down on any Australians deploying from the huts and I can cover any move from the sections in the centre with fire.
The grenade dischargers target the 2" mortar team who are exposed in the vegetable garden and when Dave sees the threat of losing this small team he decides to use the one CoC dice he has accumulated for an interrupt and the mortar team beat a hasty retreat.
Dave decides to pay little heed to this development on his flank and the Sergeant continues to direct the two sections into the jungle in pursuit of the weakened Japanese squad. Perhaps he senses there is little he can do about my flank move and his best option is to try and cause as many Japanese casualties as possible before the scenario ends? Time may be against him and it's not helped by the slowness with which the two sections move into the jungle.
Once the bren team are in the jungle they spot the Japanese squad and so the Sergeant calls in some HE from the 2" mortar, but the rounds fall wide of the mark.
I choose to keep up the pressure on the left flank and move the squad in the jungle towards the Australian base line and then deploy my final squad with the Rikugun (SL). The ability to deploy 9" from the JoP means the newly deployed squad can take up a good overwatch position behind the paddy bank.
This now makes any deployment by the Australians in the huts a very difficult proposition. It's going to be unlikely they can prevent a Japanese unit reaching the edge of the table and may result in casualties that they would rather avoid.
Meanwhile back in the jungle the Gunso does good work rallying off shock and manages to bring the squad back some distance from the advancing Australians. The Japanese characteristic of Neo-Bushido allows them to ignore the first two points of shock and in this instance they are able to move a reasonable distance despite carrying six points.
The Australians remain undaunted and are determined to try to finish off the squad in the jungle. Both squads move reasonably quickly and are close enough to fling a grenade at the Japanese, but it misses. They are also close to capturing a Japanese JoP.
However the move will come to nothing, as in the next Japanese phase one of the squads on the left moves quickly along the jungle tree line and to the edge of the table for a scenario victory.
That was an interesting game with both sides making full use of their respective national characteristics to try and gain an edge. My decision to use a Ruse as my support was a surprise for the Australians in every sense and was decisive in giving the Japanese scenario victory. I thought early on Dave made excellent use of both his command dice and Australian national characteristics to bring a lot of fire to bear and to try and really hit the Japanese hard. Had the dice been a bit kinder he may have inflicted a lot more damage than he did and it's certainly a tactic that should make the Australians very formidable in this close terrain.
While the Japanese have scenario victory they did so at some cost, having eight men lost as casualties - four of these are lost permanently, two will return immediately and two are wounded. The Australians, once again, suffered relatively light casualties, with only three men hit, which means they lose one man permanently and two for the next game. Both sides will take the same platoons into the next scenario which means the Australians will be down four men (one killed in the previous scenario plus the other killed in this one and two men wounded). The Japanese as the scenario victors are able to call for replacements to make good some of their losses.
The Japanese CO is pleased with the progress and his opinion has gone up to +3. The men did not like seeing so many comrades fall and their opinion has dropped down to +1. We will use the CO's opinion go help calculate the replacements, which will be the number of permanent losses (four) plus the CO's Opinion (+3) divided by two. We round down fractions to give us at least three men returning and to this we add the result of 1D6. We will do this prior to the next scenario, but it means the Japanese can expect at least four men to return and an even chance they are back to full strength.
Despite the loss, the Australian CO is pleased to see the platoon withdraw having caused the Japanese a number of casualties and so his opinion is raised to 0. The men seem to feel the same way and their opinion also goes up to +1.
So we move on to the next map and you can follow what happens next here
Scenario 3 Fix the Enemy.
You can find all of the AARs for the Malaya 1942 campaign and all the other campaigns we have played
here.