
Elements of the American 175th Infantry Regiment continue to push on from the Omaha beachhead in their attempt to link up with the landings at Utah. We have reached the second map of the campaign where the Germans have planned a delaying action to stall the advance.
The Americans enjoyed a fairly comfortable victory in the first game of the campaign. I put that down to two things. First, Dave played a very good game, using sound tactics and all the advantages of US firepower. Second, I played into his hands and didn't take full advantage of my defensive position and the off-table 88mm gun. My main mistake was to conduct the defence too far forward. I should have drawn the Americans towards me. Instead I deployed in a way that allowed the Shermans to sit back in relative safety and make my position almost impossible to hold.

I don't plan on making the same mistake twice. In this scenario, much like the first, the Germans enjoy anti-tank support from off the table. There are two Marders positioned to the south that can cover most of the open area in the central part of the map. I think the key here is to defend in such a way that the American armour will be ineffective unless it is forced to venture into that kill zone. Something I failed to take advantage of in the previous game.
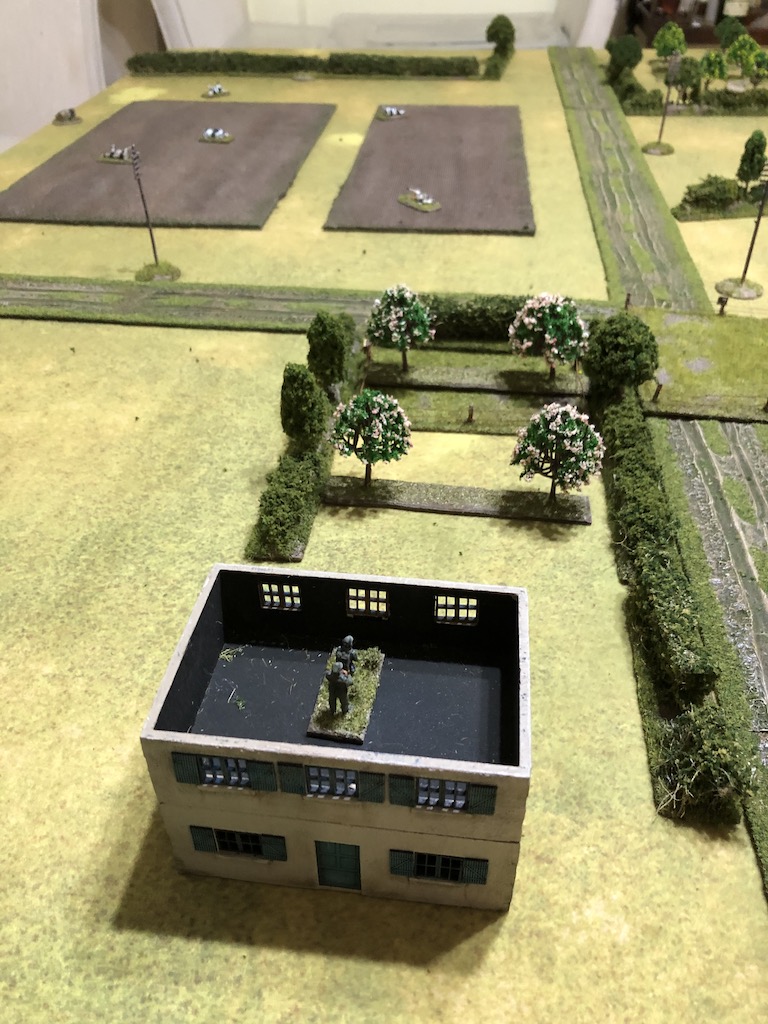
To win the Americans are required to capture a jump-off-point in the rectangle area at the rear of the table. The terrain should make it possible for the Germans to hold the rear of the map and make the Americans come to them. If their infantry need armour support then it will have to be brought forward to help them.
The Americans enjoyed a fairly comfortable victory in the first game of the campaign. I put that down to two things. First, Dave played a very good game, using sound tactics and all the advantages of US firepower. Second, I played into his hands and didn't take full advantage of my defensive position and the off-table 88mm gun. My main mistake was to conduct the defence too far forward. I should have drawn the Americans towards me. Instead I deployed in a way that allowed the Shermans to sit back in relative safety and make my position almost impossible to hold.

I don't plan on making the same mistake twice. In this scenario, much like the first, the Germans enjoy anti-tank support from off the table. There are two Marders positioned to the south that can cover most of the open area in the central part of the map. I think the key here is to defend in such a way that the American armour will be ineffective unless it is forced to venture into that kill zone. Something I failed to take advantage of in the previous game.
To win the Americans are required to capture a jump-off-point in the rectangle area at the rear of the table. The terrain should make it possible for the Germans to hold the rear of the map and make the Americans come to them. If their infantry need armour support then it will have to be brought forward to help them.

Using Google Maps I took a virtual 'drive' across this map and aside from some widening of the road, it would appear little has changed since 1944. The farm buildings on the German right consist of a large L shaped barn with few windows or doors. As a result it offers a defender very few vantage points from which to cover that flank.

Similarly the houses on the left of the road all face forward, with few if any windows to cover the left flank. Something I need to take into consideration when planning the defence.

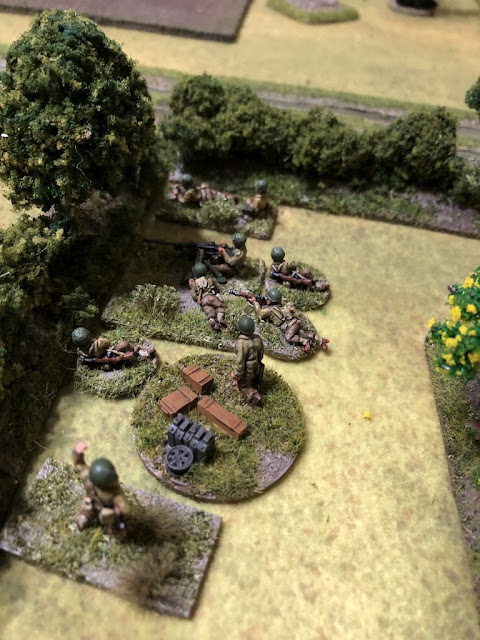
The German platoon took a number of casualties in the previous game and that sees them short of five men, with three lost permanently and two wounded who are yet to return. As a result I'll form up one squad as a single, slightly enlarged LMG team under the command of an Obergefreiter (junior leader).


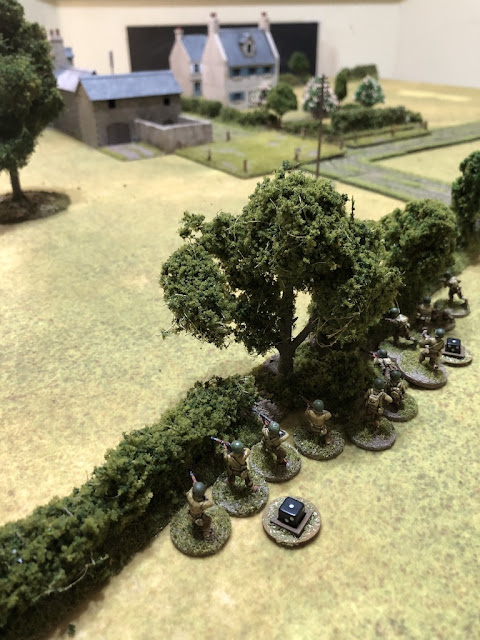
Force Morale will start at nine for the Germans and eleven for the Americans. I play the patrol phase conscious that the Americans are likely to have the support of a mortar barrage. My jump-off-points are spread out in such a way that a barrage can't deny me all of them. As the farm buildings don't provide adequate vantage points I plan to deploy entrenched squads to either flank and so have jump-off-points placed accordingly.

If I hold back my defence then the Americans must cross the open ground to engage me. A mortar barrage should either make that advance very hazardous or close down one avenue of attack, so a forward observer will accompany the platoon. To deny the Americans the cover of the hedgerow and orchard at the road junction I will place a couple of minefields.
As the defender I find buildings a mixed blessing. While they provide hard cover, the restricted arc of fire from the windows and limited access points can make them as much a trap as an advantage. As I've said, it is also clear from looking at the terrain that the two exposed German flanks cannot be adequately covered by fire from the buildings. Entrenchments offer hard cover, wider fields of fire and more flexibility in defence and so I will add three entrenchments. If the Americans try to work their way around my right flank (which offers them the best covered approach) then I plan to have that covered by an entrenched squad.
Lastly, as the Germans have a single senior leader, an Adjutant will be available to help the platoon deploy should the Feldwebel be sent forward earlier than planned. With that done the minefields are placed and we are ready to begin.


The Americans are quick to deploy and a squad takes up overwatch positions behind the hedge on their right flank.


Despite deploying from an exposed position that squad has now covered a lot of open ground in safety.

Meanwhile on the American left, the squad that had struggled over the hedge has caught its breathe and once again demonstrates its athleticism, moving forward rapidly at the double towards the nearest barn. That squad has covered a lot of ground in a handful of phases and is in danger of compromising my defence.


The platoon sergeant deploys to join the Lieutenant. He's clearly a more experienced man and the veteran politely suggests to the 90-day-wonder that the Lieutenant might like to go forward and join the other men. Clearly the sergeant can take matters into his own hands in the orchard and so the young Lieutenant makes his way forward over the hedge. We won't say he has ordered the Lieutenant forward with his CI, rather he has used the CI to offer a suggestion.


Fortunately the command dice give me a number of options. The Feldwebel is cornered and desperate, but not about to give up without a fight. He has three hand grenades and plans to shower them on the Americans below. At that range he can't miss. My only fear is that in all the excitement he fumbles a grenade and drops it at his feet.

He lobs out the first grenade and it kills one man.

The second grenade bursts with more deadly effect and another two Americans are taken casualty.

The third and final grenade sees yet another American fall. The Feldwebel is determined to go down fighting.

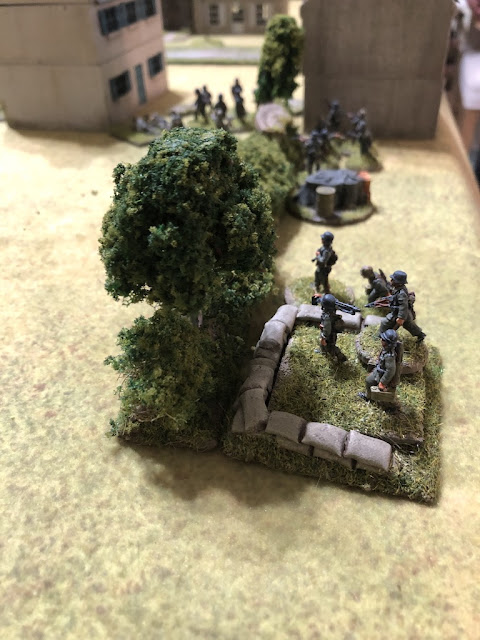
While it is satisfying to give the Americans a bloody nose, it won't be enough to save the day. A squad deploys from the German jump-off-point at the rear of the table, approaching as close to the farmhouse as it can get.


A second squad deploys. The squad's Obergefreiter joins the MG42 team on the upper level of the house and puts the gunner on overwatch.


Meanwhile the squad's rifle team take up position alongside the house behind the hedgerow.

Meanwhile the rifle team move into the adjoining farmhouse.

The German rifle team behind the rear hedge are on overwatch and respond as the Americans move in.

Despite the hard cover the Americans lose a man.

Once again the US forward observer tries to contact the mortar battery, but once again he is unsuccessful.
In the subsequent phase the platoon sergeant has the forward observer try for contact yet again, but this time the FO learns the battery will not be available at any stage during this turn.


With that news he orders the 50 cal team to move forward with him up to the hedge row.

The Lieutenant makes a dash towards the farm and joins the BAR team outside the barn where he rallies off some of their shock.

The BAR team then makes its way into the barn.


Meanwhile in the farm house the squad sergeant rallies off a point of shock and has the rifle team return fire at the Germans behind the hedge.

The Germans lose a man.

It's reached the stage now where my Germans have taken a few casualties and I have to decide whether I can still hold the Americans off. I'm pinned back into a corner and the Americans can now take their time to build up and mount a second assault.
I persevere for now. The Feldwebel rallies off the remaining shock from the squad.

The Obergefreiter behind the hedge does the same thing for the LMG team.

I don't want to withdraw the rifle team from the hedge but at the same time I don't expect to come out on top in a firefight with the American rifle team enjoying the better cover of the farmhouse. So the team go tactical and find better cover. This is where those entrenchments would have come in useful.

The Americans continue to bring men forward with the platoon sergeant and the 50 cal moving up towards the barn.


The Americans have units yet to arrive and a 30 cal MMG team tries to deploy, but with all the senior leaders on the table they are unsuccessful.
The Lieutenant enters the barn, takes the last remaining shock off the BAR team and sends them forward.


The rifle team in the farmhouse fire across at the Germans behind the hedge but it has no effect.


Another squad deploys on the opposite flank, taking up tactical positions behind the hedge surrounding the orchard.


In the German phase I deploy the forward observer in the upper level of the farmhouse and he immediately makes contact with the mortar battery.
Note that we play the Advanced Rule for targeting and buildings (Chapter 17, page 70) which means infantry can only be targeted in a building that is more than 18" away if they have been seen to enter or if they fire from the building. This means that the forward observer can remain hidden to enemy over 18" away unless another friendly unit draws attention to the location by being seen to enter the building or fires from it.
Note that we play the Advanced Rule for targeting and buildings (Chapter 17, page 70) which means infantry can only be targeted in a building that is more than 18" away if they have been seen to enter or if they fire from the building. This means that the forward observer can remain hidden to enemy over 18" away unless another friendly unit draws attention to the location by being seen to enter the building or fires from it.
The command options for the Americans are limited in their next phase. A lone Sherman makes its way onto the road and the gunner is placed on overwatch.


With a choice of targets the German forward observer feels there is no need to hold back and he calls down a ranging shot on the squad on the American right flank. It comes down on target, inflicting a point of shock on the BAR team.

The next American command roll is 66431 and a double phase. This could give the squad on the right a chance to move away from the incoming barrage, however with no better cover available than that which they currently occupy this may not be much of an opportunity.
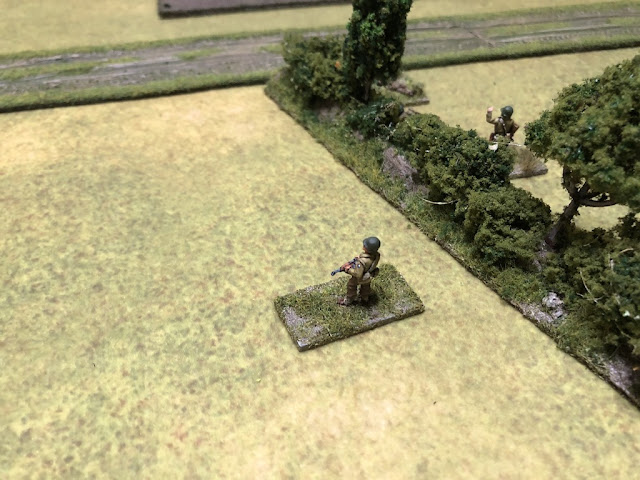
The platoon Lieutenant deploys on the left flank in the orchard and orders the squad to move forward over the hedge.
The platoon Lieutenant deploys on the left flank in the orchard and orders the squad to move forward over the hedge.


I'm not surprised to see a forward observation team deploy into the orchard. The FO makes immediate contact with his battery and confirms my expectation that I would face a mortar barrage.

The subsequent phase sees the Americans push forward aggressively. A third squad deploys from the exposed jump-off-point near the ploughed field on their right flank. Short of natural cover they wisely take up tactical positions.


As if I don't already face enough US firepower, a 50 cal HMG team deploys in the orchard alongside the forward observer.


The platoon Lieutenant orders the squad on that flank to make a run for the hedge opposite them. They move at the double and their training has clearly paid off. They cover the distance in a single dash.

To provide supporting fire for the advance the Lieutenant then puts the 50 cal team onto overwatch.


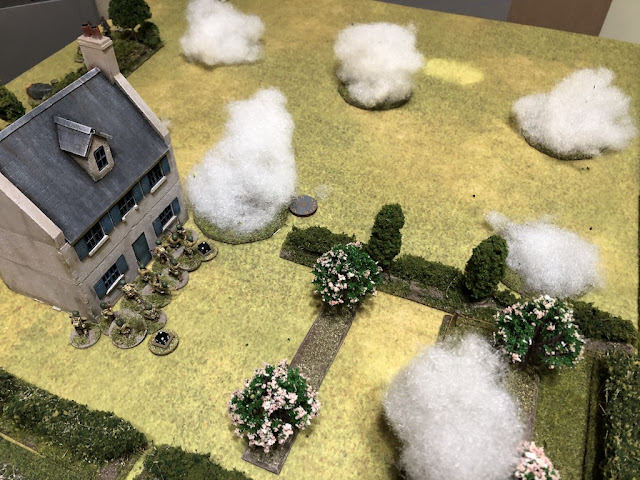
The American FO doesn't have a specific target but he's now aware there must be an opposing FO in the area. To cover the advance he calls down an immediate smoke barrage without a preliminary ranging shot.

There's a risk that the barrage falls well off target, but he calls it well and the smoke comes down exactly as intended. Things are ticking along nicely for the Americans.

I still intend to draw the Americans towards me and so I don't see the need to deploy any more of the platoon just yet. That just leaves the FO to be activated in the German phase. Despite losing sight of his target he knows he has found his mark and so instructs the battery to continue firing.

The barrage is having little more effect than pinning that squad and only inflicts a point of shock on each team. Nonetheless that's one squad tied down for now.


There's a risk that the barrage falls well off target, but he calls it well and the smoke comes down exactly as intended. Things are ticking along nicely for the Americans.


The barrage is having little more effect than pinning that squad and only inflicts a point of shock on each team. Nonetheless that's one squad tied down for now.


The Americans continue to press forward in their phase, with the squad on the right moving to the edge of the ploughed field and towards the smoke.

The sergeant under the barrage does his best to rally his squad and removes the shock from the BAR team.

The squad on the left must have been exhausted by the earlier dash across the field because when ordered to push forward over the hedge can only move slowly and laboriously. This could be a risky move, as it leaves the men in the open and not that far from the farm buildings. At the moment they are at effective range but will make a very inviting target once they come closer.

Meanwhile the US Lieutenant moves along the hedgerow in the orchard to join the HMG team and FO.

He asks the forward observer to have the smoke barrage shift to the right.


That should enable the nearest squad to close on the farmhouse in more cover.


The sergeant under the barrage does his best to rally his squad and removes the shock from the BAR team.
The squad on the left must have been exhausted by the earlier dash across the field because when ordered to push forward over the hedge can only move slowly and laboriously. This could be a risky move, as it leaves the men in the open and not that far from the farm buildings. At the moment they are at effective range but will make a very inviting target once they come closer.

Meanwhile the US Lieutenant moves along the hedgerow in the orchard to join the HMG team and FO.

He asks the forward observer to have the smoke barrage shift to the right.


That should enable the nearest squad to close on the farmhouse in more cover.

The German command roll is unable to activate the FO. I contemplate deploying a squad alongside the barn and engaging the squad that just crossed over the hedge. At the moment they would be at effective range so ideally I wait until they have come a little closer, so for now I bide my time and the phase passes back to the Americans.
Unfortunately for me this sees another double phase and with the enemy closing in it makes me regret not deploying in the previous phase. Too late now. The Americans seize this sudden opportunity and push forward. The squad on the right moves quickly up to the road and close to the smoke barrage.
Unfortunately for me this sees another double phase and with the enemy closing in it makes me regret not deploying in the previous phase. Too late now. The Americans seize this sudden opportunity and push forward. The squad on the right moves quickly up to the road and close to the smoke barrage.

Despite deploying from an exposed position that squad has now covered a lot of open ground in safety.

Meanwhile on the American left, the squad that had struggled over the hedge has caught its breathe and once again demonstrates its athleticism, moving forward rapidly at the double towards the nearest barn. That squad has covered a lot of ground in a handful of phases and is in danger of compromising my defence.


The platoon sergeant deploys to join the Lieutenant. He's clearly a more experienced man and the veteran politely suggests to the 90-day-wonder that the Lieutenant might like to go forward and join the other men. Clearly the sergeant can take matters into his own hands in the orchard and so the young Lieutenant makes his way forward over the hedge. We won't say he has ordered the Lieutenant forward with his CI, rather he has used the CI to offer a suggestion.


What concerns me more than the advancing Lieutenant is the prospect of what could unfold in the second US phase. If the American squads continue moving at this rapid pace I may have left it too late to respond. So it's with considerable relief that I see the next US command roll is 55551. A stroke of fortune which will prevent a move forward in force.
It is however enough to activate one team and that might just prove enough. The squad sergeant and rifle team on the left dash forward at the double once again. Despite the shock the rapid moves have accumulated the team cover the distance they need to reach the barn.
Unfortunately for the Germans it's enough to bring them within 4" of the jump-off-point, closing it down and preventing all hope of a swift response on that flank.

They've had to leave the BAR team behind, but that's a small price to pay.

Well, that's a turn for the worse. I had hoped to catch that squad in the open before it could reach the barn, but the combination of double phase and very rapid movement have scuppered that plan.
It is however enough to activate one team and that might just prove enough. The squad sergeant and rifle team on the left dash forward at the double once again. Despite the shock the rapid moves have accumulated the team cover the distance they need to reach the barn.

Unfortunately for the Germans it's enough to bring them within 4" of the jump-off-point, closing it down and preventing all hope of a swift response on that flank.

They've had to leave the BAR team behind, but that's a small price to pay.

Well, that's a turn for the worse. I had hoped to catch that squad in the open before it could reach the barn, but the combination of double phase and very rapid movement have scuppered that plan.
The next German command roll is 65522, which offers few options. As I have an Adjutant I decide to bring on the Feldwebel and have him command the forward observer. He may be on his own for now but as the building is the site of the most important jump-off-point then it won't be long before he will be joined by others from the platoon.

The FO calls down the barrage again but it has little impact on the Americans, inflicting a single point of shock on the rifle team. It's not much but it continues to keep that squad pinned down.


The FO calls down the barrage again but it has little impact on the Americans, inflicting a single point of shock on the rifle team. It's not much but it continues to keep that squad pinned down.

In the American phase the rifle team on the left pauses for breath. It's an opportunity for the squad sergeant to rally off some of the shock from the rapid moves.

The pause is also an opportunity for the BAR team to catch up with the rest of its squad.

The squad on the American right now takes its turn to move rapidly. Moving at the double it sprints through the smoke barrage, covering 15" in a single bound. I don't know what sort of training the 29th Division undertook but these men are proving to be athletes of the highest order.

Meanwhile the platoon Lieutenant moves himself forward to the hedge row.


At long last there's some good fortune for the Germans with a command roll of 66641. A double phase and turn end which I hope will offer a chance to respond to the American advance. Unlike an HE barrage the smoke will completely disappear at the end of the turn. This gives me a chance to catch the American squad in the open in the next phase. With that in mind the weakened German squad that is made up of a single LMG team deploys dug-in at the rear.


The Feldwebel is about to order the forward observer to call down the barrage when Dave chooses to use his one full CoC die to interrupt. I'm sure he would have preferred to save it to keep the US barrage going at the end of the turn, but the prospect of his squad being caught in the open has meant he needs to use it more urgently to try to help them. He takes the opportunity to have that squad dash towards the cover of the farmhouse and once again they move with great speed to cover the required distance.

Not only does it succeed in getting the squad out of danger but it also closes down the jump-off-point in the farmhouse. Things are going from bad to worse. My only consolation is they won't have captured it at turn end, but that seems a small mercy at this stage.
With the American interrupt out of the way the German FO calls down the mortars once again. The rifle team suffers a further two points of shock. The mortars may not be inflicting casualties but at least they continue to keep a full squad out of the fight.

With that the turn comes to an end and the smoke barrage is removed. The Germans use one of their CoC die to maintain their barrage.


Despite having another phase the Germans now find themselves in a very tight corner. The Feldwebel and forward observer are trapped in the upper level of the farmhouse and the key jump-off-point is perilously close to being captured. If I'm to salvage anything from this game this calls for some drastic action.


The Feldwebel is about to order the forward observer to call down the barrage when Dave chooses to use his one full CoC die to interrupt. I'm sure he would have preferred to save it to keep the US barrage going at the end of the turn, but the prospect of his squad being caught in the open has meant he needs to use it more urgently to try to help them. He takes the opportunity to have that squad dash towards the cover of the farmhouse and once again they move with great speed to cover the required distance.


Not only does it succeed in getting the squad out of danger but it also closes down the jump-off-point in the farmhouse. Things are going from bad to worse. My only consolation is they won't have captured it at turn end, but that seems a small mercy at this stage.
With the American interrupt out of the way the German FO calls down the mortars once again. The rifle team suffers a further two points of shock. The mortars may not be inflicting casualties but at least they continue to keep a full squad out of the fight.

With that the turn comes to an end and the smoke barrage is removed. The Germans use one of their CoC die to maintain their barrage.


Despite having another phase the Germans now find themselves in a very tight corner. The Feldwebel and forward observer are trapped in the upper level of the farmhouse and the key jump-off-point is perilously close to being captured. If I'm to salvage anything from this game this calls for some drastic action.
Fortunately the command dice give me a number of options. The Feldwebel is cornered and desperate, but not about to give up without a fight. He has three hand grenades and plans to shower them on the Americans below. At that range he can't miss. My only fear is that in all the excitement he fumbles a grenade and drops it at his feet.

He lobs out the first grenade and it kills one man.


The third and final grenade sees yet another American fall. The Feldwebel is determined to go down fighting.

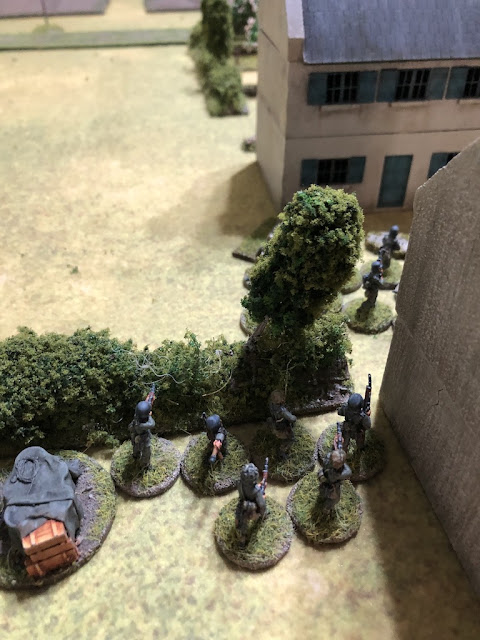
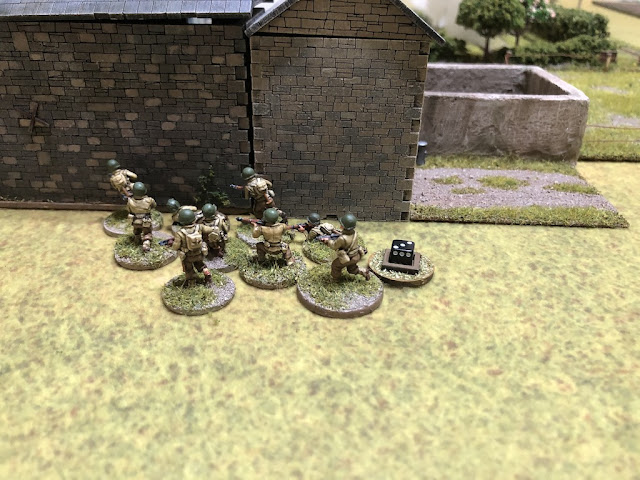
While it is satisfying to give the Americans a bloody nose, it won't be enough to save the day. A squad deploys from the German jump-off-point at the rear of the table, approaching as close to the farmhouse as it can get.


A second squad deploys. The squad's Obergefreiter joins the MG42 team on the upper level of the house and puts the gunner on overwatch.


Meanwhile the squad's rifle team take up position alongside the house behind the hedgerow.

That leaves the situation around the farmhouse delicately poised as we go into the American phase. The US command roll is 64311 giving the Americans several options. The platoon sergeant has seen the grenades flying out of the farmhouse window and so is now aware of the presence of the enemy in the building. He orders the 50 cal to fire at the the upper level of the house.
The machine gun fire wounds the forward observer but leaves the Feldwebel unscathed.

The platoon sergeant then asks the forward observer to try to access the mortar battery only to be told it's not available this phase.
Now that the Feldwebel has revealed himself the Sherman commander orders the gunner to put a round of HE into the upper level.

The results are deadly. The Feldwebel is lightly wounded and the forward observer is killed. That's a blow to German morale which drops three points down to six.

The tank commander then orders the bow machine gunner to fire at the entrenched Germans behind the hedge.

The men are in good cover and the fire has no effect.
At the farmhouse the American squad tries to enter the building, but both teams are carrying some shock from moving at the double and only the rifle team makes it through the door, leaving the BAR team outside.


The machine gun fire wounds the forward observer but leaves the Feldwebel unscathed.

The platoon sergeant then asks the forward observer to try to access the mortar battery only to be told it's not available this phase.
Now that the Feldwebel has revealed himself the Sherman commander orders the gunner to put a round of HE into the upper level.

The results are deadly. The Feldwebel is lightly wounded and the forward observer is killed. That's a blow to German morale which drops three points down to six.

The tank commander then orders the bow machine gunner to fire at the entrenched Germans behind the hedge.

The men are in good cover and the fire has no effect.

At the farmhouse the American squad tries to enter the building, but both teams are carrying some shock from moving at the double and only the rifle team makes it through the door, leaving the BAR team outside.


This demands an immediate German response and a command roll of 54421 gives me what I need. Firstly the Obergefreiter outside the house passes a hand grenade to one of the LMG team.

He orders him to throw it through window.

He can hardly miss at that range and the grenade explodes inside killing one of the rifle team and inflicting a point of shock.

With that the Obergefreiter leads the squad in a charge into the farmhouse. The Feldwebel has been watching all this from above and grabs his machine pistol to come charging down the stairs to join them. A wild melee ensues.

The Germans win the close combat, but at some cost. The Americans are wiped out. The wounded squad sergeant was stunned and unable to withdraw and so is captured. Despite the loss of a leader and a team American force morale drops only one point. The Germans lose five men and the squad Obergefreiter is wounded and stunned, but their force morale remains steady. Their swift counter attack has managed to reclaim the farmhouse.
Meanwhile the BAR team who were left outside the farmhouse have heard the crump of a German grenade followed by shouts and the chaos of close combat. Suddenly there is silence. When that silence is broken by the sound of German voices the shocked BAR team are pinned with fear at the realisation they are now alone.

While that's a blow for the Americans they still have the upper hand and considerable firepower, so this has been only a temporary reprieve for the defenders.
In the following American phase the rifle team from the squad on their left flank makes its way around the farm buildings towards a door at the rear.

The platoon Lieutenant climbs over the hedge and continues to make his way forward.


The Sherman commander now turns his full attention to the entrenched Germans behind the hedge. He orders the gunner to fire a round of HE and the bow gunner to follow this up with a burst of machine gun fire.

The Germans are lucky to escape with only three points of shock, but they won't be able to stand this amount of fire for much longer.

The platoon sergeant urges the forward observer to keep on trying to access the mortar battery, but he's not having any luck. He then calls the 50 cal team to follow him forward over the hedge and out of the orchard.

In the German phase the Feldwebel rallies shock off the remnants of the squad.

The LMG team open fire to clear away any remaining Americans outside the farmhouse. They pour point blank fire into the hapless BAR team.

It's almost a miracle none of the surviving BAR team are hit, but they do suffer five points of shock which is enough to break the team and send them reeling back towards their own lines.


Things were looking very desperate there for the Germans, but a swift, aggressive counter-attack has recaptured the farm and jump-off-point. Just as significantly it has destroyed a full US squad. Despite the loss of the forward observer the barrage continues to pin down another full squad, which means for now the Americans only have the single squad in action. Yet at the same time the Germans are not in the best shape, nor in the best position. The counter attack has meant abandoning any entrenched positions which will make the farmhouse that much harder to defend.
With the threat of the Sherman making life very uncomfortable the Obergefreiter commanding the entrenched LMG team removes shock then has the men abandon their position and move out of sight of the enemy tank.


Just as things appear to be looking up for the Germans the Americans roll another double phase. On their left flank the BAR team moves towards the barn doors.

Meanwhile the rifle team move into the adjoining farmhouse.

The German rifle team behind the rear hedge are on overwatch and respond as the Americans move in.

Despite the hard cover the Americans lose a man.

Once again the US forward observer tries to contact the mortar battery, but once again he is unsuccessful.
In the subsequent phase the platoon sergeant has the forward observer try for contact yet again, but this time the FO learns the battery will not be available at any stage during this turn.


With that news he orders the 50 cal team to move forward with him up to the hedge row.

The Lieutenant makes a dash towards the farm and joins the BAR team outside the barn where he rallies off some of their shock.


The BAR team then makes its way into the barn.


Meanwhile in the farm house the squad sergeant rallies off a point of shock and has the rifle team return fire at the Germans behind the hedge.

The Germans lose a man.

It's reached the stage now where my Germans have taken a few casualties and I have to decide whether I can still hold the Americans off. I'm pinned back into a corner and the Americans can now take their time to build up and mount a second assault.
I persevere for now. The Feldwebel rallies off the remaining shock from the squad.

The Obergefreiter behind the hedge does the same thing for the LMG team.

I don't want to withdraw the rifle team from the hedge but at the same time I don't expect to come out on top in a firefight with the American rifle team enjoying the better cover of the farmhouse. So the team go tactical and find better cover. This is where those entrenchments would have come in useful.

The Americans continue to bring men forward with the platoon sergeant and the 50 cal moving up towards the barn.


The Americans have units yet to arrive and a 30 cal MMG team tries to deploy, but with all the senior leaders on the table they are unsuccessful.
The Lieutenant enters the barn, takes the last remaining shock off the BAR team and sends them forward.


The rifle team in the farmhouse fire across at the Germans behind the hedge but it has no effect.

I feel the time has come for the Germans to withdraw. Whenever the turn ends the Germans will lose their barrage thereby freeing up the American squad. There's a chance the US forward observer could contact the mortar battery. In which case I would end up facing two squads, a 50 cal, a 30 cal, a Sherman and a mortar barrage with what remains of my existing force. Not great odds and I need this platoon to fight again in the future.
My plans were undone by fast American movement that capitalised on a couple of double phases. The traffic wasn't all one way and the counter attack at the farmhouse was enough to eliminate an entire squad, however by that time the defence was compromised, particularly on my right flank. A wonderful example of how a plan doesn't survive first contact with the enemy.
To me it also highlights how well variable movement and variable phases take the predictability out of a game. That level of uncertainty adds a whole new layer of decision making. Responding to the enemy is no longer a matter of counting turns and inches of movement, but a much more nuanced judgement call. Some might say the Americans won this because they were lucky, but I'd argue just as strongly that I lost this because I misjudged or gambled with the timing of my deployment.
The Germans suffered nine casualties, eight from the core platoon, which means a further four men lost permanently and two wounded. As the platoon won't fight again until we reach map 5 those wounded men and the wounded from the first game will all have returned. Nonetheless this leaves the platoon down seven men.
With the news of a second defeat the German CO's opinion drops from -2 to -3. At this point the Germans learn of the naval bombardment of Isigny which has destroyed all communication with the HQ. Until communication is restored the CO's opinion will not change and will remain at -3 until further notice. The men on the other hand have inflicted more casualties on the enemy than they have suffered and so their opinion rises from -1 to 0.
With the Americans constantly rotating in fresh platoons the only opinion that matters is that of the regimental commander Colonel Goode and as long as the units of the regiment are pushing forward he is feeling reasonably confident all is going well.
So we now move over to the left flank of the American advance. This is the area from where the two Marders were able to fire onto this table. For as long as the Germans hold that position the main road to Isigny won't be safe for movement. For this encounter a fresh American platoon will tackle a fresh German platoon in an attempt to clear the area and secure the flank. You can find out what happens next in this post.
You find reports for all the games in this campaign and many other campaigns on the Chain of Command Campaign AAR page here.