This is an Attack & Defend scenario and we roll nine for support. The Japanese have a +1 due to the CO's opinion, giving them ten points. The Australians receive a total of seven points (half of nine, fractions rounded down, plus three points for the difference in platoon ratings).
Where as in the probe scenario I was able to lever the Australians out of position by a flank move and so win the scenario with little fighting, this scenario requires a more aggressive approach. I need to drive down Australian force morale and that will come predominantly from inflicting casualties.
As the Japanese player I find the temptation to use the cheap support of the Ha Go tanks too hard to refuse. I can bring in two of these for only five support points (two points for the first one and three for any subsequent ones). To this firepower I will add an engineer flamethrower team, which will help negate the hard cover provided by the jungle and threaten the Australians with casualties they would prefer to avoid. Finally I add a Ruse, which worked well for me in the last scenario and may help me introduce a further element of surprise in my deployment. As is always the case, I have no idea how Dave, my opponent, will allocate the support for his Australian platoon.
Force morale sees the Japanese start strong with 11, while the Australians will only have 9. Playing across the table sees a very short patrol phase, with the Australian patrol markers starting 18" from their baseline. When I roll 6 for the free patrol moves I am able to lock down all the Australian markers before they have a chance to move. While this may sound like a huge advantage I actually find there is little room to out-manoeuvre the Australians and only manage to make some headway on my right flank. I was initially tempted to weight all my patrol moves on a single flank, but any progress outflanking the Australians would be lost in allowing Dave to know exactly where I was coming from and so concentrate his force to meet me. The advantage of attacking across the table like this is the ability to stretch a defence and so I decide to leave my options open and keep Dave from concentrating against me. Well, that was the plan anyway.
Jump off points find the Australians concentrated around the road and paddy fields. The Japanese opt to keep all options open and spread themselves across the table.
I was able to use my new style Japanese jump off point marker featuring the officer and the horse, which you can see more of in
this post.
With initiative the Japanese have the first phase and I deploy one of my squads to the left flank and place them on overwatch. They arrive from a jump off point in open ground, which is not ideal, but as I can deploy first I think it's worth trying to get at least one of my squads to the tree line by the paddy fields, if only to prevent the Australians doing the same and limiting deployment options from my JoP. Perhaps more importantly from the Japanese perspective, if I can get there quickly it will allow me to use the cover of the paddy field bank to put fire on any Australians deploying from their jump off point.

While I've deployed initially to this left flank I intend my main thrust to be on the right flank where there is more cover. Much will depend on the Australian response, but I hope this opening move will ensure their attention is stretched across the table.
In the Australian phase a Bren Carrier appears on the road with the gun team on overwatch. That's an interesting development and makes me think he's wanting to draw out a response from any Ha Go's that I may have brought along as support.
The following Japanese command roll delivers a double phase, which gives me the opportunity to push the squad on my left flank aggressively forward, as the Australians are not yet deployed in that area. The Gocho (JL) understands what's required and moves his men very briskly through the jungle to the paddy field bank.
This then puts them close to the jump off point on the Australian right flank.
On the other side of the table, on the Japanese right, I deploy the Grenade Discharger squad along the jungle tree line.
From this position they have a good line of sight across the table and in particular the jungle tree line near the Australian base line. I'm hoping this will make things difficult for any Australian units deploying in that area.
I now enjoy another run of luck, with the subsequent Japanese command roll providing two sixes and so another double phase. As is often the case with this sort of command roll, my remaining dice leave few activation options. There is however enough to move the squad on my left flank. The paddy fields are flooded and in full season as the campaign is set in December. Moving through them will be slow, but moving along the paddy banks will leave me particularly exposed. I decide the squad will move around the paddy and make use of the cover. I don't want to have the squad caught in the open at close range on the paddy banks if they fail to move fast enough.

In the following Japanese phase (with no further double phases, much to Dave's relief) the squad attempts to close in on the Australian JoP. The jungle extends to the banks of the paddy, so there is no option to move any faster than a normal move. I need to go 8" to get within 4" of the JoP, something close to average dice would get me there, but I roll a 5. The men are being over cautious or having trouble finding their way through the jungle. Though having just benefited from three phases in a row, I hardly feel justified in complaining about my luck.

This does change how I intend to deal with this flank. I have Dave under pressure, but my single squad could find itself in trouble if the Australians can suddenly emerge in strength and respond. I need to make sure I have enough on this flank to deal with whatever may happen. While it is earlier than I had planned to use it, I decide to use the Ruse and move my left jump off point forward the full 18" up to the tree line by the paddy fields. With that I then deploy a second squad on overwatch behind the paddy banks, ready to respond to any Australian deployment.


In hindsight I could have played this so much smarter. I should have had the squad Gocho (JL) create a scout team and send them running along the paddy banks to the jump off point. There's a very good chance they would have made it. At the time it never occurred to me to create a small team like that, but doing so would have removed the risk of having the whole squad exposed on the paddy bank. In fact the rest of the squad could have been on overwatch to cover them. Hmmm, bloody hindsight, don't you hate it?
But now that I am committed on this flank I want to give it as much support as I can. With that one of the Ha Go's is sent up the road to provide additional firepower, or to deal with any flanking move by the Bren Carrier.
For now there is no line of sight between the Ha Go and the Bren Carrier, but any move forward down the road by either vehicle could soon change that.
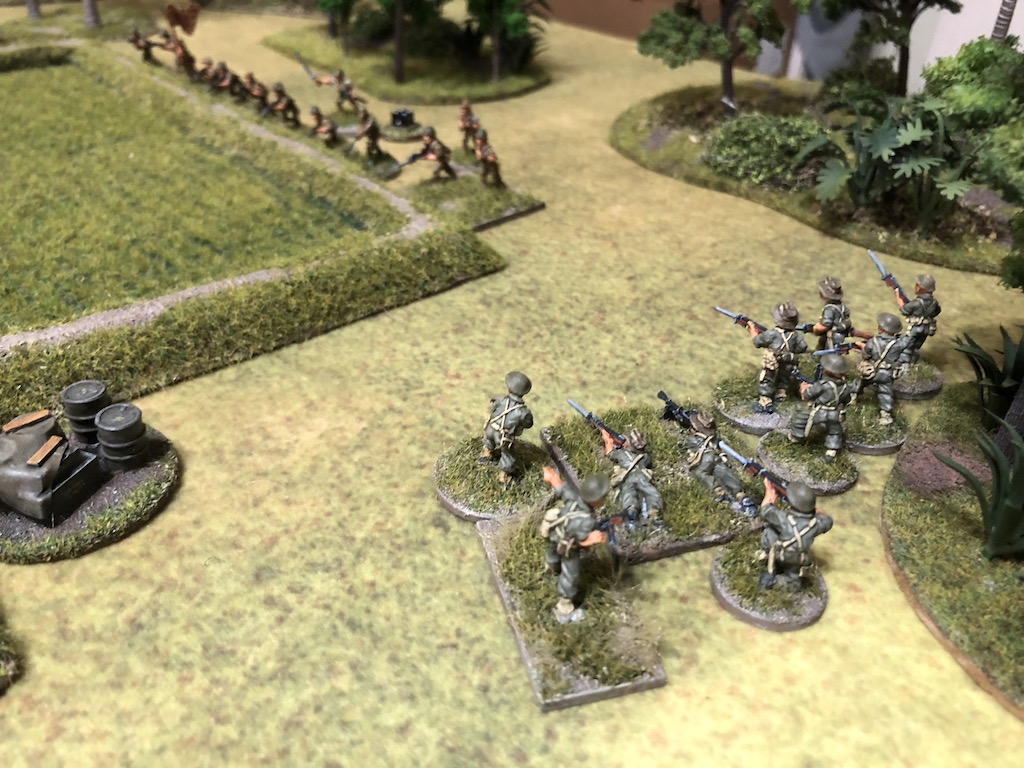
The pendulum now swings the other way with an Australian double phase. It looks like I will regret not taking swifter action to seize that jump off point. The Australians respond quickly and aggressively. A section, accompanied by the platoon sergeant, emerges at the edge of the jungle.
The section corporal orders the men to fire, while between him and the sergeant grenades are passed around. A flurry of bullets and grenades showers the Japanese squad, who lose a man and take four points of shock.
The Japanese squad on overwatch at the other end of the paddy field returns the fire, which proves effective and the Australians lose a man from each team. Fortunately for the Japanese there are no further useful activation dice in the Australian command roll, but they will have to face another Australian phase.
In the following Australian phase the platoon sergeant orders the section to open fire and hands out his last grenades. This time the fire and grenades prove more effective and the Japanese lose three men and take another point of shock.
Two more Australian sections have been lying in wait and now make their presence felt. While these are not full strength having taken a few casualties in the previous scenarios, they are still able to dish out significant fire. The one lesson the Australians have learned during this campaign is to hit as hard as possible, and with the whole platoon now deployed this is exactly what they try to do.
Both sections target their fire at the same Japanese squad. The fire is deadly, with nineteen hits resulting in the loss of another four Japanese men and two more points of shock. So far the Japanese Gocho (JL) has emerged unscathed and does so once again. That said, his command is now a shadow of its former self. It's only the Japanese characteristic of neo-Bushido, which allows them to ignore the first two points of shock, that prevents the squad from pinning.
The Japanese are paying a high price for failing to close down that jump off point. The platoon second in command, the Gunso, deploys and orders both squads to return fire at the Australians.
The Japanese fire is accurate, yielding 15 hits from 20 dice. The Australians lose another two men and take six points of shock. Like their Japanese counterparts the Australian leaders survive unscathed. However the Australians are the ones who can least afford the casualties, so while they may have the upper hand in terms of firepower, they don't want to win this firefight at too great a cost.
I hope I can inflict more casualties and drive the Australians back and so deploy the engineer flamethrower team. It's not the ideal time or place, as they are at the full extent of their range, but I need to try and make this as difficult for the Australians as I can.
The flamethrower can just reach one section at the corner of the paddy fields. The Australians lose one man and see the section corporal wounded and stunned for the rest of the turn. They also acquire two points of shock. The wounded leader sees Australian morale drop two points down to seven.
The Australians are determined to wipe out the remainder of the nearest Japanese squad and two sections concentrate their fire in that direction. Once again it proves effective and the Japanese lose a further three men. Miraculously the Gocho is not one of them, but with another three points of shock what little remains of the squad breaks and flees back into the jungle. At the sight of which Japanese force morale drop down to ten.
Wisely the Australian section on the receiving end of the flamethrower fall back out of range, dragging their stunned corporal with them.
With the full Australian platoon in action it seems the scenario is coming down to the fight for the paddy fields. Having lost a squad I decide I need to even up the balance of forces. There is not much subtlety here, I can afford to take the losses much more than the Australians. My men may hate me for it in the short term, but it may pay off as the campaign progresses. With that I deploy my final squad at the paddy field and fire at the Australians opposite.
The fire inflicts another two casualties and more shock on the Australians. This could become a grim battle of attrition and a test of which side is prepared to take the most losses.
With all squads on the table I deploy the platoon leader, the Rikugun, into the heart of the action where he can be most effective.
He orders the squad nearest him to fire back across the paddy field. Another two Australians are casualties and the platoon sergeant is wounded. This is a real blow to Australian morale which tumbles another two points down to five. While the Japanese have suffered at their hands, things are not looking so great for the Australians.
The Rikugun wants to close in for the kill and sends the flamethrower team around the paddy field. His instructions are to close the range, but the flamethrower team are almost too eager and in their haste are fortunate not to blunder into close combat.
The commander of the Ha Go decides to come up in support and moves quickly up the road, but not quite far enough to come into line of sight of the Bren Carrier.

We seem to have reached one of those decision points that occur in every scenario. Things are finely balanced and it would seem the Japanese have a slight upper hand with the Australian force morale much lower. Dave and I discuss the merits of the Australians continuing to fight. The Japanese can replace their entire platoon if they lose, so continuing to fight could reap further rewards. On the other hand the Australians must consider conserving their force, if they don't withdraw now will they rue the decision with higher casualties and a lost scenario? It's not an easy decision. With the declaration that "heck, it's only a game, I could roll a double phase" Dave picks up the command dice and rolls for another Australian phase. Fate is kind, he gets his wish and the Australians will have a double phase - the lieutenant lets it be known they stand or die. There will be no retreat.
On that stirring note the platoon lieutenant deploys and orders one of the sections to fire at the flamethrower team, which loses a man and suffers a point of shock. No longer attached to the other Japanese squads makes this team rather brittle and I doubt they will be around to see the next Japanese phase.
With that result the lieutenant orders the middle section to fire at the same target, but they only inflict another point of shock. Determined to rid himself of the team the lieutenant orders the third section to fire as well, but once again they only inflict another point of shock. Despite three points of shock on a team of two men the Japanese characteristic that allows them to ignore the first two points means they don't pin.
More alarmingly for the Japanese a Forward Observer team deploys and establishes contact with the mortar battery. This could be deadly, as the Japanese are tightly bunched together and could be trapped in a barrage.
The Australians are pulling out all the stops now and the platoon anti tank rifle deploys and targets the Ha Go.
Despite the obscured target and the fact the Ha Go moved at full speed last phase the ATR round hits the Japanese tank, knocking out the hull machine gun and putting the crew under two points of shock.
All that and the Australians have a follow up phase. Firstly the Australians do a bit of housekeeping and the corporal in the middle section assigns one of the riflemen to the bren team to make good a casualty and rallies off some shock.
Meanwhile the lieutenant orders the section to his left to fire on the flamethrower team. This time the fire is accurate and when the team loses another man, suffering more shock in the process, it's enough to see the lone survivor break and fall back. It's unlikely the flamethrower will be back in action anytime soon.
The ATR team take a second shot at the Ha Go.
They strike again, taking the shock up to three points and stunning the driver for the next phase.
The lieutenant then directs the middle section to fire across the paddy fields. The Japanese lose two men and the Gunso is hit and wounded, stunned for the remainder of the turn. With that Japanese morale takes a drop to nine.
Then in a bold move the lieutenant orders the FO to take a risk and immediately call the barrage down without a ranging shot. The barrage duly comes crashing down, it's slightly off target, but stays clear of any Australians. More effectively for the Aussies it smothers all the Japanese units on that flank. The Japanese lose three men as the mortar rounds rain down and the wounded Gunso takes another hit.

Having spent time making my
barrage markers I forgot to bring them with me to Dave's place where we are playing today's scenario. As a result we have to make do with using the smoke markers in the picture above, rather than use the lovingly crafted barrage markers pictured below.
This riles the perfectionist in me almost as much as realising that the barrage has effectively killed off my hopes of winning this scenario. When it comes to the Japanese phase I announce I will be withdrawing. For the first time in the campaign the Japanese have been repulsed.
To replay this scenario I have the option to approach away from the jungle road and I may have to consider whether I want to do this and benefit from the more restricted terrain (which might limit the opportunities for an Australian FO to bring down a barrage until I am almost on top of them?).
That was a good, close game. Dave was fully rewarded for deciding to stick it out for a few more phases, even when things were not looking like they could go in his favour. Fortune swung both ways and ultimately Dave was able to make the most of his.
Having lost the scenario I have the option to call in a new platoon and, given the high level of casualties, that's undoubtedly the best way forward. The Australians don't have that luxury just yet and despite winning the scenario, their lower force morale won't mean they see more casualties returned. They took nine casualties this time around, which will see four men permanently lost, three wounded and two returned immediately. All up they go into the next scenario with six men permanently lost and three absent with wounds - effectively down a section.
The defeat sees the Japanese CO's opinion drop down to +2, meanwhile the heavy casualties see the men's opinion drop two points down to +1. On the other hand the Australian CO is pleased with the result and his opinion goes up to +1, similarly the men also increase their opinion and are now at +2.
With three games completed in the campaign we can now assess the commander's outlook and the Australian's is 'secure' and the Japanese 'happy'.
If you want to read the game reports of earlier scenarios or other campaigns, this page has all of the Chain of Command
campaign AARs.