The campaign starts to draw to a close as the British finally arrive in the city of Bremen. The British battled through the factory district in
The Road to Bremen Scenario 7 where a weakend platoon of Volkssturm put up a remarkably decent fight before finally succumbing to the superior strength of the British.
So we have now reached campaign turn eight and if the British can win this scenario, then they have won the campaign. The three British platoons have all taken casualties along the road, but the Germans are down to their last and final platoon. However, while they are down to the last unit they are not quite scraping the bottom of the manpower barrel. I have assigned a platoon of Fallschirmjager to defend the last table. I had hoped to be able to add some reinforcements, but my rolls have been abysmal. So far all I've received is one Volkssturm panzerschreck team. No additional units have turned up for this scenario either. The Fallschirmjager platoon will have to do this alone.
The campaign map gives us a very blank canvas for our table. Other than a few roads marked on the map below, it is left to us to populate it with ruined buildings to recreate the devastated city of Bremen.
I used to play Crossfire, a set of rules that requires a lot of terrain and works particularly well for actions set in urban areas, so as it happens I do have a lot of ruined buildings that I scratch built. Despite saying that, it is remarkable how many buildings are needed to fill a 6'x4' table. So Dave and I set about doing our best to create the look and feel of a devastated city. Other than the fact we don't have a cityscape gaming mat, I think it has worked quite well.
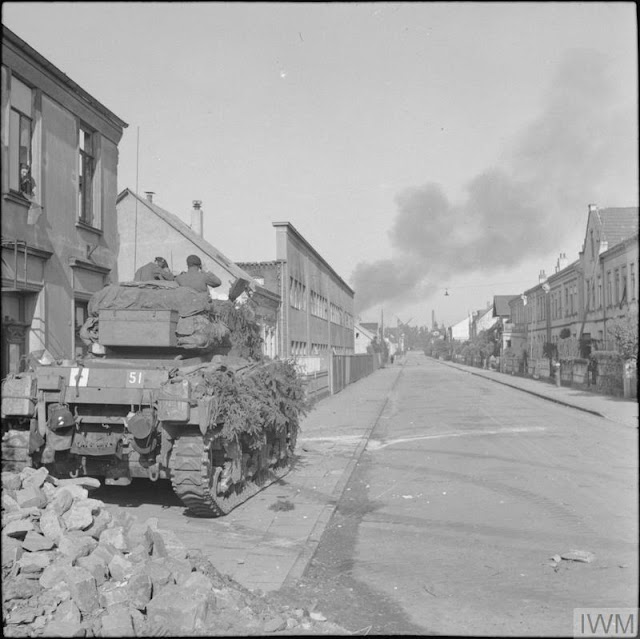
It's not quite Bremen in 1945, but these pictures on the Imperial War Museum website give a good indication of the state of the place. I think we've done okay in our abstracted way.
 |
| copyright Imperial War Museum |
 |
| copyright Imperial War Museum |
 |
| copyright Imperial War Museum |
For this game the British have elected to use the 2nd Platoon, which is now understrength. Their casualties include a couple of NCOs, so both the platoon sergeant and one of the section corporals have been promoted from the ranks. They have lost seven other ranks killed along the way. In effect they will field two full sections and by disbanding the PIAT team, they will be able to make up a weakened third section as a single reinforced Bren gun team. Unlike the Germans, they can call on support and so this weakened platoon will not be asked to do the job unaided.
With the terrain in place we rolled for force morale, with the British starting on 9 and the Germans on 11. A good start for the Germans, who will need all the help they can get.
The British start the patrol phase with two free moves and we end up placing jump off points that cover the flanks and centre of the table. With so much terrain we both want to be sure we can either cover or exploit all flanks. The biggest danger the Germans face is being outflanked. Ideally I can deploy my squads so they can support each other, but in this sort of terrain that's going to be very difficult. I expect Dave to stretch my limited resources so I need to be careful I don't get destroyed in detail.

The last thing we do before we begin is for the Germans to place a stretch of wire to try to limit access down their right flank, this is the final piece of German defensive fortifications allotted to the campaign.
The Germans have the initiative, but other than acquiring a few CoC points there is nothing I want to deploy just yet and so the phase passes to the British. Dave deploys immediately, bringing on a 2" mortar team and his #1 section into the centre of the table, all under the watchful eye of the platoon sergeant. As the sergeant was only recently promoted his command range is limited to 6" and he will only have two CI, so Dave will need to keep him closer to his units than would normally be the case.
I don't want to deploy any of my squads just yet, but I can anticipate lots of smoke from the 2" mortar, so while the team is isolated it seems a good target for my sniper. I deploy and take a shot. With double shock and the chance of a kill, it wouldn't take much to pin or break a solitary two man team. Unfortunately the sniper hits, but it has no effect.
In the British phase the platoon sergeant orders the #1 section to press on and into the ruins.
The mortar team have let the sergeant know they feel exposed under the gaze of the sniper and so he orders them to move to better cover.
The Bren team that constitutes the weakened #3 section deploys on the right flank.
From the road the sound of motor engines heralds the arrival of a Universal Carrier section. This is one of the best support choices for the British, especially at this stage of the campaign. With two bren teams and a junior leader, this is to all intents and purposes an additional section, and a well armed one at that. They look like they are headed to add their support to the right flank.
The next German command roll delivers a double phase. It's one of those frustrating moments when some luck comes your way but it's just not the right time to capitalise on it. However, on the outside chance this turns into a triple phase I decide I should deploy something because I'd hate to see a wasted opportunity. As it is, I need to consider reacting to the British move in the centre and it would be expedient to have the area of open ground covered. I deploy one of my squads from my central JoP and place them on overwatch.
The next German command roll doesn't deliver another double phase and frankly I didn't really expect it to (but you just never know) and so I decide to leave things as they are for now.
The British react cautiously to the German deployment and their section in the centre stays back from the windows, awaiting reinforcement. The platoon sergeant comes forward to join them. Meanwhile the carrier section, as expected, continues to make its way over to the right flank.
Other than gaining a few CoC points there is nothing for the Germans to do just now and so the phase returns to the British. The 2" mortar is told to start laying down some covering smoke.
A section of engineers, made up of a flamethrower and a demolition team deploy in the centre. That's an ugly development from the German perspective, with this dense terrain the British should be able to bring that up into close range without too much bother.
Meanwhile the universal carriers show their versatility over rough ground and make a swift 12" move behind the British JoP on the right flank.
When the third British section deploys on their left flank, my fears of being stretched on both flanks is realised. My three squads are going to be spread very thinly trying to hold back this assault across a broad front.
While the British have deployed most of their force I'm still not clear where the main effort is going to be. It certainly looks like the centre, although there is something of a development on their right flank with the carrier section. I decide it's best to hold back my deployment until I'm sure.
The British continue to prepare themselves to move forward. The sergeant orders the 2" mortar to fire more smoke and he sends the flamethrower team forward into the building.
The carrier section bren teams disembark and move into the building on the right. There are now three bren teams on that flank.
I feel I can't continue to do so little and perhaps I need to try to grab the initiative and disrupt the slow and steady British build up. Rather than wait for a development from the British left flank I decide to take an aggressive stance and deploy my second squad to this flank, in the open and heading towards the British section. I'm cautious and we deploy tactically. I have two senior leaders and so decide to deploy one of them to this flank to make sure my command options are open. If I can make a quick and violent counter attack on this flank and neutralise that British section I may be able to shift all my focus back to the threat from the centre. Well, that's the theory anyway.
The British platoon sergeant sends the engineer demolition team towards the left flank and the wire.
On the far left the British section moves forward out of the building. Exiting and crossing rubble proves tricky and the rifle team get ahead of the bren team. It's not easy picking your way through ruins and rubble.
I've decided to contest the intervening building with that British section and so my squad moves up to the walls.
The British respond, but with the rifle team ahead of the bren team they wait for the bren to catch up, they will need all the firepower they can muster.
And talking of firepower, there's the grinding and squeaking of tracks to be heard as a Sherman rumbles onto the table.
Now is a very timely moment for the Germans to roll a double phase. This is one I plan to capitalise on, there are no British on overwatch and they haven't accumulated a CoC die yet to use for an interrupt. The German feldwebel (SL) orders the squad on my right to probe forward into the building.
Movement is slow across the rubble, but in the subsequent phase the squad moves up to the windows and they hurl out a grenade.
The detonation wounds the British corporal and he's stunned for the remainder of the turn. It's a blow to British force morale which drops to 8. The feldwebel is not far behind the squad and when he joins them he orders them to throw more grenades. They both hit the target and the section loses another two casualties and accumulates shock.
That was a good result and the British try to pull back in their phase, but I have them in the open and I have a CoC die. Now is the perfect time for an interrupt. Both LMGs open fire and it proves devastating. Caught in the open the British are hit 12 times and take 6 casualties. That means the leader is automatically hit again and wounded. British force morale drops to 7. The remnants of the section complete their move and manage to get themselves out of sight. Dave was very unfortunate with his casualty rolls, despite all the hits his section have only accumulated two points of shock - he rolled an awful high percentage of kills.
With his move on the left flank rebuffed Dave turns his attention to the centre where his sergeant orders the section in the building to move up to the windows. I have my squad on overwatch and I'm very tempted to fire, but the flamethrower team has yet to move and I suspect they are my biggest threat, so I hold fire for now.
The 2" mortar fires another round of smoke, this time right in front of one of my LMG teams. Perhaps I should have fired earlier? Too late now.
On the British right the platoon lieutenant deploys and orders the carrier section teams and the section to move forward across the road. I can sense British firepower building up here.
I can't ignore what is happening from the British right flank, but I'm determined to finish off the British section on their left. I plan to close in for some close combat, but my squad doesn't quite move close enough and so I fling my last grenade. It hits and kills the last rifleman from the rifle team, with the loss of that team British force morale drops again, down to 6. In hindsight I should have used the German
handgranaten characteristic for a flurry of grenades and more movement dice.
In the centre I finally fire one of the LMG teams across to the building occupied by the British section, but the hard cover means the fire has little effect. Meanwhile there is no point the other team remaining where they are blinded by the smoke, so they try to slowly work their way to the other side of the building.
The British start to bring up more firepower in the shape of the Sherman, which moves forward carefully over some rubble and takes up an overwatch position that dominates the road.
The platoon sergeant orders the flamethrower team up to the edge of the building and moves forward himself so that he can continue directing the men.
On the British right the lieutenant coordinates the fire of the three bren teams and they pour fire at my LMG team in the central building. There's a lot of fire and I'm lucky to get away with only three points of shock.


I'm determined to make the most of the opportunity to finish off what remains of the British section on their left flank and in so doing drive down their force morale. The feldwebel orders the squad to advance into close combat. Despite the disparity in numbers the close combat ends up at 12 vs 6. The German assault is decisive inflicting six kills, while the British can only inflict one in return. With both the corporal killed and the bren team wiped out British FM drops to four. The German squad can congratulate itself on wiping out an entire British section at the cost of a single casualty. I took a gamble acting so aggressively on that flank, but it has paid off. Now what I need to do is bring that squad over towards the centre where it can help counter the growing British presence.
The increasing British firepower is making it difficult for my single LMG team and so the obergerfreiter (JL) rallies off a point of shock and tells the team to fall back from the windows.
The German sniper, who has been quiet up until now takes a shot at the flamethrower team, but misses.
The British are now down to only four command dice which I hope will limit their options. However Dave shows no sign of holding back and the platoon sergeant orders the section and flamethrower team to advance out of the building to take advantage of the withdrawal by the German LMG team. The carrier section teams edge forward into some rubble, but find the going very slow.
The bold British advance demands a response and I deploy the final German squad from the JoP on my left flank. They engage the section and the engineers, however they are not totally exposed as the intervening mounds of rubble and debris provide them with light cover. The fire is disappointing and only manages to inflict a point of shock on each team.
I need to bring more fire to bear and so the obergefreiter in the centre rallies off another point of shock and orders the LMG team to move slowly to the window and open fire. Any roll but a one will do it and so, of course, I roll a one and the squad remains static.
With the British section on their left out of the way, the German squad moves forward to close in on the British JoP.
Having pushed hard against this flank I'm trying to work out how best to take advantage and try to turn the British flank. There is one problem though.....the Sherman. It has the road well covered and is on overwatch. If I enter the building with the JoP I will also be in line of sight. I don't think I can afford to be cavalier with my squads, so I'm uncertain what is my next move. One thing is certain I really need to find a way to get that squad into action. If I move across the road I risk at least two rounds of fire from the Sherman (overwatch and the British phase) and given I will be in open ground I fear that will prove too costly.
 |
| We are on the British flank but..... |
I found the picture below, taken in Bremen, on the IWM website and I think it pretty well sums up the situation on our table.
 |
| copyright Imperial War Museum |
In the British phase I'm in for a rude shock when I discover my newly deployed squad is in range of the flamethrower. I had not planned on that. The British section targets the squad first, but only inflicts a point of shock. I wish I could say the same for the flamethrower. The platoon sergeant orders it to fire and its first squirt causes two casualties and six points of shock. The obergefreiter is one of those hit, bringing German force morale down to ten. The sergeant then tells the 2" mortar to use up one of its three HE rounds to try and inflict more casualties, but it has no effect.
Ominously for the Germans, on the British right the lieutenant orders the carrier section teams to move up the road while the other section's Bren team advance to their left. If I'm not careful I'm going to be flanked here and even attacked in the rear. This is where I could really do with another squad, but it's trapped on the other side of the table.
With the growing threat from the flamethrower the Germans deploy their leutnant and he rallies off as much shock as he can. With that done the obergefreiter orders the team to pull back, but with all their shock they are unable to move fast enough through the rubble. I sense this team may be in a lot of trouble.
The German ability to move quickly across the rubble doesn't get any better when the squad in the centre looks to align the two LMG teams behind the wall of the ruins, but somehow I manage to roll two consecutive snake eyes for movement rolls. The Germans are having real problems responding quickly at the moment.
No surprise in the following British phase to hear the platoon sergeant order the flamethrower team to fire once again. The German squad takes a further two casualties and another six points of shock. The obergefreiter is wounded again, this time he's stunned for the rest of the turn and German force morale drops to nine. The sergeant follows this up by ordering the section to contribute its fire and another German falls, which is enough to pin the squad. With a flamethrower on one side and a flanking move on the other, this pinned squad has found itself in a bad spot.
The British look to make the most of this and the carrier section teams are told to move on the double down the road, but much like their German counterparts they are finding movement in this terrain difficult and they only manage to move 6".
At this critical moment another double phase for the Germans is very welcome, but I'm not sure it's going to be enough. The leutnant uses all his CI to rally off shock. With the obergefreiter out of action there is little else I can do on that flank.
The squad in the centre finally gets it's act together and one team moves forward to the windows and opens fire at the section and flamethrower team. With targets in the open the fire inflicts two casualties, one of which is the section corporal who is wounded. This takes British FM down to three.
My squad on the right flank is also finding the terrain difficult and barely moves - that's the third double one I've rolled for movement in the last few phases.
In the subsequent phase the LMG team in the centre fires again and the British take another casualty and more shock. The second LMG team tries to move to the window to fire but only manages to roll a 1 for movement and goes nowhere once again. Very frustrating, the Germans must have lead weights in their boots today. Meanwhile the leutnant rallies off as much shock as he can from the squad on my left.
On my right the squad slowly works its way through the rubbled building. I'm under real pressure on my left and centre and it is very frustrating having a full squad out of the action like this. They've done some fine work on this flank, so I shouldn't complain, but now I need them elsewhere.
With British force morale so low they are restricted to three command dice, so this should take some pressure off the Germans. Their command dice are 621, but that doesn't stop the flanking teams from the carrier section trying to move into close combat. Fortunately they don't quite have the movement to get into the building, but it won't be long before they are there.
The flamethrower team uses up the last of their fuel on my squad in the centre where the Germans take one casualty and six points of shock. At least that's sees an end to the flamethrower.
In the German phase the leutnant rallies off two points of shock and then orders the pinned section to fire, causing the British two more casualties and some shock. I'm slowly whittling down their numbers and with the flamethrower out of fuel they are much less of a threat. The centre squad manages to bring all its fire to bear when finally the second LMG team makes its way to the windows. The engineers lose a man and enough shock is accumulated to pin the team.
On my right flank we make slow progress through the ruins.
The next British command roll is 653 which limits action to a single section. No surprise this comes on the British right as the carrier section teams close in on my pinned squad. They throw some grenades, but they have no effect and then storm into the building. The Germans are pinned and attacked from the rear, but despite this the odds are not quite 4:1, with a 14 to 4 combat. The Germans suffer five kills and the British come away unscathed. The leutnant is wounded, one team is wiped out and the survivors rout. I use this opportunity to use the campaign benefit of the Fallschirmjager to decline two rolls on the force morale table and now seems the best time. I can't avoid the roll for team wiped out and German FM drops by 1. The victorious British teams occupy the recently vacated building.


In the German phase the centre squad continues to fire on the section and flamethrower team. They take another three casualties, but the leader manages to avoid being hit, however it's enough to see the engineers break and the section's bren team wiped out. With that British FM drops to two.
Even with British morale so perilously low Dave stills senses an opportunity. The Sherman has effectively isolated one German squad; the men from the carrier section have broken another squad, and the German centre squad is rapidly accumulating shock. If the British cannot win this scenario then at least they can degrade the German platoon for the next one. This is exactly what they set about doing in their next phase. The carrier section bren teams join the bren team from the weakened section and fire at the centre squad. The Germans take another casualty and enough shock to see them pinned.


The scenario is on a knife edge. British FM is very low and while German FM is much better the centre squad could find itself in some trouble. The obergefreiter commanding the centre squad rallies off a point of shock and has the squad fire on the remains of the section in the open. The Germans have some shock and are pinned, so it's not a lot of firepower and the best I can do is add to the British shock.
The next command roll sees the British learn the cost of playing with three command dice when they roll 555. CoC points are always handy, but not when you need activations.
The German centre squad fires again, inflicts a point of shock and that's enough to pin the section. In the following British phase the carrier section moves out of the building and aggressively towards the flank of the Germans in the centre.
With the German squad pinned their best option is to keep on firing, which they do and that's enough to cause another British casualty and break the section. Dave uses the CoC die he's just acquired to wisely negate the need to roll on the force morale table.
The British decide to move the bren team from the weakened section so they can close on the Germans in the centre. They are moving in the open and I have a CoC die and this seems a good moment as any for an interrupt. Despite the fact my squad is pinned they can still dish out some firepower. It has instant results, causing two casualties, one of which is the corporal who is stunned. Fortunately for the British this doesn't impact their force morale.
The British carrier section moves closer to the Germans in the centre, but the rubble makes movement difficult. That doesn't stop them throwing a grenade, but it only adds a point of shock.

With the British edging very close to another close combat, which they have a good chance of winning, I need to do something to wrestle back initiative. My command roll is not great - 65541. I decide I should use the one to deploy the panzerschreck team and try to take out the Sherman. It will require the team to deploy in the road and should they fail to take out the tank, there's a good chance they will be wiped out before they get another shot. The last time I did this, during the battle in the factories, I took out a Sherman but the subsequent loss of the panzerschreck team cost me heavily in force morale. It ends up being academic when the team fails to deploy (all my senior leaders are on the table). If I could distract the Sherman I might have been able to move my squad across the road. Not in this phase.
The British respond aggressively. The bren team from the weakened section fires at the centre squad, killing a German. The carrier section teams follow this up by throwing grenades that kill another man and inflict more shock. At this point they move in for the kill and attack in close combat from the rear. The odds are more than 4:1, which automatically breaks the squad and they fall back 7" suffering a further 8 points of shock (they now have 16 points of shock). No surprise to see German force morale drop to six.
 |
Despite their morale near breaking the British have continued to attack doggedly and been rewarded for their aggression. What can the Germans do to try to rescue the day? It's obvious to me - that Sherman has to go, whatever the risk. |
In the German phase the panzerschreck successfully deploys. The range is 38" but the team deliver the goods and land their rocket on target. The AP strike is 7 and the Sherman can only counter with 3 saves. For once a British Sherman doesn't burst into flames, but it is knocked out and the loss of support takes British FM down to 0.
 |
Well, that was another intense game that could easily have gone either way. The early German success wiping out the British section was countered by a strong British attack on the other flank that shattered two squads in close combat. Once again British armour proved more of a liability than an asset. Perhaps I should have deployed the panzerschreck team earlier and released my squad to cross the road safely? |
With a British defeat on campaign turn eight, their chance for complete campaign victory has passed them by. If they can win the next one we will see the campaign end in a draw and if by some miracle the Germans can hold on for one more game we could see a German victory. That's a big 'if', as the Germans must do this with ever dwindling resources.
Despite the German close combat defeats their casualties were much less than the British. The Germans lost twelve men, but with the net difference in FM at six, half of those casualties are patched up and return immediately. Overall the Fallschirmjager platoon will be down five men for the next game.
On the other hand the British lost twenty men, two were from support teams but eighteen were from the core platoon, which leaves that platoon with a total of nine effectives. They can now disband the platoon if they wish and make up the numbers in one of the other two platoons. That means they will be able to bring one of the other platoons up to full strength for the next game.
This has turned into a finely balanced and really enjoyable campaign, but how long can the Germans continue to put up resistance? Will the weakened platoon see any reinforcements, any hope that they can hold on for one more scenario? You can
find out what happens next here.
You can follow all the campaign AARs here
Chain of Command campaign AARs


