We reach the final game in the Kampfgruppe Von Luck campaign. The Germans have eight games to achieve victory and this will be their eighth. In the best possible way, this has come right down to the wire.
We have battled over this terrain once already (
Von Luck Campaign Scenario 5 'Delaying Action at the Chateau') and the ground bears the scars of recent battle. A key building has collapsed under the impact of a 150mm HE round from a German Lorraine Schlepper. That very same vehicle, victim of a PIAT round, now sits as a smoking hulk blocking one of the narrow, wall-lined lanes that lead to the chateau. All the while the clock is ticking. The Paras know relief is on its way and Von Luck's men know that time is not their friend.
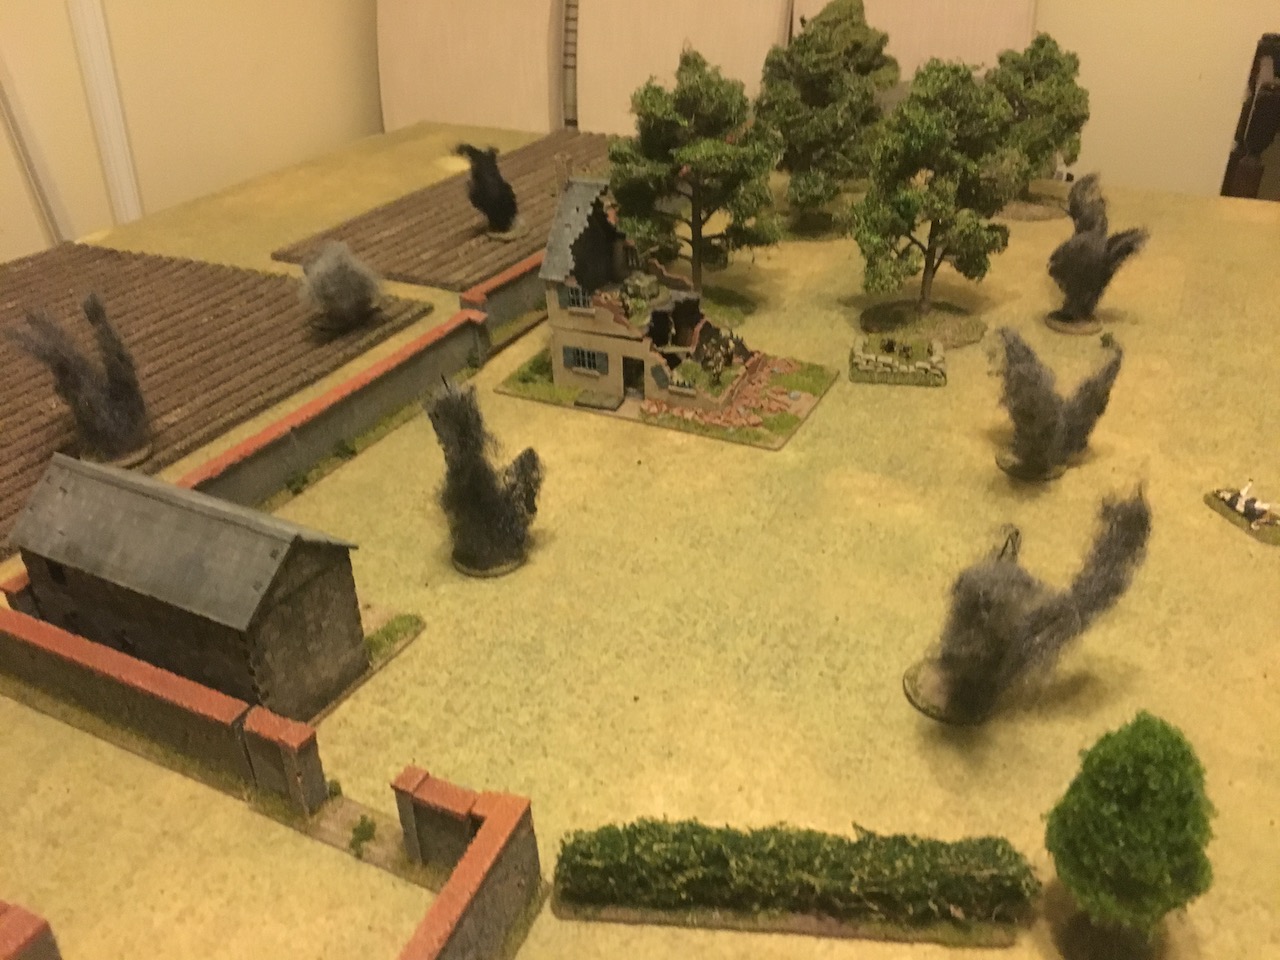
 |
| German view of the table |
 |
| As the Paras see it |
 |
| The wreck limits vehicle access to the chateau |
With the wreck blocking the road Dave's options for his vehicles are a little more limited. That said, I don't think this is a real problem for him, as the alternatives are all viable. Based on the last scenario my gut feeling is that he will try a flanking move through the ploughed field and over the wall. He made good progress on that flank last time and was only brought short when his attack on the other flank suffered considerable loss. So, my thinking is, he will set up a strong base of fire behind the hedge, most likely including a forward observer and this will cover a main thrust across the fields and around the flank. A diversion on my left flank will have less ambition and simply try to pin me in place.
 |
| How I think the Germans will advance |
So, how do I plan to counter this? My thoughts are that I will need to have at least one section, if not more, dug in ready to counter the main thrust across the ploughed field. This small force won't be quite enough knowing the strength of German firepower, so for the first time in the campaign (and with the luxury of enough support points), I plan to call on a mortar battery and have the FO on that flank if needed. With the FO attached to the squads and with everyone entrenched we will present any Germans behind the hedgerow with elite troops, in hard cover, at effective range. That's about as good as it's going to get. Unfortunately, the Para battery is only two mortars, so we won't cover off as much area as a full battery, but I'm hoping it will prohibit movement through the field and block line of sight.
 |
| The Paras defence plan |
I will aim to place jump off points so that I can defend the field from Area 1 and then form a base around the ruined building in Area 2. If the defenders in Area 1 are overcome, then it will be up to those in Area 2 to defend the victory jump-off-point. So that's the plan, but will it survive first contact?
I have nine support points and so use them to bring in the mortar battery, an additional section and an entrenchment for a team. I also receive three entrenchments at no cost as part of the campaign. Dave has four less support points for this scenario replay, but that still leaves sixteen points, which gives him several options. I'm expecting to see a FO, a Lorraine Schlepper, an additional squad and a second Senior Leader in the mix.
The Force Morale rolls see the Paras start on ten and the Germans on nine. The Patrol Phase is not much different from the previous game, except this time I have a jump-off-point in the ploughed field.

The command phase starts off with the Paras rolling a double phase. Deja vu, that's nothing new. Good news is, I also roll a few 5s in both rolls and while I don't deploy anything yet, it means I have a few CoC points amassed.
Dave's first deployment is on his right flank in the chateau grounds, where a squad deploys in front of the gatehouse. This I suspect will be part of his diversionary force, but then he surprises me a little by driving on the S307 Pak40 on the same flank. I take the opportunity to deploy a sniper into the ruins and begin taking shots at the squad in the open. No kills, but some shock.
 |
| The Para sniper takes a shot |
 |
| No kills, but a bit of shock. |
 |
| I've had trouble from one of these before.... |
The next deployment sees a squad turn up on my right flank near the hedgerow. This is where I expect to see the main German force appear, so no surprise.
 |
| The first Germans appear on my right flank. |
A German senior leader also turns up on this flank which inclines me to think my hunch may be correct. It's still too early to see what Dave has planned, so I'm cautious with my deployment until I see more. Dave moves the squad on my left to the hedgerow so that he has a line of sight to the ruined building. I decide to make the most of this before more Germans deploy and bring on my FO into the ruined building (yes, I know, he is supposed to be covering the other flank, but he does have a line of sight to there from the upper level of the ruins).
 |
| The FO team joins the sniper |
The Germans fire at the FO, but to no effect. The Pak40 rumbles closer. Surprisingly and somewhat rashly the German squad on my right decides to advance over the hedge into the ploughed field. No more Germans deploy, which has me a bit confused, as Dave normally builds up a very solid fire base before advancing. So, what has he got planned here then? Regardless, I need to use my next phase to get some other teams on the table so the FO is not a lone target.
 |
| A bold move into the open for the German squad |
I then have a stroke of good fortune with a double phase. I really feel I may have an opportunity here, for the Germans don't seem as well coordinated as usual. I'd like to try and catch them while they can't bring their full force to bear. For my first phase I deploy a section on the ground level of the building and the 2" mortar, while the FO calls in a ranging shot.
 |
| The 2" mortar and a section deploy |
My hope is to inflict some hurt on that German squad on my left. The 2" mortar is there to blind them with smoke if my fire is ineffective. The FO's first ranging shot was a little wide of the mark, but not much and the section's fire inflicts casualties and shock on the German section. The 2" mortar pops some smoke, but it's also off target.
 |
| Ranging shot and smoke both wide of the mark |
I roll for the second phase and lucky me, this turns into a triple phase. Luck is on my side and I need to take full advantage. There is a German squad in the open in the ploughed field, it's not on overwatch and there are no other units to provide covering fire. That's a good target and I've got two phases, so I deploy the Para Bren section, entrenched into the ploughed field. Dave has a CoC dice which he could use for an interrupt (if only to get the squad in the field back into cover behind the hedgerow). He decides not to use it.
 |
| Two bren teams deploy |
The fire from the two bren teams is very effective and causes three casualties and some shock. The German senior leader is hit and wounded. German morale drops by two.
Meanwhile on the other flank the Para section fires into the squad behind the hedge, inflicting further casualties and shock, while the FO adjusts the barrage and brings it down. With the German squad's cover reduced the barrage inflicts further shock. That would be enough to pin the squad were it not pinned already by the barrage.
The next phase is mine, so it's simply a case of repeating what I've done. The barrage continues to take a toll on the German squad and the Para Bren section inflict further casualties on the exposed squad in the ploughed field. The combination of triple phase and the fact the German deployment is unsupported means I've really been able to inflict some loss on these two squads, with none in return.
 |
| The squad is down to three men and the JL. |
When Dave finally gets a phase he moves the Pak40 closer into the chateau grounds.
Meanwhile the squad leader in the ploughed field frantically throws a smoke grenade to mask his battered squad from the bren teams.
At this point Dave plans to retaliate with a barrage of his own and his FO team position themselves carefully behind the wrecked Lorraine Schlepper.
With both German squads out of my line of sight (one behind his own smoke grenade, the other in the barrage) I fire on the FO team, but they are tough to hit and I have no effect. At this stage I'm beginning to wonder where the rest of Dave's platoon is. He has at least one more squad from the core platoon and most likely a support squad as well.
Dave calls in a ranging shot for the barrage which lands on target in the ruined building, but doesn't cause any casualties. Dave and I both have a CoC die and clearly we are both thinking of how we can use them to end each other's barrage. Dave brings the Pak40 around on the flank and turns it to target the ruined building.
In my phase I activate the FO and we adjust the barrage, if I move it the full 6" it can just get the Pak40 while still hitting one of the LMG teams in the squad. So I adjust the barrage and it comes crashing down, destroying the Pak40. That brings German FM down once again.

This is just in time, as it's now Dave's turn to have some luck and he rolls a quadruple six. The random event is a wine cache which brings his flagging force morale up one level. That does mean my barrage could end, but I can't complain, it's done good work, however I use my CoC dice to keep it going. The quadruple four is a mixed blessing as it limits his command options. Next phase the FO can't be activated so the German barrage is delayed. However he takes the opportunity to extract his reduced squad from the ploughed field and get it back behind the hedgerow and out of harm's way. With his FM sinking fast there's no point leaving them to be sacrificed. Meanwhile, I try to take out his FO but he's found some good cover behind the wreck and it comes to no effect.
Dave decides to use his CoC dice to end the turn at the end of the following phase, which removes my barrage and frees himself up for his barrage. The German squad that was under my barrage is in bad shape, the seven surviving men have eleven points of shock and they are close to breaking. I make this my priority as his force morale is now only five. In my next phase the Para section in the ruined house fires on the squad, inflicting two casualties and more shock. They break and fall back, and German FM goes down further. That's two squads of panzer grenadiers effectively written off for this game and the Paras have hardly been scratched.
Dave is not about to give up though and brings his barrage down onto the ruined house. The Paras take two casualties, including a wound to the junior leader.
A third German squads deploys to the left of the wrecked Pak40 and a fourth on my right flank.
 |
| German squad deploys on my left |
Things are not looking good for the Germans. Their morale is down to four and the Paras are all in good shape and they still have units to deploy. Up until now Dave has coordinated his German attacks very well, but I feel something has gone awry this time. In this case I think it's a combination of my good fortune with the triple phase and that lack of coordination in the German deployment.
I have a CoC die with five points and my next phase command roll includes a five. Given I'm under the barrage there's nothing I can really do, so with my newly acquired CoC die I end the turn. This removes the German barrage and causes the broken German squad to rout off the table taking the junior leader with them. German FM goes down to three. Things are looking desperate for the Germans. In Dave's next phase he activates the FO and rolls to see if he can connect with the mortar battery, but things have definitely taken a turn for the worst, he rolls a one which means he's lost the battery completely. That was the last straw and what has been inevitable for the last few phases occurs when Dave admits defeat.
That was shorter and a lot more one-sided than I think either of us were expecting. Dave quite rightly pointed out that with every German defeat the root cause has always been the same - moving too hastily, in an uncoordinated fashion, before a solid firebase had been established. Whenever Dave has taken his time to deploy and cover all forward movement with a number of fire options the Paras have been unable to stop them. As with the previous playing of this scenario my Paras were able to capitalise on this by concentrating their fire on individual German squads that were isolated from other German units. Having consecutive phases certainly helped the Para's cause, but I don't think they would have been quite as successful had the Germans been better supported.
The lesson then, is that a platoon must fight as a platoon. Units should provide mutual support and by doing so, bring maximum fire to bear to suppress the enemy and allow for manoeuvre. The best way for a defender to counter this is to find a way to isolate individual units and write them down. And, if you are lucky enough to get a moment of good fortune, then make the most of it while you can. Those opportunities are fleeting, but they can tip the balance.
So ends the Von Luck campaign. The Paras finally triumph, but it was a close run thing. A gripping campaign that went the full distance, you can't ask for more.
You can follow more campaigns at the
Chain of Command Campaign AARs Page.