. A change of tactics to rely on the skirmishers paid dividends and helped turn back a superior British force. Is this something the rebels can repeat?
This will be the fourth game in our five game Sharp Practice campaign set around New York in 1776. Major Petrie, the British commander, has received news that a prominent local loyalist is being held prisoner near a large orchard. He's determined to rescue him and reassure the loyalist community that the King's men are there to protect them. He must draw on his persuasive skills to convince the local militia to release the prisoner and then bring him back safely. If quick he may be able to avoid running a gauntlet through rebel held orchards.
This is a Rescue Mission scenario from the main Sharp Practice rule book. The British have a deployment point near the house where the prisoner is held. However they must also protect their primary deployment point which will be in one of two halves of the right hand table edge. The Americans will be coming from one of the long edges, possibly both if they have any skirmishers who can use a movable deployment point, but they will be feeding in their units piecemeal. They can deploy no more than one leader and his unit each turn. If the British can build up their force quickly and waste no time convincing the militia leader to release the prisoner they might find they can stay one step ahead of the rebels.
Major Morris, the rebel commander discovers that two groups of State Line under a Captain Horton have come to his assistance, as have a group of frontiersman skirmishers. The latter can make use of a movable deployment point and this will enable the Americans to take advantage of deployment points on both sides of the table. That should keep British attention divided, but much will depend on how fast the rebel forces can arrive. Initial deployment points are set out in the map below.

This looks like a tough assignment for the Americans, as they have to prevent the rescue of the prisoner while ensuring their primary deployment point is secure. If the British capture it before all the rebels have deployed then things would become difficult, if not impossible. As the rebels I think it will be a matter of deploying whatever unit is available and hoping the others arrive quickly. I'm also concerned about all the open ground, as this plays to British strengths, not least their light dragoons. Major Morris and his Continentals have already witnessed first hand the impact they can make when they catch men in the open.
We start with British force morale at eleven and American at nine.
Turn 1
British Command Card drawn (British:1 American:0)
The Americans have the opportunity to deploy immediately and Captain Horton arrives with the State Line who should be able to stall any early British attempts to capture the deployment point until more units can arrive.
The first redcoats, under the command of Captain Winston-Smythe, appear from the British primary deployment point.
Almost instantly they present a threat to the State Line who could find themselves sandwiched between two British forces.
Despite drawing the cards for several American leaders I must now wait until Turn 2 before I can deploy any more. Tiffin can't come fast enough.
Lieutenant Parker-Edwards arrives with the British light infantry from the British secondary deployment point.
The State Line already appear horribly exposed, with the enemy to their right and left.
The light infantry waste no time and open fire.
They inflict a single casualty and four points of shock, then reload. Immediately that puts Captain Horton's command between a rock and a hard place. They must move to cover, or at least further from danger, but with British to both sides of them any shock they suffer will make a forward move in any direction that much more difficult. This does not bode well.
British Command Card drawn (British:2 American:0)
British Command Card drawn (British:3 American:0)
Speed is the key for the British and so Dave uses the three command cards to deploy Major Petrie and his regulars from the secondary deployment point. One group accompanies him to the door of the house where the prisoner is held, while the other group joins the light infantry facing the State Line.
Petrie orders them to open fire.
The rebels lose another man and suffer a further point of shock. The regulars then reload. British musketry is already taking its toll, putting Captain Horton in a tight spot.
Major Petrie knocks on the door of the house to confront the militia sergeant who is holding the prisoner. The sergeant is suspicious but Petrie is both charming and very persuasive. He somehow manages to convince the sergeant to release the prisoner into his custody.
It's only Turn 1 and already things are looking rather bleak for the Americans. The State Line have enough on their hands surviving British musketry never mind trying to prevent the rescue of the prisoner.
With things going very much the way of the British, matters only grow worse with the arrival of Captain Carr-Clarke with his light dragoons.
Tiffin Card drawn (British:0 American:0).
Turn 2
Tiffin Card drawn (British:0 American:0). This causes a Chapter End but it's too early in the game to have any impact.
Turn 3
The Americans have the option to deploy Lieutenant Carroll with his militia skirmishers. However, until the frontiersman skirmishers have used the secondary deployment point and opened it up for other units to use Carroll can only arrive via the primary deployment point. His skirmishers are most comfortable in cover and the only protection near the primary deployment point is the orchard. With the light dragoons and two groups of regulars heading in that direction I can't see going there as a wise deployment. I decide to hold them back for now and see what other opportunities present themselves this turn.
As if to confirm what I feared, Captain Carr-Clarke has his dragoons canter into orchard. There would have been no safety for the skirmishers in that orchard had they deployed there.
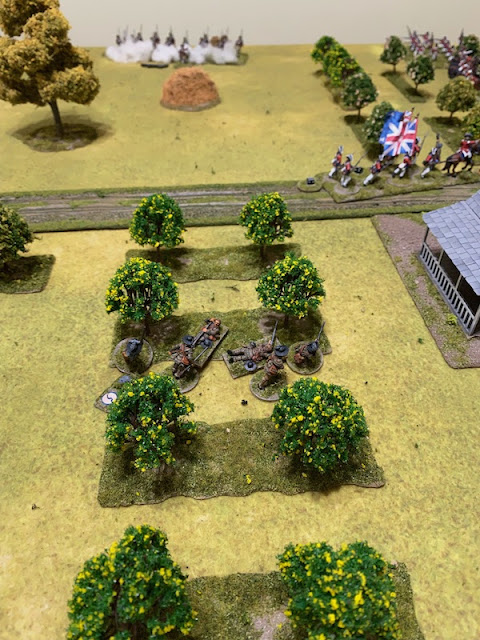
The frontiersmen are then able to deploy and I think this is a much better option for the Americans. They come on from the secondary deployment point on the opposite side of the table to the State Line and straight into the nearest orchard.
If nothing else they will keep the British looking over their shoulders and hopefully they can make it difficult for Petrie and his regulars to move off with the prisoner.
American Command Card drawn (British:0 American:1)
American Command Card drawn (British:0 American:2)
British Command Card drawn (British:1 American:2)
The three command cards in a row trigger a random event and something in the result tells me that today is not going to be the rebels' day. The leader of the frontiersmen is barged over by his men in their enthusiasm to get forward. In something akin to a friendly fire incident he's knocked to the ground and will spend his next activation dusting himself off and getting back to his feet.
On the other hand, Major Petrie is full of energy and uses the British command card to increase his command initiative to four.
He uses two of those CI to have each group of light infantry fire at the State Line. Somewhat surprisingly and much to my relief there is only one hit and that has no effect.
Undeterred they reload and move out of the animal enclosure.
Petrie then activates the other group of regulars and orders them to move forward and fire. They barely move forward at all and their long range fire has no effect on the State Line.
Major Petrie now prepares to make his getaway. He has the prisoner and the group of regulars with him run along the road in the direction of the primary deployment point.
They don't waste any time and cover 15" in a single move.
At this rate the game could well be over before most of the rebels have deployed!
The British four pounder arrives and at this stage the British position looks unassailable.
American Command Card drawn (British:0 American:3)
Lieutenant Campbell card is drawn but his militia skirmishers must continue to wait before they can deploy as the frontiersmen have already taken the solitary rebel deployment opportunity for this turn.
American Command Card drawn (British:0 American:4)
That's four American command cards in play but for now there isn't an opportunity to activate a leader for a second time. I think my best hope is that Captain Horton can activate and put all four cards to use.
British Command Card drawn (British:1 American:4)
Major Morris's card is drawn but he also must wait on the sidelines.
Finally Captain Horton is able to activate and I intend to use all four of those American command cards to get as much out of him and the State Line as possible. The first thing he does is use one flag to increase his command initiative to three and he rallies two points of shock.
He can see Major Petrie trying to make his way along the road and Horton's best opportunity to slow or halt that move is to have his men fire. It will be at long range, but he can have them present and make a controlled volley and benefit from first fire. He will use the remaining three cards to have them deliver a crashing volley and double any shock. This may be the best and only chance he will get to halt Petrie's progress.
The State Line send a hail of musket balls towards the road. None of the regulars are hit but the crashing volley results in six points of shock. Who knows, had fortune been kinder they may have hit Petrie himself? As it stands there's not even enough shock to force an involuntary withdrawal.
That's the only controlled volley the State Line can make and it leaves them unloaded.
British Command Card drawn (British:2 American:0)
British Command Card drawn (British:3 American:0)
Captain Winston-Smythe activates with his regulars and uses the three British command cards to have his men use Step Out to move forward.
That they certainly do, covering 17" in a single move.
The British are fleet footed today and this piles the pressure on the State Line who really do look like they are in a bad position.
Tiffin Card drawn (British:0 American:0)
Turn 4
American Command Card drawn (British:0 American:1)
Lieutenant Smith's card is drawn, he is the junior leader with the militia skirmishers and so he can't bring them into action.
British Command Card drawn (British:1 American:1)
American Command Card drawn (British:1 American:2)
Tiffin Card drawn (British:1 American:2)
The first American command card is used to have the State Line reload and fire at Major Petrie once again. This is a desperate attempt to halt Petrie's progress and leaves the State Line firing uncontrolled volleys.
It wouldn't take much shock to send Petrie and his men reeling back, but the fire inflicts only a single point of shock, enough to equal the number of redcoats but not exceed it.
The British command card is used to move Petrie's group closer to the orchard and further out of harm's way.
The final American command card is used to have the frontiersmen advance as fast as they can through the orchard towards Petrie.
This may be the last chance the rebels get to halt his progress.
Turn 5
Lieutenant Campbell with the second group of regulars on the road decides to have his men seek out the frontiersmen in the orchard with their bayonets. They need to move a fair distance to make contact and will need to roll a nine or more to make it. I consider whether the frontiersmen should try to evade, but that would probably mean they end up either out of the cover of the orchard or too far back to fire on Major Petrie and the group with the prisoner. I decide to hold my ground and gamble that the British won't make it this turn. That turns out to be a bad judgement call. Campbell's men move fast enough to just make contact.
The British show their customary aggression with the bayonet and the frontiersmen suffer four casualties and three points of shock. To make matter worse they fail to inflict any casualties in return. It's a completely one-sided affair.
The skirmishers are thrown back 18" out of the orchard and suffer more shock. Their leader is one of those taken casualty and he is knocked unconscious.
It's a complete debacle that drags the rebels' force morale down to eight.
American Command Card drawn (British:0 American:1)
Major Petrie rallies a point of shock from his group. It's not entirely necessary because now that they are moving away from the enemy they are not impeded by shock. He leads them into the orchard.
This brings him into command range of the dragoons and ominously he orders them to canter through the orchard towards the State Line.
For once the British don't move quickly and the dragoons have trouble making their way through the orchard trees as fast as they would wish. This spares the State Line, but for how long?
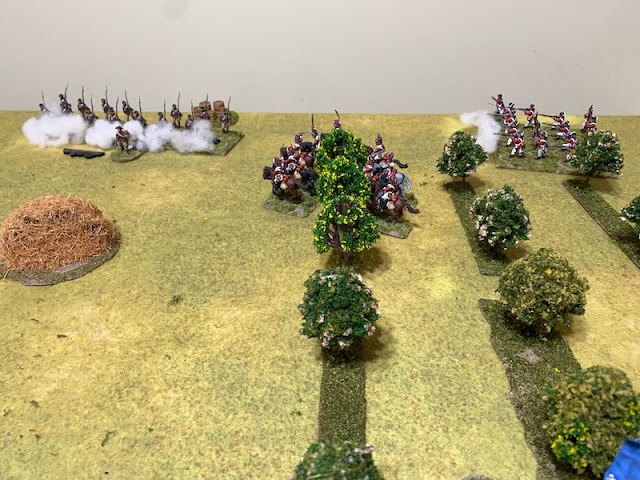
Captain Winston-Smythe and his regulars are also closing in on the State Line and he has the group leading the column present and fire.
The rebels take another casualty in each group and suffer two points of shock.
Somehow I sense this is just softening up the State Line before the dragoons charge into them.
The leader of the frontiersmen continues to have a bad day. Knocked off his feet by his own men when they first arrived, he now lies stunned after rough handling by the British regulars. He's unable to come to his senses and get back into action just yet.
British Command Card drawn (British:1 American:1)
Captain Horton now has a chance to prepare his men for the inevitable arrival of the dragoons. He succeeds in bringing them under control and uses the one American command card to increase his CI. He rallies a point of shock and has the group nearest the dragoons break off from the formation and turn to face the cavalry. They reload, ready to receive them.
The other group of State Line reload.
And fire at the light infantry.
The long range fire has no effect and leaves the group unloaded.
American Command Card drawn (British:1 American:1)
British Command Card drawn (British:2 American:1)
American Command Card drawn (British:2 American:2)
This triggers another random event and once again the Americans are on the receiving end. The State Line group that just fired now has fouled barrels and will suffer a -1 to hit penalty. It's just not their day.
American Command Card drawn (British:2 American:3)
Tiffin Card drawn (British:2 American:3)
The British use a command card to bring one of the groups of light infantry forward toward the State Line.
They open fire at close range.
The Americans lose another two men and suffer further shock.
The second command card activates the light infantry with Lieutenant Parker-Edwards and they target the group of State Line facing the dragoons, inflicting two points of shock on them.
Turn 7
American Command Card drawn (British:0 American:0)
Captain Carr-Clarke now waves his sabre and leads his dragoons at the canter to deliver the coup de grace.
Four of the rebels are struck down and they suffer four points of shock. That leaves a sole survivor who is forced back through the group with Captain Horton carrying six points of shock.
In doing that he adds a further five points of shock to Horton's group and drags Amerian force morale down to six.
Despite that calamity the State Line did not go down without a fight. The dragoons suffer three casualties, one of whom is Captain Carr-Clarke, who is lightly wounded. That brings British morale down to ten, nonetheless it still leaves the remaining State Line in a perilous position.
Lieutenant Parker-Edwards orders one group of the light infantry to reload.
They then turn and fire on the State Line.
Another rebel is hit, the group's shock increases to fourteen and that's enough to see them rout from the table, taking Capitan Horton with them. That's a huge blow to American force morale which tumbles to two. To rub salt in the wound the second group of light infantry load and fire at the lone survivor of the State Line. He's hit, which sees the group wiped out and American morale slumps to one. In case it wasn't obvious earlier it's clear now that there is only going to be one outcome to this scenario.
With barely an American on the table and those that are broken, the British have clear passage to get the prisoner to their deployment point with little or no interference. At which point we call an end to the game.
Well, that rather one sided affair was both short and brutal. Yet I think there's quite a bit to be learned from it. This is our first attempt at a homegrown campaign and as we feel our way I can see clear lessons in scenario design. We have already identified a growing imbalance in force between the British and the Americans. That's not a problem in itself, there are plenty of great games and campaigns to be had playing with an asymmetric balance of forces. The key is to look for a balance in the scenario and campaign design that compensates, by making it more demanding for the stronger force or giving an advantage to the weaker force. This is where scenario design can come in to play.
The Rescue Mission is a great concept and perfect for Sharp Practice, but in this particular scenario I think the weaker rebel force faced a couple of particular disadvantages. Firstly, the delayed American deployment meant the British could build up quicker and that was made all the more advantageous when you consider the added mobility of the dragoons and the light infantry. A classic case of having the opportunity to 'get there the firstest with the mostest'. Secondly, the fairly open terrain favoured British mobility and firepower, something amply demonstrated by the destruction of the State Line. With no option to deploy elsewhere and unable to do so in cover, they were left with few tactical options and quickly crushed in a British vice.
Perhaps a more challenging situation for the British would be to have them rescue the prisoner through more dense terrain by a less direct rout. In particular one that gives the Americans an opportunity to try to keep the two British forces separated, or at the very least, less able to support each other. Certainly some food for thought and all part of the learning process.
However all is not lost for the Americans, we enter the final scenario of the campaign with honours even at two wins apiece and the British are not certain of a campaign victory just yet. The core American force of Continentals and militia skirmishers emerge from this defeat without having made an appearance and therefore without taking any casualties. So, in the words of Nathanael Greene 'we fight, get beat, rise and fight again'. Let's hope we can do a little better next time!