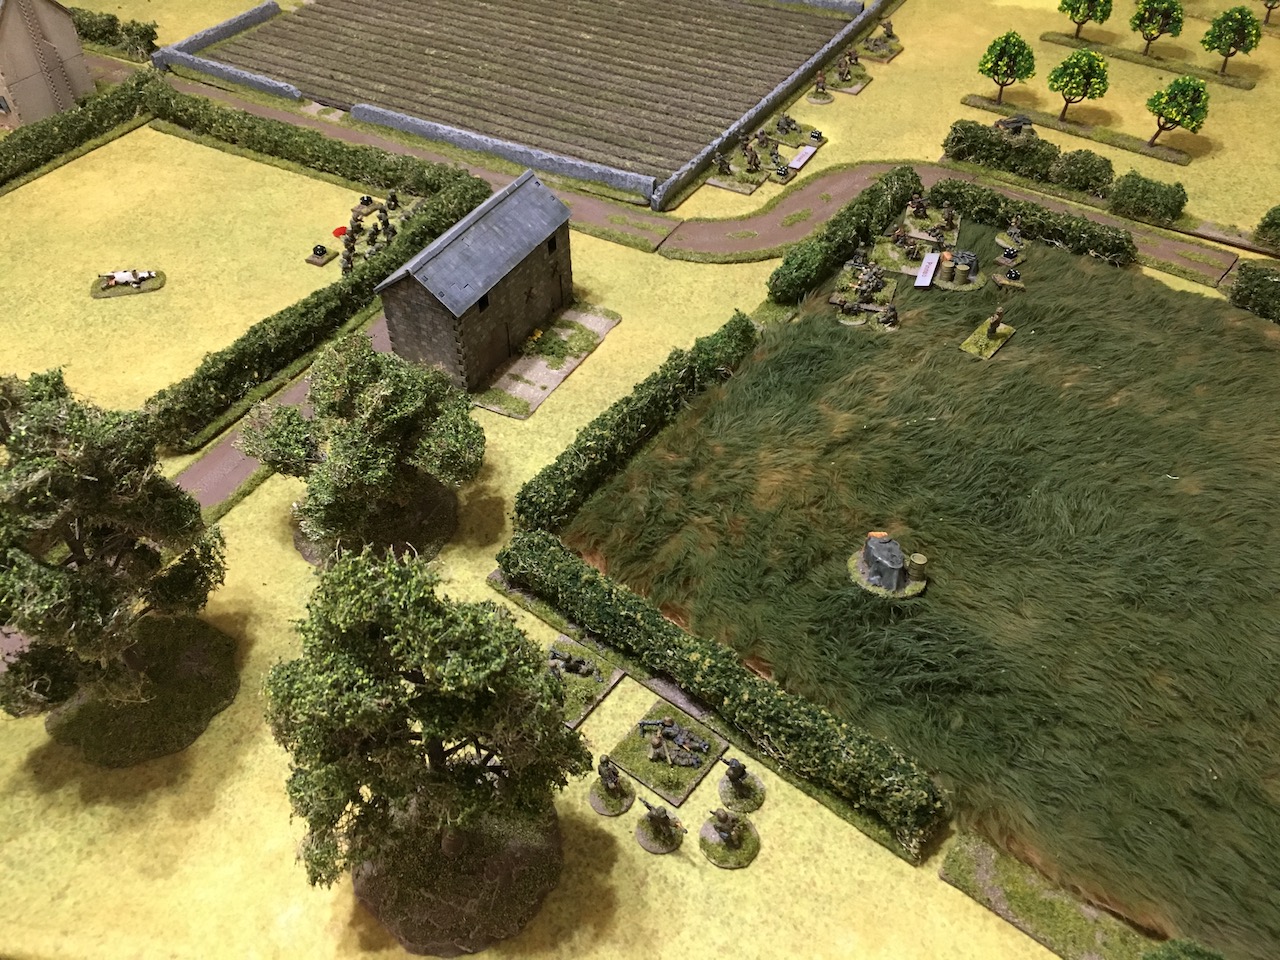
We had a pick up game during the week using Dave's freshly painted US Airborne platoon once again. This time we decided to put them on the defensive and have them face some stiffer opposition in the form of SS panzer grenadiers. We concocted a scenario loosely based on the counter attack at Carentan by 37th SS Panzer Grenadiers against 101st Airborne's 506th PIR and so we put together a table of typical Norman terrain.
The Airborne would defend a cluster of houses near a round junction and the SS would attempt to dislodge them - a straightforward Attack & Defend scenario. The US Airborne would be an elite force, but we chose to use the new six dice system for elites, whereby a six rolled on the sixth dice will count as a CoC point, rather than another six for determining double phases. Support points would be 11 for the Germans and 5 for the Airborne.
 |
| The Airborne JoPs around the farm buildings |
 |
| German JoPs placed |
The challenge for the SS will be crossing the two open fields that divide the table. The Airborne have a two squad platoon, so the Germans will want to focus on building superiority on one flank, while maintaining a threat against the other to try to stretch the US defence. With that in mind I opt to bring in an extra squad of panzer grenadiers, a second senior leader and an MG42 HMG. I gave some thought to a tank, either a StuG or a PzIV to add HE punch, but decided infantry numbers may be the best answer. This is perfect ambush terrain for the US bazooka teams, not to mention a 57mm AT gun and armour might prove very vulnerable in such close terrain.
The Airborne, much like the panzer grenadiers, can wield a lot of firepower. As we found when we played the Von Luck campaign, the best way to deal with this sort of force is to try to break it up and not allow it to concentrate against you. Dave's airborne will want to find a way to focus on individual SS squads and gain fire superiority and I will be trying to do the same. If I can bring three squads to bear against one Airborne squad I should be able to negate some of the advantages of the Airborne's elite status. So much for the theory.
The SS started off bringing on a two man team to scout ahead and threaten a JoP. The thinking was that this would be enough to provoke Dave to deploy a squad in response. That would leave him with only one other squad to deploy and if I could draw them to his far left flank it might give me scope to threaten along his right flank.
 |
| Trying to draw out the Airborne with a scout team |
 |
| What's the bet there's an Airborne squad lurking ahead? |
This doesn't draw a response from Dave who waits to see what else deploys. The scout team work their way around to the right, while the rest of the squad deploys behind the wall ready to give some covering fire.
While the Airborne continue to bide their time, other Germans appear on the same flank - another squad and the Unterfeldwebel. The squad behind the wall is placed on Overwatch.
My scout team climbs over the wall and makes its way around the side of the ploughed field. This finally provokes a response. It comes with a vengeance and a double phase for the Americans. It's at this point when it first becomes apparent that my deployment might not be the wisest.
 |
| The first Americans appear |
An Airborne squad deploys behind the wall and opens fire. They are at effective range and the Germans are behind hard cover, so the American fire only inflicts a casualty and a point of shock. It's not until my squad on overwatch returns fire that I realise the full implications of a firefight with a powerful, elite unit in hard cover at effective range. In short I need 6s to hit and he needs 5 and 6s. He has as much firepower as me, but twice as much chance of getting a hit. A prolonged firefight is only going to end up in the Airborne's favour.
So just when I'm wondering why I've deployed two squads to this flank the Americans deploy a 50 cal upstairs in the farmhouse. One of my squads couldn't deploy close enough to the wall and while they are tactical this will make no difference as the HMG reduces cover by one level.
 |
| The 50 cal has a good line of sight |
The Germans take some shock and another casualty and I begin to feel under pressure. In the second phase the Americans continue to fire and German shock accumulates and men fall as casualties.
I need to bring some of my firepower to bear. I want to advance my squad in the open towards the wall. Firstly it will give them some good cover and secondly they will be able to join in the firefight across the field and try to even out the odds. To keep the 50 cal suppressed I deploy another squad into the field behind the hedge to see if I can reduce some of that fire coming my way. Suddenly I find I no longer hold the initiative and I'm responding to the Americans. So much for my plan to hold him on one flank while I work around the other!

Just when I'm hoping I can exert pressure on the Americans Dave rolls four 6s in his command roll. The random event roll is a 6, so his FM goes up by one and he goes on to enjoy another double phase. This is a repeat of his earlier phase and the squad and 50 cal inflict further shock and another two casualties. At this point I've already lost five men to this fire and one of my squads has accumulated 6 points of shock and is in danger of pinning. Worse than that I've hardly moved.
The Germans finally get a chance to return some fire and while I roll a lot of dice, with both squads now behind the wall, I can only manage a handful of hits. It's not all bad, as the Americans take two casualties, one of which is the junior leader, who is stunned.
 |
| The Sergeant is stunned |
With that the Americans make effective use of marching fire to fire off a volley before pulling back from the wall. The Germans take another casualty and more shock.
 |
| A blast of automatic rifle fire before pulling back |
While Dave has pulled back I suspect it's only temporary. As long as he's close to that wall and there's no way I can move quickly across that field, I know he's confident he can keep me checked on that flank. A sign of that confidence is the appearance of the second squad, which deploys by the farmhouse.
I've taken quite a few casualties so I pull back the scout team to rejoin their squad. I put some firepower up at the 50 cal and they take some shock, but I sense my attack is stalling.
Dave decides the 50 cal may be better off coming downstairs, with only five men he doesn't want to risk losing them in a firefight just yet. While that seems a bit cautious he acts very aggressively with his newly deployed squad which moves double quick across the field towards the barn. He's clearly feeling he can take it to the SS. These boys are hardcore.
 |
| They are not elite for nothing. |
This will bring the squad very close to a lot of Germans.
In the German phase the squads look to move to be ready to face the oncoming Americans.
The US squad arrives at the hedge line and in their customary fashion also dish out some marching fire. Yet again the Germans take a casualty and more shock. It's beginning to feel like death by a thousand cuts as my casualty list grows steadily but surely.
 |
| Another squad draws close to pinning |
The Germans return fire and even though we are at close range I now have a lot of shock which adds to the difficulty of hitting the elites. It's not all bad, the American junior leader is a casualty and is lightly wounded.
In the next US phase the 50 cal returns to the upper level of the farmhouse and using marching fire once again, his squad behind the wall manages to inflict another casualty from across the ploughed field.
The fire fight at the hedgerows takes a turn for the worst as the German squad takes another casualty, accumulating enough shock to pin down.
I'm really feeling under pressure and my whole attack is not moving, I need to find a way to break the deadlock. I deploy the MG42 behind the hedge and bring on my second senior leader to try to rally off some shock.
While the MG is there to provide some more firepower, I deploy my fourth squad on my left flank to try to find a way to outflank the Airborne squad behind the hedge. Surely with the number of squads I have and the MG I can find a way to do this?
 |
| A move to take the left flank |
The US bring on their second senior leader to back up the wounded leader behind the hedge. Meanwhile the 50 cal, though suppressed with covering fire from the MG42, joins the 60mm mortar in slowly chipping away at the Germans, inflicting more casualties and shock. Both German senior leaders spend their activations bringing down the shock levels and the squad on the left flank moves very slowly forward, unable to find their way through the woods. With two of my squads pinned, it allows the Airborne squad to move along the hedge line to meet my flanking move.
I rally off enough shock to then use a CoC die to end the turn and remove the pin markers, but it's really not enough. The next phase sees the Airborne apply enough firepower to inflict further casualties and increase shock and so see the squads pin again. The 60mm mortar, the 50 cal and the squad behind the hedge do enough to reduce my flanking squad to four men and a leader, at which point I decide to call off the attack. While German FM was still holding up I was simply running out of men. I had taken 15 casualties, 40% of my men and had almost nothing to show for it. Some units had not moved since they deployed. Suddenly the panzer grenadiers who seemed so invincible had been stopped dead in their tracks.
So, what did I learn? Firstly there is no point engaging in a prolonged firefight with an elite squad in hard cover at effective range - even if you do have two belt fed LMGs. In our experience, up until now at least, the panzer grenadiers muscled their way around the table using their impressive firepower, but it isn't always enough.
I was very unwise to think the approach across the walled field was a good or practical idea. While the wall offered me solid protection it did the same for the Americans and eventually I was going to have to leave its safety to cross the field. Before doing that I needed to suppress the Americans and that was unlikely to happen at that range. In fact it's not a good idea to try to engage elites at effective range regardless of cover.
I would have been better choosing the left flank. I could have tried fighting through the hedgerows and restricted my action on the right flank to threatening across the walled field with a single squad. An alternative means of approach could have been up the road instead of across the fields and the more I look at the table I think that could have been a more viable option in combination with a flanking move. Ah, hindsight, it's a wonderful thing.
I suspect my choice of supports was not a bad one. If anything was bad, it was my tactics and plan. A tank might have been useful, but I would have to keep it back and avoid a surprise attack from the bazooka team, in that sense it might have been useful for suppressing the 50 cal in the farmhouse. Perhaps it might have given me an edge and driven the Americans back after their brazen move to the hedge line. I'm not totally convinced though.
In terms of the Airborne, Dave made very effective use of marching fire, a really powerful asset that allows fire and movement in a single phase that the panzer grenadiers, for all their firepower, cannot match. The Airborne could aggressively move to a wall or hedge and deliver fire on arrival. I may have been a bit unlucky with the number of casualties I rolled for each hit, but it was the constant ability to fire and hit me that slowly degraded my force. It never drove my FM to the point I had to retire, but it reduced me to a force ineffective for the task at hand.
While it was a frustrating game for the Germans I felt I learned much from it. I'll find a way to deal with those Airborne elites.......one day.