
You can follow what happened in the first game in this post. That encounter saw Major Morris lead his mixed force of Continentals and militia to a resounding victory. The sight of the feared redcoats being driven back has given him, and the men under his command, a needed boost of confidence.


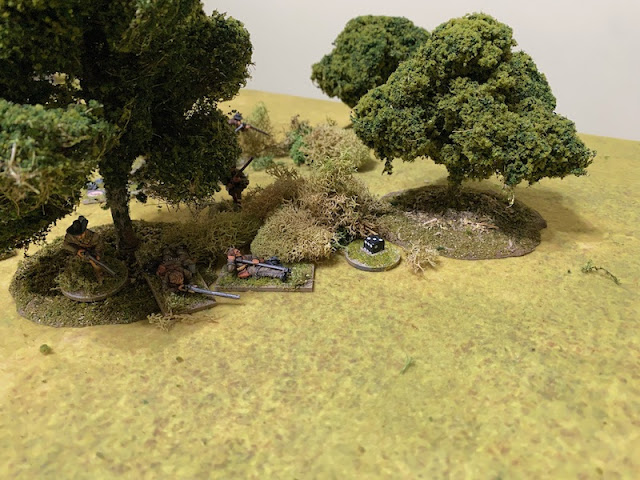
The secondary deployment point is placed at the edge of the orchard. From there skirmishers can deploy into the woods on my left to harass the British as they try to cross the stream and at the same time it allows the Continentals to form a blocking force across the road.


I'm hoping they can provide a hot reception for any British crossing the stream.


The fire is at long range but the combination of first fire and a controlled volley see a good proportion of hits. The skirmishers lose two men as casualties and suffer three points of shock. Well, that's first blood to the British and they are certainly not wasting any time sticking it to the rebels.


This puts four groups of British regulars bearing down on Morris's Continentals.


I'm hoping they can provide valuable harassing fire and protect the left flank of the Continentals.


This is the cream of the rebel force and represents their best hope of standing up to the advancing redcoats. Much may depend on their ability to deliver a powerful volley.


Taking a cue from their senior commander, they too open fire on the skirmishers across the stream.


Once again British musketry takes its toll. Despite their skills at concealment the skirmishers lose another two men and suffer more shock.

Reduced to two men, the group are forced into an involuntary withdrawal and American force morale drops to eight.


The British mule train slowly follows in their wake.


Hopefully Sergeant Burns will have time to bring his men back into the line to join them.


They may be at long range but the British have nothing to lose with what is in effect a free activation. Dave is making sure he doesn't miss any opportunity to inflict casualties on the Americans.

In this instance the rebels don't lose any men, but they do suffer two points of shock to each group.

Having fired, the light infantry move off to their right.

Petrie then orders the regulars to wheel to the right to face the Continentals.

That leaves the British well poised for the next turn and if their luck continues they may be the first to let loose a volley.


If I'm not careful the Continentals could find themselves the centre of attention for a lot of British fire.


I don't think they'll risk moving into range of loaded muskets, at least not yet, but they are hovering menacingly and the rebels will need to be wary.


Once in position they load and fire at the Continentals.

None are hit, but each groups suffers a further point of shock.


From there they can cover the open ground on this flank.


The British fire proves much more effective and the Continentals lose two men and suffer a further point of shock on each group.


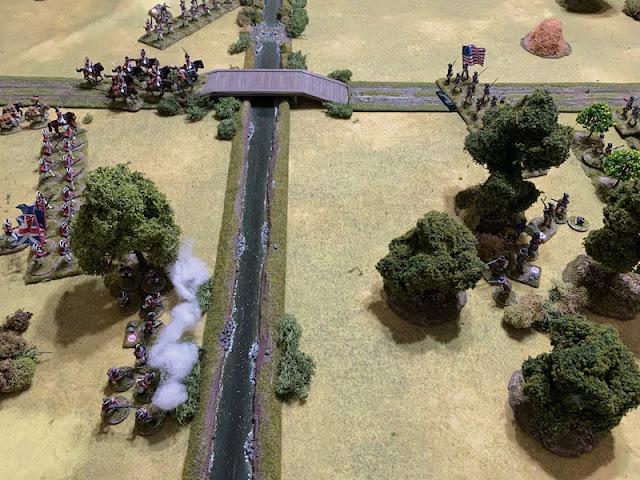
There's not too far for the dragoons to travel and they move rapidly over the bridge.

This does not look good for the Continentals who could be in real trouble.

The dragoons slam into the rebels with full fury.

Seven are killed and they suffer three points of shock.


However there's absolutely no doubt who has had the worst of it. The Continentals are forced back in some disarray and Morris and the surviving men flee towards the tavern.

That may prove a decisive moment. The dragoons have had a major impact and perhaps swung the battle irrevocably in the favour of the British.

Morris and the survivors are in a sorry state and can't get far enough away from the front line.


McNeil leads his men forward and forms them up into line, putting a barrier between Morris and the advancing British.


British confidence is so high that even the mule train feels safe enough to venture to the bridge.


With little in the way of American opposition the British should be able to make it across the stream with relative easy. The only blessing is that it will slow down their advance while they do so, but that's a small mercy in the greater scheme of things.

American Command Card drawn (British: 0 American: 1)


The other American command card is used to have the militia skirmishers over on the left also target the dragoons.
They suffer another two points of shock, forcing them back 2", but once again British morale holds steady.


This time they are more effective, they only inflict a single point of shock but the involuntary withdrawal that results is enough to bring British morale down to eight.


This is one of the rare occasions that British fire has no effect.


There's no way the militia skirmishers want to take on the light infantry and they try to evade, but the movement roll could not be worse - it's 2”.

That's nowhere near sufficient to get them to safety and they have the misfortune to have the lights' bayonets at their backs as they try to escape.
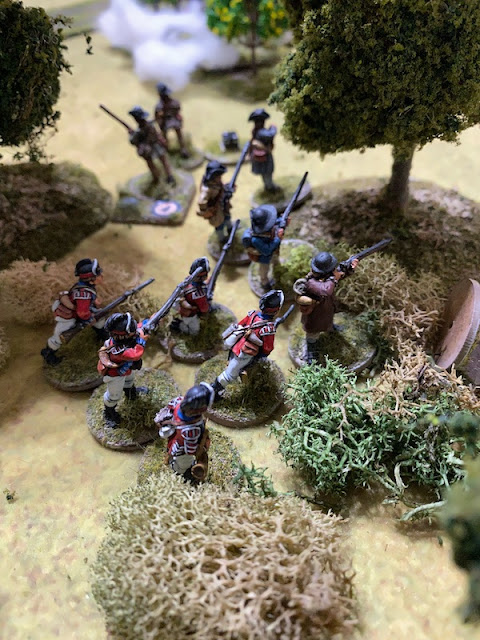
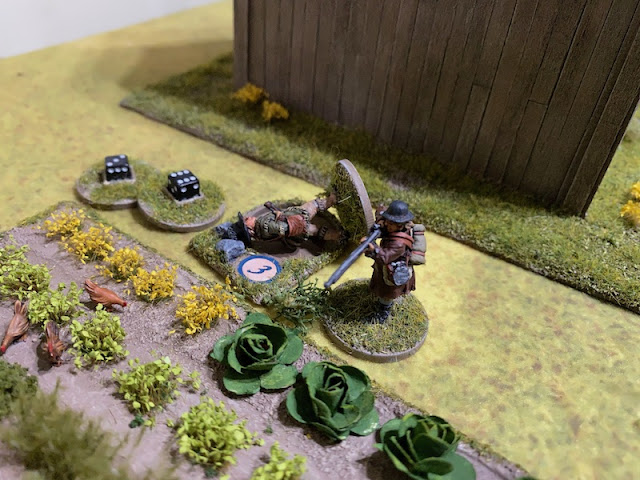
The skirmishers are mauled badly by the light infantry. They lose three men and Lieutenant Carroll is wounded again, which brings American morale down even further to five. The British do suffer one casualty, but having won the fisticuffs they have successfully driven the surviving skirmishers out of the woods.

Those same skirmishers have suffered a huge amount of shock following that attack in their rear which is now enough to see them break and rout.


He sees no point in the dragoons risking any further casualties. With Captain Carr-Clarke unconscious they have been milling about the bridge aimlessly taking fire and so, with their work done, Petrie orders them to turn their horses and walk back over the bridge.


That puts all the British infantry across the stream and pressing forwards. If the Americans are to escape they will need to act quickly.


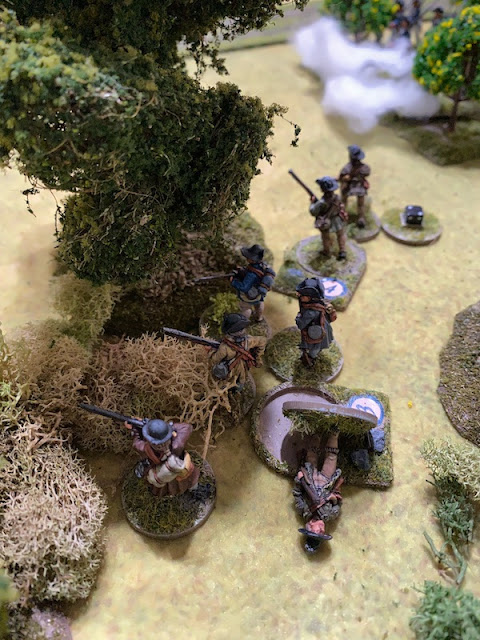
Sergeant Hardy takes advantage of the British now being within long range to have his skirmishers open fire.

Despite the range they manage five hits which is enough to cause a casualty and inflict a point of shock.

It may not be much but if it manages to delay the British, no matter how briefly, it may help Morris save his command.

Lieutenant Carroll remains knocked out, perhaps it's better this way and he's spared the disaster that is unfolding before everyone else's eyes?

He rallies a point of shock and then activates his regulars.
They present and fire a controlled volley into the orchard.

Despite the volume of fire Sergeant Burns' group of Continentals are fortunate to escape with a single point of shock.

Petrie then orders the regulars on the other side of the bridge to present and fire at the skirmishers in the woods opposite.

The fire is at long range and the skirmishers enjoy good cover, nonetheless they suffer one casualty.


He rides to the orchard from where he can be in command range of the Lieutenant Smith and his solitary skirmisher, and Burns with his Continentals.

He calls both groups back to rally on him.


Once he arrives he orders the other group to move to the far edge of the wood.

Once there they reload and fire at Lieutenant Smith and his lone skirmisher near the rear of the orchard.


There he joins the wounded Lieutenant Carroll in relative safety.


They suffer four points of shock. With any luck the rebels may just be able to hold off the British long enough to withdraw without too many further losses.


He then has the regulars under his command load and advance forward, which they do very slowly.


When they arrive he rallies the shock off them and for the first time in quite a while he begins to see his command consolidated, if somewhat battered.


The successful igniting of a hilltop beacon following the victory has raised the alarm throughout the district and Morris hopes that the call to arms will see the arrival of fresh units to bolster his force. One of those who have heeded the call is Lieutenant Samuel McNeil (Status Level I) who has come to the major's aid with two groups of recently raised State Line. He is joined by Sergeant James Hardy (Status Level I) with a group of militia skirmishers. Both officer and NCO are inexperienced leaders but the firepower they bring will be most welcome.
The British commander Major Petrie managed to conduct an orderly withdrawal that avoided the shame of a humiliating defeat. Nonetheless his pride is tarnished and he's out for revenge.
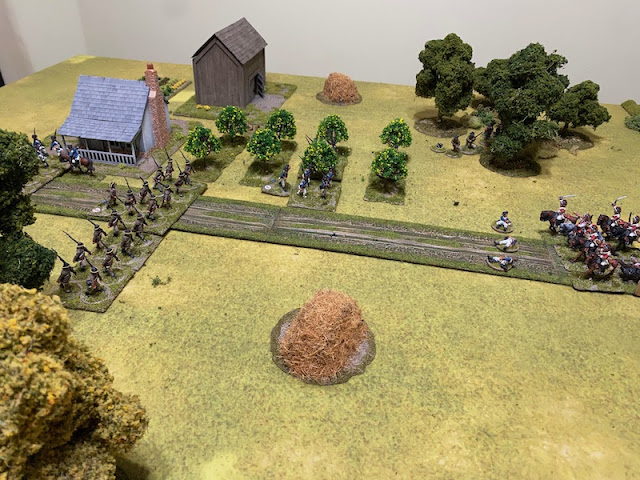
He now faces a challenging task. He must capture an important bridge at Miller's Crossing and clear the rebels from a local tavern where it is believed arms may be hidden. While he's aware that Morris's continentals are operating in the area he doesn't know how many militia and other local units may have flocked to his aid. Despite the defeat his casualties were fairly light, some are permanent losses, others are absent with wounds, however he cannot lose sight of the fact he must fight the campaign with the force at his disposal, without hope of reinforcements. Care is needed if his command is to go the distance.
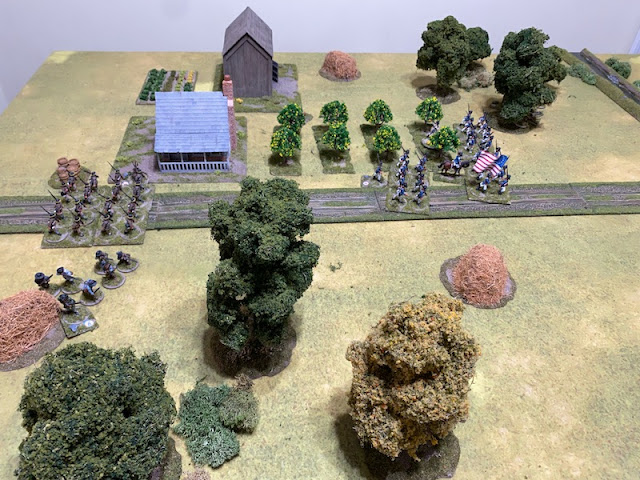
This is a defence in depth scenario as in the main Sharp Practice rule book. The Americans will have one deployment point in the rear quarter of the table that is available for use by the recently arrived state line and militia skirmishers that have come to Morris's support. A secondary deployment point is closer to the centre of the table and that can be used only by the Continentals and skirmishers that form Morris's core force. They must try to keep the British at bay until the state line and skirmishers can join the fray.
I put the primary deployment point near the tavern. Its capture would mean a scenario defeat and so I don't want to put it in jeopardy.
Force morale at the start for both sides is fairly similar with the British at ten and the Americans at nine.
Turn 1
Lieutenant Samuel McNeil is the first to arrive, with his two groups of state line advancing in column along the road.
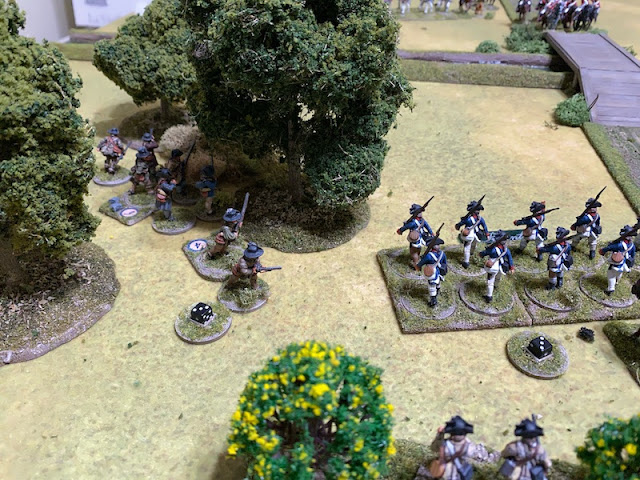
Lieutenant Smith, who commands a group of militia skirmishers that are part of Morris's core force, deploy into the woods near the stream. One of his men has been transferred to Lieutenant Carroll's group of skirmishers. Carroll suffered two casualties in the last game and so this evens out the number of men in each group.
Smith's men take up good firing positions at the edge of the woods. From there they can cover much of the stream and the bridge.
American Command Card drawn (British:0 American:1)
With no sign yet of the British, Major Morris deploys his Continentals. Two groups deploy in line by the road, with a third group under Sergeant Burns close behind.
American Command Card drawn (British:0 American:2)
As if on cue Major Petrie appears with two groups of regulars on the other side of the stream.
Two men are missing, they were both wounded in the last encounter, but Petrie is not prepared to let that stop him aggressively seeking revenge. Before the skirmishers have any opportunity to begin peppering his men with fire he orders his command to present and deliver a volley into the woods.
British Command Card drawn (British:1 American:2)
Sergeant James Hardy arrives with his militia skirmishers and they head for the woods on the American right hoping to find good positions from where they can harass the British.
More redcoats appear as Captain Winston-Smythe brings on his two groups on the British left. Like Petrie's command he is not at full strength, having lost a man killed earlier.
Lieutenant Carroll brings on his militia skirmishers to join Smith's group in the woods on the American left.
With Smith's skirmishers already suffering under the attention of British musketry they bring some welcome support.
Tiffin Card drawn (British:1 American:2) There are no units to activate and so the turn ends.
Turn 2
American Command Card drawn (British:0 American:1)
Sergeant Burns orders his group to form up with the Continental line.
As if the threat of British musketry is not enough, Captain Carr-Clarke arrives with his light dragoons, one of the most menacing threats in the British force.
Lieutenant Smith is only status level I and so the dilemma is how best to use his command initiative. Given the small size of his group of skirmishers I decide rallying is more important than firing at the moment and he removes a point of shock.
American Command Card drawn (British:0 American:2)
British Command Card drawn (British:1 American: 2)
Sergeant Hardy leads his militia skirmishers into the woods on the American right. There will be some time before the British come into range and so he has time to find the best location for his men.
Lieutenant Parker-Edwards, commander of the British light infantry deploys both of his groups into a skirmish line in front of Petrie's regulars.
British aggression is paying off. Before firing a single shot the rebel skirmishers have lost four men and been driven back.
British Command Card drawn (British: 2 American:2)
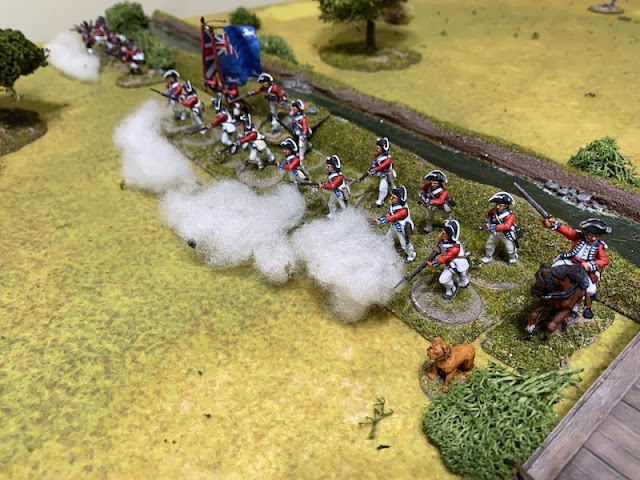
Meanwhile Captain Winston-Smythe advances with his regulars toward the stream and he has them form into line as they do so.
I can feel British pressure really building up and Dave is taking a much more coordinated approach to his advance this time. I need to even up the odds and bring the state line forward. Lieutenant McNeil leads his column towards the right flank of the Continentals.
The rebels are finding themselves on the back foot with the British constantly one step ahead of them and maintaining the initiative.
Major Petrie orders his men to reload and move up behind the light infantry.
With British to the left and right I need to make a decision about how best to use the Continentals. Despite the fact Sergeant Burns has only just brought his group into the American line Major Morris decides there is no time to lose. He breaks off with two groups who wheel to the right to face the regulars and light infantry across the stream. The Continentals are good for one controlled volley and he wants to make sure it's as effective as possible, so rather than open fire now, he orders them to present.
British Command Card drawn (British:3 American:2)
British Command Card drawn (British:4 American:2)
That's a moment of good fortune for the British with four command cards now available. Dave wastes no time taking advantage of the situation and activates Major Petrie once again. He orders the two groups of light infantry to fire on the Continentals.
American Command Card drawn (British:0 American:3)
With Smith and his sole surviving skirmisher withdrawing, Lieutenant Carroll moves his skirmishers forward into the woods to take their place.
While I need to support the Continentals this does put those skirmishers rather close to the light infantry and the regulars. Hopefully they can make better use of the cover than Smith's men did.
At this point in the turn it's become apparent there are only two cards left to draw - the Tiffin card and one American command card. The American command card would be ideal as it would make up four in play, allowing a second activation of one of the rebel leaders. Alas, that sort of luck seems to be going only to the British today and the next card is.....
Tiffin Card drawn (British:0 American:3)
(In hindsight it may have been a mistake not making earlier use of two of the American command cards to have the Continentals use Sharp Practice and fire).
Turn 3
The British threat multiplies when Captain Winston-Smythe wheels his line to face the Continentals.
Tiffin Card drawn (British:0 American:0 )
Turn 4
Captain Carr-Clarke canters his Dragoons toward the bridge.
American Command Card drawn (British:0 American:1)
The dragoons have made me nervous and rather than have Sergeant Burns bring his men into line he leads them to the cover of the orchard.
Lieutenant Parker-Edwards leads his two groups of light infantry towards the stream.
Sergeant Hardy takes his militia skirmishers to the edge of woods.
Lieutenant Smith rallies a point of shock from the remnants of his group.
American Command Card drawn (British: 0 American:2)
Feeling like the British are always one step ahead of me I decide now is a good time to make use of the two command cards. The Continentals use Sharp Practice to fire a controlled volley at Petrie's regulars.
Each group suffers three points of shock. I had hoped for more.
Once again Major Petrie is quick to react. He rallies a point of shock off each group, before ordering them to present and fire.
Tiffin Card drawn (British:0 American:0)
Turn 5
Captain Carr-Clarke of the dragoons has a keen eye for the moment and orders his men forward at the gallop. He has the opportunity to catch the Continentals before they have reloaded and he won't let the chance pass by.
It's not all one way. The dragoons lose one trooper; Captain Carr-Clarke is wounded and knocked out, and, they suffer two points of shock. American morale drops to seven and British morale to nine.
Tiffin Card drawn (British:0 American:0 )
Turn 6
Well, what to do? Morris, like Petrie, will not receive any replacements or reinforcements for his Continentals for the rest of the campaign. Somehow he needs to salvage as much of his command as possible if he's to have any prospect of fighting through the campaign without relying solely on whatever militia and others can come to his support.
Lieutenant McNeil and his state line have just watched what has happened. They have become the best hope of holding back the British while Morris tries to reform his command and get them to safety.
British Command Card drawn (British:1 American:0)
Major Petrie rallies a point of shock from each group of his regulars and they advance to the stream.
British Command Card drawn (British:2 American:0)
Dave is eager to keep up British momentum and uses the two command cards to activate one group of light infantry. They move up to the stream, reload their muskets and fire at the militia skirmishers opposite them in woods.
Things are not going well for the rebels. Another skirmisher is taken casualty and Lieutenant Carroll is hit and wounded. He'll be out of action for a while and that takes American force morale down to six.
Captain Winston-Smythe leads his formation to the edge of the stream.
Sergeant Burns is determined to exact revenge on the dragoons and he moves his men to edge of the orchard.
From there they open fire.
They have the satisfaction of seeing another dragoon taken casualty and fall from his horse. The remaining men suffer a further five points of shock which is enough to force an involuntary withdrawal. They fall back 1" and British morale holds steady, but for now their threat is greatly reduced until they can rally off all that shock (which may prove difficult with an incapacitated leader).
American Command Card drawn (British:0 American:2)
Tiffin Card drawn (British:0 American:2)
One of the command cards is used to activate Sergeant Hardy's skirmishers on the American right. They take aim at the milling dragoons, but the fire has no effect.
Turn 7
Captain Winston-Smythe leads his regulars cross the stream.
Meanwhile Major Morris does his best to restore his command to some semblance of good order by rallying three points of shock from the group he is with.
British Command Card drawn (British:1 American:0)
Hardy's militia skirmishers continue to target the dragoons.
British Command Card drawn (British:2 American:0)
The two British command cards are used to activate Petrie's formation and they also wade across the stream.
That puts all the regulars across the stream and ready to close in on the state line and the remnants of the Continentals. Somehow I need to hold them off long enough to salvage as much as possible.
Lieutenant Parker-Edwards has one group of light bobs load, move to the stream and fire at the militia skirmishers in the woods.
Meanwhile Lieutenant Parker-Edwards sends the second group over the stream.
Tiffin Card drawn (British:0 American:0)
Turn 8
Once again the British are quickest off the mark and Major Petrie orders the group of light infantry within his command range to attack the militia skirmishers in the woods.
That comes as a further blow to American morale and it crashes down to three.
With the flank cleared Major Petrie orders his regulars to reload and then advance, but they only edge forward slowly.
The mission now for the Americans has become a matter of saving as much of Morris's core force as possible. Lieutenant Smith leads the sole survivor of his skirmishers away from the advancing light infantry and back to the orchard.
British Command Card drawn (British:1 American:0)
Major Morris rallies off more shock. While I want to try and withdraw before things get any worse, it may need to be a fighting withdrawal and so I want to be sure as many units as possible are in good order.
Captain Carr-Clarke of the dragoons remains out of action and so for now it looks like the dragoons will not play much more of a role in today's action.
Lieutenant McNeil prepares to face the onslaught and has his state line present, in anticipation of the arrival of the British regulars.
Lieutenant Parker-Edwards crosses the stream with his second group of light infantry.
American Command Card drawn (British:1 American:1)
Lieutenant Campbell, second in command of Petrie's regulars, rallies shock in preparation for the advance.
Lieutenant Carroll remains knocked out, perhaps it's better this way and he's spared the disaster that is unfolding before everyone else's eyes?
British Command Card drawn (British:2 American:1)
British Command Card drawn (British:3 American:1)
British Command Card drawn (British:4 American:2)
The British enjoy the good fortune of four command cards and Major Petrie is activated once again.
American Command Card drawn (British:0 American:3)
American Command Card drawn (British:0 American:4)
It's now the Americans' turn to enjoy some fortune and I use the four command cards to activate Major Morris again. This is his opportunity to try to pull his command together and start to withdraw.
Tiffin Card drawn (British:0 American:0 )
Turn 9
With their force morale at three the Americans will now lose two of their command cards, so it was extremely fortunate they were able to take full advantage of the four command cards in the last turn.
Lieutenant Parker-Edwards leads the group of light infantry at the stream to the edge of the woods.
Fortunately the fire has no effect.
With musket balls whizzing around him Lieutenant Smith makes the wise decision to retreat behind the barn.
Sergeant Hardy's militia skirmishers maintain their fire on Captain Winston-Smythe's regulars.
British Command Card drawn (British: 1 American: 0)
Major Petrie commands Captain Winston-Smythe’s regulars to reload their muskets and present.
British Command Card drawn (British:2 American:0)
Determined to maintain the pressure on the rebels Dave makes immediate use of the two British command cards to have Captain Winston-Smythe's regulars use Sharp Practice and fire a volley at Hardy's militia skirmishers.
The skirmishers suffer two points of shock.
American Command Card drawn (British:0 American:1)
Sergeant Burns leaves his group under the command of Major Morris and moves to join the other group of Continentals on the road by the tavern.
Major Morris, with a sense of urgency orders the Continentals to run with him to join the other group.
American Command Card drawn (British:0 American:2 )
British Command Card drawn (British:1 American:2 )
Lieutenant McNeil holds his state line steady.
Tiffin Card drawn (British:1 American:2)
One American command card is used to move the lone survivor of the group of Continentals struck by the Dragoons off the table.
The British use their card to pull the dragoons further back.
The final American command card is used to withdraw the wounded Lieutenant Carroll and his skirmisher.
All that remains is for Major Morris to withdraw the Continentals and for Lieutenant Smith with his sole surviving skirmisher to join him and the rebels will have salvaged as much as they can from this defeat. With that the game ends with a clear British victory. A total reversal of the previous encounter that sees Major Petrie exact his revenge and restore some of his reputation.
There's no doubt the charge of the light dragoons was the pivotal moment. That broke the Continentals and left the rebel defence in disarray. In hindsight it would have been wiser to have the Continentals defend further back and not in open ground, that was to play to British strengths and for that a heavy price was paid.
The Americans suffered a total of nineteen casualties, worst of all seventeen of these came from Morris's core force. Eight were militia skirmishers and of those three are dead, two wounded and three can be patched up and returned to service. Nine were from the Continentals, a painful loss that sees three dead, four wounded and two returned to service.
British casualties were only five men and with a difference in force morale of eight to three that means they are able to recover all of those men, tend to their wounds quickly and return them to service.
To make matters worse the British have the battlefield and are able to make two important discoveries. Firstly they find a preacher at the tavern who has medical skills. Major Petrie proves very persuasive and, whether out of fear or his own loyalist tendencies, the preacher agrees to accompany the British for the rest of the campaign.
Even more significantly a search of the buildings uncovers a significant arms cache and a light artillery piece. Petrie is keen to add this to his force and sends back a request to see if any artillery men are available to come forward to man it.
The British had two wounded men from the first scenario, one of those fails to recover and dies but the other survives his wounds and will return to the unit.
With honours even, this now takes us to Engagement 3: The Bales are Burning.
Splendid stuff. It goes to show how dangerous regulars can be when the chips are on their side.
ReplyDeleteCredit to Dave for exploiting every opportunity and really taking the initiative, sure he had some good luck in the card draw but he also had a good plan that was well executed.
DeleteOK, I'm starting to get into the flow of the rules now - I really must try theses rules having owned them for some time now. I was impressed by how a well coordinated approach by the British paid off, but I'm as yet unsure whether it was really the tactics that worked or the dice. I shall follow this campaign with interest to see how it works ot.
ReplyDeleteAgain, thanks for posting such well-written AARs.
I've been playing SP for about five years and I'd say that to maximise whatever you can hope for from the dice, you really do need to play with a tactical plan. Your chips might not come out when you want them to, but when they do, you need to stick to a plan, as well as using your troops in the right way for the period. Knowing how to get the best from your command flags helps a lot too. As others have said, the rules are simple to learn but have a lot of nuance too.
DeleteI think Carole is right here. Dave was punished in the last game for poor tactical decisions and this time he had a much clearer plan which he executed well. He had a bit of fortune with the card draw at times, but as always, it’s what you make of it that counts. Last game he let a four command card opportunity slip by and he certainly wasn’t going to let that happen in this game. His victory was due to a good plan, well executed. I lacked a coherent plan and paid the price.
DeleteThese last two games also demonstrate the great narrative power of SP2. Dave's aggressive impulsiveness in the first game can neatly be attributed to the over-confidence of British regulars, which has now been moderated in the second game to a more disciplined and cautious though equally aggressive stance. Helps to have a master story teller as your narrator too (and so glad to see that once more being applied here!)
DeleteThanks for the great report
ReplyDeleteThanks Dennis, given your local knowledge I hope you’re enjoying it so far.
DeleteI love your terrain, figures and most of all the AARs! But please don't knock over figures to represent dead/wounded, you take the time to paint casualties so use them or mark standing figures. Always my pet peeve has been knocked over figures in any game, it detracts from the whole diorama of your set-ups.
ReplyDeleteI hear you. I’d forgotten I didn’t have a solution for wounded leaders in SP and my heart sank when I realised we’d have to be expedient and tip them over for now. Certainly not my preferred solution. Have no fear I’m on to it!
DeleteIt took me ALL day to read this. The post is long on tactics and details and I was constantly interrupted by children. I enjoyed the tactics and details.
ReplyDeleteThe AWI collection continues to impress with its presentation. I love the effects of the campaign with the added bonuses and casualties meaning something.
That was pretty resounding British victory. Dave did well. 😀
Ah the joys of parenthood. I remember going to social events when the kids were young and leaving knowing I failed to complete any of the conversations that were started due to interruptions. I know the feeling. I've always enjoyed campaigns because of those added consequences and events, it helps keep players honest and thinking beyond winning a single game. And yep, Dave gave me quite a beating there, those redcoats weren't the pushover they were in the first game.
DeleteIt didnt take me quite as long as Stew but then I dont have little kids and a 10 month old baby to contend with! Nonetheless, a comprehensive report that certainly took me longer than average to read - and must have taken you almost as long to write as the game took to play! My friend Julian and I have had several games of Sharpe Practice with Napoleonic figures and I have always enjoyed the games and the mechanisms.
ReplyDeleteThanks. I've developed a system for the AARs that helps speed up the process but I still give them a lot of time. I download the notes from my phone to the blog and then populate it with pictures, that gives me the bare bones and the chronological order of events (and sometimes my notes are short of information but the pictures fill in those details). That's the easy bit. I then go back and turn it into a story that readers can follow and hopefully feel engaged, which takes the most time.
DeleteThanks for all the marvellous photos and the ton of work that went into this.
ReplyDeleteThanks Norm, it's a labour of love, so while time consuming I find it very enjoyable. All the good feedback is very rewarding and lets me know it's all been worth the effort.
DeleteA great and epic report, fantastic pictures, love your terrain and, of course, your armies...
ReplyDeleteThanks Phil, it was a great game even if I did come out of it thoroughly defeated. The charge of the dragoons certainly made for a dramatic moment.
DeleteLike all your other campaigns, gripping stuff and very enjoyable.
ReplyDeleteLovely as always. I re-read part one before reading this one and it's a fascinating mirror image. On to part three!
ReplyDeleteThanks Nicholas, it was definitely a contrast to that first game which may have give me a sense of over confidence. Dave certainly put me in my place in this one and reminded me that when playing to their strengths the regulars are a powerful force, not to be trifled with.
Delete