Saturday 23 October 2021

I'll Take Manhattan campaign
Engagement 1: The British are Coming!

This is the first report on I'll Take Manhattan, a five map American War of Independence campaign for Sharp Practice set during the New York campaign in 1776. I will be handling the Americans and my regular opponent Dave will take the British.

The campaign kicks off with the Americans receiving reports that the British are on the move again. They must stop the King's men pushing any further up Manhattan island and if possible turn them back. At the very least they hope to light a beacon that will call the men of the district to arms and alert them to the imminent arrival of the redcoats. 

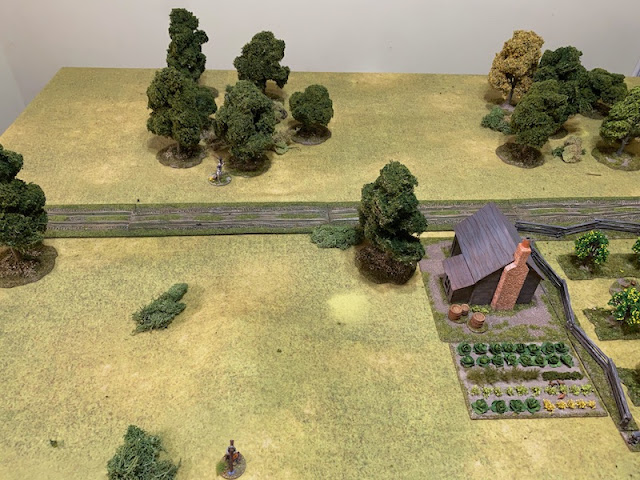
What they also know, that the British don't, is that a local farm cabin is the hiding place of fugitive Jacob Johnson, a prominent landholder and supporter of the rebellion. They hope to rescue Johnson before the British have time to discover his whereabouts.

Johnson's hiding place is near one of his orchards, but more ominously it is adjacent to the main road down which the British are expected to come. With the redcoats searching for rebels, hidden arms and foraging for food it's almost inevitable they will discover him. Prompt action is called for to save the day.

This scenario is an All-Out Attack as per the Sharp Practice Dawns & Departures campaign guide. Both sides can win by driving the enemy Force Morale to 0 or if the enemy withdraws voluntarily. In addition:

  1. The British can win immediately if they capture the American deployment point.
  2. The Americans may attempt to set up and light the signal beacon, if successful they receive a bonus to their die roll for the militia reinforcements prior to scenario 2.
  3. Rescuing Jacob Johnson will earn the Americans +2VP, however if he is captured by the British they will instead lose -2VP.


Johnson looks forward to the day when he can return to his home and his own bed, in fact, to any bed at all.

The core American force in the area is led by Major Ezekial Morris (Status Level III).


He commands three groups of Continentals with the assistance of Sergeant Burns (Status Level I). They are accompanied by two groups of militia skirmishers who have been put under the command of regular officers Lieutenant Carroll (Status Level II) and Lieutenant Smith (Status Level I). This force must fight the entire campaign without receiving replacements, however before each encounter Morris will look for the support of local militia, although how many will turn up will only be known on the day. Nonetheless Morris will need to avoid any excessive casualties to his core command if they are to last the campaign.

The call for militia for this scenario is resolved by a die roll and has seen the despatch of two groups under the leadership of local merchant Nathaniel Brown (Status level II). 


They have been joined by a group of skirmishers led by blacksmith Josiah Nelson (Status Level 1). 

Despite the large proportion of militia the Americans start with a good force morale of nine, however that's no match for the British regulars who are at eleven. 

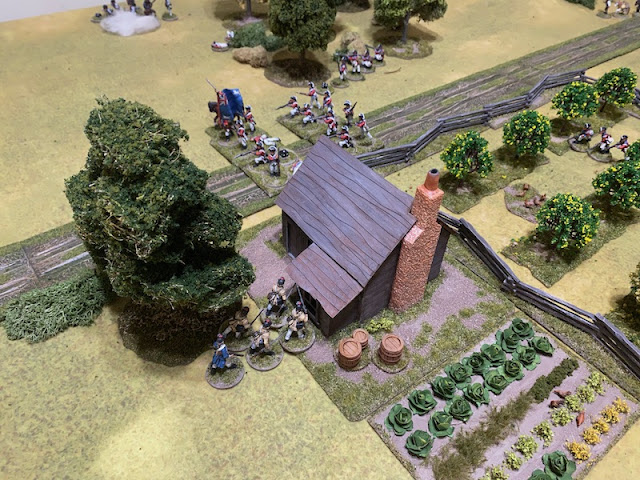
Below is the view from the American side of the table. I will be aiming to reach the cabin and to light the beacon on the nearby hill. However, I'm going to play this one cautiously. While it is tempting to make a dash for the beacon and the cottage there's a danger I become over extended. I know the British have light infantry and cavalry which means they can move fast and if I'm not careful I could see the rebel force destroyed in detail. So while I'll be making efforts to rescue Jacob Johnson and light the beacon, how fast and in what order will depend much on how the British respond.


The British have further to travel and so time will be of the essence, but they have a well trained force of regulars under the command of Major Thomas Petrie (Status Level II).


He commands two groups of regular infantry assisted by Lieutenant Alexander Campbell (Status Level I). Two more groups of regulars are under the command of Captain Winston-Smythe (Status Level II). They will be supported with two groups of light infantry led by Lieutenant Parker-Edwards (Status Level II) and backed up with a group of light dragoons under the control of Captain Carr-Clarke (Status Level II). 

While this is a strong force the British, like the Continentals, will receive no replacements, but unlike the rebels the British have no local militia to come to their support. They must do this alone and keep an eye on their casualties if the force is to last the length the campaign.


Unsurprisingly, the British deployment point is placed close to the road.


The American deployment point is on the edge of the woods to their left. With a number of irregular skirmishers in the force I want to take full advantage of the opportunity to engage the British at long range while enjoying the benefits of good cover.


The deployment point also needs to be placed carefully to minimise the risk of capture. Placing it closer to the farm cabin is to tempt fate and so I decide to err on the side of caution. 


Turn 1

British Command Card drawn (British: 1, American: 0)

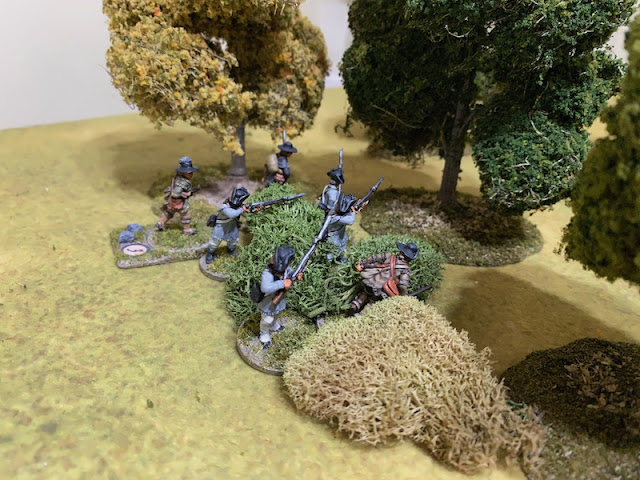
The first rebels to appear are the militia skirmishers under the command of Josiah Nelson.


They deploy across the road heading in the direction of Jacob Johnson's hiding place. They can make two choices depending on how quickly the British arrive. If necessary they can bypass the house and form a firing line at the rail fence behind the house by the orchard, but, if time allows, they can instead act quickly to rescue Johnson.


A second group of skirmishers under Lieutenant Carroll take up firing positions along the edge of the woods on the American left flank, ready to engage any British who might venture down the road.


British Command Card drawn (British: 2, American: 0) 

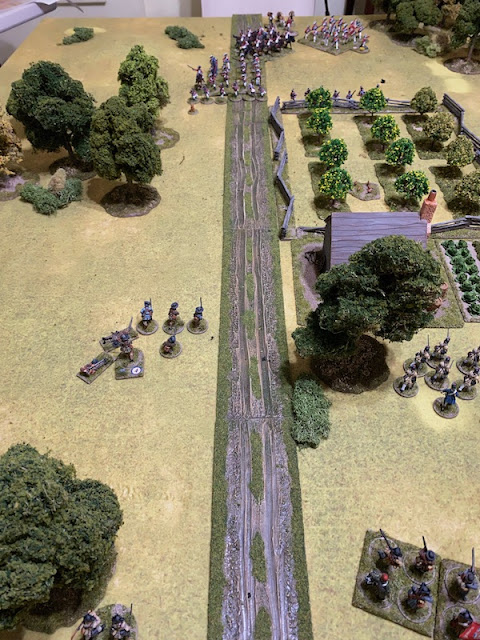
The first sign of the redcoats is the arrival of their senior commander Major Petrie, as he leads a column of two groups of regulars directly up the road. 


Tiffin card drawn. Command cards available: British: 2, American: 0 

With all units activated the command cards are of no use and so the turn ends.

Turn 2

Major Petrie's column is joined by two groups of light infantry skirmishers under the command of Lieutenant Parker-Edwards. He has one group form a screen in front of Major Petrie's column and leads the second in the direction of the orchard. 


American Command Card drawn (British: 0, American: 1)

British Command Card drawn (British: 1, American: 1)

Nathaniel Brown arrives with his two groups of Militia ready to face the redcoats that are advancing down the road.


More militia skirmishers appear under the command of Lieutenant Smith who deploys by the road in the direction of the wood cabin. 


There is no sign yet of Major Morris and his Continentals but groups of rebel skirmishers are pushing forward to harass the British advance.


The British force continues to build up as Captain Winston-Smythe arrives with another two groups of British regulars to the left of road.


That is a substantial force of British regulars and they may prove very difficult for the militia to handle without the help of Major Morris and his Continentals.


Tiffin card drawn.  Command cards available: British: 1 American: 1  

Josiah Nelson continues to lead his skirmishers towards the farm cabin in search of Jacob Johnson. 


Meanwhile the British commander Major Petrie continues to lead his column along the road. 


The British are well provisioned for this advance and a laden mule train follows slowly behind.


Turn 3

British Command Card drawn (British: 1, American: 0) 

Sergeant Burns, the second in command of the Continentals is eager to see the men committed but must wait patiently for his commander Major Morris to issue the order. 

American Command Card drawn (British: 1, American: 1) 

British Command Card drawn (British: 2, American: 1)

British Command Card drawn (British: 3, American: 1)

The command card draw initiates a random event but it's one that has no impact on the units in play.

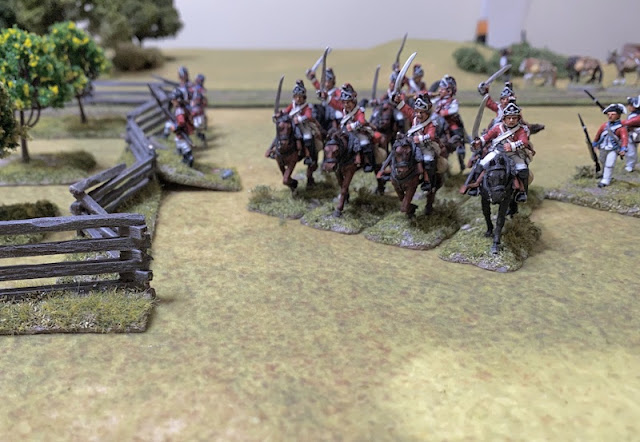
The rebels are now faced with the daunting sight of the arrival of Captain Carr-Clarke with his dragoons. 


Nathaniel Brown of the militia senses the urgency. He needs to set to work lighting the beacon and try, if possible, to hold off the advancing British while he does so. He orders both his groups to move as fast as they can and run up the hill. 


American Command Card drawn (British: 3, American: 2)

With the British column making its way down the road Lieutenant Carroll decides to take his militia skirmishers on a wide move around the flank. He wants to reach the woods opposite and from there threaten the British flank. While Carroll thinks this is a good idea, his men seem a little more reluctant. They set off slowly, much to Carroll's annoyance (read that as mine!).


Lieutenant Parker-Edwards is eager to bring his light infantry into the fight. He orders them to follow him to the orchard fence and unlike the more tardy rebel skirmishers the light bobs do so at a rapid pace. 


American Command Card drawn (British: 3, American: 3)

American Command Card drawn (British: 3, American: 4)

I choose to make use of those four American command cards immediately before the opportunity slips away. Lieutenant Carroll seizes the moment to continue driving not only his group of skirmishers forward but also those of Lieutenant Smith towards the woods. 


This time it is Smith's men who are slow off the mark and they edge forward cautiously.


And yet, perhaps not totally unwise given what is marching down the road in their direction.


On the other hand Carroll's men have been quick to cover the ground to the woods, realising that there is more safety to be had there than remaining in the open.


This puts the rebel skirmishers in a position to begin harassing the British column should it come any closer.


Not that the rebels' intentions do much to fluster Major Petrie, who with some swagger continues to march his column up the road. 


British Command Card drawn (British: 4, American: 0)

Dave decides to hold out a bit longer before using his command cards. This is always a gamble and the arrival of the Tiffin card demonstrates just that.

Tiffin card drawn.  Command cards available: British: 4 American: 0  

All that is left to do is for Captain Winston-Smythe to continue moving his regulars forward toward the American right flank. 


Turn 4

Lieutenant Smith finds his small group of skirmishers in the open, staring a column of redcoats in the face. This is not a good place to be for men accustomed to sniping at long range from cover.


Wisely he orders the men to beat a hasty retreat to the relative safety of the woods. Oddly enough, they have no reluctance moving in this instance and are swiftly back amongst the trees where they feel much more at home.


That puts them at a safer distance and in better cover. Sometimes it pays to stand your ground and trust to the fortunes of war, but this is not that moment.


Captain Carr-Clarke orders his dragoons forward at the canter. Frankly these terrify me as I have no idea how best to deal with them and I have visions of them cutting through my militia with ease.


They make their way between the light infantry at the orchard and the regulars on that flank. The dragoons pose a real threat to the rebels, particularly the militia who will be in some peril if charged.

Sergeant Burns, second in command of the Continentals, is beginning to get anxious and wants to see the men on the march, but once again, until Major Morris gives him the order he must bide his time. 

Meanwhile Lieutenant Carroll continues to push his skirmishers forward and they make it into the woods.


I know I want them to threaten the British flank but they might be getting uncomfortably close. If nothing else, it will demand a response of some kind and they cannot be ignored.


British Command Card drawn (British: 1, American: 0)

With his militia now on the hill Nathaniel Brown gives one of his men a task. 


He assigns him the job of lighting the beacon. It's going to take more than one turn to get the job done and he sets to it a little slower than Brown would like given the urgency of the situation. 


American Command Card drawn (British: 1, American: 1)

Lieutenant Parker-Edwards is keen to get his light infantry into the fight and he orders his men over the fence and into the orchard.


True to their name the lights move swiftly.


With British units closing from several directions I decide the best option is to make a dash to save Johnson. Josiah Nelson sends his skirmishers to the door of the farmhouse. 


British Command Card drawn (British: 2, American: 1)

Captain Winston-Smythe continues to lead his regulars around the flank but they can't keep pace with Major Petrie's column on the road and they're in danger of being left out of the coming fight.


They still have some way to go before they can threaten the farm cabin or the militia on the hill.


Major Petrie has noticed the rebel skirmishers slipping into the woods on his flank. 


He promptly dispatches the light infantry to go and root them out at the point of their bayonets. 


The skirmishers can see what's about to happen and try to evade, but the light infantry are fleet footed and the rebel skirmishers have left their departure too late. The redcoat light infantry have their blood up and come roaring through the woods to catch the skirmishers with their backs to them. This does not bode well, the odds are heavily in the lights' favour at 12 dice to 3. 


If those rebel skirmishers are religious men then what follows might only be put down to a miracle. Neither side cause a casualty or shock to the other. The first round is a draw. Well, that was fortunate, but unlikely to be repeated. 

In the second round the Americans roll two 6s and the British four 5s and unfortunately here we make a critical rules error. Being a bit rusty on the SP rules we were thinking a 5 resulted in shock and a 6 in a kill and shock. Where as it should be a kill on a 5 and a kill and a shock on a 6. As a result of our faulty calculations the British lose two men killed, whereas the Americans suffer eight points of shock (four shock doubled due to an attack in the rear) but none of the skirmishers are lost as casualties. As a consequence the British fall back appearing to have lost the fight against all the odds, leaving two of their men behind. 


The shock on the Americans causes them to also fall back, however their force morale remains unchanged while British morale drops to ten.  


Major Petrie is surprised to see the light infantry falling back through the woods but is determined to push on. He can't form the regulars into line in their current position due to the narrow space between the split rail fence and the woods, but he doesn't want to be caught in closed column either. He orders the formation to break up and for both groups to advance separately. 


Tiffin card drawn.  Command cards available: British: 2 American: 1  

All units have been activated, so the turn ends.

Turn 5

Lieutenant Smith's skirmishers are lining the edge of the woods with their muskets trained on the British, these are the sort of conditions favoured by irregular skirmishers and they open fire at long range from cover.  


The lead group of redcoats takes two casualties and suffer a point of shock. The skirmishers hastily reload ready to fire again. 


Having had a near miraculous escape from death Lieutenant Carroll's men sense their luck might be in and despite the shock decide to turn and fire at the regulars on the road, taking them in the flank. 


With all the shock they don't offer much of a threat but it's enough to see another redcoat fall to the ground (given our previous error the impact of eight points of shock to the volume of fire they can generate is exactly the equivalent of losing four men, so while this doesn't entirely compensate for our failure to apply the correct rules, it does go some way).


There's a cost to turning and firing and that will leave them unloaded for now, but the rebel skirmishers are slowly taking their toll on the British.


Meanwhile at the farm house, Josiah Nelson detaches two of his men and sends them into the house to retrieve Jacob Johnson. "Not a moment too soon" exclaims Johnson pointing to the British all around him. 


American Command Card drawn (British: 0, American: 1)

American Command Card drawn (British: 0, American: 2)

British Command Card drawn (British: 1, American: 2)

The random event caused by the draw of three consecutive command cards has no effect on play.

With Major Petrie's force engaged and taking casualties Captain Winston-Smythe is eager to press on with his regulars on the flank and bring them into action.


They still have some way to go and it gives my rebels an opportunity to focus all their attention on Major Petrie and his regulars on the road. 

American Command Card drawn (British: 1, American: 3)

The Continentals cannot arrive a moment too soon and the three American command cards now available make it the ideal time to have Major Morris bring his men into the fray. The first two groups deploy in line across the road facing Major Petrie's regulars, while the third group deploys behind and to their right, ready to support the militia.


Major Morris can sense his moment has come and so do the men under his command. They are ordered to present arms and fire. 


With their guns properly loaded and firing a volley in the controlled manner they have practised on the drill ground they unleash a devastating hail of musket balls at close range. Firing a controlled volley at close range as their first fire results in 18 hits. 

The group of redcoats at the front lose another three men and suffer three more points of shock. That's enough to see them fall back 1", but for now British morale holds steady. The group behind suffer four points of shock. 


The Continentals have made their appearance with impeccable timing and sent the redcoats reeling.


American Command Card drawn (British: 1, American: 1)

British Command Card drawn (British: 2, American: 1)

This produces another Random Event which leads to only more British misery. Major Petrie is hit and wounded and his Status Level drops down to II. The wounding of their most senior leader has a knock on effect on British morale which drops down to nine. Things are going well for the rebels but I need to be careful not to become over confident. The British still present a considerable threat. 

Nathaniel Brown has his militia continue preparing the beacon while he orders the second group to close up on the men on the hill. 


They may have only one opportunity to unleash a good volley and so I want to make sure that when the time comes they are ready to do so.


Sergeant Burns in the Continentals finds some satisfaction that he has had so little to do, with the men in good shape there isn't even any shock to rally. 

British Command Card drawn (British: 3, American: 1)

Dave uses the three command cards to have Major Petrie try to get a grip on events along the road. He orders the two groups to form up into a closed column. I pause for a moment, could he really be thinking of forming column and charging the Continentals? They are currently unloaded but it still strikes me as a wild and crazy gamble given the British must be careful with their losses.


As it turns out, charging is about the last thing on his mind. Major Petrie orders the men to about-face and move off hastily down the road in the direction they just came. 


Well, well, what a sight for rebel eyes! The redcoats turn and march away, no doubt with American jeers and insults ringing loudly in their ears.


This might be a blow for British prestige but Petrie does not plan on being humiliated. He orders the nearby light infantry to form a screen behind the column. The regulars may be falling back but under his command they will do so in good order.


Nonetheless the British casualties scattered about the road tell their own story.


The other group of light bobs under Lieutenant Parker-Edwards move through the orchard and line the fence by the road providing yet more cover for Major Petrie's withdrawal. 


Captain Carr-Clarke can sense the danger and so he slows his dragoons to a walk and turns them towards the road. If the Americans are flirting with any ideas of pursuing the British he plans to give them a very nasty surprise. 


British Command Card drawn (British: 1, American: 1)

Tiffin card drawn. Command cards available: British: 1 American: 1  

With all units activated this turn the remaining command cards cannot be used by either side.

Turn 6

Josiah Nelson realises this is a good moment to try to bring Jacob Johnson to safety and he orders the men in the farmhouse to bring him out. 


Johnson greets his rescuers cheerfully and hopes he can make good his escape.


Across the road, Lieutenant Smith has only three of his skirmishers with a line of sight that is not obstructed by the Continentals so he has them fire at the screen of British light infantry on the road.  


They suffer a point of shock. That's enough to force them to make an involuntary withdrawal, which brings British morale down further to eight. 


British Command Card drawn (British: 1, American: 0)

American Command Card drawn (British: 1, American: 1)

The random event would have seen the farmhouse set ablaze had the skirmishers been much closer than they are but as it transpires nothing happens. 

Captain Carr-Clarke then walks his dragoons to the side of the road, keeping a watchful eye for any rebels closing in on the withdrawal of Petrie's men. 


Lieutenant Parker-Edwards light infantry are not leaving without giving the Continentals a taste of their musketry and they fire from behind the orchard fence. 


The Continentals suffer a single point of shock. The British lights are not to exact any revenge today.


They reload and then fall back to keep alongside the column of regulars.


British Command Card drawn (British: 2, American: 1)

British Command Card drawn (British: 3, American: 1)

It's now clear the British have decided to cut their losses and withdraw to fight another day and Dave uses the three command cards to have Major Petrie move further to safety. He orders the lights to form up with the column and they all move down the road away from rebels. 


The British Mule train that has been slowly following the regulars also turns and makes its way towards the table edge. 


British Command Card drawn (British: 1, American: 1)

Once again the British are on the receiving end of a random event. All future movement will be -1 pip to each die due to thirst. Today is just not their day. 

As if any more evidence is needed of a British withdrawal, Captain Winston-Smythe turns his regulars and leads them back to woods.


Tiffin card drawn. Command cards available: British: 1 American: 1 

It's now clear that the British plan to withdraw. While my rebels could try to pursue them and inflict more casualties I see no need to suffer a British riposte, not least from the dragoons, and so decide to hold the ground I have. With that we call the end of the game and a clear American victory.


Jacob Johnson, consummate politician that he is, takes the opportunity to deliver a rousing speech to the militia, all local men, many of whom he knows by name. 


Finally the beacon is lit, alerting the district to the arrival of the British and increasing the chance more militia will be available in the next scenario.


Dave, by his own admission, paid the price of moving units forward unsupported. I don't believe the error with the fisticuffs had an impact on the overall outcome, the critical moment of decision was the ability of the Continentals to deliver a withering volley that left the British on the road heavily outnumbered and with little choice but to pull back. Two groups of regulars under Captain Winston-Smythe took no part in the action and the same is true of the dragoons and I think that cost the British any chance of turning the tide in their favour.

Casualties are important for the development of the campaign and so we need to make some adjustment to address the imbalance from the Fisticuffs fight between the skirmishers and the lights. We will assign the four casualties to the skirmishers for the purposes of calculating the impact of losses for the ongoing campaign.

The British lost a total of eight casualties - two from the light infantry and six regulars. Both of the lights die as a result of their wounds, as do two of the regulars. Two of the regulars will miss the next game while they recover and the remaining two are patched up quickly and return to their units. Similarly Major Petrie's wounds are tended and he will be ready to lead the men in the next scenario.

The Americans should have lost four casualties from the militia skirmishers as a result of the fisticuffs and so I roll to see the outcome of their injuries. Two of those die from their wounds but the other two have suffered only light wounds and are able to return to duty immediately. 

Victory has given the Americans several advantages to carry through to the next scenario and the campaign. These are:
  • Rescuing Jacob Johnson has earned them 2VP
  • Lighting the beacon successfully will add a +2 to the die roll for militia reinforcements in the next scenario
  • They will receive two free barricades for the next scenario
So the campaign now moves to Engagement 2: Miller's Crossing with the British continuing to probe the American positions while searching for forage and hidden caches of rebel arms. You can find out what happens next in this post.

20 comments:

  1. I've still not played SP2 but given the simlilarities to CoC, again I find the camapaign doesn't feel right to me. With Americans getting VPs for rescuing a figure and lighting a beacon - both nearer to them feels unbalanced when the forces on both sides are the same. It was feeling pretty balanecd until Contientals showed up.

    ReplyDelete
    Replies
    1. All balance is totally the responsibility of Dave and I. Dave created the campaign and makes no claim to its balance. I’ve made a few tweaks and additions but we’re really just seeing how it plays out and we’re letting the narrative drive it more than anything else. I suspect we will make changes and try to balance it out once we’ve finished. Dave took the British, so he only has himself to blame. Who knows, the Dragoons are fast and powerful, more aggressive use of them could force a different result. The Continentals have only one controlled volley, after that they get a bit flakey, had there been more British at the road they could well have swept the Continentals away in a more protracted fight or with a bayonet charge.

      Delete
    2. Apologies - I had thought it was a commercially produced campaign from TFL.

      Delete
  2. The game played well, looked great! The group of militia that got lucky on the rule error was the only technical error, tactically the loss of use of the off road units by the British gave the Americans advantage more than the scenario. We enjoy the mini campaign scenarios and will do more of them soon.

    ReplyDelete
  3. What a great game! I love reading your reports. They certainly convey all the tension of the action. I have not played SP2 yet, but, this certainly makes me want to.

    ReplyDelete
    Replies
    1. Thanks Kevin, glad you enjoyed it. SP offers lots of command challenges and decisions while delivering a great narrative. It took us a little while to get to grips with making the most of the rules (our problem, not the rules!), but once things clicked we’ve been really enjoying them.

      Delete
  4. As usual, a great report. I look forward to seeing your next report, as I am very familiar with the 1776 campaign in New York.

    ReplyDelete
    Replies
    1. Thanks Dennis, I hope we’ve made a reasonable attempt to capture the look of your neighbourhood! Thanks again for sending me those pictures, I’d love to visit some of those sites and walk the battlefields.

      Delete
  5. Amazing battle report. I really enjoyed reading the account and I’m very happy to follow along a campaign with SP. I kinda like SP way more than CoC but don’t tell anyone.
    The terrain and figures are really nice. 😀

    ReplyDelete
    Replies
    1. Thanks Stew, I’ve been looking forward to playing a SP campaign, I think the rules really lend themselves well to this. Oh and yeah, don’t worry your secret is safe with me 😉

      Delete
  6. So glad to see you back at the gaming table! Another great AAR. You did a great (I use that word too much!) tutorial on getting into CoC, you should do one on how to generated such great (there I go again) AARs. If ave wrote the campaign and this scenario, how did you keep him from knowing about Jacob? Did you draw scenario cards?

    ReplyDelete
    Replies
    1. Thanks Dick, it’s great to be back gaming again and to start a new campaign. You guessed right on Jacob. There were three possible occupants of the house - Jacob for the rebels to rescue; a loyalist family for the British to rescue, or, a doctor who would join the campaign and serve whichever force could reach him first and persuade him to their cause. These were randomly selected but only revealed to the American player on the basis the militia had good local knowledge and knew the occupants of the area. Both sides had an incentive to reach the house regardless of who occupied it, but only the Americans knew in advance who the occupants were. Dave has worked in some similar sub plots for the other scenarios to add more flavour.

      Delete
    2. Another way may be to have one character or several characters in the house who could be described as an advantage to either side. I.e The same character is Jacob if the Americans get there first but he is a British Officer's dad if the British get there first. Both sides know that someone has to be rescued wothout having to use the cards.

      Delete
  7. Great stuff - looking forward to more Sharpe Practice content in future! :)

    ReplyDelete
    Replies
    1. Thanks, I’ve been looking forward to a SP campaign and I think we’re off to a good start (well, I certainly am!).

      Delete
  8. A fine report and a fine-looking game.

    ReplyDelete
  9. I like that way of handling the randomness of who to rescue. This was, as usual, a great report. And a great game -- I commend Dave on a beautifully executed tactical withdrawal. That's something you don't see in one-off games. I really like SP2 -- though all of my games have been Redcoats on Mars (Victorian Sci Fi) -- and I was delighted to see you picking those rules for your next campaign as your AARs are the closest thing to being there. Cheers!

    ReplyDelete
  10. Thanks. Dave may have been responsible for leading his men into a bad situation, but at least he extricated the survivors with style and salvaged some honour in defeat. There was no way I was going to pursue him, that was to tempt fate (not to mention the Dragoons).

    ReplyDelete
  11. Looks like you’re off to a great start! Gripping write up as ever. Not really a nail biter yet, but I’m sure there’ll be other games that’ll be.

    ReplyDelete
  12. Splendid report! Looking forward to future instalments.
    Cheers
    Matt

    ReplyDelete