

I've wanted to find a way to represent a unit in an entrenched position in an aesthetically pleasing way that is also functional. The most obvious and in some ways most simple way is to create a piece of terrain into which existing figures can be placed. This involves an element of compromise because whatever you create will have to sit above the level of the table and not below it.

My first solution was to dig up, literally. I made two shapes, one to fit my standard 40mmx40mm base size for crewed weapons and another to hold between six to eight figures individually based on 20mm rounds.


These do the job and can work very well. The main issue with the larger ones is that it has a big footprint that won't work in a crowded terrain environment and so lacks flexibility.
When I saw the sets of entrenched figures produced by AB Figures I couldn't resist purchasing them. These come with half figures and a set of entrenchments. They give a much better feel for the look of a squad that has dug in, of course the downside is that this is another set of figures to be painted but ones with limited use.

The smaller groupings of figures make it easier to place the squads in crowded terrain. But I have to confess I didn't let form follow function and in the interests of making these look better I mounted them on fairly large bases and that partly defeats the object of the exercise. It also means I have to find a way to account for casualties because individual figures cannot be removed.

I've been playing a campaign set in Normandy and in most scenarios many of my Germans have been entrenched. It's made me look for an alternative solution. In particular a tidier way of removing casualties.
In the end I settled for a simple, unoriginal idea - cut plastic figures in half, mount them on my regular 20mm round bases and then sculpt the foxhole around them. What made the solution easy was that I already owned a quantity of plastic figures left over from other projects, so this didn't require purchasing any additional figures. I've learned over time to never throw things out just because I can't see an immediate or future use for them. This is a classic example why.
I have a number of sets from Plastic Soldier Company including a host of spare figures that come with their vehicles and from these I was able to create all the figures I needed.

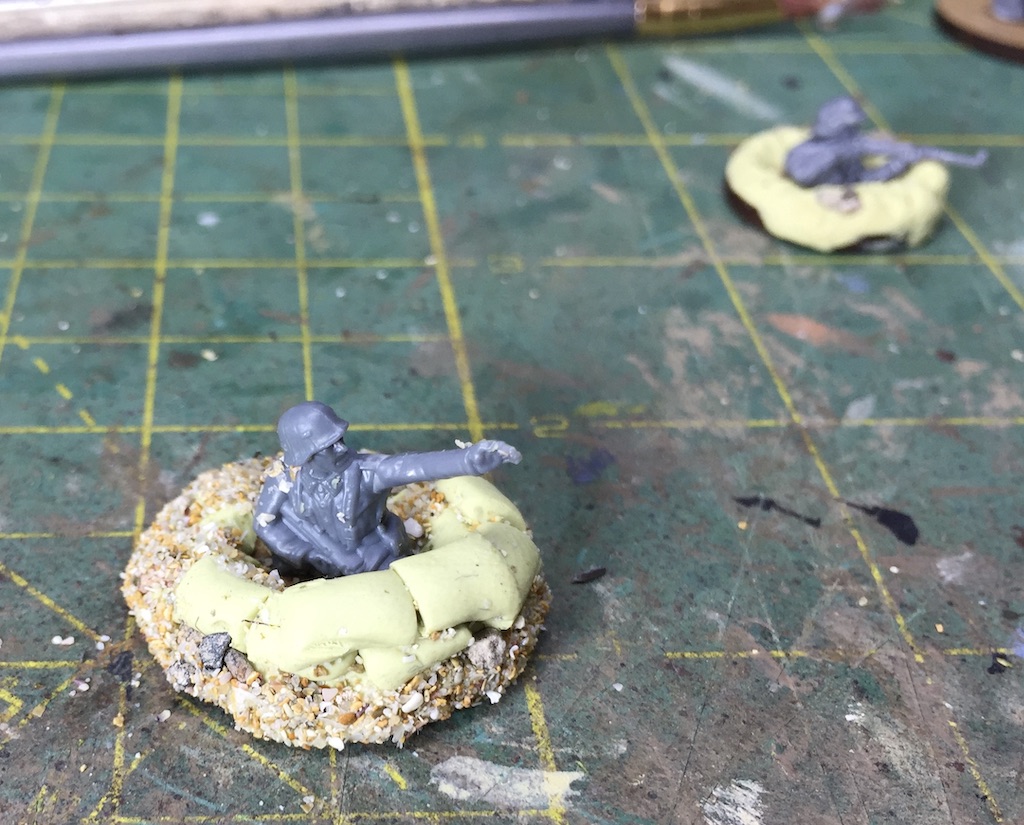
The first step was to find a suitable pose and then cut away the legs. The figure was then glued to a standard base.

Milliput was used to sculpt a simple foxhole shape around the figure. While it was still soft I pressed in a few small stones.

To add variety I sculpted sandbags for some of them, before texturing the surrounds with sand stuck down with PVA glue.


These were then primed ready for painting.

I must admit that at this stage I was a bit alarmed at the way the foxholes had started to look like the men were hiding in doughnuts - this entrenchment proudly brought to you by Krispy Kreme. If there's a lesson to be learnt it's that the front of the foxhole should be higher than the rear and to avoid a shape that's too symmetrical place the figure off centre towards the rear of the base.

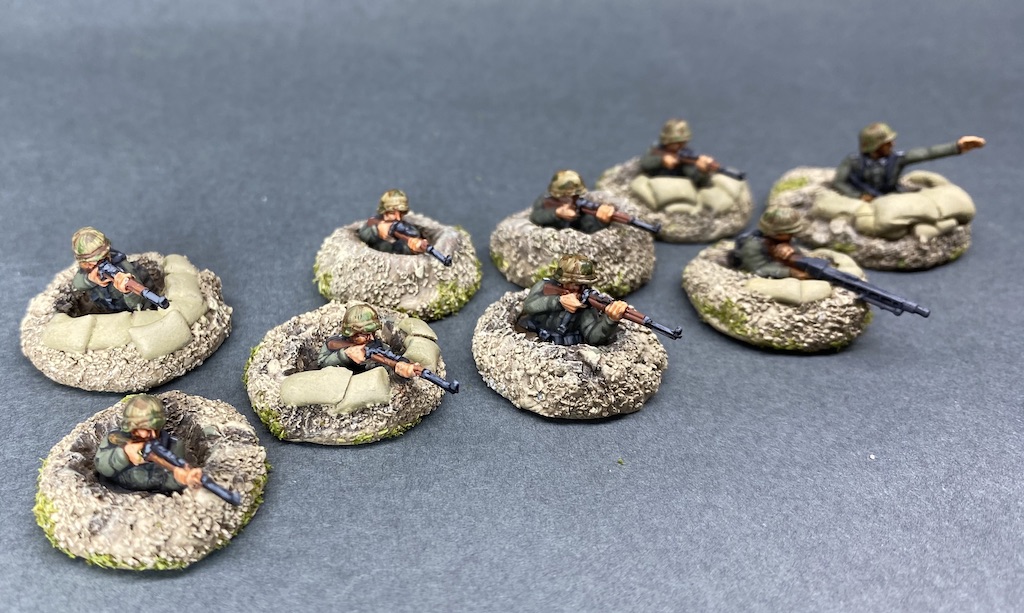
Once painted and with a small amount of flock added to try to break the shape I think these will work well enough.

I plan to use them with my other entrenched figures. They can be used as 'small change' so that when there are casualties I can transfer out the bigger bases and replace the survivors with some of these. Alternatively these can be used when terrain makes it difficult to use either of the other types of entrenchments. Finally, if nothing else, this gives me another entrenched squad should I need one.

I still had a number of figures left over and so decided to make up some double foxholes to add variety to the way they could be arrayed on the table. To keep a modest footprint they are on 30mm round bases and actually take up less space than two figures individually mounted on 20mm bases. These were made in exactly the same way as for the single figures, but trying to avoid the 'doughnut' look.


This has been a great way to use up surplus figures and provide me with plenty more figures in entrenched positions.


Depending on terrain, there is the option to use only those figures in individual foxholes.


Alternatively, they can be mixed up in variations of the two types.

While rummaging through my spare figure box I also came across a bunch of PSC British figures that I had started painted several years ago but I had put aside once I began converting my platoons to AB Figures. It didn't take long to cut them in half and give them a quick lick of paint.
All up this is certainly not an original idea for creating men in foxholes but it's been a great way to make use of surplus figures.


I've been playing a campaign set in Normandy and in most scenarios many of my Germans have been entrenched. It's made me look for an alternative solution. In particular a tidier way of removing casualties.
In the end I settled for a simple, unoriginal idea - cut plastic figures in half, mount them on my regular 20mm round bases and then sculpt the foxhole around them. What made the solution easy was that I already owned a quantity of plastic figures left over from other projects, so this didn't require purchasing any additional figures. I've learned over time to never throw things out just because I can't see an immediate or future use for them. This is a classic example why.
I have a number of sets from Plastic Soldier Company including a host of spare figures that come with their vehicles and from these I was able to create all the figures I needed.

The first step was to find a suitable pose and then cut away the legs. The figure was then glued to a standard base.

Milliput was used to sculpt a simple foxhole shape around the figure. While it was still soft I pressed in a few small stones.

To add variety I sculpted sandbags for some of them, before texturing the surrounds with sand stuck down with PVA glue.


These were then primed ready for painting.

I must admit that at this stage I was a bit alarmed at the way the foxholes had started to look like the men were hiding in doughnuts - this entrenchment proudly brought to you by Krispy Kreme. If there's a lesson to be learnt it's that the front of the foxhole should be higher than the rear and to avoid a shape that's too symmetrical place the figure off centre towards the rear of the base.

Once painted and with a small amount of flock added to try to break the shape I think these will work well enough.

I plan to use them with my other entrenched figures. They can be used as 'small change' so that when there are casualties I can transfer out the bigger bases and replace the survivors with some of these. Alternatively these can be used when terrain makes it difficult to use either of the other types of entrenchments. Finally, if nothing else, this gives me another entrenched squad should I need one.

I still had a number of figures left over and so decided to make up some double foxholes to add variety to the way they could be arrayed on the table. To keep a modest footprint they are on 30mm round bases and actually take up less space than two figures individually mounted on 20mm bases. These were made in exactly the same way as for the single figures, but trying to avoid the 'doughnut' look.

I enjoyed doing these, as they are like small vignettes. At the same time I've added leaders and these are mounted on the larger 25mm bases that I use for junior leaders.

This has been a great way to use up surplus figures and provide me with plenty more figures in entrenched positions.


Depending on terrain, there is the option to use only those figures in individual foxholes.

Alternatively, they can be mixed up in variations of the two types.

While rummaging through my spare figure box I also came across a bunch of PSC British figures that I had started painted several years ago but I had put aside once I began converting my platoons to AB Figures. It didn't take long to cut them in half and give them a quick lick of paint.
All up this is certainly not an original idea for creating men in foxholes but it's been a great way to make use of surplus figures.

A great little project Mark. Good to see your surplus figures getting utilised. Cheers Greg
ReplyDeleteGreat idea, looks very good.
ReplyDeleteLooking great as always. What puts me off is the need to paint still more figures! One thought - make multiple figure version but use magnets to hold figures in and then they can be removed as casualties OR fewer foxholes and emplacements can be used for multiple purposes (i.e figure combinations).
ReplyDeleteTop stuff, I have just done similar for my 28mm Germans using the free Warlord sprues that came with recent issues of Wargames Illustrated.
ReplyDeleteA neat idea and well realised.
ReplyDeleteGreat job! Ought to do the trick. 😀
ReplyDeleteFabulous work on those
ReplyDelete