The Operation Martlet campaign for Chain of Command includes the options for the Germans to entrench one of their AFVs in a dug-in position.

When I made entrenchments many years ago I included a couple that could accomodate larger pieces of equipment.
At the time I was imagining their primary use would be for anti-tank guns and for that they work well.
The downside is their large footprint, which can present problems when placing them in terrain. They are also much less convincing as tank scrapes, especially given they are supposed to represent a tank in a hull down position near ground level.
While they suffice, to my eyes they don't look right with a tank sitting in them. Call me a perfectionist if you must, but I wanted to find a more aesthetically pleasing solution.

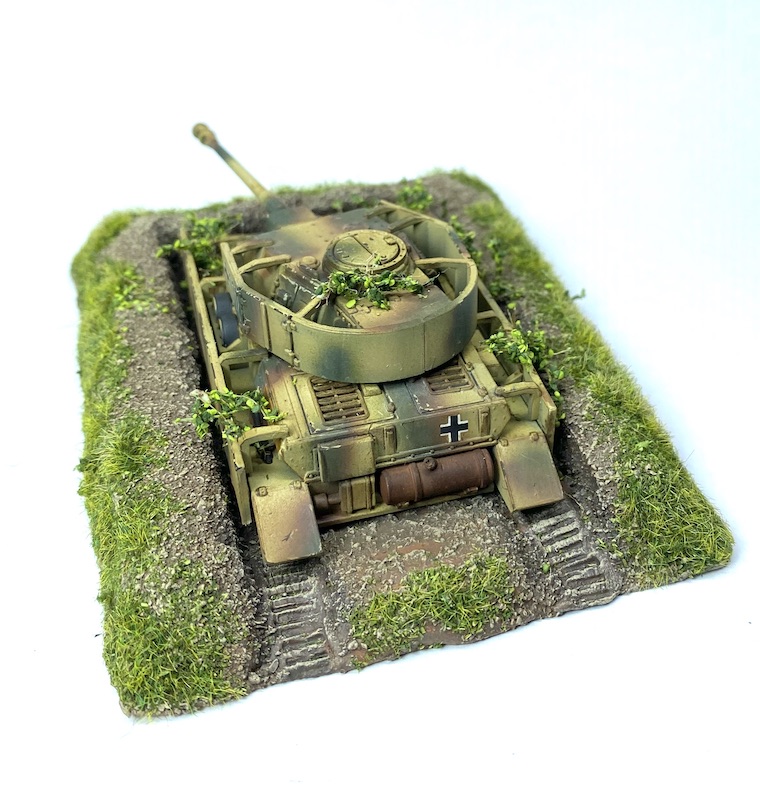
So for the Martlet campaign I thought I'd make something on a smaller base that was more compact and better shaped for a tank. Then I had a bit of a brain wave. There was a Plastic Soldier Company PzIVH assembled and part painted languishing in my 'to finish' draw. I was in no hurry to paint it, after all I had several completed ones in the collection already. In the Martlet campaign the core German platoon includes one PzIVH as part of their order of battle and that's when the idea came to me, why not try and create a dug-in AFV that actually sat realistically on the table? I'll cut the PzIV in half.
It was easier than it sounds as I was able to separate the lower half of the model by cutting along the join between chassis and hull. The only real surgery involved cutting the schurzen skirts on the side.
To make the base I cut a piece of MDF trying to keep a fairly compact footprint.
I used pieces of cork floor tile to give shape to the entrenchment.
That was then made more natural using Milliput.
The key objective is to create the illusion that there is a whole tank in there. It's one reason to keep the entrenchment compact as that will make it more difficult to see into and notice the missing lower half. The other most obvious way is to give a sense of depth by using paint.
To add to the illusion I made tank track impressions by pressing the ones that I'd removed from the model into the Milliput while it was still soft.
Next job was finishing painting the PzIV. I would use a scheme very similar to my Revel PzIV H as it was quite likely that would be used in the campaign.
At the same time the base was textured using my own mix of various sizes of sand I've collected from different beaches.
The base was painted a mix of browns and then highlighted with a dry brush before adding a base mix of flock around the edges.
The lower interior and sides of the entrenchment were painted in much darker shades to give the impression of depth.
At that stage I was beginning to get a good idea of how this was going to look.
The tank then needed finishing off and for this I proceeded exactly as I would were it a complete model, which included adding decals.
Everything was then toned down with a wash and weathering to give the tank a more worn look.
With static grass added on top of the base layer of flock the project was looking complete.
Yet while it certainly looked the part I wanted to add a little more. Contemporary photographs from the Normandy campaign often feature German tanks adorned with foliage and I thought it would be worth adding a few pieces to this kit.
I would use the same method that I used when adding foliage to a Marder.
This is made by gluing Noch leaves to coconut fibre.
With those pieces added the piece was truly complete.
If you've found this post useful and would like to
Buy Me a Coffee to help cover some of the costs of running the blog you can click through at the link or on the tab in the right hand column of this page.


That looks brilliant. Really nice piece of kit.
ReplyDeleteThanks Carole, I was really happy with the way it turned out.
DeleteA lovely piece and got me thinking - I have some incomplete metal kits that I cannibalised for others. I must check to see if I have enough for an upper half - imitation is of course the acme of appreciation. I can always swap in a turret from an 'above-ground' tank if I don't need both for a game. Thanks for the inspiration.
ReplyDeleteIt’s a great way to make use of left over pieces or spare models.
DeletePS does this mean we'll get MARTLET soon?
ReplyDeletePossibly! I’m taking a new player through it so won’t be doing AARs for that, but Dave and I have talked about it as our next one. We’ll see, he’s snowed under at work at the moment.
DeleteA finely rendered piece, it really looks the part.
ReplyDeleteNicely done. Being fussy has advantages.
ReplyDeleteHaha, yes, that’s true. It was worth the effort.
DeleteVery effective! It really looks like the tank drove into the scrape. I'm reading 'The Bloody Battle for Tilly' by Ken Trout which refers to Pz IVs being dug in this way in the middle of cornfields.
ReplyDeleteThanks, that was the effect I was aiming for, glad you can see that.
DeleteNice work - that looks great.
ReplyDeleteperfectionist! LOL
ReplyDeleteBut that's a very nice result and worth the effort. 😀
A fantastic idea and execution!
ReplyDelete