Most of my buildings start off as MDF models and I use those as a base to add extra details and embellishments. My initial thoughts when I was looking for a barn for my American War of Independence project was to find something similar that I could detail. However the more I thought about it the more I realised that a simple barn was really nothing more than a box shape with a sloping roof - perhaps a single small window and a door. Surely it would be easy enough to build one from scratch? So that's what I did.
I started by cutting out the basic shapes for the four walls from 5mm foam core.
These were glued together with PVA and secured in place with pins.
To make the wood exterior I used wooden coffee stirrers. These appeared to be the perfect width for timber planks at this scale (or certainly close enough for me). A large bag from a craft store will give you a hundred or so at a very reasonable price.
These need to be cut to size. I wanted the barn to have a rustic look so I didn't want to have all the planks the same length and that meant cutting a variety of different sizes.
They were all cut using my trusty 'Chopper' a wonderful tool for all sorts of modelling projects, but particularly good when you need to cut lots of pieces for a terrain project.
Once cut to size the strips of wood were glued to the exterior of the foam core frame using PVA.
As you can see I've tried to vary the lengths and avoid a uniform look to the planking.
The only variation was to make a frame for the barn doors on one side. The Chopper has the ability to cut precise angles and so I was able to cut 45 degree angles to make these joints.
The original plan was to make the barn with the doors closed but given how few features it was going to have on the exterior I decided to have one door open. I made a cut in the foam core for the one side that would have an open door. The doors themselves were made from a piece of balsa wood and the 'planks' were simply scored on the balsa with a pointed tool. The hinges are small pieces of toothpick cut to size.
That then inspired me to add a window (so much for the 'simple box with sloping roof'!). In this instance I took the easy option and didn't cut a hole, choosing instead to have the window shuttered and closed. The frame was made in exactly the same way as the door frame and the window shutters, like the barn doors, were made from balsa wood.
The second barn door would be slightly ajar, but I would wait to glue it in place until the exterior was finished.
A base for the completed building was cut from MDF and the edges bevelled using the sanding tool on a Dremel.
The basic form of the roof was also made from foam core and reinforced at the join with a few pieces of balsa wood.
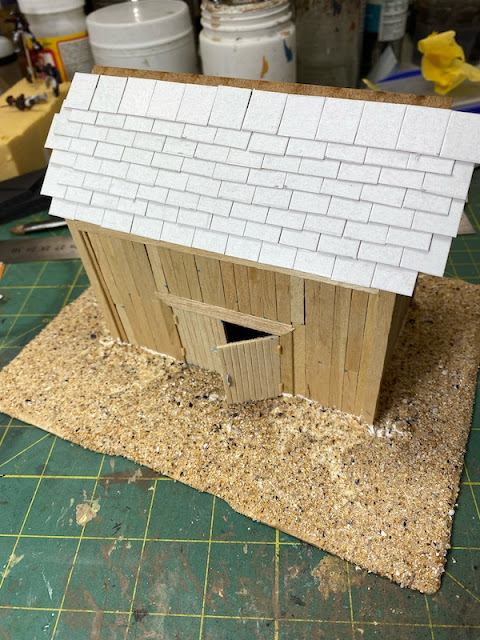
The base and interior of the barn floor were textured using a mix of sand glued down with PVA. As you can see below I also added trim for the corners and across the top of the planking near the roof.
A few piece of spare plastic sprue from a model kit were trimmed to shape to make a bolt and handle for the doors.
The wood shingle roof tiles were cut from cardboard (a breakfast cereal box) and glued down with PVA.
These were supposed to be shingle and I wasn't look to be overly precise in their placement.
Once the glue had dried they were then trimmed to size.
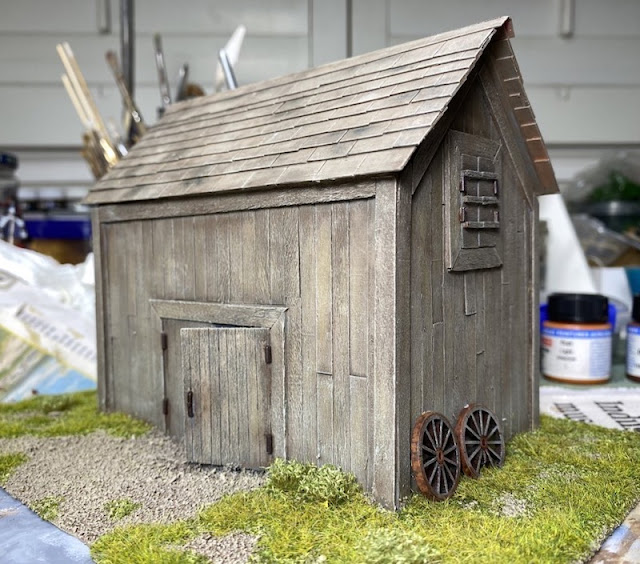
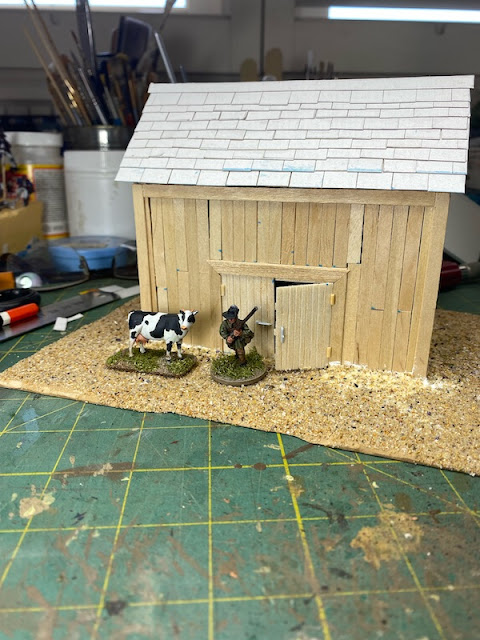
With that the core construction was complete and you can see here how it scales with 28mm figures.
Prior to painting the entire model and base were primed with a flat grey primer. This gives an even surface for painting and also helps the paint to flow easier.
The primer does a great job of tying all the elements together and I always find that this is the moment when you start to visualise how the final model might start to look.
The whole model, base included, was given a coat of diluted Dulux emulsion Brown Land. The solid colour of the wood was then broken up using Brown Land mixed with other lighter colours and a little yellow ochre to simulate the look of newer wood. I want the wood to look suitably weathered but not evenly so.
To bring out the natural wood grain in the coffee stirrers and to highlight the division between individual planks the whole building was given a wash of Citadel's Agrax Earthshade.
This muted the brighter colours, brought out the grain and began to tie things together.
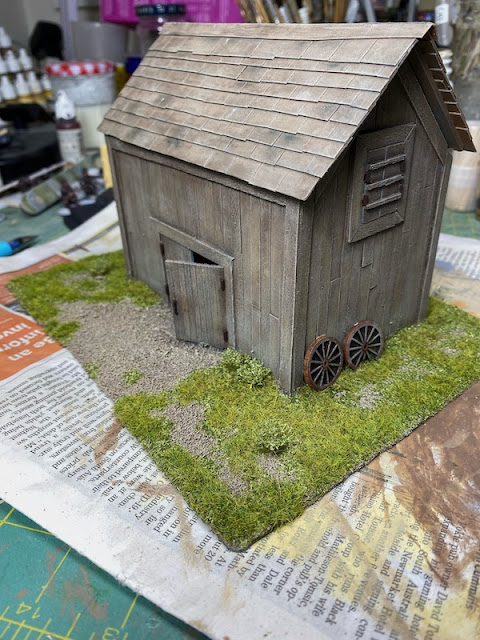
The next stage is to age the wood by dry brushing. This was done with an initial brush using Vallejo Stone Grey, followed by a second brush to pick up the highlights with a mix of Light Grey and Stone Grey.
The metal hinges and door latch were painted using a mix of Vallejo Hull Red and Black Grey and then washed with Citadel Reikland Fleshade.
The roof shingles received additional weathering with a dry brush using Vallejo German Dark Green to simulate a bit of moss and mould.
With the painting of the wood completed the base was flocked using a mix of commercially available flocks from Army Painter and from Noch.
This is a base level on top of which I add static grass (a homemade mix of grasses from Noch) and a few tufts.
The wagon wheels come from an MDF set available from Charlie Foxtrot Models that are perfect to add to a project like this.
And that's the barn completed and ready for the table.
The total cost was effectively zero as all the materials were already to hand. The bag of coffee stirrers, for example, I bought a couple of years ago with no specific plan in mind. I've used maybe a dozen of them in that time, but now found a good use for a lot more. Same applies to the foam core and other materials. I'm particularly pleased with the way the natural grain in the stirrers has come through in the painting, now that I can see how effective that is I'm already thinking about making use of them in other terrain projects.
If you've found this post useful and would like to
Buy Me a Coffee to help cover some of the costs of running the blog you can click through at the link or on the tab in the right hand column of this page.


Lovely scratch build Mark.
ReplyDeleteThanks John, just trying to follow in your footsteps!
DeleteExcellent work, a grest bit of building.
ReplyDeleteThanks Ray.
DeleteVery nice. I need to replenish my supplies of static grass so I can try your on-top-of-flock technique.
ReplyDeleteI think they key with any groundwork is building it up in layers. It’s something the model railway folk are particularly good at and I think it’s well worth the effort.
DeleteExcellent work there Mark hope you are not abandoning 20mm
ReplyDeleteNo fear. Second World War will always be in 20mm and we have a campaign lined up for CoC once the Sharp Practice campaign is finished.
DeleteNice scratchbuild! :)
ReplyDeleteThanks Tamsin, always good to conjur something up from bits and pieces in the terrain tub.
DeleteA fine build there Mark
ReplyDeleteThanks Phil.
DeleteWell done, Mark. That looks terrific, It is a lovely model.
ReplyDeleteThanks Carole, I think a lot of help came from the natural grain in the stirrers, I had no idea how effective that would be until the paint went on.
DeleteVery atmospheric, can almost smell the hay. Great tutorial as well. Thanks for the post.
ReplyDeleteThank you!
DeleteWood effect is so convincing it's hard sometimes to believe the painted versions are those we see being made up as the transformation wrought by the paint job is stunning.
ReplyDeleteThanks Rob, the paint job worked a treat in bringing out the natural grain in the stirrers.
DeleteThis is a wonderfully done step by step tutorial. Your barn is truly a piece of terrain art. Well done! Bookmarked.
ReplyDeleteThanks for posting the link to TMP.
BTW, where did you buy your chopper?
Thanks. I bought the chopper in the US many years ago while there on a business trip. I can’t actually recall where from but pretty sure I ordered online.
DeleteExcellent job. The wood effects are very convincing and the steps well documented for one to follow.
ReplyDeleteOnly mistake I can see is that all barns are painted red in my mind. Lol 😀
Thanks Stew. When did people start painting their barns (and red in particular)? I wonder if it was common in the 18th century (asking for a friend)?
DeleteI'm not sure how common painted barns were in the 18th century.
DeleteI can say that most painted barns would be either red or white.
Red is iron oxide red, a cheap and easily available pigment.
The white is common whitewash.
A lot of the older barns around here were oxide red on the outside and whitewashedd inside.
Looks great, and should serve very well in different theaters.
ReplyDeleteI have a chopper, and while I do not use it all that often, it is great for this sort of project! (the fanciest thing I have made is a casement window)
Thanks. I’m going to do an alter roof with thatch to make it as versatile as possible. The chopper is a great tool that has a myriad uses. That and my Dremel are my two most used terrain tools.
DeleteGreat result - very nice. Similar to one of the first scratch built buildings I ever made (here, if you're interested - https://classic40k.com/2016/01/05/barn-raising/ ) of which I would do it a bit differently now, more like yours.
ReplyDeleteThanks for sharing your techniques in such detail, very useful.
Great looking barn,lovely finish, the chopper looks like a really useful tool,it's funny I always thought the boards would go horizontal but maybe it's an American style?
ReplyDeleteBest Iain
Lovely work - I saw the small version of the image and thought it was a Border Reivers Bastle House!
ReplyDeleteThat’s a splendid bit of terrain!
ReplyDeleteCheers
Matt
Great post, appreciate the step-by-step photographs.
ReplyDeleteExcellent post. I love reading along with step-by-steps like this. The best part of a barn like this is using it for multiple time periods!
ReplyDeleteSUperb barn, excellent step by step post...and wonderful job!
ReplyDeleteFabulous looking barn Mark, really captures the feel.
ReplyDeleteCheers
Matt
This comment has been removed by a blog administrator.
ReplyDelete