
We return to Holzthum Village (Map 3) for the second planned attack of Campaign Turn 8. The first attack the Germans made during this turn was at the outskirts of Consthum village (Map 4). They were successful and took advantage of the campaign's blitzkrieg rule to go on and immediately mount an attack on Consthum village itself (Map 5). That was repulsed and so now we return to the other attack which is another attempt to dislodge the Americans from Holzthum village.

A number of defences are still in place following previous games, including two minefields and two areas of barbed wire. I think the one thing we have learned from those earlier games is that any German approach from Assembly Point B leaves their infantry very exposed to American fire from the houses in the village. It would appear that an attack along the road from Map 2 is the more viable option. With that in mind barbed wire had been placed prior to the last attack to try to channel the Germans into the centre of the village where I hope to be able to concentrate the defence.

The Americans have a strong force here. The initial platoon has lost one man permanently but they have been reinforced by the unexpected arrival of five riflemen who made their escape following the loss of Map 2. The platoon is supported by two 30cal MMG teams and each squad has been bolstered with an additional BAR. To this they can add a Sherman which arrived from Consthum (Map 4) earlier in the campaign. Having successfully held off two attacks they have strengthened their defence by adding two entrenchments to the one they had at the start of the campaign.


The Germans will attack with a fresh Volksgrenadier Sturm platoon backed up with eighteen support points. Once again I fully expect to face German armour - most likely in the form of a Panther.

With the Germans in control of Map 2 and with units at Assembly Point B they have chosen to make this scenario a Flanking Attack. While I don't expect to see much German activity from the direction of Assembly Point B I cannot ignore the presence of jump-off-points in that area and so I need to ensure I have options to cover that flank.
The German jump-off-point near the rear of the village is something I will need to keep an eye on. That said, I'm not unduly concerned. The Volksgrenadiers can deploy only 4" from that point and would being doing so in open ground. That makes me fairly confident I won't see a major threat from that direction, but I can't be sure until I see how the attack develops.


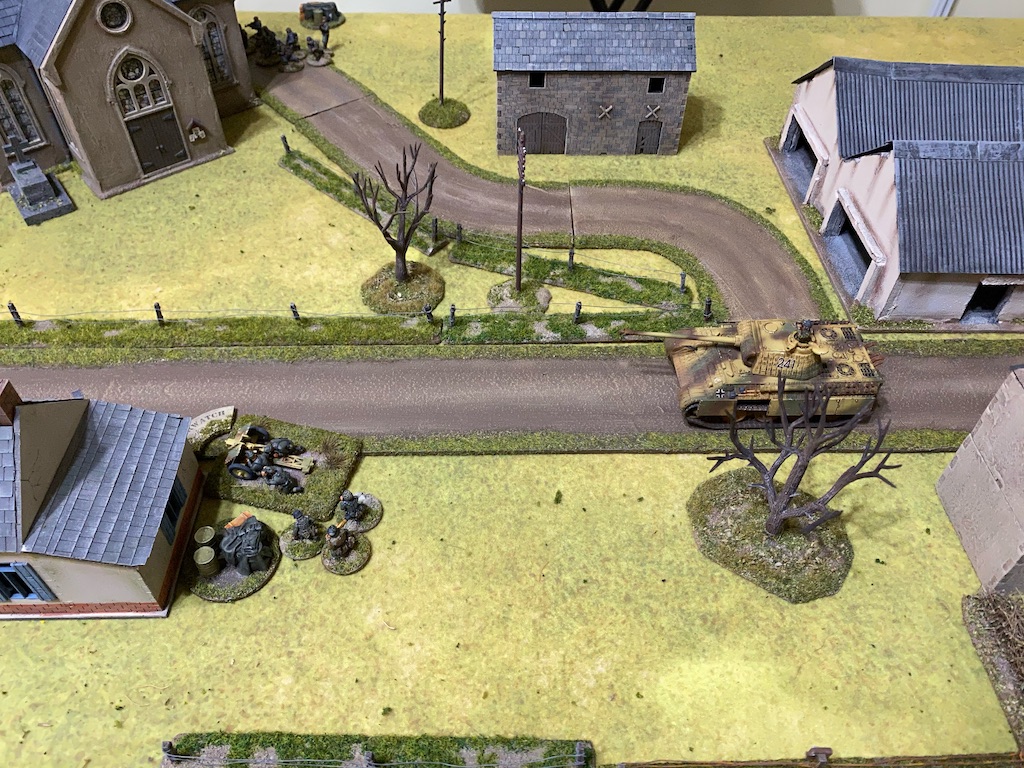
The tank commander casts a watchful eye over the quiet village and puts the gunner and bow MG on overwatch.

Meanwhile one of the Sturm squads deploys behind the cover of the village church.


I see little point in revealing any of the Americans just yet and so the phase passes back to the Germans. An leIG18 infantry gun deploys alongside the road near the Panther.

The Volksgrenadier platoon's LMG squad then deploys into the house next to the infantry gun and both MG42 teams are placed on overwatch.


The Panther moves normally along the road.
Once again the Americans choose to remain concealed. As always there's a risk in doing this and the next German command roll of 66443 makes me wonder if I'll live to regret that decision. An Unterfeldwebel who has been called in to support the platoon joins the LMG squad and orders them to move further along the building to where they have a better arc of fire.


The LMG teams can't quite target the house in the walled courtyard from that position, but they do cover a large part of the centre of the table.

The Panther commander orders the driver to move forward slowly while the gunner is placed on overwatch.


The Volksgrenadier squad behind the church move towards the front of the building as the Germans carefully manoeuvre toward the centre of the village. Despite the opportunity of a double phase it's clear Dave is playing this carefully and not planning on any rash moves.


The following German command roll is 64311 and the steady build up continues. The platoon's second Sturm squad deploys from the jump-off-point at the barn near the Church and they are placed on overwatch.


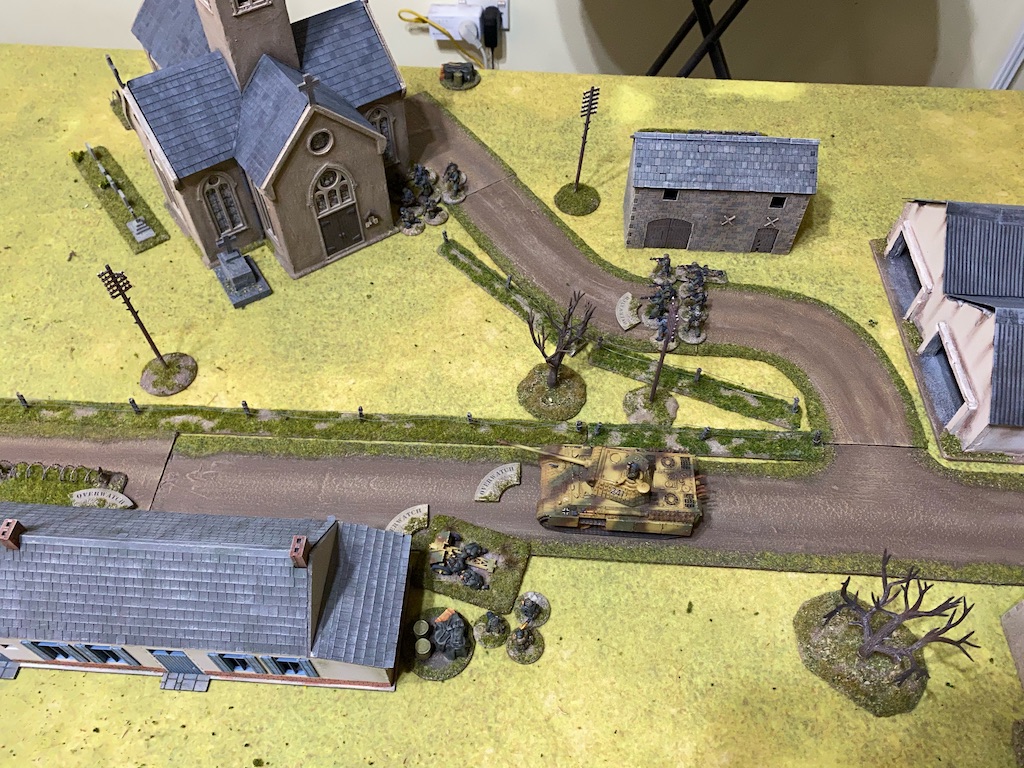
The platoon's Unterfeldwebel deploys and directs the squad to move into the church.

They don't move as fast as he would like and only make it as far as the doors.

The American command roll is 66642 and while that will mean a second phase I'm not sure I want to commit any of my units just yet, not least because most German units are on overwatch and would return a considerable volume of fire. I decide to do nothing. So the Turn ends and all the German overwatch is removed. Perhaps the next phase will give me a better opportunity to react? The following command roll is 64431. I think about what I might be able to achieve but decide I'm better off holding fire until the Germans commit themselves further.
With a command roll of 65222 the Germans have several options. The squad makes its way into the church where a few of the men are able to take up positions by the windows.

The Panther commander puts both the main gunner and the bow machine gunner back on overwatch.

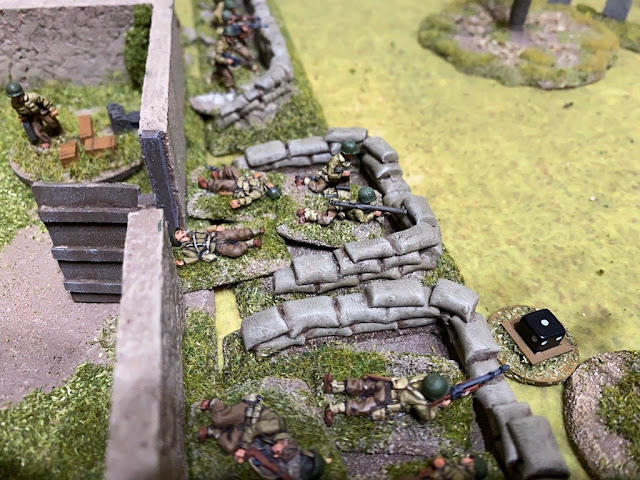
The Americans enjoy another run of phases with a command roll of 66541. This time I decide to take action. The Sturm squad that deployed from the barn is in the open and makes for a very tempting target. This is where the Germans are at their most vulnerable. I may find it very difficult to deal with the Panther but catching their inexperienced infantry in the open is to strike at their achilles heel. I decide to deploy one of the 30 cal teams entrenched in front of the walled house. They are near the gate, which may provide a quick getaway should the German return fire prove too hot to handle.


The 30cal opens fire at the exposed Sturm squad.

I was hoping to inflict a few casualties, but the squad suffers only three points of shock.

As expected the Panther responds and the main gun fires a round of HE at the team, but fails to hit the target. That was lucky.

The MMG team are less fortunate when the Panther's bow machine gun opens fire killing two of the team.

The following American command roll is 65432, which won't enable the MMG team to activate without the direction of a leader and so the platoon sergeant deploys into the cover of the walled garden. That puts him within command range, but safe from enemy fire (for now at least).


This time the 30 calibre rounds scythe down the Volksgrenadiers - killing three riflemen; wounding and stunning the Obergefreiter and inflicting a further three points of shock. German morale falls to seven and the squad are very close to pinning. In two rapid bursts of fire the 30cal has almost neutralised one squad.

That's a good result and I feel I should capitalise on the success. I bring more fire to bear by deploying a rifle squad entrenched alongside the MMG team.

The squad leader orders the BAR team to fire on the Volksgrenadiers while he commands the rifle team to engage the crew of the leIG18 infantry gun.

The Volksgrenadiers lose another man and accumulate more shock, which is enough to see them pinned down.

The rifle team's fire is less effective and fails to have any impact on the leIG18 crew who benefit from their gun shield. A second American squad deploys into the row of terrace houses that line the road and opens fire on the Germans at the church windows opposite.

That fire is deadly. It kills two of the Volksgrenadiers and inflicts a point of shock on the squad. This opening burst of American fire has proven to be very effective.

The German command roll is 55321 which limits their range of options. The squad in the church fall back from the windows to regroup, while the Panther fires both its main gun and bow machine gun at the entrenched Americans.

This time it manages to inflict only a single point of shock on the squad's BAR team.

In the American phase the squad leader rallies the shock from the BAR team.

He then orders the rifle team to maintain their fire on the crew of the infantry gun.

This time the American fire is much more accurate and three of the gun crew are taken casualty.

The platoon sergeant then commands the 30 cal and BAR teams to try to finish off the Volksgrenadier squad that is caught in the open.


They have another man killed and suffer two points of shock, which is enough to break the squad.

They turn and fall back 13” dragging their wounded leader with them.


German retribution is swift and in the following phase the Panther opens fire with both guns again. This kills a third man in the MMG team and one in the BAR team. It also inflicts shock on the squad.


The Volksgrenadier LMG squad opens fire from across the road targeting the entrenched rifle team, who are the only Americans they can see.


The team lose one man and suffer a further two points of shock.

The Americans have dished out a fair amount of punishment in this firefight but the return German fire is starting to take its toll.

The Americans have another moment of good fortune with a command roll of 66654. It won't allow for many activations but it will enable the platoon sergeant to act.


A huge volume of American fire sweeps away the remaining members of the gun crew and wounds the gun commander, who is now the sole survivor. German morale drops yet again and is now down to four.

German morale takes a further blow when the turn ends and the broken squad rout from the table taking their Obergefreiter with them. That sees it drop another couple of points to two.


In the subsequent American phase the squad leader rallies the rifle team.


Once again the platoon sergeant orders the BAR and MMG teams to focus their attention on the leIG18 infantry gun. For as long as the wounded gun commander remains at his post that weapon remains a serious threat.


The gun commander is made of stern stuff and survives unscathed.

The Germans are reduced to three command dice and their next roll of 653 limits their options. It does mean they now have one full CoC die, which may prove useful. The wounded gun commander demonstrates the threat the gun still possess by firing off a round of HE at the MMG team.

The machine gunners are unharmed but the BAR team loses another man, reducing that team to the lone BAR gunner.

The following American command roll is 53321, which in turn gives them their first full CoC die. Once again the platoon sergeant orders the BAR and MMG team to target the infantry gun commander.


This time he is not so fortunate. He suffers a second wound which is enough to kill him. With German force morale perilously low Dave opts to use his CoC die to avoid the roll for the loss of a junior leader.

With that threat eliminated the platoon sergeant orders the rifle team to fire at the LMG squad in the house opposite.

There are eight hits and despite the hard cover four of those are kills. Fortunately for the Germans it is not a leader but it's enough to see one of the MG42 teams wiped out. This time German morale holds steady, but clearly they are not having a good day.

The following German command roll is 221, which allows the Panther commander to activate. Both the main gun and bow machine gun fire on the entrenched Americans targeting the MMG team.


The Americans may have inflicted a number of powerful blows to German morale but for as long as the Panther remains active they are by no means certain of victory. The tank alone could cause considerable damage and there's no certainty the bazooka team or Sherman can neutralise it.
The surviving MG42 team from the LMG squad fire out at the entrenched rifle team.


It's not a good start. The gunner's aim is off and the AP round misses the target.


The bazooka fires with deadly accuracy and makes a critical hit.


The next American command roll is 44433. The platoon sergeant calls the bazooka team back to the jump-off-point in search of more ammunition.

They move back quickly and are able to replenish their ammo supply.

American hopes now hang on the gunner of the Sherman, who is told by the commander to let fly another round of AP at the Panther.


The gunner is now zeroed in on his target and the Panther takes another hit. The round from the Sherman makes an AP strike of only three, which doesn't look like it will be sufficient to deal with the thick armour of the Panther. However it must have hit a vital piece of equipment because it results in one net hit which is enough to rattle the crew and convince them it's time to abandon the tank.


The hard cover provided by the entrenchment serves its purpose well and they suffer a single point of shock.

Luck swings the way of the Americans once again with a command roll of 66443. The platoon sergeant orders the rifle team to return fire at the German machine gun team in the house opposite.


The LMG crew lose one man and suffer two points of shock.

I've driven German morale very low but aside from the LMG squad there are few other targets that would allow me to drive it to zero. In the meantime the Panther is dominating the centre of the village and could take its time to slowly pick off one American unit after another.
With a double phase and a CoC die I decide to take a gamble and tackle the Panther. If I can have the Sherman and the bazooka team fire in the next two phases I'm hoping between the four shots I can disable the tank. Failing that there is the chance that with only three command dice the Germans may not be able to activate the Panther in their next phase. With that decision made the Sherman deploys into the village and fires.

Next I use the CoC die to mount an ambush with the bazooka team. They deploy into the entrenched position formerly occupied by the 30 cal team and fire at the Panther.

The bazooka rocket hits the target and makes an AP strike of four. That's not a bad hit, but the Panther's armour is very good and makes five saves. Hmmmm, things are not going quite to plan.

The subsequent command roll is 55421 and that will be enough to have the Sherman and bazooka fire again. First the platoon sergeant commands the entrenched rifle team to fire at the MG42 team in the house.

Despite the hard cover of the building the team suffers two casualties which is enough to wipe them out. Fortunately for the Germans their morale holds steady.

The sergeant then orders the bazooka team to engage the Panther again.


It's a moment of good fortune that results in an AP strike of six. The Panther's thick armour makes five saves but that's not enough to prevent one net hit, which rattles the tank crew, inflicting two points of shock and sending the tank into reverse.

The Sherman commander then directs the gunner to fire another round of AP down the road.

This time the gunner has found his aim and the round hits the frontal armour of the Panther causing four AP strikes. This time the Panther can make only three saves. The one net hit results in a further point of shock and sees the driver incapacitated for the next German phase.

I've come very close to forcing the crew to abandon the tank, but it hasn't been quite enough. Everything now hangs on the next command roll. This is where the low German morale will prove a major handicap and to Dave's disappointment the three command dice produce a roll of 651. The only team the Germans can activate are the platoon's rifle grenadiers but with all the senior leaders in action that team fails to deploy.
This gives the Americans another chance to try to drive off the Panther and they are fortunate to roll
66551 with their command dice. While that restricts the number of possible activations it does allow the bazooka team to fire their last round and raises the possibility of the Sherman firing in the next. The bazooka team fire their third rocket at the Panther.

Once again they hit their target but this time the three AP strikes are insufficient. An armour save of four is enough to protect the tank from further damage.


The loss of the Panther pushes German morale down to zero and once again they find themselves repulsed from Holzthum village.
I think this was one of those games where fortune smiled on the Americans. Dave conducted a careful approach into the village, supported with considerable firepower. Initially his attacking force looked daunting but as we've found so often in this campaign, once the Americans can concentrate against the Volksgrenadiers they are unable to withstand the weight of fire. That was only helped with timely double phases and a number of awful casualty rolls.
The key, as has so often been the case in this campaign, has been for the Americans to delay deployment until a time when they can bring maximum fire to bear on multiple enemy units. By simply refusing to make themselves targets the Americans can force the Germans to put themselves in exposed positions and at greater risk. While a Panther can prove tough to take out, it's by no means impossible and without the support of that armour the Volksgrenadiers have had trouble moving into close range and bringing their own firepower to bear.
That brings us to Campaign Turn 9 with the Germans in possession of only three of the maps. In order to win a narrow campaign victory during the next turn they would need to successfully capture two maps and use a blitzkrieg move to capture a third map. Given what's happened so far that now looks very unlikely, which leaves the more realistic target of a draw in campaign turn 10 as their last remaining hope.
Having won this scenario the Americans gain the initiative and can mount a counterattack on Map 2. With the German platoon down to about twelve men there's a very good chance the Americans could recapture the table and in the process delay the Germans even further. That makes the prospect of a draw very unlikely and so the campaign appears to be heading towards an American victory.
That's led us to question whether we've reached a culmination point where the outcome is a foregone conclusion. The games are falling into a familiar pattern and the lack of variety makes us wonder if we will end up playing out several more scenarios that will look and feel much like those that have preceded them. I feel the campaign has done a great job of showing the determined stand of a handful of isolated American units, but it may have run its course. We've built that narrative well over the previous games and I wonder if going forward it would just a case of rinse and repeat? For that reason we've decided to end the campaign at this point with an American victory.
It's been an intriguing campaign and spanning ten games across eight campaign turns has been the longest one we have played. Dave has struggled to find a way for the Germans to attack successfully, while I've been able to devise a workable American strategy.
If you've enjoyed following along and would like to Buy Me a Coffee to help cover some of the costs of running the blog you can click through at the link or on the tab in the right hand column of this page.
Time to move on to new challenges. What will that be? We will return to the early war in the Low Countries and play the Many Rivers to Cross campaign that featured in the 2018 Lard Magazine. Dave has painted a Dutch platoon and that complements his early war German platoon and so the setting will be Holland 1940. All we need now is suitable terrain and with that in mind I better get to work on this windmill.

You can find links to all the games in this campaign and several others on the Chain of Command Campaign AAR Page (link from here or at the top of this page).
Excellent game and report a fine result for the Americans a just reward for holding their nerve. Kind of agree with you on going forward a cut and run must seem a tempting option.
ReplyDeleteWe’ve completed ten games so far, making this the longest campaign we’ve ever played. I think I’ve come up with a viable strategy for the Americans but so far neither Dave or I can see an obvious one for the Germans. We’re finding each scenario is a little too similar to the others - the Americans defend a cluster of buildings while the Germans have to approach across open ground. We found that the Opium Hill PSC with only four maps offered a lot of variety and a great narrative demonstrating that it’s not necessary to have a long campaign over many maps for a great experience.
DeleteEach AAR that you post has me eagerly waiting for the next one. Whether you continue with this campaign or set the next one in the vineyards of Bordeaux or the wilds of Borneo, I am always looking forward to reading more about your games.
ReplyDeleteThanks. Dave recently completed a Dutch platoon and we have the Many Rivers to Cross campaign in mind for our next one, so our eyes are starting to drift west to Holland and back in time to 1940. Something very different.
DeleteAs always, a great AAR. Even if that Panther was a menace, this game shows that having a big cat is not always the key to victory. You could have ended the game without having to destroy that tank, but looks like the Germans where quite lucky with their morale rolls. Games that focus on a single defensive position can be a bit static and boring, but this one was quite engaging and shows that you have to be selective with your targets while ignoring others.
ReplyDeleteThanks Matias. I think you’re absolutely right, focusing on hurting the volksgrenadiers has often been the key to defeating the Germans.
DeleteAs usual another brilliant AAR, I do see and agree with the pattern, your lacking a commander giving a withdrawl order at a critical moment in the confusion to mix things up.
ReplyDeleteWe’ve given the campaign ten games, so it’s the longest campaign we’ve ever played. If the outcome looked more in the balance we would definitely persevere, but as Dave said, would we just be using up valuable gaming time to continue and still end up with the same result? He has a point.
DeleteI think your right, you've probably played it out, it didn't have any tactical faux pa's anywhere, the Americans stood and the Germans fell. My question is what PSC next? 😁
DeleteWe are most likely going to do one from Lard Magazine 2018 - Many Rivers to Cross. Dave has been painting up a Dutch platoon and has an early war German platoon, so we will do something set in Holland 1940 using his miniatures.
DeleteThat became one battered Panther! Well played.
ReplyDeleteIndeed. I think the best strategy when you lack a powerful AT weapon is to bombard the enemy AFV with as much as you can in the hope the crew break and bail out.
DeleteLove the detail and pictures - thank you.
ReplyDeleteThanks Norm, glad you enjoyed it.
DeleteVery good AAR as usual, you way of setting the scene is superb!
ReplyDeleteHowever, I feel, even though the campaign shows a bit how determined american units held off the Germans at crucial points, it feels a lot like it's very one sided...which is even accentuated with very good dice on the American side.
I feel like Germans should either get more support (artillery, mortars,...) or a different morale system. They almost always had the downside on force morale which doens't allow for too many brisk actions.
You make a good point. Historically the Germans didn’t have that support, but that aside I do wonder how the playtesting and development went for this one. We suspect the Americans were not handled that well and they offered themselves up as targets too soon allowing the Germans to overwhelm them. I think if handled well the Americans should prove very hard to beat which makes me think the campaign is not as well balanced as it could be.
DeleteAttacking with green troops is just horrible. Additionally these tables haven’t really allowed the Germans to take advantage of the assault rifles at all. Tough PSC for the Germans IMO.
ReplyDeleteTotally agree. I think if the Americans play to all their advantages the Germans are going to find this very difficult. Despite playing ten games I still don’t have a clear idea in my mind how I might go about attacking as the Germans.
DeleteI really think that assault rifles should be treated as semi automatic rifles when over 18", 2 shots when under 18".
DeleteThanks for the excellent report. As always, the next best thing to actually playing it. I think the US were pretty lucky with multiple phases. If it had been the reverse, i think they would have been in trouble. But as you say, the games are becoming quite similar. If I was playing the Germans I would be thinking about deploying Panther, infantry gun well back, and then scout teams to threaten the US player into deploying, and letting the Panther and gun destroy them at a distance. The Volksgrenadiers just seem too brittle.
ReplyDeleteYou’re dead right about the luck, Dave had an awful game and the Americans certainly took full advantage of the luck that came their way, there’s no doubt about that. It wasn’t just the double phases but the German command rolls rarely allowed the weapons to concentrate their fire. Often it was the Panther or the leIG18 but never the two in the same phase. I always felt it was a gamble deploying the entrenched infantry and p, as you say, had the Germans benefited from the luck the outcome could have been very different. Despite all that if the Americans can hit the volksgrenadiers then they just seem to melt away - green and small squads in the face of big US squads with automatic rifles.
DeleteGreat report and photos. :)
ReplyDeleteThanks Tamsin.
DeleteVery nice battle report. I was rooting fir you the whole time....lol. I think the campaign has probably run its course by now as the Germans attack seems to have stalled and as you say; the games are becoming too similar. That’s not necessarily a bad thing if you like solving the same puzzle over and over but it sounded like you both were finding it stale. 😀
ReplyDeleteThanks Stew! It is a bit of a puzzle, for the Germans at least. I have a few ideas but not sure whether they would be any more successful. It’s an intriguing campaign with lots going for it, but I suspect it may be too long given the lack of variety in the scenarios.
DeleteHi Mark, if you decide that the German's can't win,you could try a counter attack by the US army (as allowed in the PSC). Perhaps, not wise strategically but could be an interesting contest.
ReplyDeleteGerry
A counterattack is allowed following an American victory so that’s certainly a possibility and by doing so I can probably deny the Germans any chance of a narrow campaign victory. I suspect Dave’s resigned to losing this one but it might be a bit of fun for my Americans. It’s a thought!
DeleteAnother great report.
ReplyDeleteSeems like as the others have mentioned above, this one is pretty challenging for the Germans. Without the firepower to blast the buildings, they have to get pretty lucky to dislodge the Americans. (or spend all that support on regular infantry squads?)
Thanks. A careful American defence that stays concealed and then focuses on inflicting as much damage on the Volksgrenadiers as possible seems to be the issue. German armour seems to hold the key, although the issue is how to use it in a combined arms way to shoot the Volksgrenadiers onto the target. Easier said than done of course.
DeleteI am always in awe as to how you manage to play a great game, take fantastic photos with a great story line and still enjoy yourself! I have one question. The 2 long buildings I see in this campaign; are they scratch built or a kit? I have looked everywhere for them (except, of course, where they come from)? Thanks
ReplyDeleteThanks Dick, glad you're enjoying the campaign. The two long buildings I think you are referring to are in fact one building that I scratchbuilt to use as an industrial/factory type building (actually for Crossfire, hence the subdivision on the interior into a number of building sectors. It has served many purposes - it was an industrial ruin for the Road to Bremen campaign; the opium factory in Last Stand on Opium Hill, and then here as a large agricultural building. Initially it had no roof but I made one out of corrugated card for the opium factory. The building is made from foam core and mounted on a MDF base.
DeleteI've read al the campaign AARs, and sadly feel this is the most disappointing.
ReplyDeleteThe Americans have been commanded well and cautiously, but the German volksturm are the classic putty dagger.
Impotent, and little bit a target, as evidenced by their defeat by single platoons in some battles.
Th other campaigns have maintained a feeling of real tension until the last.
I say, with regret, this one seemed inevitable from the outset.
That's not to detract form the quality of the commentary, or the photographs.
I just wasn't drawn into a "this went down to the wire" tense narrative.
The combination of green troops and the need to attack is not a good mix.
The times I’ve seen German success in other people’s games has been when the Americans have made the errors, generally deploying too early and gifting the Germans targets. As you’ve noted, the task for the Germans to cross open ground and break into a solid defensive position is a big ask and we found a competently handled American defence can normally see them off. Once the Americans have found the right formula the maps are very similar and so it’s a question of rinse and repeat. Fair to say we found this the least engaging of all the campaigns so far.
DeleteComing to this a bit late(!), but bear with me. Having marvelled at your winter table, and having most of the forces available to put it together (finally an excuse to do my winter Germans) I was initially quite excited to go with this campaign, but it's become obvious that it appears unbalanced. While the maps "sameness" can't be easily fixed perhaps, looking at the historical record the campaign should probably play very different at the start.
ReplyDeleteThe first two turns in particular should operate to different rules. The first turn is stated to occur at 0600. On December 16th full darkness should apply, as it was fully dark until 0615 that morning. In addition there was low lying fog. The Americans reported movement at 0615 but due to lack of visibility held fire for fear they were American troops.
By 0800 (turn 2) visibility would still be very poor. Nautical twilight ended at 0750, with civil twilight just starting then. It was also overcast so light would still be very poor. While not recorded it's also likely fog still lingered to at least some extent at this time.
The historical record also states that the German 26th Division "jumped the gun" and crossed the river at 0300 and then substantially infiltrated the US positions, to such an extent that Consthum had been assaulted 5 separate times by noon. As currently designed the earliest the Germans can attack Consthum is at 1100. It’s apparent the Germans had definitely infiltrated further than the campaign suggests.
Day 2 starts on turn 7 at 0600 according to the campaign, but historically action was only joined closer to 0800. (And in fact was initiated by the Americans counter-attacking.)
Thus, I would suggest the following changes:
1. The Germans should get one infiltration “pre-move”, I.e. the first platoon should move to to point B on the map, with a second platoon generated at point A, before the campaign starts. This at least means the Germans could should they choose, attack Consthum by turn 2, 0800.
2. Turn 1 (0600) is played in darkness. Visibility is 12” as per Operation Winter Storm night rules.
3. Turn 2 (0800) is played in twilight. Visibility is 24”
4. Turn 7 should be an 0800 turn, again with 24" visibility.
The reduced visibility will be a significant advantage for the Germans, particularly the first turn, as they have a great opportunity to get into close range with their assault rifles. The first turn is a huge dilemma however for them. Do they attack with both platoons into map 1 and 2 immediately, or move one and attack with one, or just move both along the infiltration routes? They are passing up a potentially great opportunity to attack in darkness, but perhaps being able to hit Consthum in twilight is worth it?
Maybe these changes would over-balance in favour of the Germans, but given how tremendously hard it is for green troops to attack, especially these small squads, I doubt it. (If it’s too much then make turn one twilight and turns 2 and 7 regular daylight.) I suspect the Germans MIGHT do well(ish) the first few turns but then still run into the same problems of crossing open ground towards an entrenched opponent.
Of course now I HAVE to play-test it, don’t I?
Thanks, you’ve certainly given some good ideas and as you have rightly observed the campaign as it stands does look tough for the Germans. A competent American player should be able to make it very difficult. Some nice ideas there, thanks.
DeleteGreat series of AARs. Thanks
ReplyDeleteThank you, glad you enjoyed it and I appreciate you taking the time to leave a comment.
Delete