
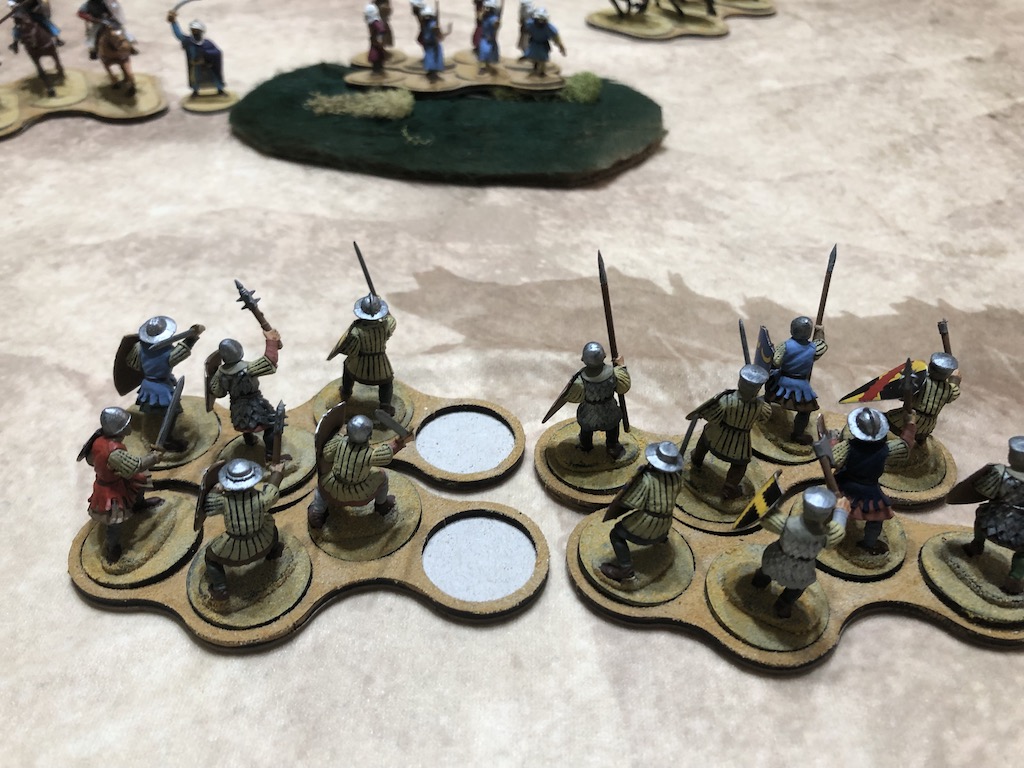
This scenario is the Clash of Warlords from the rule book and features a fight between two 4 Point forces, one of Crusaders and one of Mutatawwi’a across a simple table with a few patches of scrub and a small wooded area. Dave, my regular opponent, will play the Mutatawwi’a and I will play the Crusaders.
The Mutatawwi’a will field two groups of Mounted Fanatics, one group of Warriors with Bows and one group of Warriors Elect. The Crusaders will field two groups of Mounted Knights and two groups of Serjeants on foot. Each force includes a Warlord, which although represented by a single figure has fighting qualities that make it the equivalent of another unit.


The Crusaders start first and set up is sequential, with each side placing one unit at a time within a defined area of the table. I'm not really sure what I'm doing given this is the first game, but it seems to make sense to guard my flanks with my knights and place my Serjeants in the centre where the wooded area and scrub can prevent any rapid move by the Mutatawwi’a mounted units. Dave decides to keep his units in a more compact formation.

The scenario is made up of six turns. Each turn players have one phase where they roll their Saga dice and these determine many of the actions they will be able to take. These are not only 'command dice' they also allow players to select and then activate certain abilities, most often combat related. The number of dice rolled is determined by the number of units in play. Not all dice have to be used in each turn, in fact it can be helpful to keep some unused in your phase so that you can activate certain combat abilities during your opponent's phase. However there are a maximum eight dice that can be in play at any one time for each side putting limitations on what is possible.
With the forces arrayed on the table we were ready to start playing.
With the forces arrayed on the table we were ready to start playing.
Turn 1
The Crusaders won the roll to see who starts and while they have five units (the Warlord counts as a unit for Saga dice purposes) the rules determine that in the initial turn the first player may roll only three. Saga allows unit beyond 12" of an enemy unit to make a 'manoeuvre', which is a free move as long as they start and never move within 12" range of an enemy unit while remaining always in open terrain. As that does not require use of Saga dice to activate I decide to use my three Saga dice to select two abilities and one activation for a unit of Knights.
 .
.

My first move is to take a group of Mounted Knights around the right flank. Mounted may move up to 12" in open ground and as I am making a manoeuvre I must stay in that terrain (had I elected to move through the scrub it would have required a Saga dice to activate the Knights and they would have been slowed down to only 4").


Meanwhile the two groups of Serjeants make their way forward in the centre, again using a manoeuvre.

At this point I decide there is no reason to be cagey. Why not be aggressive and discover exactly what the rules will allow? I will use the powerful force of my Warlord and a unit of Mounted Knights on my left to attack the Mounted Fanatics opposite. With that decided the Crusader Warlord uses his We Obey ability to activate the Knights and send them forward.

This brings them to within 12" of the Mounted Fanatics and therefore in charge range.

The Warlord's Determination ability means he can activate without the need of a Saga dice and so he also moves forward. The reason I needed to rely on these abilities to activate was in order to bring both units within charge range (12") of the Mounted Fanatics, which meant the free manoeuvre move was not going to be an option.

Saga permits multiple activations by the same unit in a given turn. However it does so at a price, for every move after the first the unit will receive a fatigue token. With my Knights now in charge distance I opt to use a Saga dice to activate them again to charge the Mounted Fanatics. A bit hot headed? Probably, but what the heck, we are here to fight and embrace the spirit of the age!


This will make them fatigued and I'm about to discover that this is not a good condition to be in when you are about to engage in melee.

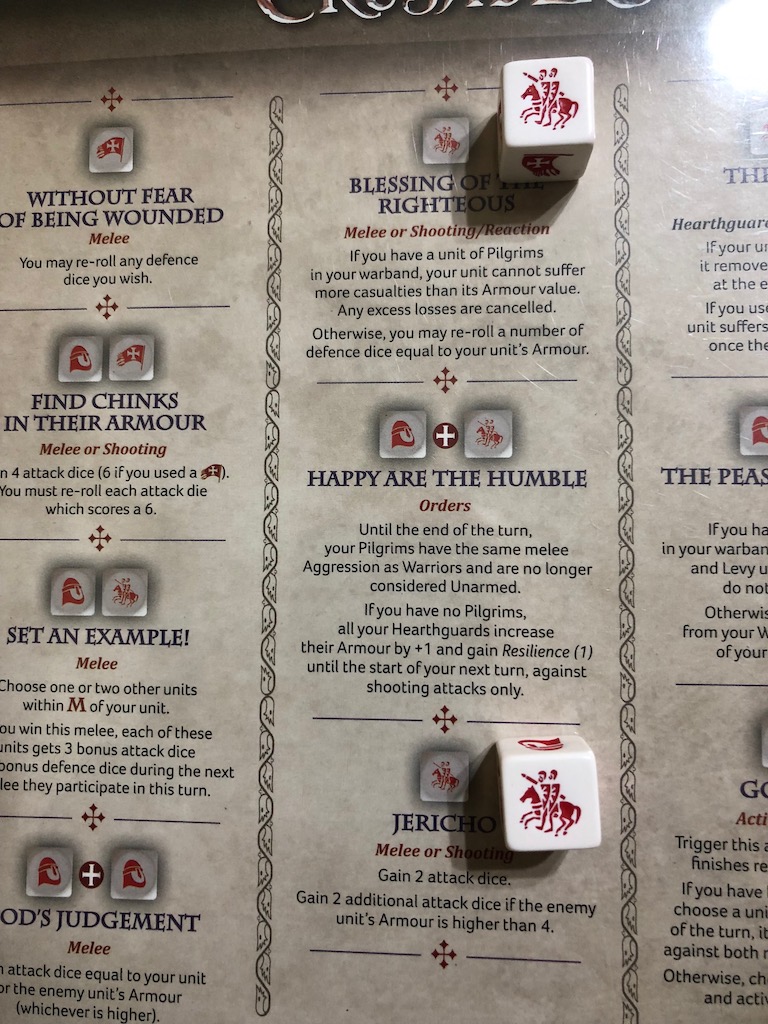
Prior to combat resolution each side announces sequentially which abilities they wish to use. I decide the Crusaders will use Jericho. This seems to give me a reasonable advantage against units with good armour.

In an interesting twist on the way these things are applied in other rules, it is the opposition who determine how your fatigue will work against you. In this case Dave decides to use my one point of fatigue to increase his armour by one level.

In an interesting twist on the way these things are applied in other rules, it is the opposition who determine how your fatigue will work against you. In this case Dave decides to use my one point of fatigue to increase his armour by one level.

The combat does not go well for the Crusaders, their fatigue has clearly worked against them. Hits are determined by the quality of each side's armour and with the Fanatics taking advantage of the Knights fatigue to improve their chances it's no surprise they kill three of the Knights while only losing one of their own. That's a bit of a disaster and a very quick lesson.

My lone Knight falls back and acquires a fatigue for having engaged in combat (his original fatigue marker was removed the moment that the Mutatawwi’a took advantage of it).

The Mutatawwi’a Fanatics are fatigued following the melee and so I decide to send my Warlord on a charge. However the Mutatawwi’a take advantage of the fatigue the Warlord receives for this second activation and use that to their advantage to halt his charge.

So, there's the first lesson - think twice about charging into a melee if you suffer from fatigue, it can really work against you. Well, that certainly makes sense.
The turn now moves over to Dave and his Mutatawwi’a. They don't suffer the same first turn restriction on the number of Saga dice for going second and throw five dice for the number of units they have in action.
The turn now moves over to Dave and his Mutatawwi’a. They don't suffer the same first turn restriction on the number of Saga dice for going second and throw five dice for the number of units they have in action.

Dave elects to assign these across a mix of activations and abilities.

The Mutatawwi’a Warlord uses his We Obey ability to activate the Archers and order them into the scrub. From there they will soon be able to bring the Crusader Serjeants into range.


The Mounted Fanatics in his rear make a manoeuvre towards my Knights on their left flank.

Dave now uses the ability Like Djinns to move his Warriors Elect and charge my lone Knight from the previous combat.


My Knight has only two dice for the combat and there are no abilities I can call on to assist. Not only that, the Mutatawwi’a will use my fatigue against me to reduce my armour - this is not looking good. Little surprise then that the Knight is killed, the only consolation being that he does take one of the Mutatawwi’a Warriors with him. Nonetheless I've paid the price for my rather rash early charge and have lost a full unit of Knights. As a result my Warlord has found himself isolated. Hmmm.

The Mounted Fanatics spend the turn resting and losing their fatigue from the earlier combat. I think we've both learned quickly that fatigue is a dangerous thing.

Finally the Mutatawwi’a Warlord moves into the centre, putting himself in a good position to exert his command influence over several units.

That ends Turn 1 and already I sense we have got a decent grasp of key rules and concepts. In my case I've learned the hard way!
Turn 2
Having lost the unit of Mounted Knights the Crusaders are now reduced to four units and therefore four Saga dice for the turn.


This seems a good opportunity to use the Activation Pool ability which will allow additional dice to be rolled, so that's exactly what I choose to do.


This now gives me activation options and some combat abilities which I hope will come in useful.
The first thing to do is use the Warlord's Determination ability (in effect a free activation for the Warlord without the need for a Saga dice) and he makes his way backwards and away from danger.

On my right I use a manoeuvre to bring the Mounted Knights closer to the Mutatawwi’a but not quite close enough to charge just yet. I plan to be a little more cautious going forward in future.

In the centre I see no point in having my Serjeants remain stationary while the Mutatawwi’a Archers fire at them and so my best option seems to be to advance and attack them. With that both groups of Serjeants make their way forward.


The turn then passes to the Mutatawwi’a who will roll five Saga dice.

With some abilities selected but unused from the previous turn this brings the Mutatawwi’a to their maximum number of Saga dice in play.

The first thing Dave does is to announce the use of the Jahannam ability which could prove a useful asset for combat despite the fact it will apply to both sides.

The Elect Warriors spend their turn resting.

The Mounted Fanatics move from the right flank into the centre to be joined their by the Warlord.


The Warlord then uses his We Obey ability to have the Archers loose their arrows at the advancing Serjeants.


The Mutatawwi’a decide this is a good time to make use of their Combat Bonus ability.

In response the Crusaders will use their Blessing of the Righteous ability to improve their defence.

Even with the re-rolls the Serjeants still lose two of their men.

Turn 3
Despite rolling only four Saga dice the Crusaders have a few still in play on their battle board, so this turn should allow for a range of options using activations and calling on abilities when needed. My main aim for this turn is to consolidate and wait for the Mutatawwi’a to come to me.

Dave decides this is a good moment to trigger his Fanaticism ability to enhance his Archers and limit any damage from my attacks.

The Crusader Warlord makes his way around the wooded area and once in command range of the Serjeants he is able help them pull back and away from the Archers.

Meanwhile I hold my Mounted Knights steady on the right flank.

I then hand over the turn to the Mutatawwi’a.

They use most of their dice for activations, so I can expect to see a fair bit of activity from them.


On my right the Mounted Fanatics approach my Knights.


In the centre the Warlord sends the Archers forward and then joins them.

They are all joined by the other group of Mounted Fanatics and that sees the Mutatawwi’a massed together in the centre.

Somehow my noble band of Serjeants and the Warlord are going to have to deal with this threat. It's not looking very promising for the forces of Christendom.

Dave now uses the Hijrah ability.

This comes at a price and requires him to remove one of his Mounted Fanatics but gives him the advantage of being able to move without fatigue. I sense he's about to launch an assault.

Firstly the Archers fire off their arrows at the Serjeants.

The Crusaders call on their Blessing of the Righteous ability and this stands them in good stead, they take only one casualty.


Sensing the Archers actions are just a prelude to some charges from the Mutatawwi’a I decide to call on the Gods Host ability. This will allow me to move my Mounted Knights back and beyond charge range of the Mounted Fanatics.


As I suspected, in the centre the Warriors Elect push forward, advancing close to the Serjeants.


I sense I was wise to move my Knights back as Dave clearly had in mind to charge them with the Fanatics. Instead they've been diverted to the centre, but in doing so they cannot use any of the advantages from the Hijrah ability. Nonetheless I feel the pressure is really starting to build against my Serjeants.

It does not help that my Mounted Knights are out on the flank and far from where they can provide support. It has been very wasteful having them operate out on that side, Dave has been able to concentrate his force while I've allowed mine to disperse.

Turn 4
I don't feel I can just stand and let the pressure build and so I need to select my Saga dice carefully and plan to counter the Mutatawwi’a pressure. There is bound to be a lot of combat soon and so I ensure I have abilities selected to help me. In particular I have my eye on how to make best use of Set an Example.

The Crusader Warlord uses We Obey and activates a group of Serjeants to charge the Warriors Elect by the woods. My men are outnumbers but I'm hoping to draw on some abilities to win the melee.


The Mutatawwi’a decide not to close ranks and the Crusaders announce they will use the Find Chinks in their Armour ability which will add six additional attack dice in combat.

In response the Mutatawwi’a announce they will use Mortal Blow.

Players may use as many abilities as they have available and we will continue to announce these until we both pass. At this moment I announce I will also use Set An Example. I nominate the other Serjeants and the Warlord as the possible beneficiaries. If I can win this melee it will mean I can capitalise on any success and perhaps swing the initiative back in the Crusaders' favour. Of course, there is a risk that if I lose the melee that ability is wasted.
The melee rolls go well for the Crusaders who score seven hits to the Mutatawwi’a five. The end result is the Mutatawwi’a lose four men while the Crusaders only lose two. A decent result, but can I capitalise on it?

The Warriors Elect retreat and it leaves the Serjeants victorious but fatigued. What it does mean is I can make use of Set an Example and all its combat bonuses.

I want to hit the Warriors Elect once again and activate my Warlord to charge, but we notice that the Mutatawwi’a Warlord is in charge range and the Pride characteristic of the Crusader Warlord means he must charge the enemy Warlord. This he promptly does.

I announce the Warlord will use the Jericho ability (and this will be in association with Set an Example which is already in play). This gives my Warlord thirteen attack dice.
The Crusader Warlord scores four hits while the Mutatawwi’a only two. Despite rolling five defence dice my Warlord fails to fend off any of those hits and he takes two casualties (which in the instance of the Warlord is marked with two fatigues). The Mutatawwi’a Warlord has the Bodyguard ability and so even though he takes three casualties one of those is absorbed by one of the Mounted Fanatics. The end result is two casualties for each Warlord and so technically a draw which means my Warlord must retreat.

That was vicious and my Warlord falls back adding an extra fatigue for the melee, which makes him exhausted (unable to activate until he can rest off some of that fatigue).

The Mutatawwi’a Warlord is in a similar situation and is also exhausted, but he has also survived the melee at the cost of a member of his bodyguard.

The other group of Serjeants can also use the Set an Example ability and they charge the nearest group of Mounted Fanatics. This is desperate stuff but a good chance to put the Mutatawwi’a on the back foot.


To improve my chances I call on the Blessing of the Righteous ability.

In response the Mutatawwi’a call on The Name of Allah.

In the bitter melee that follows the Serjeants lose three men and the Mounted Fanatics lose two. Not a bad trade off but it forces the Serjeants to retreat.


Feeling like I still have an opportunity to stay in the game I bring my mounted Knights around the flank of the Mutatawwi’a and within charging distance of what remains of the Mounted Fanatics.


In the Mutatawwi’a phase it looks like Dave will need to pause and draw breath, many of his units need to rest and recover from their fatigue.

No surprise then that the Mounted Fanatics spend the turn resting, as does the Warlord. However he is now able to use We Obey to activate the single Mounted Fanatic and send him charging into the fatigued Serjeants by the woods.


The Serjeants announce they will close ranks and in response the Mutatawwi’a make use of The Name of Allah.

There are no abilities available for the Serjeants and the Mutatawwi’a take advantage of their opponent's fatigue to reduce their armour by one level. The closed ranks of the Serjeants puts them in good stead and they repulse the Mounted Fanatic without taking any losses.

The Mutatawwi’a Archers fire at the Mounted Knights to their left.

The arrows are unnervingly accurate scoring three hits, none of which the Knights' armour can save. That's a devastating blow that sees the unit reduced to a single knight.


No surprise then that the Mounted Fanatics spend the turn resting, as does the Warlord. However he is now able to use We Obey to activate the single Mounted Fanatic and send him charging into the fatigued Serjeants by the woods.


The Serjeants announce they will close ranks and in response the Mutatawwi’a make use of The Name of Allah.
There are no abilities available for the Serjeants and the Mutatawwi’a take advantage of their opponent's fatigue to reduce their armour by one level. The closed ranks of the Serjeants puts them in good stead and they repulse the Mounted Fanatic without taking any losses.

The Mutatawwi’a Archers fire at the Mounted Knights to their left.
The arrows are unnervingly accurate scoring three hits, none of which the Knights' armour can save. That's a devastating blow that sees the unit reduced to a single knight.

Turn 5
After what was turning into a reasonably good turn things have returned to look somewhat bleak for the Crusaders, not least because the loss of the Knights has reduced the unit to the point it can no longer contribute a Saga dice. With three dice to roll for the turn the options for the Crusaders will be limited.


Like the Mutatawwi’a in the previous turn I am carrying a lot of fatigue and will need to spend the turn resting units. My Warlord activates himself to rest and removes one of his fatigues.

He uses We Obey to activate the Serjeants to also rest and remove fatigue.

The other group of Serjeants activate and they also rest.

In a desperate bid to restore some of the momentum won in the last turn the lone Mounted Knight launches a charge at the Mounted Fanatics. As an aside, there is no ruling in Saga for flank or rear attacks, all units have a 360 degree facing and so there will be no particular advantage to my attacking from this direction.

The Knight will make use of the Find Chinks in their Armour ability which will add an additional six attack dice.
Sadly this matter little, with the Knight losing the melee and dying, while the Fanatics took no loss. A noble attempt by the last remaining Knight to claw back some lost honour, but it came to nought.

With the complete loss of the Mounted Knights I think it would be fair to say that things are looking very grim for the weak Crusader force.

The Mutatawwi’a take their phase. With four Saga dice to roll and a few still in play on the battle board they are in better shape to continue the fight.


In preparation for the final turn the Warlord and the Mounted Fanatic rest.

As do the Warriors Elect.

The Archers are eager to continue their domination of the battefield and let loose a flight of arrows at the Serjeants.


Yet another Crusader is killed. Ranged weapons have a very high nuisance value indeed.

With that the nearest Mounted Fanatics charge into the Serjeants.

The Crusaders close ranks to face their mounted adversaries. While the Fanatics announce they will be using the Mortal Blow ability.

The Serjeants suffer six hits but have a lucky break and manage to save them all. Their hits on the Fanatics are also cancelled out, but the draw means the Mounted Fanatics are repulsed. It's a small victory in an otherwise gloomy situation for the Crusaders.

Turn 6
Reduced to a meagre two Saga dice there is not much the Crusaders can do to rescue the situation.

The Crusader Warlord rests and removes his last fatigue.

In a desperate bid to rescue some glory the Serjeants hurl themselves at the Mutatawwi’a Warlord.

The Serjeants take advantage of the Warlord's fatigue to reduce his armour by one, nonetheless they fail to score a single hit. The same cannot be said for the Warlord, who despite his fatigue inflicts six hits that results in the elimination of all the Serjeants. Oh dear.

The remaining Serjeants rest but it's clear there is little point continuing the fight, the Mutatawwi’a have given the invading infidels a severe beating.

The victorious Archers celebrate a well earned victory.

The end result was seventeen points lost for the Crusaders against only eight points for the Mutatawwi’a. A comprehensive defeat.
That was an enjoyable enough game and a very swift learning curve. The rules seem intuitive and quick to learn but it will take a bit longer to learn all the nuances offered by the battle board and the various abilities. These add a lot of flavour and depth to the game presenting a range of interesting decisions for both players.
However I'm not totally sold on the concept of the battle boards. There are two main reasons.
Firstly, I don't like the way they draw your attention away from the table. There's a disconnect between being immersed in the action on the tabletop and then taking your focus over to the battle board. While there is no doubt you are using this time thinking about how to use your Saga dice with the battle board to improve your position in the game I just didn't like that my attention was drawn away from the table. Miniature gaming is an immersive experience for me and any interruption to consult rules books, charts or a mechanic like a battle board breaks that immersion.
Secondly, I wasn't sure or convinced how to consider the abilities and strengths that I assign on the battle board with what was happening on the table. It seems that in many case I can assign additional 'powers' to units without any relevance to what is happening to them on the table. Assigning extra hit dice to a unit's attack just because I can just seems very random and I struggle to see where it fits into the narrative of the game. Factoring in religious fervour is one thing but suggesting sudden increases in fighting power simply by assigning Saga dice was like assigning supernatural powers to boost a unit.
Overall the game feels much more like a tournament style game than an historical wargame but I don't think it pretends to be otherwise. It certainly has plenty of flavour to keep you engaged. We played this out in about three hours, so I imagine once we are more familiar with the rules it would be easy to play a game in two hours or so.
As a contrast we played Osprey's Lion Rampant rules which offer a similar size encounter in a similar period. You can read my thoughts on those rules and how they compare with Saga in this post.
I played a lot of Saga when it first come out. It’s a fun game. Though I don’t play it much anymore. That was a very comprehensive battle report typical of what I now call in my head ‘Tactical Painter style.’ 😀
ReplyDeleteNice report, lovely minis!
ReplyDeleteI felt very similar to you about Saga. Surrounded by fellow gamers raving about the "next big thing" I joined a couple of games.
ReplyDeleteLike you, I found the battleboard distracting, struggled to rationalise the massive combat bonuses available, and found traditional move and flank either absent or devalued.
It was a difficult coupe of years, everybody wanting to do a game that produced a truly negative feeling.
I'm a rare sort, a miniature wargamer who finds little interest in boardgames.
There's a lot of boardgame heritage about Saga, mechanisms stretched vaguely over a historic premise, and a deep commitment to "buff chasing".
I realised that the "Buff chasing" is what really bothered me. The concept - common in wargames and prevalent in the D&D world, that units can boost their power by gathering special items and powers.
I reflect that maybe Saga and its mechanisms might better fit a magical fantasy world.
Your figures and pictures are beautifully presented.