

Several years ago I acquired a couple of the old Airfix T34 kits and as I now have more than enough T34s in my collection I thought one of these might make do as the basis for a suitable wreck. I'm also in the middle of playing the CoC campaign set around Konigsberg in 1945, so a wreck of a T34 might be something that will come in handy in the not too distant future.
I liked the idea of depicting a destroyed tank with the turret blown off. It certainly looks dramatic and there is no mistaking that it is a destroyed vehicle. The Airfix kit is quick to assemble and most of the construction time was spent creating a scratch-built interior for the hull and the turret. This is by no means based on any real interior plans, I simply wanted to show a jumble of burnt out interior details. It was just a matter of raiding the spares box and utilising pieces of plastic card and sections of old sprue to put something together.


As this wreck was going to have the turret detached from the hull it would need a base and so I cut out a suitably sized piece of MDF and then roughed up the edges using the sanding tool on my Dremel.


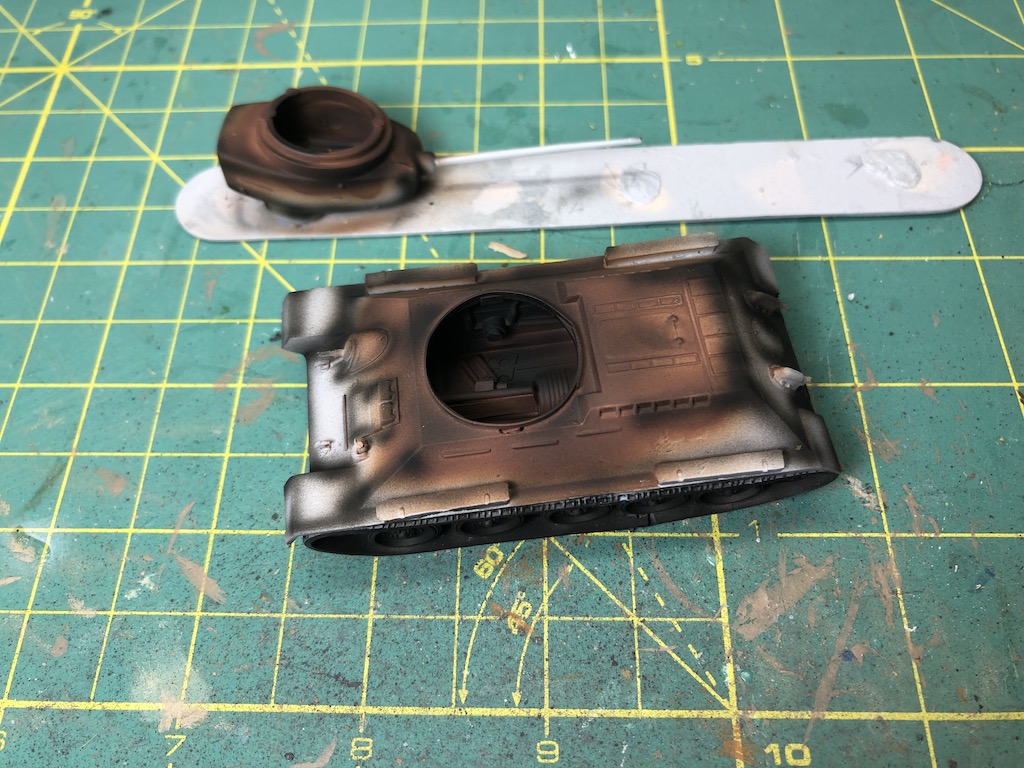
To create the burnt-out look I was going to use the 'hairspray method', a technique popular with larger scale AFV modellers. You can use actual hairspray, but I have some 'Worn Effects' acrylic fluid from AK interactive which serves the same purpose, but that is to jump ahead of myself. After the kit was primed I used my airbrush to paint the interiors and parts of the hull, first in red brown and then over sprayed in random patches with black.

I then textured the MDF base once I worked out how I wanted the turret to look in relation to the hull.


With that done I sprayed the Worn Effects fluid over the hull. As soon as that was dry I sprayed the main base colour for the tank, just as if I was painting it normally.

As soon as the green paint had dried I then wet the surface with water and using a stiff brush I slowly worked away at the top layer of green paint. As I was removing the green the burnt colours I had sprayed on earlier slowly appeared. It's a remarkably effective technique and gives the look of burnt and chipped paint.


With that done the hull and turret had a dry brush with brown oil paint (Vandyke Brown).


To weather the road wheels and tracks I used MiG pigments Europe Dust. I do this in stages. After each stage I spray MiG pigment fixer and then apply more dust while the fixer is still wet, that way I slowly build up the dust and dirt.

Once that's dry I give a second dry brush, again with Vandyke Brown. To prevent the paint drying too glossy I allow the oil paint to sit on some cardboard for about ten minutes and this soaks out some of the oil. I then dry brush the road wheels and tracks. This brings out some definition on the wheels and tracks and doesn't allow the pigment to dominate.


Finally the tracks were given a very light dry brush with Vallejo Oily Steel, to bring out some of the metallic aspect of the tracks.


With that the wreck was complete and the next stage was to finish off the base.

With the base painted and flocked I attached the hull and turret, but it didn't quite look right, it was all a bit clinical, so I decided I needed to add some debris. Once again I returned to the spares box for some odds and ends to fill up some of the space.


I can see it filling a variety of roles. It could add colour to the table as scatter terrain; it could represent a wrecked AFV from a previous scenario during a campaign and, while a bit large, there's no reason why it couldn't serve as a jump off point. Time well spent then.
I’ve since used the same painting technique to create a burnt out Sherman. I’m even happier with the way this one turned out.


Lovely work and a great idea Mark, I been tempted a number of times to create some but the price of the 28mm vehicles puts a stop to that, hopefully I can pick up some cheap tanks at MOAB this year.
ReplyDeletecheers John
Yes, that's the problem with 28mm it gets pricey, a bit easier in 20mm or 15mm where vehicles are much cheaper (or you get five in a box!). I'd like to see what you could do with a wreck, I'm sure you could create something special and set the bar higher.
DeleteWell done! Just as John I‘d be seriously tempted to do such a piece but for the price tag.
ReplyDeleteI think your painting skills would work magic with a wreck, it is a shame those kits are so expensive.
DeleteGreat project! I'm doing something similar now with a 1/76 T-34/76. I don't think I'll go as far as a blown off turret, but I love the burnt-out effects. Great stuff!
ReplyDeleteThanks Seb, glad you like it. I enjoyed doing the burnt out effect, I think I've got a bit better at it too, there's a burnt out Sherman that I did for the 29, Let's Go! campaign that I was very happy with.
Delete