
In the previous game the Germans halted the British pursuit, allowing them to break contact and save the retreat from collapsing into a rout. No troops were lost or equipment abandoned, although fuel shortages did mean one car had to be left behind. That was a minor loss and so from a German perspective the victory was a good start to the campaign.
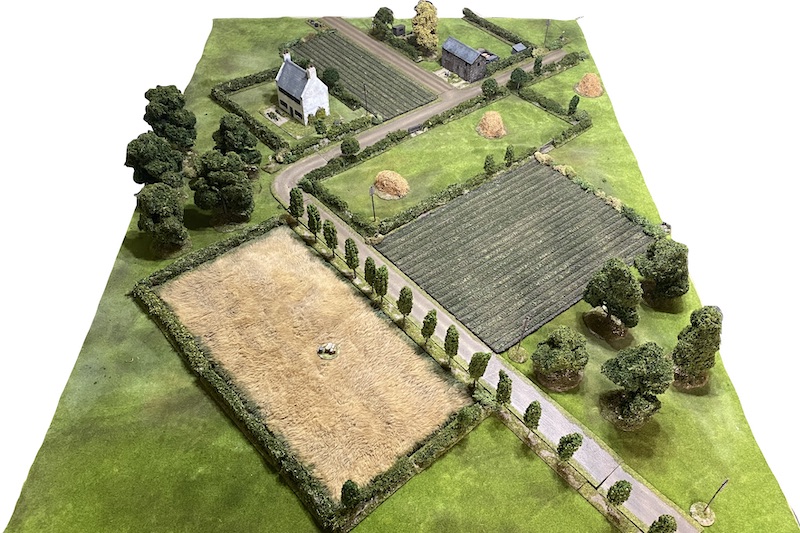
Now the retreat has reached an area of farmland and here the Germans will pause to make another stand. This may prove a more difficult position for them to hold than the village. With little hard cover and no time to entrench or prepare defences they will have to to make the best of what cover is available.
Victory in the last game bought valuable time and has enabled the kampfgruppe to muster more support. They have been joined by a Pak40 anti-tank gun team and a regular infantry squad. The delivery of an additional supply of fuel was also very welcome. It means all vehicles will be able to withdraw to the next map regardless of the outcome of this game (if you are not familiar with the structure of the campaign and how support is allocated you can find an overview in this post).

Having been rebuffed the British will use the pause to call up more support. Unlike their opponents they are free to select what they want rather than make do with whatever turns up. With 6+3D6 support for this game they have a generous seventeen points available.
Their core infantry platoon is in fairly good shape. They suffered only two casualties but one of those was the platoon sergeant. A corporal from one of the sections has been promoted as his replacement and his former section will now be lead by one of the riflemen. As a result the platoon has two inexperienced NCOs - the platoon sergeant and a section leader.
This is an Attack & Defend scenario and the British roll one free move for the start of the patrol phase, not the most auspicious start. Things don't get any better with their force morale which will start at eight while the Germans start at nine.
Jump-off-points are placed as below with both sides positioned to cover all sides of the table.

The British look across the fields at a seemingly quiet, rural idyll, but what lurks unseen?


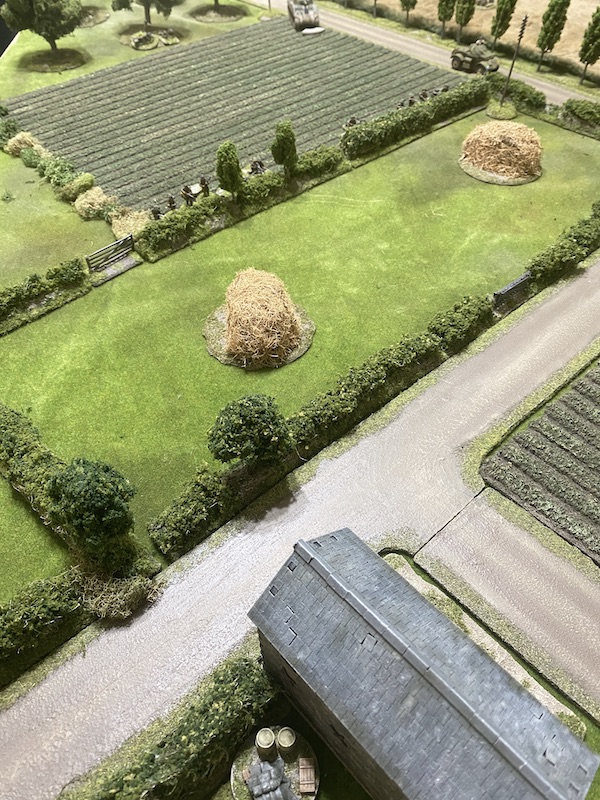
The British have the opening phase and a Staghound armoured car is the first to appear. It makes its way slowly up the road.

At the edge of the large ploughed field the newly promoted platoon sergeant deploys with a rifle section, which he puts on overwatch.


As the Germans I want to time my response very carefully. For a successful outcome to this game I will need to either inflict casualties on the core platoon or drive their force morale down to at least 50% of its starting level. Ideally I drive it down to zero for a scenario victory, but given the circumstances I'd be happy to settle for a voluntary withdrawal which I can conduct once British morale hits four.
However I need to try to do this considering my own force preservation. The core German platoon is the only one available and all support losses are permanent. Any withdrawal other than that following a scenario victory will see the force subject to further losses of men and equipment. To make matters worse a hasty or chaotic withdrawal diminishes the quality of support that might be available in the next scenario. This is very much a balancing act for the Germans.
My plan here is to time deployment for when I can inflict maximum damage on the British and then aim to withdraw before they can do too much damage in return. Given all that, I consider this early stage of the game far too early for the Germans to deploy and so for now I choose to watch and wait.
In the British phase the Staghound continues to edge forward slowly and the commander puts the gunner on overwatch.


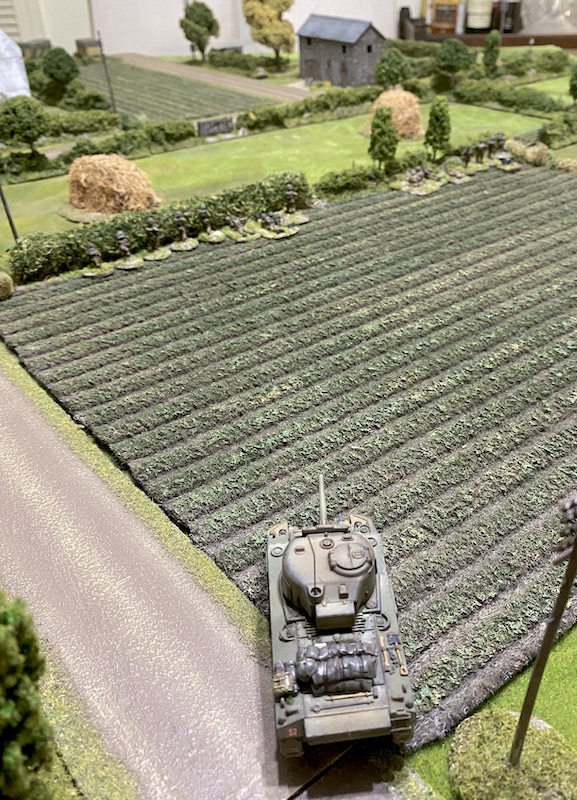
The armoured car is joined by a Sherman and the commander puts his gunner on overwatch.

The steady build up of British units continues. A second section joins the sergeant by the ploughed field and they too take up overwatch positions.

The German command roll of 55541 adds useful CoC points, but I also consider deploying the sniper. However, with two British sections on overwatch there's a fairly good chance he is spotted, so I decide to let the phase pass.
The British command roll of 65553 also delivers CoC points but it leaves them few other options. The Sherman moves slowly to the hedge and once again the gunner is placed on overwatch. These opening British moves may be cautious but they ensure that any German response can be met with a hail of fire.

The Germans continue to wait and so the phase passes back to the British. Having established a strong base of fire the platoon sergeant initiates the first move forward across the ploughed field.

He orders the section to his left to advance.


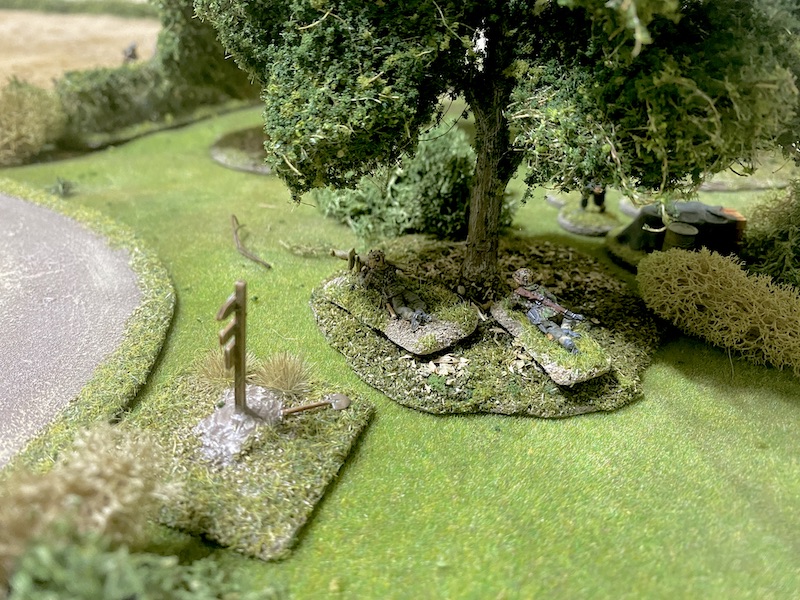
The most threatening position for a German machine gun or sniper is the upper window of the barn facing the ploughed field.


A third section deploys in the grain field on the British left.


The next German command roll is 66332 but I'm not sure the double phase will prove as useful as it might. There are few lines of sight from German jump-off-points and with so many British units on overwatch it seems unwise to gift my enemy a target unless it's to my advantage. I let the phase pass.
The following command roll is 43321. I was hoping perhaps to try to deploy the sniper or MG42 MMG team in the upper level of the barn but now that the line of sight is blocked with smoke there is no value in doing so. I let another phase pass without taking any action.
The British begin making cautious advances in bounds and the section in the ploughed field are placed on overwatch.


The sergeant then puts the 2” mortar team on overwatch.

With everyone positioned to give protective fire he then orders the section to his right to make its way forward into the field. This is text book stuff and I'm wondering exactly how I can respond without being on the receiving end of a withering amount of fire.

The section in the grain field on the left flank moves forward tactically in the direction of the hedge. The British are taking no risks.


Ideally the Germans make their deployment when it can be most effective. On that flank it would mean waiting for the British to cross the hedge and enter the woods, but that requires very careful timing, something made that much harder by the pre-game barrage. Delaying deployment is not without its risks but for now I'm prepared to take that gamble.

In the following German phase I decide the moment is not right and once again let the phase pass. Meanwhile, the British continue to press forward and the platoon sergeant moves into field to join the two sections.


The Staghound drives slowly up the road with the gunner on overwatch.


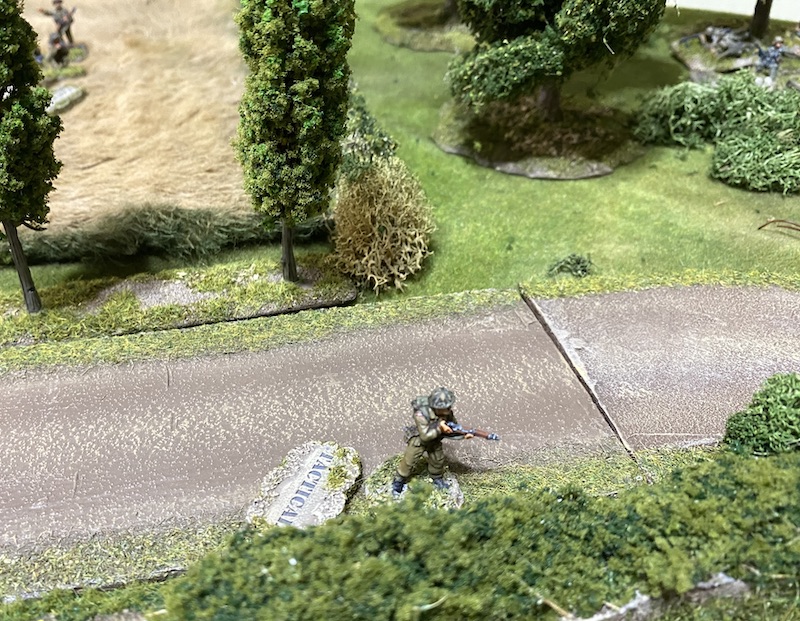
The corporal in the grain field detaches one of the men as a scout team and sends him forward to the hedge.


The next German command roll of 66521 may be a reward for my patience. I decide it's time to make a move. There's a good opportunity for the panzerschreck team to take a shot at the Staghound. If successful that would be a blow to British morale and the team could then use the next phase to slip back into the woods. While that seems like a good idea the pregame barrage ensures it won't come to fruition. The team fail to deploy.
As an aside, I should mention that the way we play this is to assign the relevant command dice (in this case a 1) and announce our intention to deploy 'a team'. We don't yet declare what that team is or from which jump-off-point. Failure means nothing more happens and the command die is expended, but our opponent does not know what unit was attempting to deploy or where (although often it's not that hard to guess!).
The failure of the panzerschreck team to make an appearance is a sobering reminder of the risk I've been taking delaying deployment. I decide it might be wise to try sending a squad into the woods and fortunately they have more success negotiating the barrage.


The subsequent command roll is 54322 and it gives the Germans their first full CoC die. I consider using it to conduct an ambush with the panzerschreck team, especially given the command dice won't allow them to make another attempt to deploy, but I think I have other uses for it.
Right now I see little value deploying another unit and so the only thing left to do is put the squad in the woods on overwatch.

He then orders the nearest section to advance and conform to the section near the hedge row.


The Sherman moves slowly onto the road and once again the gunner is placed on overwatch.

The lone British scout is not short on courage and he moves tactically out of the grain field and across the road.

At this point I decide now is a good time to use that CoC die to end the turn. While I had considered saving it for an ambush, or an interrupt, ending the turn now could be more productive. Not only will it see an end to the pregame barrage. It will also see the removal of the mortar smoke and all the British overwatch markers. I'm hoping that offers the Germans more options, perhaps allowing the sniper or MG42 MMG team to deploy into the barn and cause the British some problems.
Well, so much for great plans, the following command roll of 65422 puts paid to most, if not all, of those ideas. In this context I like to think of the command dice as defining the operational conditions of the moment. They don't tell you what to do, all they tell you is what the conditions are like right now and what might be possible. Whatever the reason, clearly now is not the time. I let the phase pass without doing anything.
In the British phase, the sergeant directs the section to his right to move up tactically to the hedge.


On the road, the Staghound continues its slow and cautious advance, with the gunner on overwatch.

Meanwhile, the Sherman moves slowly into the ploughed field, the gunner also on overwatch.


Other than the lone scout the British continue to advance very cautiously. The section in the grain field makes a tactical move to the hedge.


A command roll of 66611 presents the Germans with several opportunities and I decide now is a good time to act. First, the MG42 MMG team deploys into the upper level of the barn.

They have a clear line of sight to the British at the hedge and open fire.

The newly promoted corporal is the only casualty. He suffers a light wound, but with a single command initiative it's enough to see him killed and that loss sees British morale drop to seven. The section's rifle team also suffer a point of shock.

The Sherman gunner is on overwatch and he fires a round of HE at the barn. While it hits the building the solid stone construction means the machine gun crew survive unscathed. That might not last for long though.

The panzerschreck team are next to deploy and they emerge at the edge of the woods to target the Staghound.

Despite making a good target the rocket fails to strike the armoured car. That was a narrow escape.

The crew are on overwatch and they fire back immediately, killing one of the panzerschreck crew.

With that the phase ends as does the turn. German fortune continues with a command roll of 66542 although it leaves very few options. The squad in the woods takes up tactical positions.

The next command roll of 64431 will see the run of phases come to an end but it does allow the panzerschreck team to have another shot at the Staghound, which they do.
This time the rocket hits its target and slices through the armour with an AP strike of five. The Staghound is knocked out but doesn't explode and so the crew are able to bail out. Nonetheless the loss of a support is enough to see another drop in British morale to six.

The German squad then takes up overwatch positions ready to face the British should they decide to come into the woods.


Well, that had all the ingredients of a very cinematic moment, all it lacked was the Hollywood ending.

That brings us to a key moment, as any further drop in British morale will give the Germans the option to consider an orderly voluntary withdrawal. When the next German command roll is a very useful 44333 I decide to seize the opportunity and make a concerted effort to drive British morale down further.
The squad of elite veterans that joined the kampfgruppe in the last scenario are the first to deploy. They take up position behind the hedges near the farmhouse.


The bren team lose one man and the rifle team suffer three points of shock.


The British section is on overwatch and they return fire inflicting two points of shock on the German rifle team.

A second German squad deploys from the jump-off-point at the barn. If the British were looking for a firefight across the enclosed field then they have one.


They target the British section immediately opposite.

One of the bren team is a casualty and the rifle team suffer more shock.

The newly arrived Pak40 anti-tank gun then deploys in the grounds of the farmhouse. While the British were expecting to face panzerschreck and panzerfaust, I don't think they were expecting a heavy anti-tank gun.


The Feldwebel deploys at the barn.


They suffer a further two points of shock.

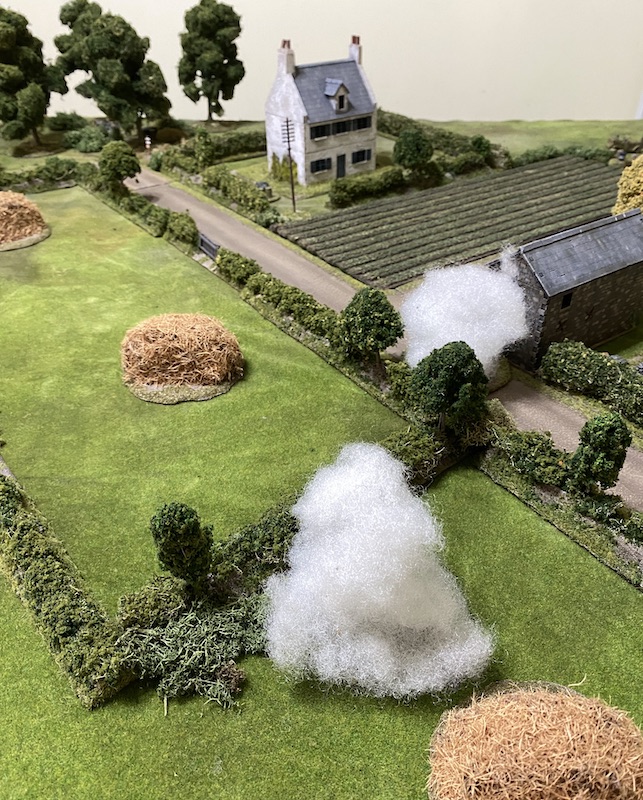
A command roll of 65544 gives the British more CoC points but it limits their actions. The platoon lieutenant deploys near the ploughed field and he has the 2” mortar team fire smoke towards the barn.


At the hedge the platoon sergeant has both sections target the elite veterans opposite.
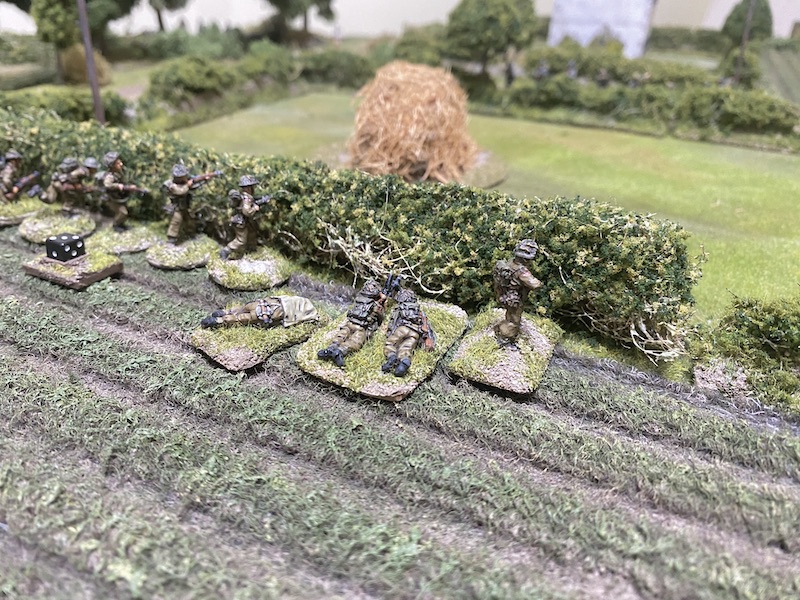


Despite the hail of rifle and automatic fire the experienced elite squad have made best use of the cover and the end result is only a single point of shock on each team.

In the German phase the Pak40 takes aim at the Sherman once again. The destruction of that tank, ideally with its crew, is one of the best opportunities the Germans have of collapsing British morale. Much hangs on the outcome of this duel.

Dave also realises the danger. He has no hesitation in using a CoC die to interrupt the Pak40 crew. The Sherman gets off the first shot and a round of high explosive kills one of the crew.

That's not enough damage to prevent the gun from firing. The commander assists the gunner's aim and the Pak40 fires a round of AP in return.

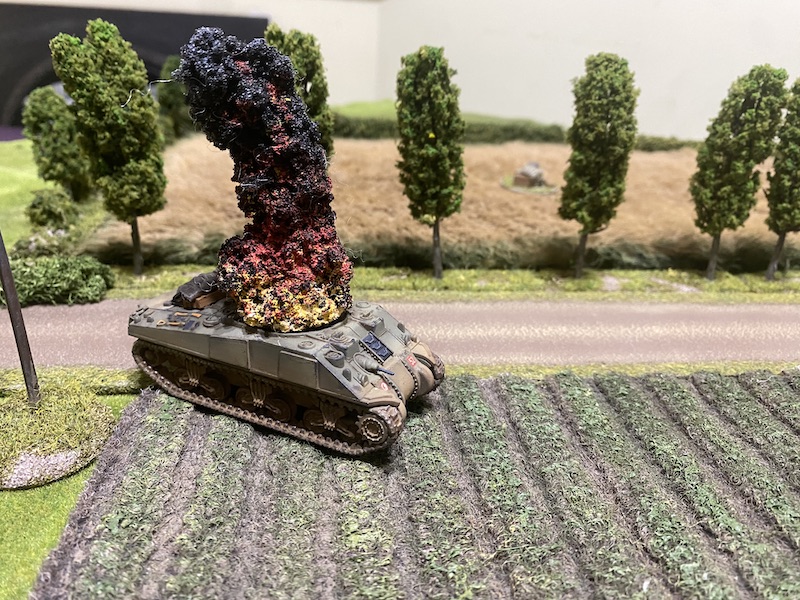
It slams into the Sherman's armour inflicting four AP strikes. The tank can only manage two saves and that results in the loss of the driver and two points of shock on the crew. Until the driver can be replaced by another crew member the Sherman won't be going anywhere in a hurry.

With the MG42 MMG team reduced to two men the upper level of the barn has become too dangerous. The feldwebel directs them to leave.


The feldwebel then shouts orders to the squad in front of the barn. He wants the LMG team to move out of the smoke and find a better firing position further along the hedgerow.


Last he orders the rifle team to shoot at the British section opposite.


The obergefreiter of the elite squad rallies a point of shock and then has the squad fire across the field.

Three men are hit. One of those is the newly promoted platoon sergeant and he is killed. That's the second sergeant to die in as many games, making it the most dangerous job in the platoon. His loss proves a real blow to British morale which drops to three. The rifle team lose two men and suffer a further point of shock.

That makes things very difficult for the British. They will be operating with only three command dice and the Germans are in a position to make a voluntary withdrawal if they choose. However, the latter is not something I'm going to consider just yet. I sense if things go well the Germans could reduce British morale to zero and achieve an outright victory.
A British command roll of 421 limits options and given the threat to the Sherman Dave's priority is to try and keep it in action. The tank commander rallies shock and orders the gunner to return fire at the Pak40 crew.


The platoon lieutenant is wise to the danger and he orders the 2” mortar team to fire a round of smoke at the anti-tank gun.

The mortar team doesn't have a direct line of sight to the gun and that makes aiming more difficult. The smoke round falls off target, landing on the LMG team in the road.

With the death of the sergeant the lieutenant moves across field toward the sections at the hedge line.


Their fire is accurate. The LMG team lose one man and the squad's obergefreiter is hit and lightly wounded.


A second 75mm round smashes into the target inflicting five AP strikes. The Sherman's armour can only provide two saves and it's not enough. The tank is knocked out and to make matters worse it explodes killing the crew. The loss of a support and the death of a junior leader is enough to bring British force morale crashing down to zero.
The British are forced to withdraw, giving the Germans another valuable scenario victory. That was not an outcome I was expecting. At first glance the terrain didn't appear to lend itself to a strong defence but matters proved otherwise. I don't think Dave did anything wrong, he conducted a careful, text book assault although I was a little surprised at the choice of supports. Given the extensive range of equipment available and seventeen support points I thought he might have opted for something more powerful - heaven forbid, perhaps something as fiendish as a Churchill Crocodile.

It's a very positive outcome for the Germans, not only are they able to continue the retreat in good order but the difference in force morale (British zero, German nine) will see recovery of all of the casualties from the core platoon (support casualties are lost permanently and can never be recovered).
With enough fuel to ensure all the transport can get away, the full German force will be able to pull back without abandoning any men, equipment or vehicles.
The Germans have lost one man permanently from both the panzerschreck team and the Pak40 crew. The British on the other hand suffered eight casualties and saw both the newly promoted sergeant and section corporal killed. Given those losses it's highly likely Dave will decide to withdraw the platoon from the campaign and replace it with a fresh one.
The German victory will give them D3 victory points, but as I did after the previous scenario I manage to roll only one victory point. That brings the tally of victory points so far to German 2 British 0. Should the British decide to replace the platoon they will lose two victory points to reflect the loss of time while they rearrange their advance guard.
As it stands the disparity in victory points is not that significant, so that although the British have lost the first two scenarios it will not take much to turn the tables. A British scenario victory also earns them D3 victory points and so a win and a better roll for victory points could soon close the gap. Clearly then, there is much still to play for and you can follow what happens in the next game in this post.
If you've enjoyed following along and would like to Buy Me a Coffee to help cover some of the costs of running the blog you can click through at the link or on the tab in the right hand column of this page.
You can find links to all the games in this campaign and several others on the Chain of Command Campaign AAR Page (link from here or at the top of this page).
Another exciting report. Thanks for sharing.
ReplyDeleteThanks Dennis.
DeleteAnother humdinger of a game with the fine narration bringing all the gathering tension along nicely. The Germans holding their nerve against all that British build up of men and material paying off big time the gamble working nicely in the instance. Thank you.
ReplyDeleteThanks Phil, it’s always a bit nerve wracking delaying deployment but always nice when it pays off.
DeleteA cracking read of an exciting game. It does however show a problem, to my mind, with most points-based systems, which is it can be ahistorical. If this is supposed to be British Armoured division in France in August 1944 then I doubt a Churchill would have been available, and Staghounds were part of corps armoured car regiments so unlikely to be attached to infantry platoons in Motor battalions. Perhaps the support list should have been more restricted for the British. The mish-mash of units for the Germans is of course entirely plausible. I have just received a copy of the Ruckzug book and am looking forward to reading it. Another (expensive) book on the same subject is "The Army That Got Away" from De Zwaard Visch publishing.
ReplyDeleteA gripping read, with a fine sense of approaching crisis. I can imagine the Sherman's fire weakened the upper floor of the barn allowing small arms fire to have a deadly effect. That lone scout was a brave - or foolhardy - chap in taking on the panzerschrek. Bad luck for the British, but well played on both sides.
ReplyDeleteThanks, yes, lots of twists and turns in this one.
DeleteGreat looking game and report.
ReplyDeleteThanks again, another really entertaining AAR. Looking forward to the next game.
ReplyDeleteGood to have you following along Doug, glad you’re enjoying them.
DeleteA diabolically good AAR as ever. I thought the Brits had managed the advance well with caution and mutual cover, but then it all went pear-shaped. The Brits have got to find a way to outmatch the Germans in the infantry firefights, either that or get a lucky run of turns to sweep up a JOP or two before the Hun can deploy. As a Brit I might be inclined to buy some more 2" mortars to saturate any potential FPs with smoke.
ReplyDeleteThanks. I have a few ideas for the British, but I won’t share them yet. I suspect Dave may have been a touch over cautious in this one.
DeleteI found the Pak 40 to be tremendously effective both against armour and infantry in cover in 29 Let's Go. Having this will cause no end of problems for the British. (Though the rules for this PSC mean a gun can very easily end up being left behind if you run out if tow vehicles.)
ReplyDelete(Oh, and tremendous AAR as always. You can take that as a given.)
DeleteYes, I think in this campaign it’s a case of ‘use it before you lose it’. The German player needs to make hay while the sun shines.
DeleteThanks, vert enjoyable.
ReplyDeleteThanks Norm, glad you’re following this one.
DeleteThat was skin of the teeth stuff. Well written.
ReplyDeleteIt was indeed, thanks!
DeleteQuite the action. Beautiful table and toys. Good approach by the British player, let down terribly by his dice. I have a machinist vice in my basement which is the only place that the dice used by the British player should go.
ReplyDeleteHa, ha. Of course I put it down solely to my superior tactics 🙄
DeleteAnother gripping account, and an excellent illustration of the empty battlefield too.
ReplyDeleteIt is a pity that the sniper was not deployed, a lieutenant slogging across a field by himself seems like a perfect target!
Thanks, yes the sniper would have been handy, it was a target rich environment.
DeleteAnother absolutely splendid AAR! Thanks for posting
ReplyDeleteMatt
Thanks Matt, glad you enjoyed it.
DeleteA great read as usual. Thank you!
ReplyDeleteHaving checked the campaign mechanics can see why it was such an incentive to force the British morale to zero. Three rolls on the reinforcement table will hopefully provide forces to counteract the new British platoon.
DeleteDo vehicles become shot magnets in CoC? Appreciate it's an infantry focused game but even the likes of an armoured car seem to cast a long shadow on your thinking in your AARs
Taking AFV in CoC is a real decision. Especially later war when infantry have fausts piats and bazookas.They can be shot magnets, use lots of rare command dice, and cause lots of force morale loss if they blow up. They can also be really powerful in standing off using HE if you don't have any effective ranged AT They are very hard to deal with.
DeleteBringing down enemy force morale is a key part of CoC and vehicles are one of the very few unit types that can be eliminated in one or two shots. Normally doing the same to an infantry unit is a more attritional process. I can imagine the sight of a supporting vehicle erupting in flames in full view of a platoon does knock their confidence quite a bit. Keep in mind in CoC terms a 6’ table represents about 240 yards, incredibly short range in terms of weaponry and so vehicles are vulnerable. AFVs need to be used carefully. The choice of an armoured car is not a bad one if you plan to use it for a rapid coup de main before the enemy has deployed but to use it as a lead vehicle in an assault was to invite its destruction.
DeleteI'm always impressed how your Chain of Command campaigns all have a very different feel from each other, despite sharing common rules and often very similar forces. For this one in particular, the Germans are playing very differently from usual, holding back until the very last moment before deploying to deadly effect.
ReplyDeleteWhat a thriller - brilliant AAR mate. It was a clash of two good tacticians! Looking Forward top the next Stage!
ReplyDeleteCheers
Great report and table!
ReplyDeleteBest wishes,
Jan