I've been wanting to find suitable vehicles to use as scatter terrain for my Second World War games set in the Far East. The initial idea came about as I was planning for the Chain of Command campaign Last Stand on Opium Hill set in Singapore. I had made a colonial plantation owner's mansion so thought a car abandoned hastily by the residents might set the terrain piece off nicely. I picked up one from the Oxford die cast 1/76 range. To get rid of the toy-like appearance I simply gave it a spray of matt varnish and then a light dry brush.

Since then I've noticed people using die cast vehicles from the Days Gone range by Lledo for this sort of thing. I stumbled across the Major Thomas Foolery blog and he has several great examples. Even better he's been converting these for his Back of Beyond games set in China and has made available very useful jpg files for making water slide decals. Suitably inspired I thought I'd try this out with the intention of using them for games in places like Hong Kong, Singapore, Malaya and Burma.
The first vehicle I acquired was a 1934 Dennis parcel van. Most of the Lledo vehicles are either British or American and types that were likely to be seen across the British empire. This particular one came in a livery for Crofts Original sherry but I didn't plan to keep it looking that way.
The first thing was to check whether it would work in 20mm (1/72). The Lledo vehicles don't come in any specific scale. It appears the key decision on the scale of any vehicle was determined by the size of their standard packaging. Basically they were scaled to fit the box and so the smaller the vehicle in real life the larger its scale would be as a model. It was clear that some vehicles would work much better for 28mm (1/56) and so I needed to pick carefully.
As you can see from the picture below this van scales well with the 1/72 Opel Blitz models from the Plastic Soldier Company.
It also scales nicely with this 20mm AB British figure.
I planned to repaint the model and so the first thing to do was dismantle it and strip the paint.
I found the paint remover below at a local hardware supplier. It's a gel that strips paints very quickly and easily. It is a bit messy, but I guess you can't have everything.

The reason I wanted to strip the paint was to have a good smooth base for the decals.
Everything was then primed.
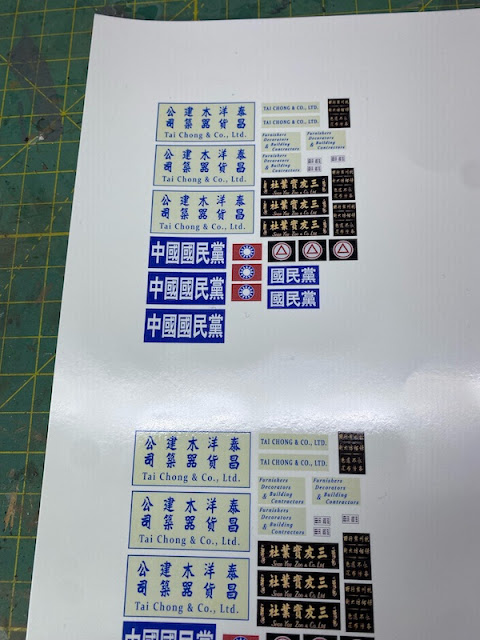
The Major Thomas Foolery blog had a set of designs that I wanted to use and I particularly liked the ones for Tai Chong & Co. The decals have a cream background and so the main challenge was trying to match that colour when I painted the van.
I think I managed to come very close.
I've never tried printing my own decals and so this was something of an experiment. In the end it was far more straightforward than I imagined and I kick myself for not trying it sooner. The decals are printed on specific decal paper that will run through an inkjet printer. We have a fairly inexpensive Canon printer at home and this proved more than adequate. I did need to resize the images to get them the size I wanted but other than that it was very simple.
The instructions with the decals indicated that they should be sealed with varnish once printed. I wondered if this was really necessary and so tested one. Sure enough the moment the decal is immersed in water the ink washes away. Varnish is essential. I used my airbrush to apply a few coats of Testors glosscote and that worked a treat.
The decals need to be cut from the A4 sheet as it is a single piece of decal film, so where possible I cut very close to the image. They work like standard waterslide decals so application will be familiar for anyone who's done this for other models.
I always apply decals to a gloss surface to avoid silvering which will occur if air gets in behind a decal, something that will often happen on matt paint.
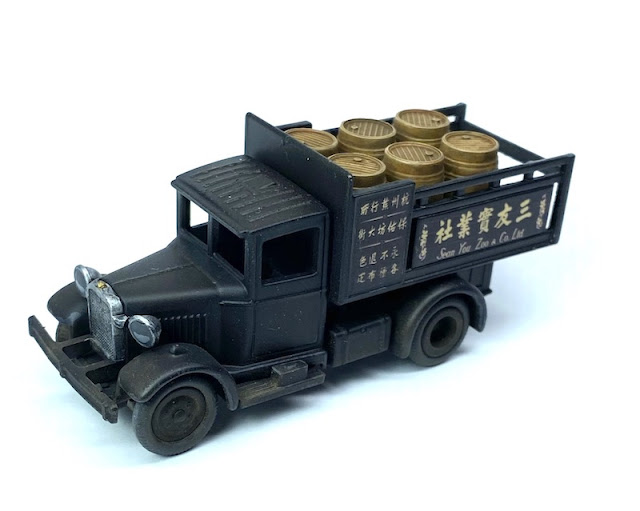
Once the decals are dry I then give the whole model another coat of gloss varnish. This seals and protects the decals for the weathering process.
The van wasn't going to require a great deal of weathering but I used a wash to pick out details and panel lines which helped to give a more three dimensional appearance. For this I make up my own wash using a dark brown oil paint diluted with thinner. The gloss varnish means the paint will flow naturally into corners and along panel lines.
For the front engine grill I carried out a second wash using Citadel's Nuln Oil.
Overall I was happy with progress, although I was disappointed that the smaller decal on the side was not blending in to the background colour. It wasn't awful, more annoying. It didn't matter so much with the large decal as I'd trimmed it close to the blue border. Someone suggested I try painting a blue border around the smaller decal but I can't paint a straight line like that to save my life.
In the end I decided to try to disguise it with more heavier weathering than I had planned. I didn't go overboard but just used Mig European Dust pigment around the lower sections. I think it worked well.
The final addition were registration number plates. It was also helped conceal the plug that attached the bottom of the model to the main die cast body. While the Lledo models lack a lot of small details the intention is that these are scatter terrain and background pieces, not models subject to any close scrutiny. So with that I'm calling it finished.
An easy and inexpensive project and a great learning experience with the home printed decals. So, what to look out for?
The decal film is quite thick and may be prominent on the model, so better if it has a border, either printed on the decal or you use a natural frame on the panels of the vehicle. That way you will hide that thickness.
I'm not sure I really needed to strip the paint, I suspect a good coat of primer over the original paint work would be sufficient. Much depends on the thickness of the decals that come with the models. In this particular case I was concerned they might show up in relief under the new paint work and decals. That certainly won't be an issue with some of the other models.
I acquired a few more vehicles so that I could make use of those remaining decals.
I like the idea of being able to fill street scenes in places like Hong Kong, Singapore, Malaya or Burma with scatter terrain like this.
Once again the paint was stripped and the trucks repainted before the new decals could be applied.


The vehicles can have other uses, for example, I'm aware the Japanese made much use of captured military and civilian vehicles. So that's enabled me to add a few more soft skins to my Japanese force.
If you've found this post useful and would like to Buy Me a Coffee to help cover some of the costs of running the blog you can click through at the link or on the tab in the right hand column of this page.


Looks really good, overly so considering it is 'scatter terrain'. If the original designs were just jpegs then it's simplicity itself to add borders to the designs. I've not come across decal paper before but very tempted to try it as anything I can grab an image of could become a decal in any scale! My only concern is that lacking an air brush (yes... total amateur, I know) is whether a spray can will give me a fine enough coat of varnish.
ReplyDeleteThanks. Had I known about the issue with the border in advance I could have altered the jpg but unfortunately I was too late for that. That’s why this was a good learning experience as I’ve got a few more I want to do but now proceed a little wiser than when I started! As Mike says, you don’t need an airbrush, a spray can will work just as well.
DeleteRob, spray can will give you excellent results sealing decal ink. But use a light spray so you don't make the clear paint run or it will ruin the decal. Run two or three light coats letting them dry a bit between coats. Excellent blog article. Don't worry about the background on the signage, sometimes people paint a big rectangle on the truck to make the letters pop more. Great job.
ReplyDeleteSplendid work, just the ticket 👍
ReplyDeleteThanks!
DeleteThis is great work although I was quite surprised you were able to get these to work with 20mm. I have used quite a few for Back of Beyond and/or Pulp type games in 28mm and even then, some of the vehicles are a bit over scale...1/43 I think I saw somewhere.
ReplyDeleteThat came out looking really good and having way more details than necessary for something parked on the side of the game table. 😀
ReplyDeleteStill we all know that little details just add to the immersion of the game overall so maybe necessary after all. Your finished product looks like a store bought toy specifically made if you get my meaning. 😀
Thanks Stew. I think it is about the immersion but it’s also nice to have a slightly different project and a change from painting camouflage or (your favourite) Russian green.
DeleteGreat tips there and an excellent end result!
ReplyDeleteExcellent work with the truck. I have bought a few of the Lledo vehicles to use but just use them straight from the box. I am not brave enough to do what you have done.
ReplyDeleteThanks. They are not so bad straight from the box, I just like the idea of everything blending in together on the table, I always find the die cast paint jobs are too glossy.
DeleteWonderful job! Stripping is certainly better than over-painting although it takes more time and effort. (That paint stripper is amazing. I have never seen one do such a thorough job.)
ReplyDeleteThanks, that paint stripper is amazing, I hate to think what’s in it but it just melts the paint and it slides off the model.
DeleteGreat work and thanks for the call out! Happy to see other people are using the decals.
ReplyDeleteYou’re welcome, credit where it is due, you have a great blog that’s full of ideas and useful material.
DeleteYour diligent efforts bore good fruit, the end result is fantastic. Now, if I could only find a 28mm-ish model of a 1938 Wolesley, the car Sam drives in Foyle's War!
ReplyDeleteBuy fs 500 pro kit online, paint striping kit online, or buy a car striping brush. Visit our website and explore our products today.
ReplyDelete