If it's true to say you can never have enough trees then it's probably true to say that you can never have enough houses. To be honest, I don't think that many houses are actually needed to game the American War of Independence, as most encounters took place in fairly rural country, in fields and in woodland. Nonetheless I've needed to add at least one more to the collection and yet somehow I'm sure it won't be the last. This latest is a small cottage with a stone chimney and porch, one of the MDF models from the Sarissa Precision 28mm range.
I had previously made a smaller house without the porch, so this new one is intended to complement the other to help create a small settlement. As with the earlier model I will make a few modifications to give the building a more unique character and to be compatible with the other.

I've found that MDF buildings can be quite transformed with just the simple addition of tiles to the roof, but I also waned to enhance the appearance of the stone chimney breast which is quite slim in its original MDF form. With the first model I went with a more rustic look and created a slab wood roof using laser cut card from Charlie Foxtrot Models. I also used brick printed wallpaper to wrap the chimney and you can see the finished result below (and in the game above).

That building has already seen action in games of Sharp Practice and one where we tried out Muskets & Tomahawks.
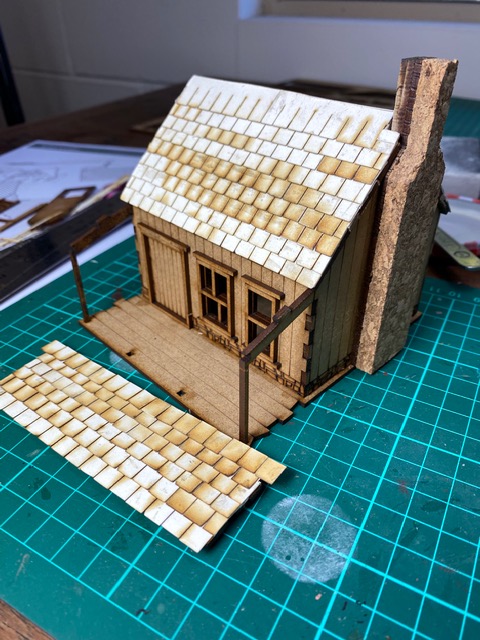
I intended to follow a similar plan with the new model. While the idea is to replicate the look of the chimney in the same way, this time I will use tiles for the roof, once again from Charlie Foxtrot Models.
The chimney breast has been thickened by cutting a piece of cork floor tile to match the existing shape and then glueing it in place.
Before any more work was carried out the whole model was primed. As you might notice there are a few other additions. I made a simple chimney pot from Milliput to finish off the chimney breast. I also used strips of card left over from the roof tiles to cover the corner joins of the walls to look like wooden planks.
The chimney breast will be wrapped with wallpaper that has been printed with scale bricks and embossed. I've seen this used very effectively by others and so bought several A4 sheets from a supplier I found on eBay. It works extremely well to create a very effective look that's relatively quick and easy to do.
First the house was painted using craft acrylic paints (mainly to avoid getting paint on the brick wallpaper). Rather than the bare wood of the earlier house I went for a slightly faded whitewashed look. As this house has a porch I'm assuming the owner is looking for a more gentrified look than a pioneer cottage (clearly with an eye on future real estate prices). Once the painting was complete then the brick effect was applied to the chimney and around the base of the house. The paper is attached using diluted PVA glue. I find letting it soak into the paper for a minute or two helps to soften it, making it easier to bend and conform to different shapes.
I find the key with the roof tiles is to vary the shade of grey randomly across different tiles. It's not the quickest job in the world but neither is it as laborious as you might think. I then unify the colours by giving the whole roof a dry brush in a lighter shade of grey.
The last thing to do was add a base which was cut from MDF and textured using PVA glue and sand. I use a flock effect for the ground cover, building up in layers with different types of flock and static grass before finally adding a few tufts here and there.


Lovely work Mark
ReplyDeletecheers John
Thanks John.
DeleteGood looking cabin. Like the foundation.
ReplyDeleteThanks!
DeleteVery nicely done indeed! I will have to look at getting some of that brick paper as it is particularly effective. The faded whitewash scheme works a treat too.
ReplyDeleteCheers
Matt
Thanks Matt, it's well worth trying, as you say it's very effective.
DeleteTurned out very well!
ReplyDeleteThanks David, yes, really pleased with this one.
DeleteReally lovely work there, Mark.
ReplyDeleteYou've made raw MDF look special.
Thanks Carole, not much wrong with most MDF buildings, except they look like they are made from MDF, but I've been inspired with what others have done. They make an excellent starting point.
DeleteLooking great. A few simple steps to transform from flat MDF to a realistic building.
ReplyDeleteThanks Stephen - it doesn't take much, especially if you focus on disguising the most obvious MDF features.
DeleteA fine and dandy job, Sir.
ReplyDeleteThanks Phil.
DeleteI have the same house in my collection. Yours looks waaay better. Nice job making it look pretty. The Sarissa MDF kits are really quite basic shells that I think they need a lot of love. 😀
ReplyDeleteThanks Stew, I think you hit the nail on the head, they are basic shells, but if you approach them with that in mind I think it then becomes all about the extras you can add to personalise it.
DeleteThat is a great result. I am about to build a few Charlie Foxtrot and Sarissa WWII houses so I will use some of these methods.
ReplyDeleteDo you mind sharing a link for the brick paper? Or some details about what scale you - it looks perfect but most of them seem to be in model rail scales so I'm not sure which paper would be the best option.
Thanks.
Thanks, I bought these a while ago for a 1/72 (20mm) project so I think they are technically that scale but I think they work just fine for 28mm (and if anything may be a bit large for 1/72). Try this link, the seller is in Greece and he has a range of different paper types. https://www.ebay.com.au/itm/313652657402?hash=item490727bcfa:g:YMIAAOSw0oZhKNXm
ReplyDeleteThanks - I'll give it a go :)
DeleteThat turned out very well- I'm a big fan of using MDF buildings as a shell to build upon.
ReplyDeleteThanks. While they have their detractors I like MDF buildings because they are sturdy yet light. They are game friendly in that roofs can be detached so, as you say, they make a good shell to build upon.
DeleteExcellent work John, I do like how you made the brickwork on the chimney look potted and realistic.
ReplyDeleteThanks Ray, glad you like it. By the way, I'm Mark (not John), you may have John Bond and I confused there?
DeleteLooks geat, we used the paper version on our Stalingrad game for the warehouse (using a plastic pipe!). I have also used blue foam and just carved it.
ReplyDeleteBut our 5.5 foot warehouse we used paper on both sides of the walls ....and corrugated paper on the roof!
That's why I bought the paper originally and I still have a factory to build and use it on. I'll get to it eventually, meantime I'm finding other uses for the paper all the time. Good stuff.
DeleteSo, I travel around the internet, searching for a “how to” on white washing timber houses and return to here. :) Dear TP do you have a “how to” on the above or could you point me in the right direction? Apologies my search fu is rubbish.
ReplyDeleteHi John, I don’t have a ‘how to’ but I think the way I approached this was fairly straightforward. The whole house was primed in grey and then I dry brushed the woodwork in white. I did it fairly lightly, slowly building up the colour and concentrated on the centre area, leaving the edges slightly darker (basically that’s the primer still showing through).
DeleteCheers
ReplyDelete