
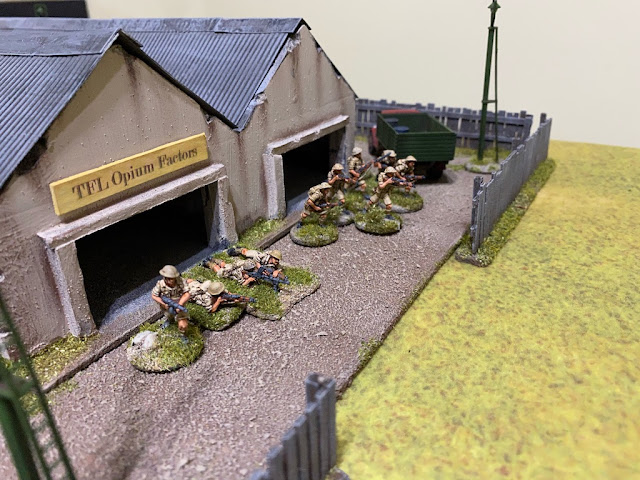
Having tried unsuccessfully to take the Opium Factory in the previous game, the second Japanese platoon suffered such heavy casualties that it is no longer effective. That means I will call forward the third and final Japanese platoon for this second attempt to clear the factory. Success would mean a campaign victory but failure with heavy losses would leave a third attempt doomed to failure and campaign defeat.
The challenge for the Japanese is to cross a large amount of open ground and arrive in good enough shape to drive the British from a strong defensive position. In the earlier game I looked to artillery support in the form of a pre-game barrage and a mortar barrage, with the additional help of a Type 97 Chi Ha tank to traverse the open ground. It did not end well.

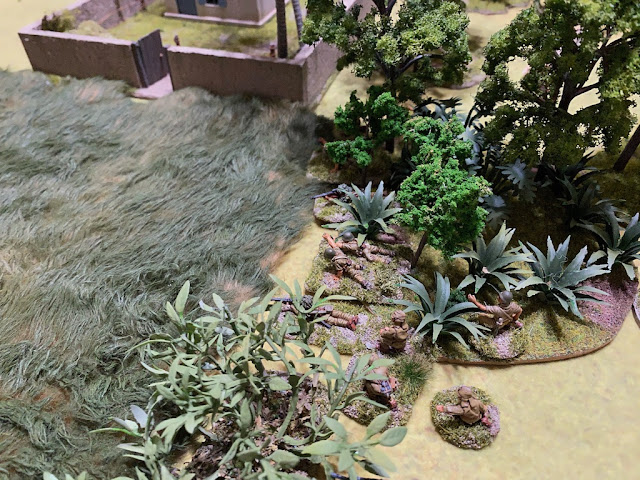
This time I'm planning something different. I think gaining a foothold in the jungle by playing a very aggressive patrol phase on the Japanese left flank is the key to covering the open ground. I intend to focus the full attention of that phase on pushing forward on that flank and heading for the jungle. How well I succeed will then determine what support I think is necessary to achieve the objective.

The Japanese receive the maximum four free moves at the beginning of the patrol phase which is an excellent start. The British have all their jump-off-points on the opposite side of the table in the objective building (the opium factory) and will find it difficult to counter a strong Japanese move toward the jungle.
I have all three Japanese patrol markers stacked together near the left flank. I use the first three free moves to move the entire stack forward and the fourth move to advance one to the edge of the jungle. From there it will be impossible for the British to move fast enough to prevent placement of a jump-off-point in that area.
 |
| Map © Rosio Espin and Karwansaray BV Originally published in Wargames, Soldiers and Strategy #101. |
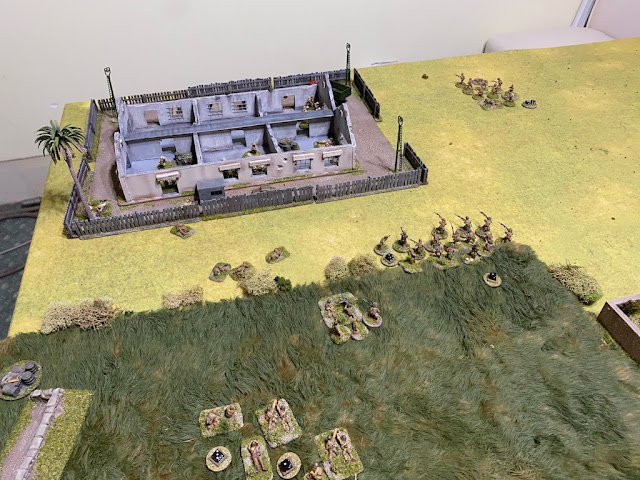
In fact the patrol phase goes very well, not only am I able to get into the jungle but I deny the British access to the plantation house, a potential strongpoint. In the end jump-off-points are placed as pictured below:
 |
| Map © Rosio Espin and Karwansaray BV Originally published in Wargames, Soldiers and Strategy #101. |
Japanese force morale starts at a lowly eight, while the British are at ten. The support roll is high with nine support points for the Japanese and seven for the British.
Now that I have jump-off-points much closer to the factory I don't think I need to call on artillery support as I did previously. The key is to bring my platoon close to the factory with sufficient force to drive out the defenders. Looking at the map I decide on a Ruse, as I should be able to advance my jump-off-point in the jungle to a point where I can deploy units and close down the nearest British jump-off-point. That would kill two birds with one stone - deny the British the opportunity to disrupt my progress through the jungle and allow the Japanese to deploy within line of sight of the factory.
I want extra firepower and if ever there was a job for a flamethrower team this is it. I suspect Dave will consider making use of the single minefield available for the campaign and so a Japanese engineer squad made up of a flamethrower team and a mine clearing team would prove a useful combination. If there is no minefield then a wire clearing team might be an alternative. To that I will add a Type 92 MMG team for additional fire support.
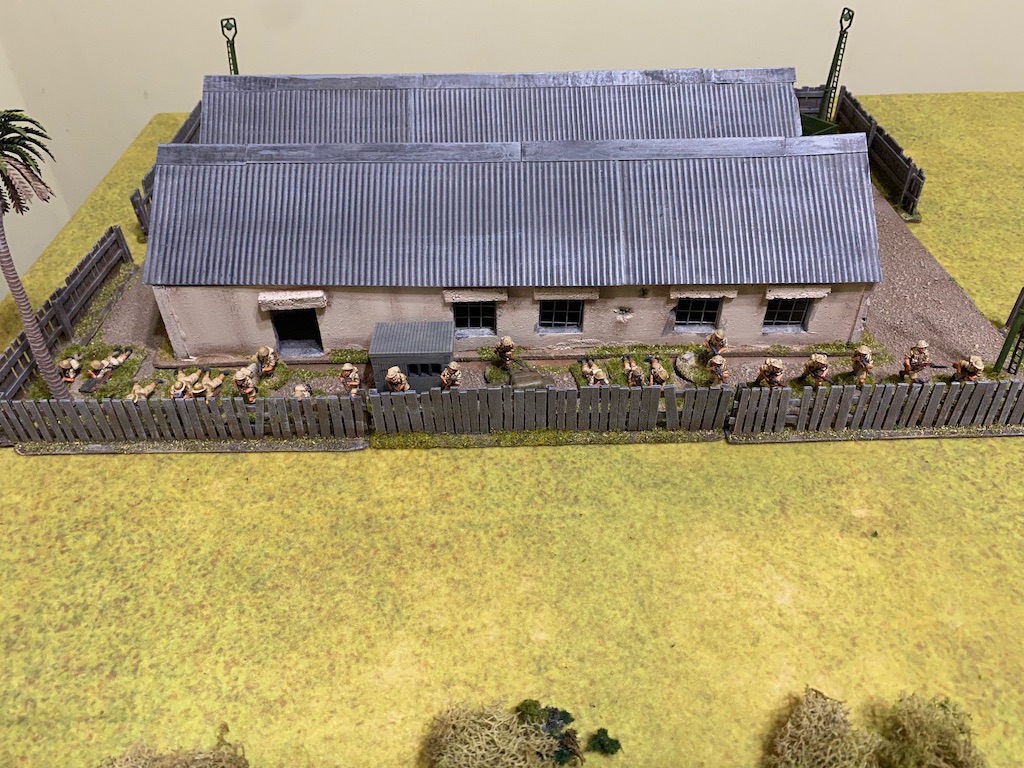
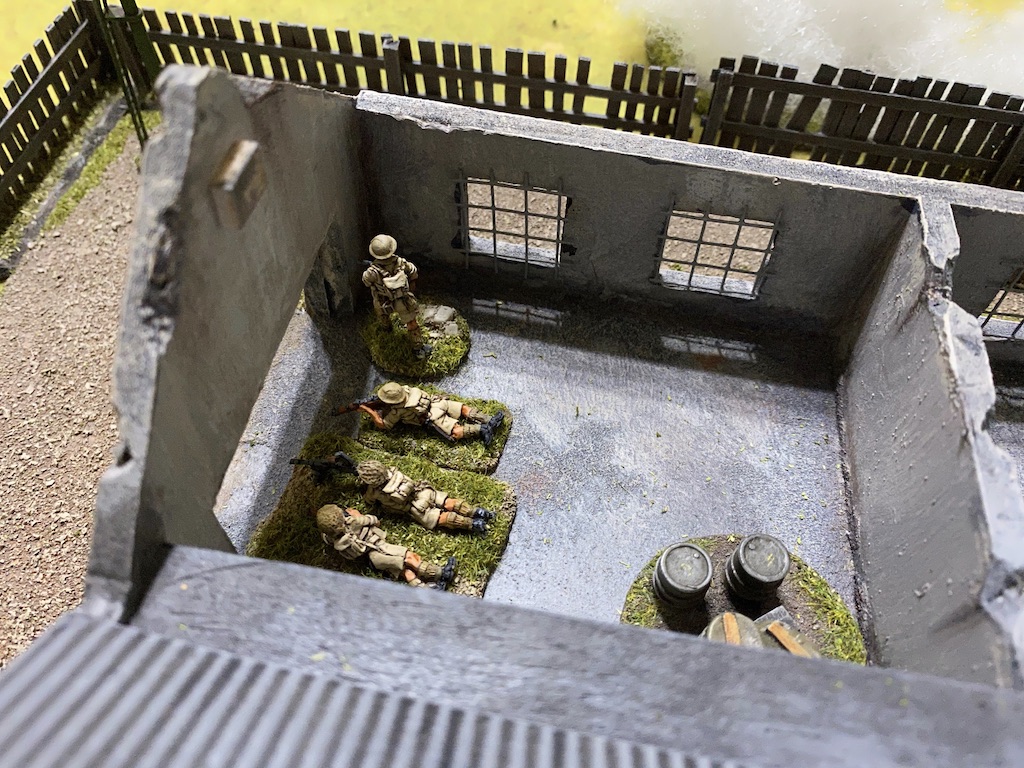
Before we start Dave places any fixed defences. He's been quite canny and selected the minefield, using it to booby trap the plantation house. I think it fits the narrative of the defence quite well - if you can't hold an important piece of ground the least you can do is try to deny it to your enemy. That's a smart move but hopefully one I can counter with my engineers. I'd like to use the house as a base of fire for the assault on the factory.

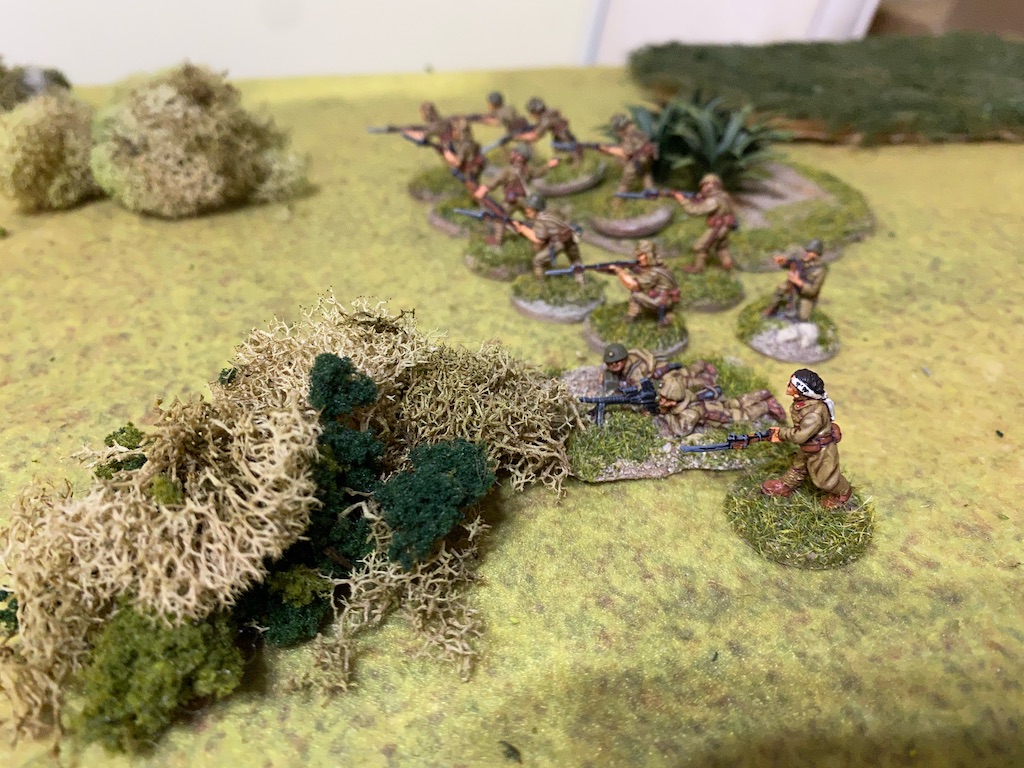
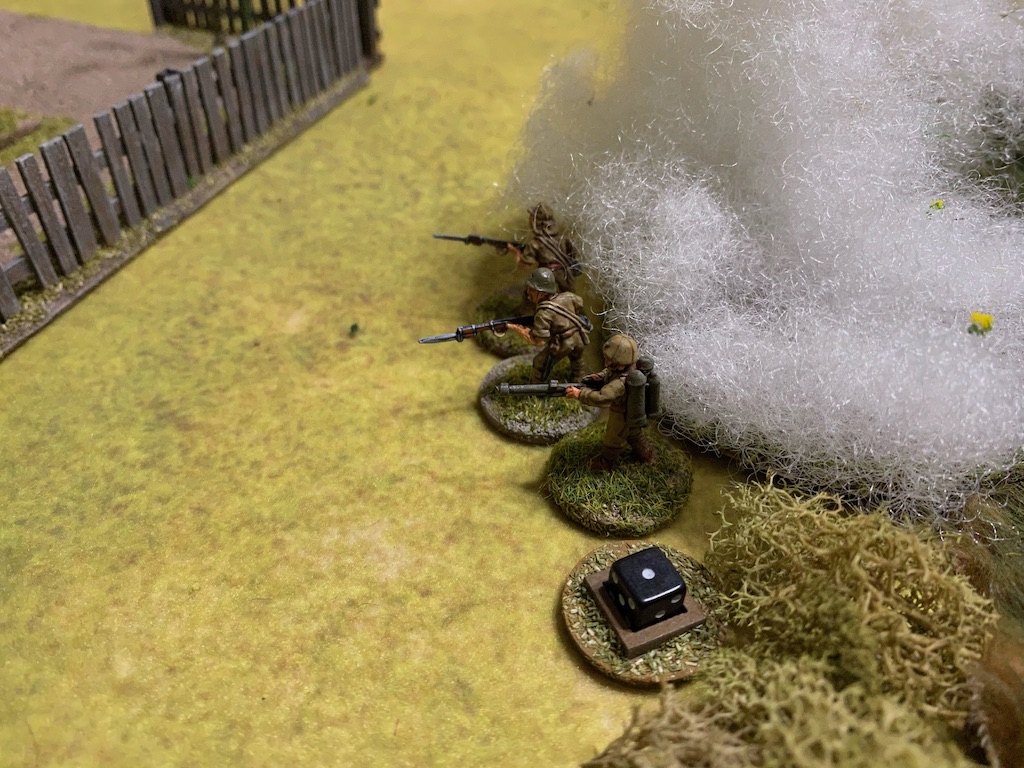
The Japanese open the first phase by announcing the Ruse and moving the jump-off-point through the jungle as planned.

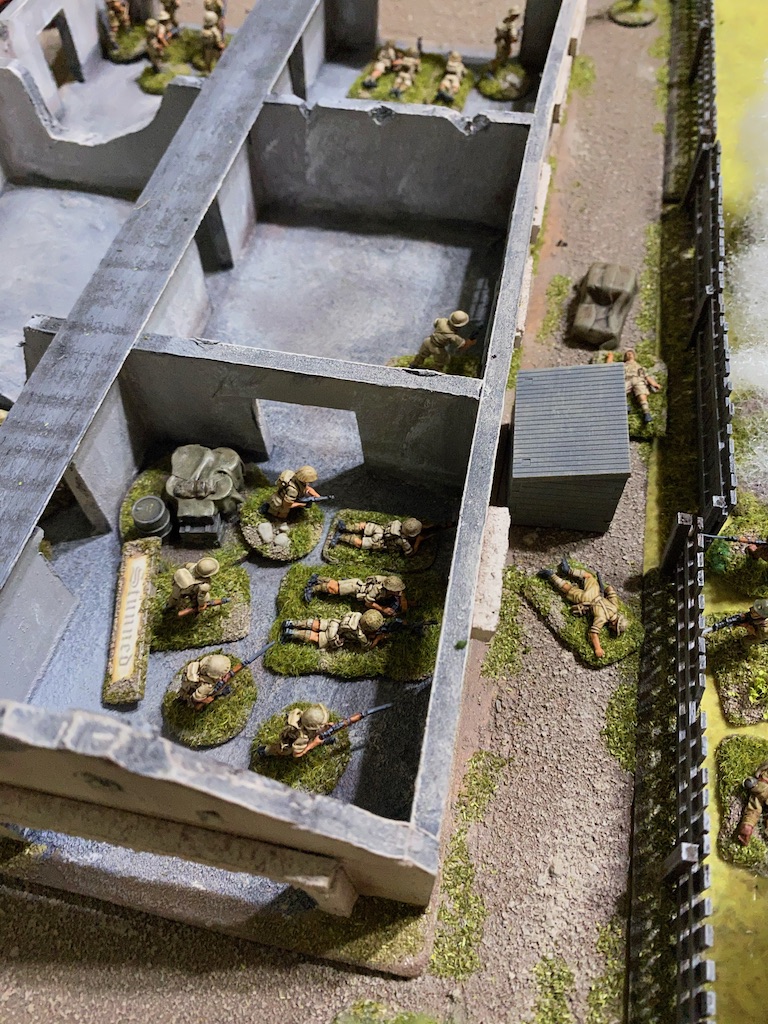
From there a squad is able to deploy and immediately close down the nearest British jump-off-point.

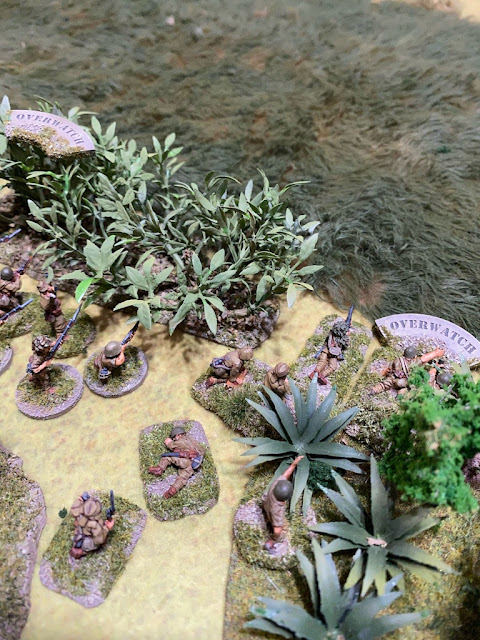
The squad corporal then puts his men on overwatch facing the factory.


Two of the Japanese are hit and one of those is the squad corporal, who is killed. That's a terrible start and Japanese force morale drops a point to seven.

The Japanese squad are on overwatch and return fire immediately. It's at this point I discover the Malay platoon are Diehards, a unique support option available only for their second platoon. The entire platoon can ignore the effects of shock, they will fight on until all their men are dead. That's going to make them very tough to eliminate. Despite seven hits from the Japanese fire there isn't a single kill and of course any shock is ignored.


They are joined by the platoon's 2” mortar team.

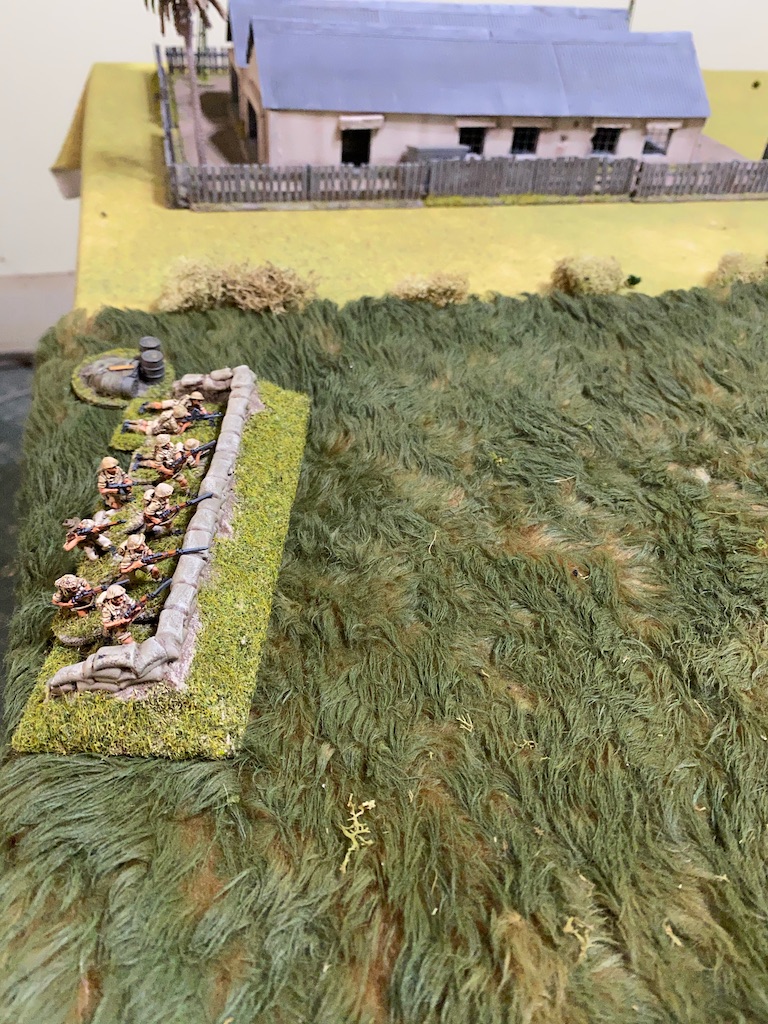
When combined with the entrenched squad in the open that makes for an imposing firing line opposing the Japanese.


The 2” mortar team then fire off a round of smoke that blocks the line of sight for two of the grenade discharger teams.


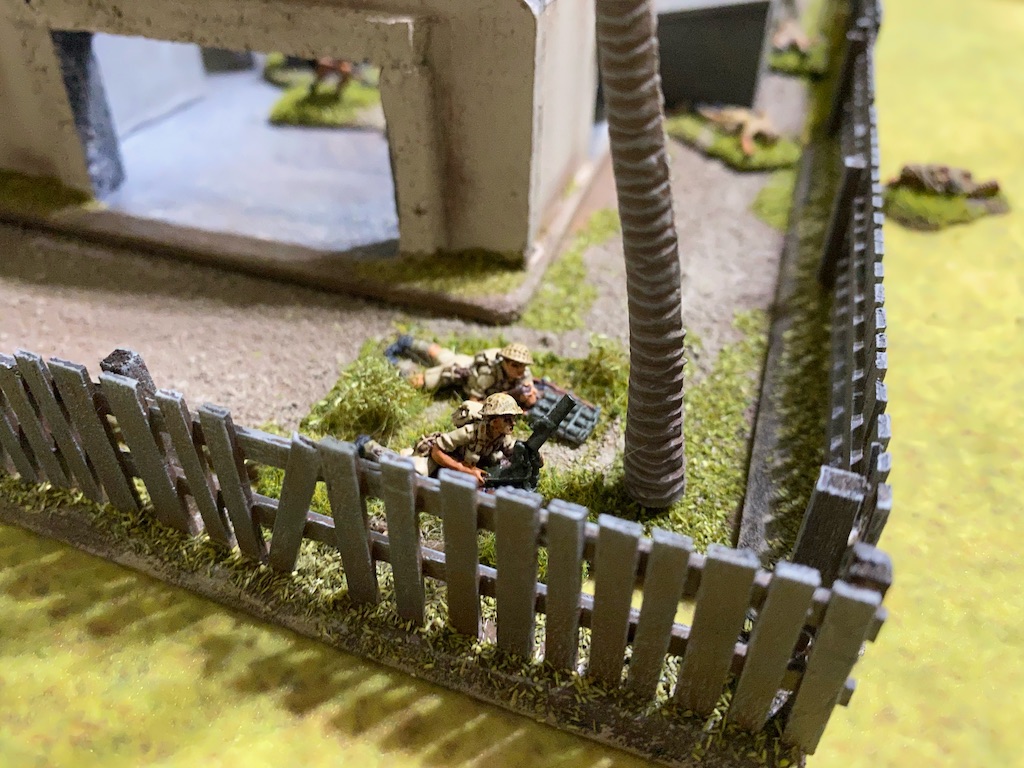
If it were not for the loss of those two leaders I would have thought the Japanese had stood up well to that opening barrage of small arms fire. Force morale may be lower than I would like but the Japanese can still bring plenty of force to bear. In their next phase the engineers deploy into the grounds of the plantation house ready to start clearing the mines.


The British have more good fortune with a command roll of 66652. That will be a double phase and a turn end. Their first action is to send one of the sections around to the front of the factory. The diversionary attack has achieved its aim of drawing British attention away from the jungle, unfortunately the double phase will allow them to respond more quickly than I had anticipated.

With that the turn ends. As a result the Japanese in the open will lose their tactical positions. On the other hand the smoke from the 2" mortar is removed which will allow the grenade discharger squad to see across to the factory.


He orders the men outside the factory to come inside and use the cover of the building.


However their aim is off and the smoke round explodes in the grounds of the plantation house.

They are joined by the grenade discharger squad who deploy to their right.


The Gunso, the platoon second in command, joins them and puts two of the grenade discharger teams on overwatch.


I feel rather pleased with myself, this is a promising start. However, the next British command roll of 66553 jolts me out of any complacency. The British reveal an entrenched section in the open ground. They drop their concealment and open fire.


Two of the Japanese are hit and one of those is the squad corporal, who is killed. That's a terrible start and Japanese force morale drops a point to seven.

The other man hit is from one of the grenade discharger teams.

The Japanese squad are on overwatch and return fire immediately. It's at this point I discover the Malay platoon are Diehards, a unique support option available only for their second platoon. The entire platoon can ignore the effects of shock, they will fight on until all their men are dead. That's going to make them very tough to eliminate. Despite seven hits from the Japanese fire there isn't a single kill and of course any shock is ignored.

In the following British phase the command roll enables the Malays to make a very aggressive response. Two sections appear behind the fence surrounding the factory.


They are joined by the platoon's 2” mortar team.


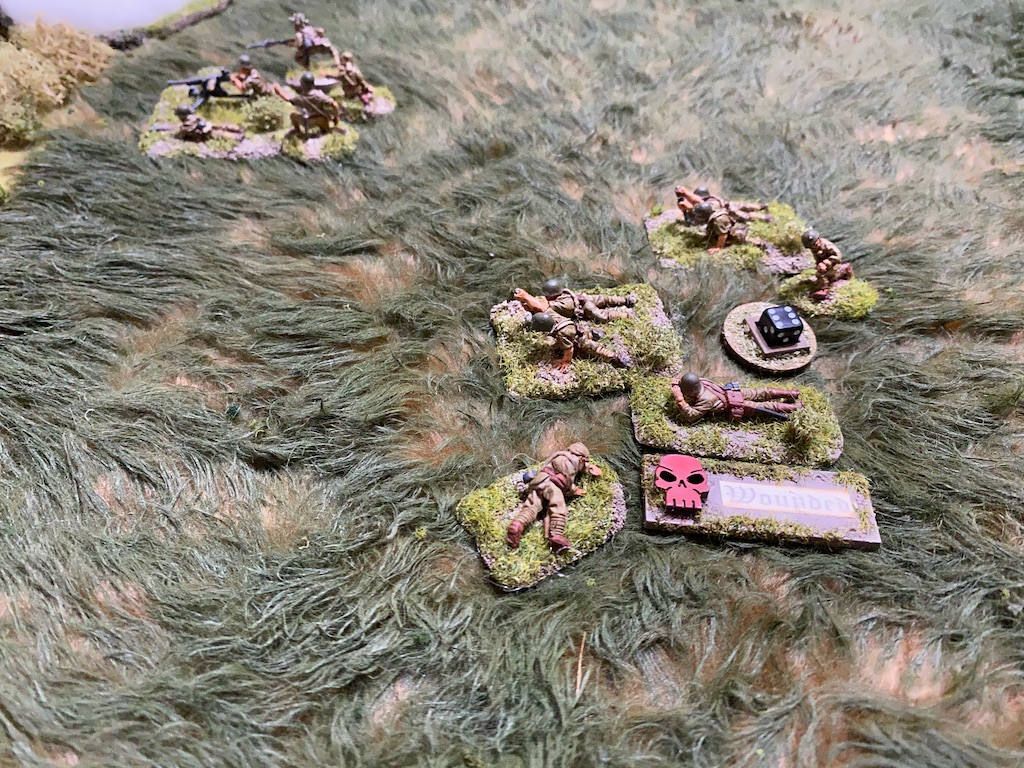
The platoon sergeant joins the entrenched section and all three sections pour fire into the jungle. The Japanese are about to take the full weight of the Malay platoon's firepower.

Fortunately for the Japanese the dense jungle provides hard cover so that despite the volume of fire only two men are casualties. However one of those men is the Gunso, the second in command, and he is killed. The loss of a senior leader is a heavy blow to Japanese force morale which drop two points to five. The death of two NCOs so early in the fight has really rocked the platoon's morale. This might not be such a good start after all.


If it were not for the loss of those two leaders I would have thought the Japanese had stood up well to that opening barrage of small arms fire. Force morale may be lower than I would like but the Japanese can still bring plenty of force to bear. In their next phase the engineers deploy into the grounds of the plantation house ready to start clearing the mines.

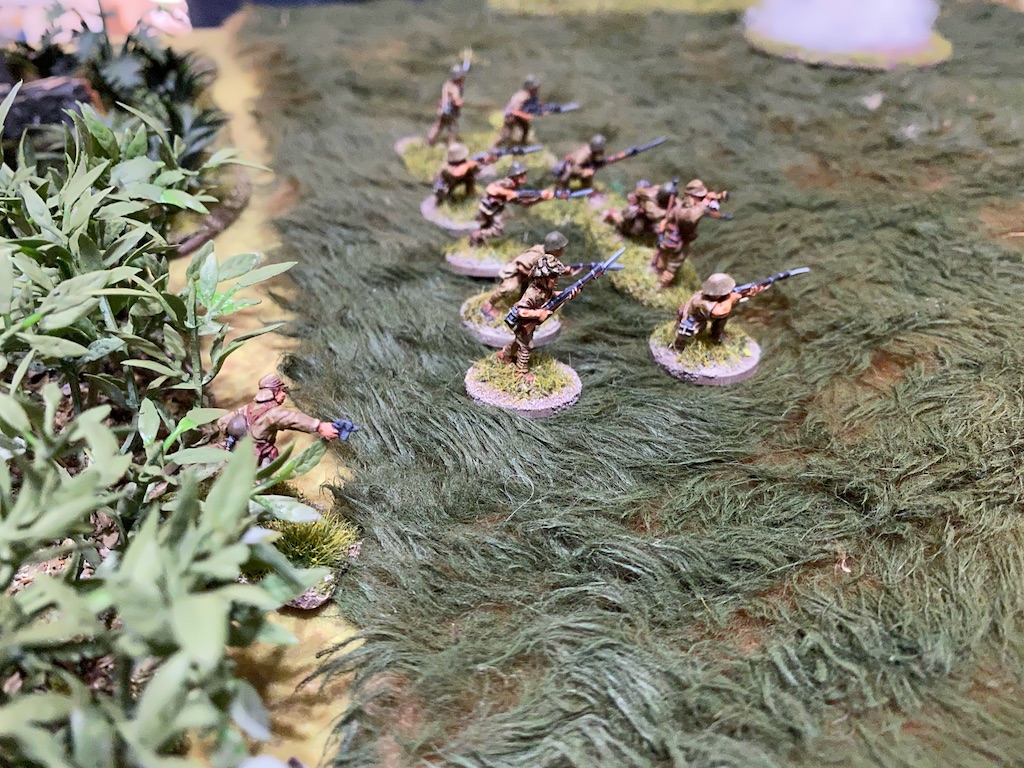
With all the British attention focussed on the jungle I decide to mount a diversionary assault from my right flank. It's a risk putting a squad into the open but I want to prevent the British from concentrating the full strength of their platoon against the jungle. A squad deploys from the village hut and takes up tactical positions.

While the squad is some distance from the factory their presence should force the British to divert attention to covering this flank. Hopefully I can move quickly and cover some of the distance before they can respond.

The squad in the jungle returns fire at the entrenched section.

This time the fire proves very effective and the section lose two men from the Bren team. If the Malays are determined to stand and die I will do my best to help them.

The British have more good fortune with a command roll of 66652. That will be a double phase and a turn end. Their first action is to send one of the sections around to the front of the factory. The diversionary attack has achieved its aim of drawing British attention away from the jungle, unfortunately the double phase will allow them to respond more quickly than I had anticipated.

All that open ground suddenly looks even more daunting.


In the following British phase the corporal with the entrenched section assigns two men from the rifle team to the bren team to bring them back to full strength. With that done the platoon sergeant directs the bren team to use concentrated fire and focus on one of the grenade discharger teams that has already lost two men. The fire inflicts only two points of shock but I can see that Dave wants to take advantage of every opportunity to reduce Japanese force morale now that it is looking weak.

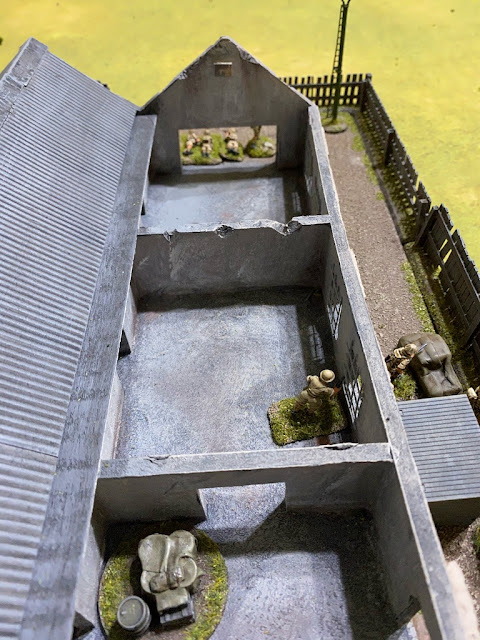
The platoon lieutenant deploys into the factory. This man is Lieutenant Adnan Saidi, whose actions on this day in 1942 were to make him one of Singapore's national heroes. His presence allows the platoon to re-roll any force morale results of six.


Meanwhile the corporal of the entrenched section directs the remaining men of the rifle team to fire five rounds rapid into the jungle.

At the same time the platoon lieutenant has the Lewis gun section at the factory join in the fire.


The Japanese lose two men in the rifle squad and another from one of the grenade discharger teams, reducing that team to a single crew member.

Lastly the lieutenant orders the 2” mortar team to fire more smoke and try to mask off the grenade discharger squad.


This is going to prove a tough nut to crack for the Japanese. In the following phase the corporal with the grenade discharger squad reassigns a man from one team to make up the numbers in the team reduced to a single man. This will enable all three grenade dischargers to fire at full effect.


The mine clearance team attempt to clear the area around the house, but they are unsuccessful.

The smoke screen will allow the Japanese to focus on the entrenched Malay section and so the Type 92 MMG team deploys to add to the weight of fire that can be brought to bear. It opens fire.


With a desperate shortage of NCOs on this flank the Rikugun is forced to deploy to take the units under command. There is still one more Japanese rifle squad to deploy and they may have trouble with the Rikugun occupied elsewhere, but for now I will just have to take that risk. He orders the squad to fire at the entrenched section. Two men are casualties and one of those is the platoon sergeant who is wounded and out of action for the remainder of the turn. That brings British force morale down two points to eight. That's a better result and with the smoke screen blinding the factory this section might find itself overwhelmed if it's not careful.
When the British phase arrives it's clear Dave has also seen what might happen here, so he's quick to act. The platoon lieutenant orders the 2" mortar team to fire a round of smoke and provide the section with some cover. The round lands on target and gives them the concealment they need to withdraw toward the relative safety of the factory.


They carry the wounded platoon sergeant with them. While they don't make it all the way back to the factory the smoke has served its purpose and keeps them out of sight of the Japanese.

No longer in tactical positions they are very exposed and so it's no surprise when they take two casualties. Once again, it's a leader who is hit and the squad corporal is wounded. Fortunately, this time Japanese morale holds steady, but for some reason my leaders seem to be attracting a disproportionate amount of bullets today.

There is no point that squad remaining where it is. For as long as it's presenting a threat to the factory it is achieving the aim of holding the attention of at least one British section, so in the next Japanese phase the squad continues edging forward tactically.

They have a long way to go but remain a threat that cannot be ignored.

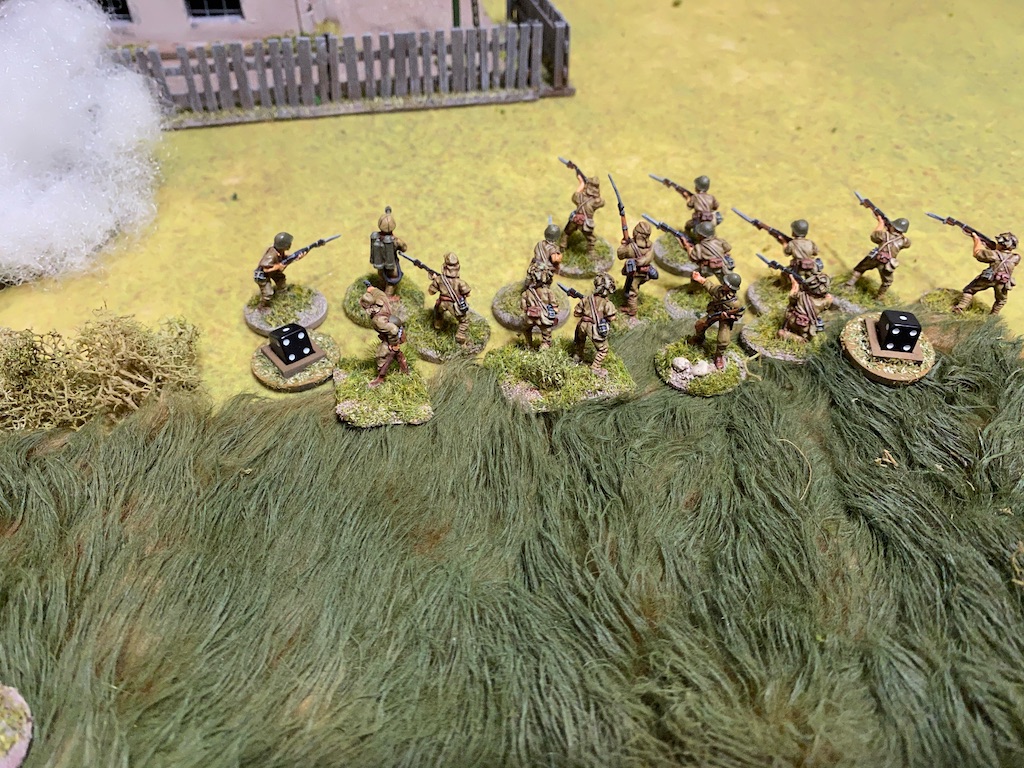
With the British all back at the factory or behind the smoke screen it's time for the Japanese to press forward. The Rikugun orders the squad to advance out of the jungle.


In the British phase the section that withdrew from the entrenchments makes its way into the grounds of the factory.

The Japanese squad in the open then faces more fire from the factory. The section corporal orders five rounds rapid from the rifle team while the platoon lieutenant orders the bren team to engage the same target.

Despite the volume of fire the squad survives unscathed.

In the following Japanese phase the engineers continue to have no luck clearing the mines. I'm beginning to wonder if it is any longer worth the effort. I would be better simply pressing forward and have the flamethrower team ready to support the attack on the factory. I had visions of the MMG team taking up position on the roof but that moment has passed.

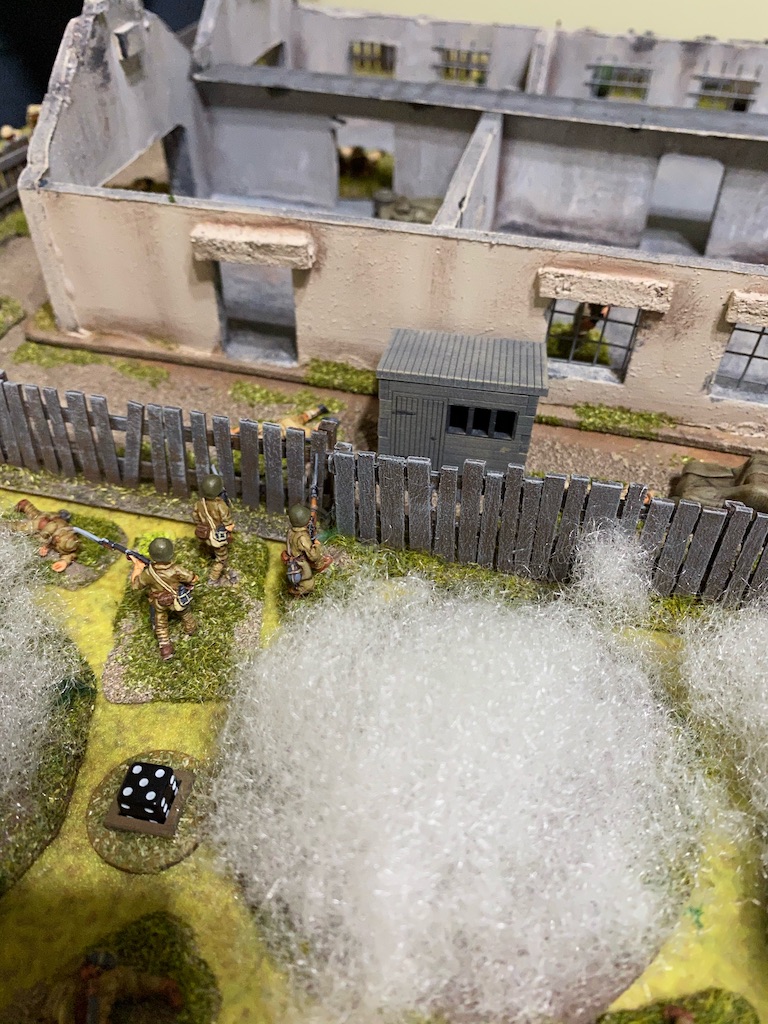
There are more important things to do while the smoke barrage is in place and the Rikugun orders the squad to move forward at the double.

I want them to cover as much ground as possible while they have the protection of the smoke screen.

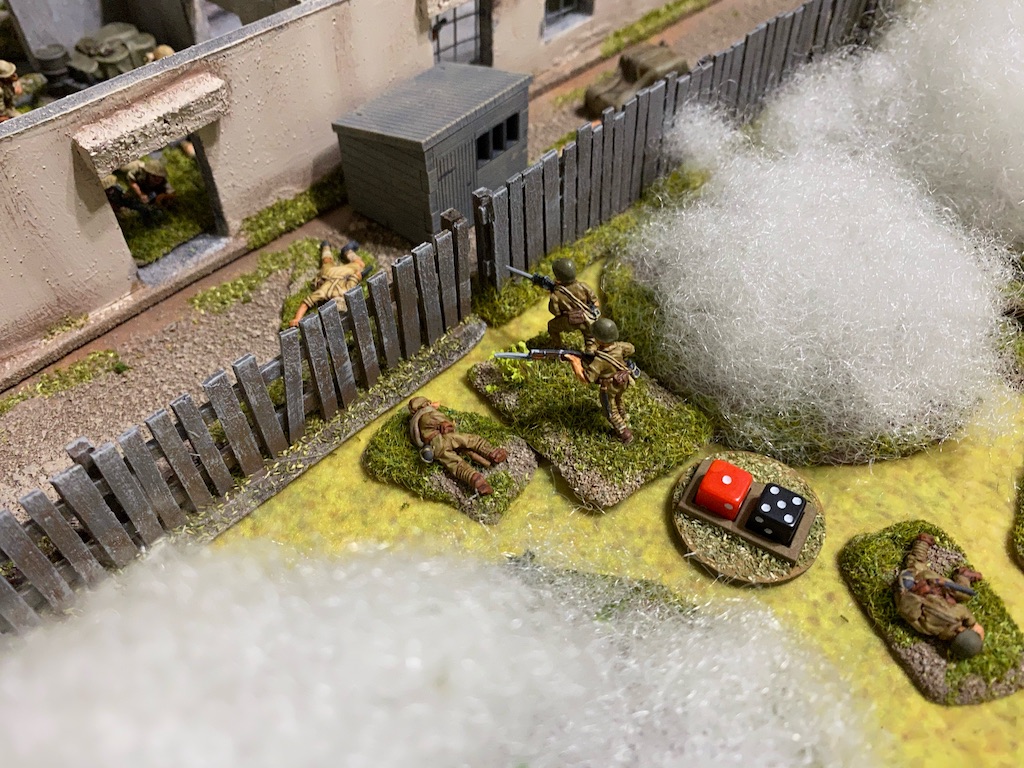
The squad are certainly up to the task and they dash forward covering the ground very quickly. In fact they go forward so fast they barrel into the smoke screen and straight into close combat with the British section at the factory fence. That wasn't quite my intention but perhaps this kind of aggression is just what I need to tackle the resolute men of the Malay Regiment?

What ensues is a very bloody bout of hand-to-hand combat. The odds don't favour the attacker with the British rolling 25 dice to the Japanese 13, but close combat can be a risky venture and something of a lottery. The outcome is never predictable and so it transpires. The British lose the close combat despite the odds, inflicting seven casualties to the Japanese eight. The Japanese do suffer four points of shock, while the British as 'diehards' can ignore theirs.

The section corporal was lightly wounded and the rifle team was wiped out, but fortunately for the British their force morale drops only one point to seven.


The Rikugun orders the MMG team forward in support.


The Japanese maintain the threat on the other flank and the squad moves forward tactically.


In the British phase the section that withdrew from their entrenchment move into the factory and take up positions at the windows.
From the window the corporal orders one of the men to throw a grenade at the remnants of the Japanese squad at the factory fence. There are two hits and they both result in kills.
That leaves a single survivor from the squad and with five points of shock he breaks and falls back 14".


The British survivors of the close combat return to the fray and move forward into the central rooms of the factory. This may be a last stand position but it's looking like a difficult one to break into. I regret not moving the flamethrower team earlier, it's just the weapon the Japanese need to assault a tough position like this.

The 2” mortar team find the best cover they can and take up tactical positions.

Once again the Japanese squad in the open comes under fire from the factory. While the platoon lieutenant directs the bren team, the section corporal orders the rifle team to fire five rounds rapid.

The Japanese squad has been wise to move tactically. It may be slower, but it has given them much needed protection. It pays off now as they suffer only two points of shock.

Low force morale has reduced the Japanese to four command dice, so a command roll of 6612 in the next phase is as unexpected as it is welcome. This presents a great opportunity to push forward. The flamethrower team move at the double toward the back of the plantation house.


Now is not the time for the squad on the right to remain cautious. The corporal orders them forward at the double and despite suffering shock they cover 12" quickly.

The Japanese luck with the command dice continues with a roll of 6642, once again as unexpected as it is welcome. The Rikugun makes his way toward the flamethrower team.

He orders them out of the gate and to move toward the factory. They move a little slower than the Rikugun would like but they should be able to cover more ground in the subsequent phase.

He then orders the grenade discharger squad forward.


The final Japanese rifle squad tries to deploy, but with the Rikugun on the table I run a 50% chance of failure. Fortunately the squad is successful and they emerge from the jungle.

That now gives the Japanese the strength they need to attempt a break in to the factory. They just need their force morale to hold up!

The run of phases comes to an end with the next command roll of 4422, but it is sufficient to enable a general advance. The newly arrived squad moves at the double toward the factory.

The Rikugun orders the grenade discharger squad to move, but they only manage a feeble 2”.

He then sends the MMG team forward.

Lastly, he leads the flamethrower team at the double around to the left of the MMG.

The squad in the open attempts a dash toward the factory fence but they don't cover the distance in time. Nonetheless the British defenders are now under a lot of pressure.

The British use their phase to prepare the defence of the factory.

The platoon lieutenant calls the Lewis team to the window to join him and one of the NCOs.


Once again the section at the front of the factory fire out at the advancing squad in the open.

The Japanese lose another two men and see their shock increase to eight.

Despite only four command dice the Japanese command roll of 6422 is enough to activate most units. Wisely the squad in the open hits the dirt and goes tactical. They've done a good job drawing British fire but they are only useful while they remain a threat and I can't afford to have them pin or break.

The Rikugun orders the grenade discharger squad to continue making its way forward.

He then puts the MMG team on overwatch.

With that done he continues to lead the flamethrower team forward.

Finally the squad moves forward to join them.

What I hadn't noticed was that the British had accumulated a full CoC dice and Dave chooses the end of the Japanese phase as the moment to use it and end the turn.
The lone survivor of the broken squad routs from the table. Fortunately there is no NCO with them and so no adverse impact on Japanese morale.


And the squad in the open no longer tactical.

More significantly the smoke screen drifts away and the Japanese lose the protection it has afforded them so far.

To make matters worse the MMG team are no long on overwatch.


The British on the other hand see their wounded platoon sergeant back on his feet.

This gives the British their opportunity to try to slow the Japanese advance. The platoon lieutenant directs the Lewis team to use concentrated fire and focus solely on the flamethrower team.

Their view is partially obscured by the factory fence which affords the Japanese light cover and while the flamethrower team suffer shock none of them are killed.


Two of the Japanese are casualties and, as has happened so often in this game, one of those is the corporal from the grenade discharger squad, who is wounded. Japanese morale drops down to three. If it wasn't for the low force morale I'd be feeling fairly optimistic about my chances here but things are really hanging in the balance at the moment.

With the British unable to eliminate the flamethrower team with small arms fire it is left to the 2” mortar team to try to blind it with smoke. It is just outside the mortar's minimum range.

This time their aim is good and the round lands right on target.

Once again the Japanese squad in the open is targeted by the section at the factory door. However the section can no longer ignore the threat on its right from the advancing Japanese. The rifle team fires at full effect but the bren team fire at half effect before moving. The Japanese squad lose another man and their shock climbs to ten, which brings them very close to pinning.

With that done the section's bren team moves to face out of the other window and the oncoming Japanese.


With the Japanese down to three command dice it's going to be a lot trickier to command the platoon and a command roll of 553 in the following phase reinforces that point. It is time to try to force the issue and so the corporal commanding the squad near the factory rallies a point of shock before ordering them to charge at the double toward the factory entrance.
It's a big moment in the game and the dice decide to be brutally cruel. Ah, the misfortunes of war and the best laid plans of men. The squad move forward a miserable 3".


Fortunately the British are not helped by a command roll of 55532. Once again the section at the factory engages the squad in the open. The rifle team give them their full attention and the bren team move back to their previous position and contribute half firepower to the attack. This time it has no effect.


That's a turn of events that puts the outcome of this game very much in the balance. Despite the casualties and shock the Japanese squad has broken into the factory and reduced British force morale. Both sides have taken a lot of casualties and the Malays are hanging on by a small margin. I have a CoC die and it's tempting to use it to end the turn and capture the jump off point to further reduce British morale but I think I may have other uses for it.


Fortunately the British are not helped by a command roll of 55532. Once again the section at the factory engages the squad in the open. The rifle team give them their full attention and the bren team move back to their previous position and contribute half firepower to the attack. This time it has no effect.


One of the other sections in the factory continues to fire at the grenade discharger squad while the corporal engages the nearby Japanese MMG team with his submachine gun.

The fire has little effect but the grenade discharger squad does suffer a point of shock.

The next Japanese command roll is 553, identical to the previous phase. While it doesn't provide many activation options it does mean they now have a full CoC die available.
Once again the corporal commanding the squad outside the factory exhorts his men to a superhuman effort and they storm toward the factory.

This time they are inspired by his leadership. They surge around the factory fence and into the building.


The Malay defenders may be outnumbered, but they have other things in their favour - they are defending hard cover, they have a light machine gun and the section corporal is armed with a Thompson submachine gun, all in all a very useful combination at a time like this. They will roll 22 dice in total against the Japanese 16.

However fortune favours the Japanese who win the close combat with six casualties to four. The British see the bren team wiped out and the corporal killed which brings their force morale down two points to six.


There is only one hit but it results in one kill. For once it's not one of my leaders, but it does see one of the grenade discharger teams reduced to a single man.

The platoon sergeant then tells the Lewis gun team to fire at the grenade discharger squad and orders the 2” mortar to fire a round of HE at the same target.


The Japanese suffer more shock and another member of one of the teams is killed. I think Dave senses a good opportunity to drive down Japanese morale by eliminating the vulnerable grenade discharger teams.

Despite the presence of the Japanese squad in the adjoining room of the factory, the lieutenant orders the rifle team to fire at the squad in the open. The British have a double phase and Dave intends dealing with one squad at a time.


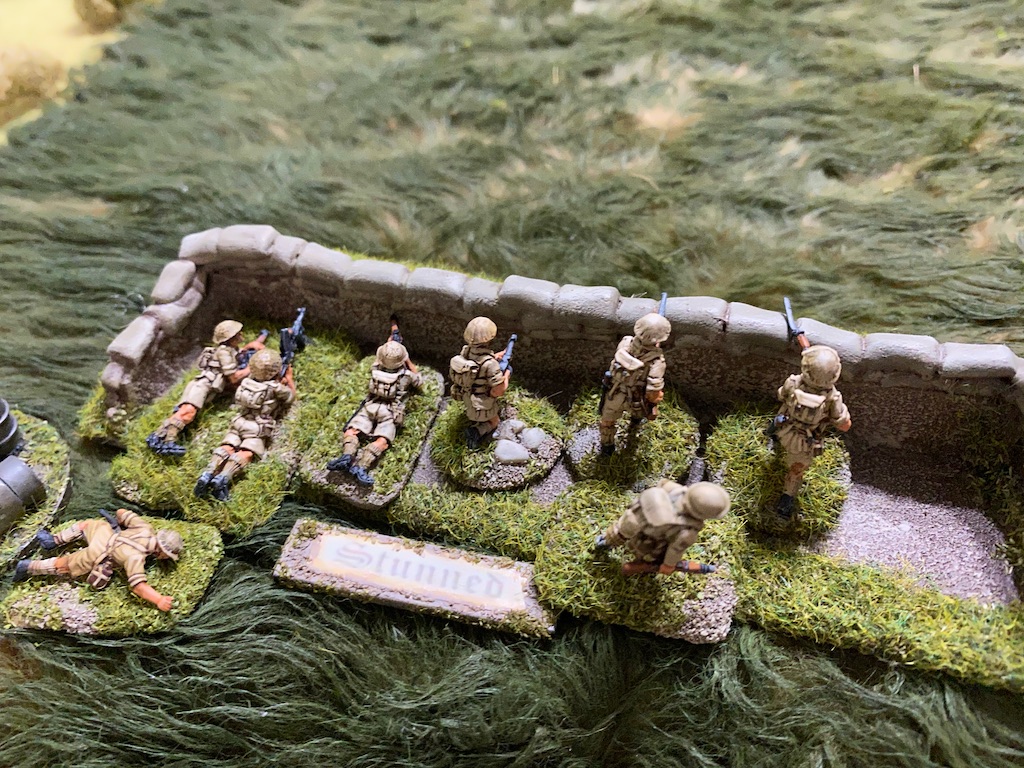
The fire inflicts two points of shock and finally that's enough to see the squad pinned. With a wounded leader and no senior leaders nearby, that squad is unlikely to do much more in this game. They came close to the factory and diverted the attention of one British section, but will it have been enough?

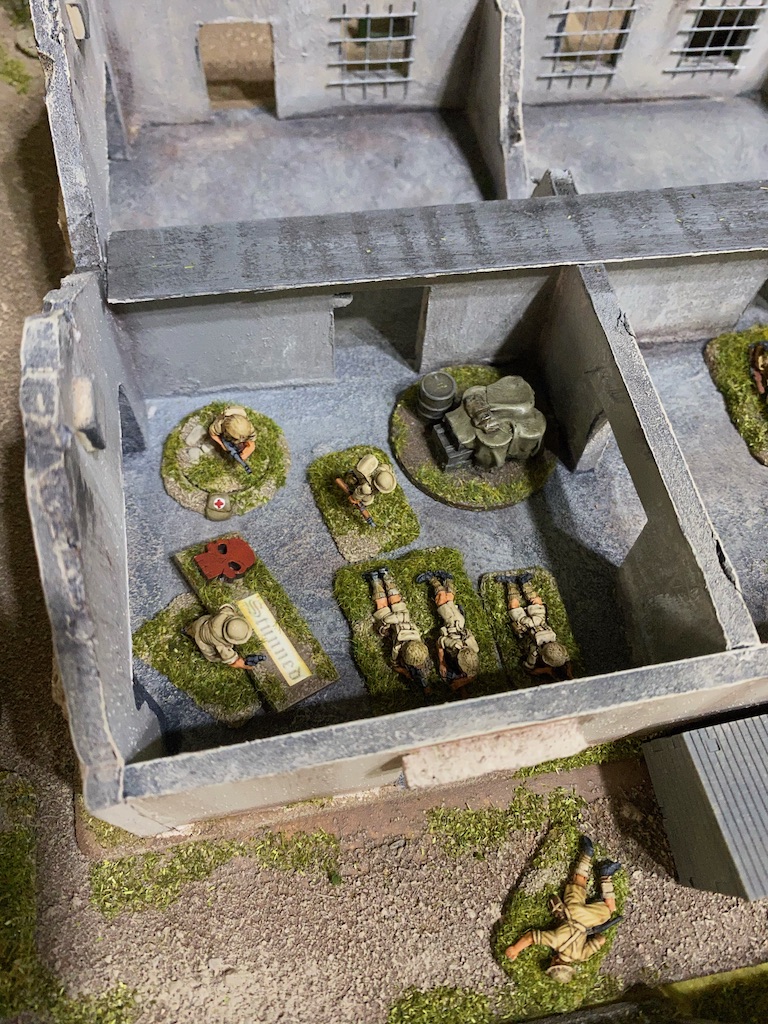
The lieutenant then has the rifle team throw a grenade into the adjoining room. In the enclosed confines of the building the grenade is particularly effective and the Japanese squad loses two men and suffers more shock. The fighting in the factory is becoming particularly vicious and desperate.

In the following British phase the lieutenant orders the section to maintain its fire at the grenade discharger squad.

The sole crew member in one of the teams is killed, which sees the team wiped out. That achieves one of the results Dave was after and Japanese morale drops down to two. Is any chance of a Japanese victory slipping away?

The rifle team in the factory prepare to throw in a second grenade, but I decide this might be the best time to use that CoC die and interrupt.

While the rifle team is facing out of the factory a move into that room will make this an attack from the rear. The Japanese attack with eight dice to the British six.

Once again Japanese aggression with the bayonet pays off. Casualties are relatively light with the British losing two men and the Japanese only one, but it's enough to see the rifle team driven out of the factory.


They finally have the opportunity to throw the grenade that the Japanese so rudely interrupted, but now they have a more difficult target to hit and the grenade misses.


The Lewis Gun team in the centre of the factory move away from the window and turn to face the internal doorway, ready for the inevitable arrival of the Japanese squad.

The Malays maintain their pressure on the grenade discharger squad and the 2” mortar team target them with another of their limited HE rounds.
There's one hit but it inflicts only a further point of shock.

After surviving that double phase the Japanese command roll is 642. The Rikugun is at the forefront of the action and even though there are limited command dice he is the right man in the right place at the right moment.
Finally it's time to bring the flamethrower into action. The Rikugun rallies a point of shock from the flamethrower team and has them advance out of the smoke with a single movement die.
They emerge from the smoke and unleash a blast of burning fuel at the factory.


The Malays suffer three casualties, which wipes out what remained of the section rifle team and wounds the section corporal. With a team wiped out and a junior leader wounded British morale drops down to four.
The Rikugun then orders the MMG team to fire at the same target.

The platoon lieutenant, the heroic Adnan Saidi, is hit and wounded. That's a real blow to the platoon and their morale drops a further two points down to two.

That was a devastating phase for the Malays who see their platoon further depleted and their morale close to zero. The Japanese are not that much better off and so the game hangs in the balance. The Japanese squad in the factory holds its ground for now, I will wait to see if the flamethrower can do more damage before they consider moving in to the next room.
The British are reduced to three command dice, but a roll of 411 gives several options for activations. The 2” mortar fire team try to blind the flamethrower team with smoke.

This time their aim is off and the smoke round lands in the grounds of the factory.


The wounded platoon lieutenant moves into the adjoining room in the factory and orders the bren team to fire at the grenade discharger squad.

This time the fire has no effect.
The Malays are being pushed back slowly into a corner of the factory but the Japanese have suffered many casualties and their force morale is no better. We are heading to a very tense conclusion to the game and the campaign.

In the Japanese phase the command roll of 521 is limiting, but it's enough to activate the flamethrower team. They no longer have sight of any British units and so they clamber over the fence and into the grounds of the factory in search of a target.


The grenade discharger squad tries to silence the 2” mortar, which has proven such a menace.

A couple of grenades land on target and one of the mortar team is killed.

They don't have far to go and should be able to reach close combat range.


That was a particularly bloody struggle with a lot more close combat than usual. The Japanese were certainly unlucky to have so many NCOs taken as casualties but on the other hand the luck favoured them against the odds in each and every close combat. I can't have any complaints.
In hindsight is there anything I could have done better? Quite possibly. I managed to close down one jump-off-point in the jungle but didn't send a unit to capture it. Perhaps I should have done that and done the same with the jump-off-point by the entrenchment. I did capture one in the factory and perhaps I should have used a CoC die to end the turn then. The combination of capturing all three jump-off-points may have been enough to drive down British force morale. I suspect all the action on the table drew my attention away from looking at game winning mechanics like capturing jump-off-points. To be honest, I think I was having too much fun.
There were a few other things that could have been handled better. Certainly moving the flamethrower team over the fence and into the factory was unwise, they could have used the protection of the fence to move around the factory and fire through the windows. I should have also considered having the grenade discharger squad revert to a rifle squad and leave their grenade dischargers behind, thereby forming one squad rather than three vulnerable teams. That way they could have accompanied the flamethrower team and provided them with protection.
However let none of that detract from a very enjoyable and tense game, a very fitting finale to a good campaign. It demonstrates how even a short four map campaign can produce a very engaging narrative and a range of challenges for both players. Credit to Mark Backhouse for devising the campaign and to Wargames, Soldiers and Strategy magazine for supporting Chain of Command with such excellent content.
You find reports for all the games in this campaign and many other campaigns on the Chain of Command Campaign AAR page here.
Last Stand on Opium Hill, a campaign for Chain of Command, appears in Issue 101 of Wargames, Soldiers and Strategy Magazine. My thanks to the magazine and publisher for permission to reproduce the maps.
If you are interested in more action set in the Far East you can follow a campaign between the Australians and Japanese that takes place in Malaya a few weeks prior to this current campaign. Click here for the first game report for the Malaya 1942 campaign.
If you've enjoyed following along and would like to Buy Me a Coffee to help cover some of the costs of running the blog you can click through at the link or on the tab in the right hand column of this page.
Nail biting finish Mark almost too much excitement.
ReplyDeleteDave should dip his two JOP's in resin blocks and present them to you..as a reminder! ;)
I think I'd need to smack myself around the head with both of them as a reminder!
DeleteMy what a thrilling finale, so gripping my cuppa was nearly cold by the time I got around to it. A fine narrative and accompanying photos, you certainly sell the rules well with these superb reports. Thank you for taking the time to post them all.
ReplyDeleteThank you. Glad you enjoyed the read but sorry to hear I might have spoilt your cup of tea. I can tell you I needed more than a cuppa after that nerve wracking game!
DeleteWell, that was an exciting game! As usual, terrific stuff and what can be better than a game where victory stays in the balance right down to the last whistle?
ReplyDeleteThanks Carole, it really turned into an excellent campaign and, as you say, nothing better than coming right down to the wire.
DeleteI've been looking forward to this conclusion and it didn't disappoint! Your NCO's were obviously leading from the front today to sustain such casualties. I think if you'd gone down the avenue of capturing the jump off points the game wouldn't have had the down to the minute nail biting finish that kept me on the edge of the sofa. Great campaign as usual I'm looking forward to the next one.
ReplyDeleteYes, those NCOs were dropping like flies, but maintaining the good honour of the IJA by leading from the front. I think you are right, there were ways to win that game that would have been a lot less satisfying than a desperate close-quarters struggle around the factory.
DeleteA phenomenal game! Everything hinging on a final do-or-die attempt. It doesn't get better than this.
ReplyDeleteThanks. It certainly was an immersive and engaging game - not to mention nerve wracking. It's definitely why we play these games.
DeleteWow! Just like the Malay regiment, I'm stunned and impressed by that nail biting finalé!
ReplyDeleteWell done Dave and Mark for another excellent play through. Compelling reading.
Thanks Graham, it made for a really great narrative and just what you want out of a campaign. I think we started off with fairly modest expectations but this really delivered and was very enjoyable.
DeleteWell done on another terrific campaign and AAR!
ReplyDeleteThanks Ian, we thoroughly enjoyed this one, it turned out to be much richer than we were expecting.
DeleteI enjoyed your AARs before I even played CoC and they were one reason for me starting to use these excellent rules. Another superb AAR and absolutely gripping campaign- I’ve been waiting for each battle. Thanks v much.
ReplyDeleteThanks Rob, nice to hear the blog has helped introduce you to CoC. The rules give a great game which really starts to shine in a campaign context.
DeleteFinally managed to read the last entry in this campaign, it didn't disappoint. I was engaged the whole time, almost skipping the pictures to see what was going to happen next! Do you have any idea what comes next?
ReplyDeleteThanks Matias, it was a very enjoyable and exciting end to the campaign. Next we're looking at either Bloody Bucket (Ardennes 1944) or possibly one with the Dutch in 1940. We will decide in the new year.
Delete