

Aside from those jump-off-points you are armed only with a rough knowledge of the nature of your opponent. You know you face an enemy of at least platoon strength and they are likely to have support, but made up of exactly what you remain unsure.
So the game begins, but where to start? At first the inclination is to think this is a race or a lottery. Is it simply just a matter of who can throw the best command dice and deploy faster than their opponent? Surely I need all my units on the table ready to fight as soon as possible? Yes? Well, actually the answer in most cases is probably, no.
It's counter-intuitive because we tend to think a unit is useful only if it is on the table firing madly at our opponent. Yet the phrase 'empty battlefield' exists for a reason, losing concealment could often be fatal. The only reason to give away your position is because it is advantageous to you and so it is in Chain of Command.
At first glance this appears to be of most benefit to the defender but, as I hope to show, the attacker can make just as much use from the same sort of concealment.
But what does that mean for deploying during a game? The best way to look at it is with an example. I discussed playing the patrol phase in an earlier post and so I will continue using the same map but this time as an Attack & Defend scenario. As before the attacker is approaching from the top of the table and the defender occupies the outskirts of the village. Note that for the purposes of this example the railway embankment provides light cover as do the wheat fields for units that are stationary.

Each player should try to formulate a rough plan based on an assessment of the objective, the terrain and the forces at hand. Let's look at it first from the attacker's perspective. In a nutshell they must find the enemy and destroy them. They start off at a disadvantage as they need to cross exposed ground before they can break into the village and deal with the defenders. Somehow they need to locate the enemy, tie them down with suppressive fire and manoeuvre into the village finding the path of least resistance.
Things look somewhat easier from the defender's perspective. The approaches to the village are very open and they can be defended from good cover. Not only is a forward defence an option, the buildings further back in the village make for good locations for a defence with more depth. Ideally the attacker will be made to work hard to find and destroy the defenders.

These plans should help determine how each player decides to deploy. This is just as relevant for the attacker as it is for the defender. The less each player knows about the other's intentions the harder it is to respond effectively. The attacker wants to time their deployment so that the defender cannot work out the main avenue of attack until it is too late to respond, while the defender doesn't want to deploy until sure of where that attack is coming from.
If the defender has opted for jump-off-points at the hedges on the outskirts of the village then the first thing the attacker needs to consider is how best to cross the exposed ground. Deployment will depend on the force available and this is where support choices will be important. What can you call on to neutralise any potential threats that could emerge from the hedge row?
While the focus will be on what units you deploy to deal with that, it is important you also give thought to making your opponent's deployment as problematic as possible. One support option, if available, is a pre-game barrage. It can introduce an element of uncertainty into a defender's deployment.

While a pre-game barrage can be quite effective, it is subject to the vagaries of fortune. There is always the chance an early command roll includes three 6s and ends the first turn prematurely, or the defender enjoys good luck with their deployment rolls. However, neither player knows any of this for certain. This unknown puts pressure on the defender to consider deploying earlier than planned to minimise the risks of failure in a later phase.
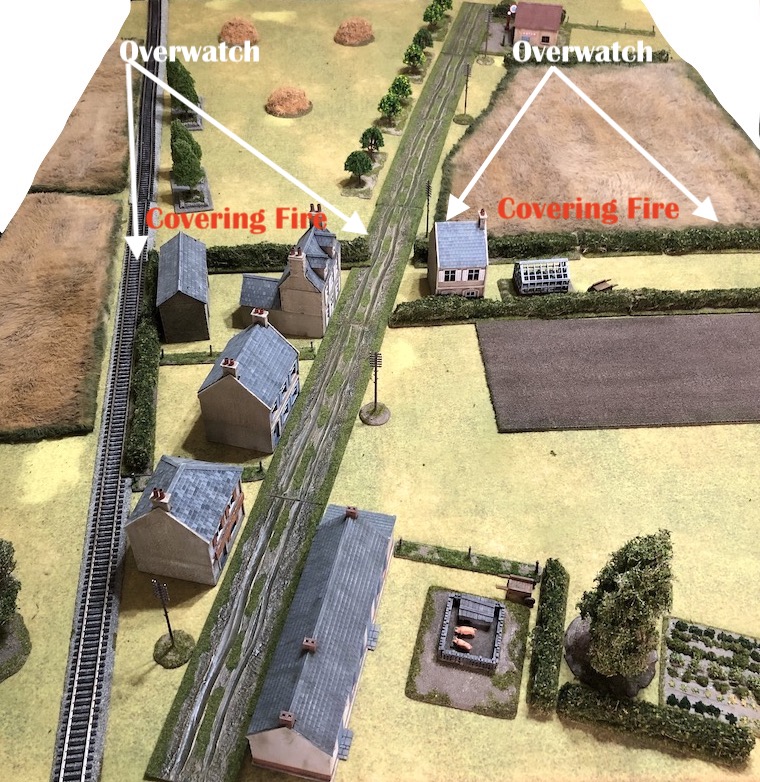
The disruption could see defending units appearing in an uncoordinated and ad hoc fashion, making for a less cohesive defence. There is a chance this will create the conditions where an attacker can overwhelm isolated defending units. For this reason a pre-game barrage can work well with other support choices such as a machine gun team, a light infantry gun or an additional squad. These could be the first attacking units to deploy, taking up positions in locations 1 or 2 in the picture below. From there they have cover and clear lines of sight. The aim here is to deploy just enough units to form a base of fire and to have these units deployed before the enemy.

The thinking behind these initial deployments is to make the hedgerow an unattractive position for the defender. So, regardless of whether there is a pre-game barrage or not, the objective for these attacking units is to suppress enemy units that deploy along the hedgerow.
By deploying these units first and placing them on overwatch or laying down covering fire the attacker gains an early advantage. If a pre-game barrage has restricted deployment to only one or two defending units it may be possible to gain fire superiority before other units can arrive to support them. The attacker is now in a better position to choose when and where to put down suppressing fire and to do so before deciding which route provides the best chance of success for the assault units. Those units remain concealed and await deployment until the moment is right, keeping the defender uncertain as to which direction the assault will come from.
But why not deploy the majority of attacking units in this early stage? Surely they could generate a large volume of fire against any defender who was unwise enough to occupy the hedgerows? That could be a viable tactic in certain circumstances, but keep in mind that such a large deployment gives the defender a much clearer understanding of enemy intentions. What if the defender simply refuses to respond, choosing to remain concealed? After all, what's the incentive to do so? If that occurs then the attacker has revealed much of his hand to no obvious advantage.
The units that will make up the attacker's base of fire could deploy to either positions 1 and 2 without revealing the intended avenue of attack. Remember the key here is not to reveal your main force, only to establish a base of fire. Don't rush this deployment if there is no obvious sense of urgency. It is best timed for when the command roll allows most if not all of the units you want to deploy to do so. The attacker should be wary of deploying an isolated team to one of these positions as that might invite an aggressive defender to attempt to overwhelm the small team and wipe it out.
In this context I like to think of the command dice as defining the conditions under which you are currently operating. If those conditions are not ideal for what you have planned then perhaps let the phase pass until the conditions improve. If the defender wants to use that opportunity to deploy you might welcome it. It may just provide you with a target for your next phase and reveal where some of the enemy are located. When it comes to deployment, timing is critical.
With limited deployment by the attacker and no real indication of the location of the main thrust there seems little advantage to the defender deploying. Why not? What if a good command roll allows the defender to deploy several units and bring their fire to bear against the enemy's base of fire? While that is certainly an option it's one that calls for a few factors to be considered.

Firstly, look at the range and the cover. If we assume the enemy base of fire is in the vicinity of locations 1 or 2 then it is beyond close range. As a result this will be a firefight at effective range against targets in light cover, both of which will reduce the chance of inflicting casualties or shock. The odds become even worse if the attacker has placed covering fire.
Secondly, unless the defender has a double phase they can expect return fire in the same phase from attacking units on overwatch. This would then be followed by more fire in the enemy phase. That's two rounds of fire to your one. Not a great trade off.
Lastly, in order to generate a decent volume of fire the defender will need to reveal a number of units without yet knowing where the main attack is coming from. That gives the attacker even more scope to determine how the attack should unfold. So, while that sort of early deployment remains an option for the defender, it is a calculated risk that needs to be considered carefully. Perhaps the defender should hold off deploying until there are better and more threatening targets? After all, at some point the attacker is going to have to approach the village.
The key here for both attacker and defender is to use the command dice to deploy only if it helps you fulfil your plan. Don't let those dice dictate the plan. It's tempting to see a lot of useful command dice and feel compelled to make use of them. Resist the temptation if it doesn't serve your overall purpose.
If there are no obvious advantages to deploying then let's assume the defender opts to remain concealed. The attacker will need to find a way to discover the location of the enemy and probe for weak spots. One way to provoke a response from a concealed defender is to threaten a jump-off-point. Without risking an entire squad the attacker could assign a rifle team to move forward, while the squad's LMG team puts down covering fire or is placed on overwatch.

In the picture below the Germans have deployed a squad into the wheat field. There are two French jump-off-points behind the hedgerows and they will have to decide how best to respond to the German deployment.

In order to save the jump-off-point a unit will eventually need to deploy and engage the advancing enemy. Whatever unit does deploy will be subject to return fire, so how can the defender deploy to gain maximum advantage? The aim is to do enough damage to the advancing enemy unit to make it ineffective. The chances of that occurring increase if the engagement can take place at close range and ideally within grenade range. The defender wants to strike hard and fast, emerging from their concealment only at the moment when they are likely to inflict the most damage. Waiting for the right moment to deploy can be unnerving but the rewards are likely to be greater.
If they succeed in wiping out, breaking or simply pinning the advancing team then they have eliminated the threat for the moment. Even if any return fire from attacking units on overwatch or in their subsequent phase causes casualties and shock the defenders have given themselves time to pull back out of sight and rally. With the attacking unit driven back or pinned down the defending unit has done its work and has no need to remain a target at the hedgerow. The attacker must now restart the process of sending another unit forward or rethink the avenue of attack.

From the attacker's perspective consider how valuable a pre-game barrage could be as a support if it caused the defending unit to fail to deploy at that critical moment.
The worrying factor for the defender when a pregame barrage is in play is whether they may be able to deploy at all. While the odds give you a 50:50 chance of success I think we have all experienced those horrendous dice results that refuse to abide by the statistical averages. This is when a jump-off-point that is placed in a deeper position can be of use. If the defender is not looking to risk revealing units in an ad hoc fashion at the forward line of their defence then there is always the option to try to deploy units to the rear as an insurance against problems deploying at the front. Accept that at times chaos and confusion will reign and have some thoughts as to how you will react should it happen.
In our example the village offers a number of good defensive positions and if a combination of bad fortune or overwhelming enemy force makes the forward defence no longer viable then some careful thought about placement of jump-off-points prior to the game should mean these form a second line of defence. Keep in mind that a pre-game barrage has time working against it, the longer the game progresses the greater the chance the defender acquires a CoC die and ends the turn, or one player's command roll includes a turn ending combination of dice.
Jump-off-points placed further back give the defender time to make several attempts to deploy and provide a fall back position if the front line is not viable.

Also keep in mind that the further an attacking force has to move the more likely it is to lose its cohesion. Consider this, if the forward German squads cross over the hedgerow they will immediately lose the benefit of the base of fire established earlier in the game. They suddenly become isolated and more vulnerable. Perhaps that is the moment for the defender to tackle them, before they can benefit from the support of other units?
The key areas to hold are those providing hard cover and offering fields of fire across the more exposed areas of the table. By the time attacking units have move this far into the defence their attack will be less coordinated and it may provide opportunities for the defender that were not available earlier in the game.

Up until now both sides have shown caution in their deployment taking care not to reveal too much of their intentions. Each has deployed only to deal with real or possible threats. They are both maintaining tactical flexibility by keeping units in reserve in order to make the most of opportunities as events unfold. That doesn't mean you don't have a plan. The attacker will have decided to press the attack through the wheat fields on one of the flanks, but exactly which flank will be reserved until there is a clearer understanding of the opposition.
There will be times when the defender can take advantage of a forward defence to deploy most or all of their force and simply drive off the attack with massed fire. Choosing that option should mean you are very confident you can gain the upper hand in a firefight and that over a series of phases you believe you should be able to inflict more damage than you are likely to receive. Something like this has happened in the picture below. Two French squads have tried to overwhelm the German squad in the wheat field. They have almost twice the firepower of the Germans and they are firing from hard cover. In this instance the French feel justified in deploying early. They are taking advantage of a tactical error where the Germans have deployed a relatively weak force without enough support.

These opening deployments can become very cat and mouse as each side tries to provoke the other to commit themselves and so reveal their intentions. There's a balance to be struck about when any major commitment from either attacker or defender is made. Sometimes it's simply a matter of grasping the sort of fleeting opportunity that comes with a double phase or a particularly successful round of fire. Those moments will always require a judgement call and will benefit from the trial and error that comes from experience (with error being the operative word!).
Once you have committed units to the table then the next important deployment to consider is that of senior leaders. Their presence at the right time and place on the battlefield can make a considerable difference to how effectively a platoon can perform.

This can be where another support, the adjutant, comes into their own. The adjutant's presence means deployment will continue unhampered even when all of the platoon's senior leaders are on the table. At the cost of a single point it is a very useful support. The two key decisions for deployment of a senior leader are when and where. The presence of the adjutant can make the 'when' part of the decision that little bit easier.

When is a matter of sensing that key moments in the action have or are about to arrive. The presence of a senior leader increases the chances of activating all the units you would wish and in rallying shock from units that need to return to the fray.
Where is about the best possible location for deployment. Do you want the leader rallying units that have broken or suffered a lot of shock, or would you rather have the leader coordinating the fire and movement of units that are in good order and can have most impact on the enemy?
If you choose the former then be careful about attaching the leader to a broken unit. A sudden turn end could see the leader rout off the table with the broken unit, a serious loss to your platoon with equally catastrophic implications for force morale. Remember that a leader can rally shock from a unit that is not attached if there are no enemy in line of sight. Deploying the leader beyond 4" of the broken unit but within command range would be sufficient to rally the shock but not risk routing off the table with a sudden turn end.
Perhaps more importantly you want the senior leader within command range of a number of units so that their actions can be coordinated. You can read more about making the most effective use of your command dice and a leader's command initiative in this post about using the command dice.

While the earlier deployments are about probing the enemy and not revealing too much of your intentions there will usually come a moment when fast and decisive action will be critical. This is very much about seizing the moment. The ability of a senior leader to influence a number of units with a single command die makes it possible to extract a significant amount of activity from multiple units in a solitary phase. A double phase is often one of those moments that allows one side or the other to shift up a gear and create a decisive moment in a game, but much will hang on how deployment is managed. To catch your opponent by surprise with the sudden deployment of force on one sector of the battlefield and then to push home the advantage by the judicious use of senior leaders can be a pivotal moment in any game. Once again, timing can be critical.
That element of surprise can arrive in various forms. It could be the deployment of an unexpected support unit; the use of a CoC die to spring an ambush, or, the use of a CoC die to move a jump-off-point. The latter is a very useful tactic and the attacker's equivalent of the defender's use of a CoC die for an ambush. It is yet another good reason to keep some attacking units in reserve. It takes only one attacking unit to make enough progress towards the enemy to then use the CoC die to move a friendly jump-off-point that much closer to the objective. If it is done at the start of a phase then any friendly units can deploy from that point immediately. This gives the defender no time to adjust his units or deployment to meet this sudden threat.
In the picture below the Germans have done just this, moving a jump-off-point to within a short distance of the hedgerow and then deploying units directly to the forefront of the action. You can read how that played out in the game report on Gembloux Gap scenario 1.

This table that I've used as an example is from the first scenario in the Taking the Gembloux Gap campaign. As the German attacker I struggled to dislodge the French from the village and only did so on the fifth attempt. What happened in several of those games illustrate many of the points I've discussed above and may help you understand how those decisions on deployment can impact a game. You can find all the game reports for that campaign on this page.
When it comes to deployment there is much to consider and no easy answers, ultimately every deployment is going to be a judgement call, but I hope this post demonstrates that the options and tactical solutions are myriad. Tempting as it can be, rushing all your units onto the table at the earliest moment is not necessarily the key to victory.
As the defender sometimes it calls for patience, as happened in this game that was part of the Westwind Konigsberg campaign where Russian deployment did not occur for many phases into the game. It called for the Russian player to hold their nerve and yet made for a very tense and enjoyable game.

At other times the stars can all align. In this game report which was part of the Malaya 1942 campaign the Japanese combined all their national characteristics with a pre-game barrage to severely disrupt Australian deployment.

One thing is for certain and that is that fog of war, the uncertainty of human reaction and the fortunes of war will all wreak havoc on the best of plans. What worked in one game may not succeed in another. Deployment will depend on a number of factors which means that in the end it will come down to the judgement of you - the commander.
If you've found this post useful and would like to Buy Me a Coffee to help cover some of the costs of running the blog you can click through at the link or on the tab in the right hand column of this page.
Excellent analysis of the game. It illustrates one of my favourite aspects of the game, there is no single optimum strategy.
ReplyDeleteWith other rules such as Flames of War or Bolt Action after a few years of playing you find 'cookie-cutter' lists and tactics combos, not so in Chain of Command.
Thanks John, I have to agree, I like games with numerous decision points and where each one requires some thought. I certainly get plenty of that from CoC. I played a lot of Advanced Squad Leader and was good enough at it to win a couple of the national tournaments at Cancon, but it lost me once I realised I was learning a lot about mastering ASL but almost nothing about WWII. It was all about the system, in fact the complete opposite of the Lardy philosophy, a true case of play the rules not the period.
DeleteAnother excellent guide, Mark :)
ReplyDeleteCheers Tamsin, glad you liked it.
DeleteA fantastic tutorial Mark, very instructive.
ReplyDeleteThanks
Matt
Thanks for this which is another great article for my CoC education.
ReplyDeleteRichard
Nice, and the ability to explain what we do sometimes instinctively shouldn't be underestimated. With Rich's tactical guide, and your series of articles, a new player can really get a head start on playing Chain of Command. Highly recommended.
ReplyDeleteGreat article. Thanks very much for taking the time to write this up--it was very helpful for me.
ReplyDelete