

The Germans have 17 support points and so benefit from considerable support (the scenario actually allocates 18 points, but the Germans suffer from a low CO's opinion and are penalised as a result). In contrast the French have 10 support points, gaining an extra point due to the high opinion in which they are held by their CO. Nonetheless the French need to remain conscious that their current platoon must fight this and the next scenario without relief. As it stands both the German and French platoons will start this game at full strength, but with both wary that they cannot afford too many casualties.

Looking at the map the best approach for the Germans seems to be to push for a quick breakthrough down the road. With that in mind I am calling on a couple of Sdkfz221 armoured cars and a motorcycle reconnaissance squad as support. Both can deploy and move immediately, each taking advantage of the considerable movement bonus for wheeled transport on the road. Their success will depend on the French response. To make their defence as difficult as possible a Stuka bombardment will attempt to destroy buildings and hinder deployment. If all goes well a rapid coup de main might be possible. Failing that the core platoon may need to breach a gap in the defence to allow the vehicles to make the breakthrough. Either way I hope the Stuka bombardment can provide the sort of useful impact it delivered in the previous game. The final element of support will be an additional command dice. With four squads and two vehicles I will need to ensure I can maximise my command and control. If I had the additional support point a 5th columnist (Shabby Nazi Trick) would have been my choice in the hope of creating more havoc with French deployment. Alas that is not to be.

The Germans roll for two free moves in the patrol phase but are unable to gain much advantage. While my plan is to go up the road I don't want to give the French any reason to think that is my only option. So German jump-off-points are placed to present threats from both flanks and the centre. No surprise to see the French are grouped around the important road junction. If the option for a swift breakthrough doesn't occur then my aim is to make a push up my left flank through the woods to try to clear the area before releasing the armoured cars.

We start the game with French force morale at nine and German at eight. I was expecting the disparity to be greater given the positive modifier the French enjoy due to the high opinion of their men, but will happily settle for this result.
Before play commences the Stukas arrive for their bombardment only to be met with an unsettling barrage from French anti-aircraft guns. It appears they were expecting an assault from the air and have come well prepared.

The AA guns have their intended effect and the Stukas are unable to find their aim.

A disappointing result for the German platoon who watch the ineffective bombardment and can only hope the aircraft have more success disrupting French movement behind their lines. I may need to accept that a swift coup de main remains only a slim hope at this stage.


The grenade hits and inflicts two points of shock.

The next German command roll is 65543(3) which gives many options, but the key one is to keep on pushing on the left flank. The Obergefreiter shouts the command Handgranaten! and the squad send forth a flurry of grenades, two of which hit the French. Two men are casualties although neither of the two French leaders are hit.


No matter, there are two less of the enemy to defend the jump-off-point and the squad storms into the French position.

There may be only four French defenders but two of them are leaders and this evens up the odds a little. Nonetheless it will be 13 German dice to 8 French. The Germans roll five kills (66655) and the French roll three kills (665). As a result all the French are casualties. The two other ranks are removed and we roll for the two leaders. The wounded junior leader receives a second wound but this time he is stunned. However the platoon Lieutenant is killed outright, a disaster for the French platoon. The Germans suffer two points of shock and three casualties but none of these are the squad Obergefreiter.
The outcome is catastrophic for French force morale, which drops three points for the killed platoon leader, two points for the wounded Groupe sergeant and another one point for the team wiped out. In total their morale drops from eight to two. As the wounded sergeant is stunned he cannot withdraw and so is captured. To rub salt in the wound the victorious German squad occupy the French jump-off-point.

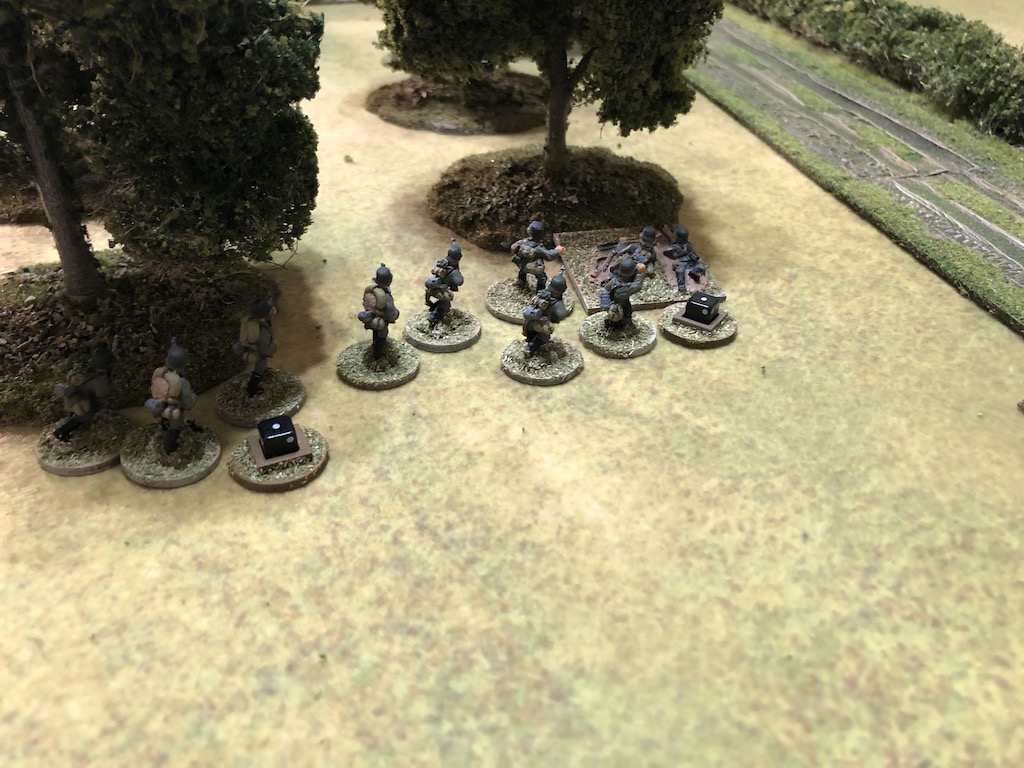
With the scent of victory in the air the Feldwebel orders a second squad forward to the woods to reinforce the success.

In a more cautious move he orders the rifle team from the motorcycle squad to pull back tactically out of harm's way.

This now puts the Germans in a position of strength on their left flank. With the French jump-off-point neutralised and their force morale down to two, there is now an excellent chance of clearing the road junction and breaking through with the armoured cars.

Over on the other flank the Obergefreiter in the wheat field rallies the LMG team and moves them forward to join the squad's rifle team in the woods.

I'm hoping most of these moves are academic as I have a CoC die and intend to end the turn at completion of this phase. This will allow me to capture the jump-off-point and further downgrade French morale. In fact there's a 50:50 chance that their morale will drop the full two points to zero.

As the phase ends so I play a CoC die to end the turn and as hoped the capture of the jump-off-point brings French force morale down to zero to leave the Germans victorious and holding the table.
That last close combat was a dramatic and sudden finale to the scenario reducing French morale from eight to zero in a single phase. Two things combined to make this possible. Firstly the good fortune that delivered a German double phase. This made the squad's advance a very viable option. Secondly, the presence of the French platoon Lieutenant and a sergeant meant any resulting casualties would severely impact their force morale. So it transpired.
Some interesting twists and turns in this one. The Stuka attack looked destined to have little impact, however from Dave's perspective it was another frustrating round of failed deployments. We estimate that so far in the campaign when faced with a Stuka attack or pre-game barrage Dave's success rate for deployment is well below average, probably around 30% rather than the 50% one would expect. That certainly seemed to contrast with the German good fortune when it came to double phases in this particular game.
That said Dave was also critical of some of his decisions. Deploying the LMG team with the Groupe's junior leader into the road was a gamble and once the Germans could return fire from two squads the outcome was swift and brutal. More significant was the deployment of the platoon Lieutenant near the road junction without supporting him with another Groupe de Combat or the Escouade de Fusiliers Motocycliste team. That would have made the German close combat an extremely risky proposition and in so doing could have negated any German advantage from the double phase. As it was the Germans could exploit the double phase to push very aggressively against weak opposition, a move I may not have contemplated if I was going to have to deal with a more substantial force.
The French suffered a total of twelve casualties. Ten men were lost from a single Groupe de Combat, who also had their sergeant captured, but undoubtedly the most painful loss was the death of the platoon Lieutenant. As a result the platoon loses five men permanently with another three men wounded and unavailable for the next game. A man will need to be promoted from the ranks to take the place of the captured Groupe sergeant. The platoon Lieutenant's place is taken by the platoon's other senior leader, the platoon sergeant.
With such grievous losses the opinion of the men in the French platoon drops quite considerably from +8 to +3. The CO's opinion is less pessimistic and drops from +4 down to +3. Meanwhile the platoon commander's outlook declines from short tempered to sad.
The end result is a good one for the Germans. Holding the table after a scenario victory with an eight point difference in force morale means they are able to recover all their casualties from the core platoon and so keep it at full strength. The men's opinion, which was looking very grim for a while now improves slightly from -9 to -7 but still remains low. The CO is pleased to see progress and his opinion goes up from -4 to -2. There is still much to be done and very little time to do it in and so the platoon commander's outlook remains insecure. We are making better progress but they are not handing out any Iron Crosses just yet.
So we now move to Scenario 4 Get the Guns! Can the Germans maintain their momentum? You can follow what happens next in this post here.
You can read all the earlier game reports for this campaign and other Chain of Command campaigns on this page.
Before play commences the Stukas arrive for their bombardment only to be met with an unsettling barrage from French anti-aircraft guns. It appears they were expecting an assault from the air and have come well prepared.
The AA guns have their intended effect and the Stukas are unable to find their aim.

A disappointing result for the German platoon who watch the ineffective bombardment and can only hope the aircraft have more success disrupting French movement behind their lines. I may need to accept that a swift coup de main remains only a slim hope at this stage.

The French have the initial phase but here the impact of the Stuka bombardment becomes more apparent when two attempts to deploy Groupes de Combat are unsuccessful.
Unfortunately a command roll with lots of 2s mean the German armoured cars are unable to be brought forward to take advantage. Nonetheless a squad moves to deploy on the German left flank. As they do so they spot some suspicious activity nearby and a number of armed French civilians are discovered - these must be the Franc Tireur we have been warned about. A roll of 6 sees a swift and brutal German response which eliminates the threat and frees up the jump-off-point.

The squad deploys as planned, taking up tactical positions to the left of the road.

To maintain a threat to the French left flank and keep the enemy from determining the main avenue of the German assault a second squad deploys into the wheat field on the right.

They threaten the French left flank while the other squad threatens their right. Looking at their jump-off-points it appears the French are anticipating the main attack to come down the road so I want to throw them off balance with a threat to their left flank that they cannot ignore.


At this point I decide I should take advantage of the disruption caused by the Stuka bombardment and risk racing the Motorcycle squad down the road. They will enter at full speed which means they are capable of moving 36" in a single phase if they stick to the road. In this instance they manage only 18" but have the potential to make a rapid breakthrough.

You won't need to be too observant to note that this motorcycle unit is strangely bereft of motorbikes. We are using Dave's collection of early war figures and he has yet to put together a motorcycle squad for his Germans (unlike his French). So for now these Germans are riding their imaginary motorcycles and doing very good impersonations of roaring motor engines. A Pythonesque moment no less.

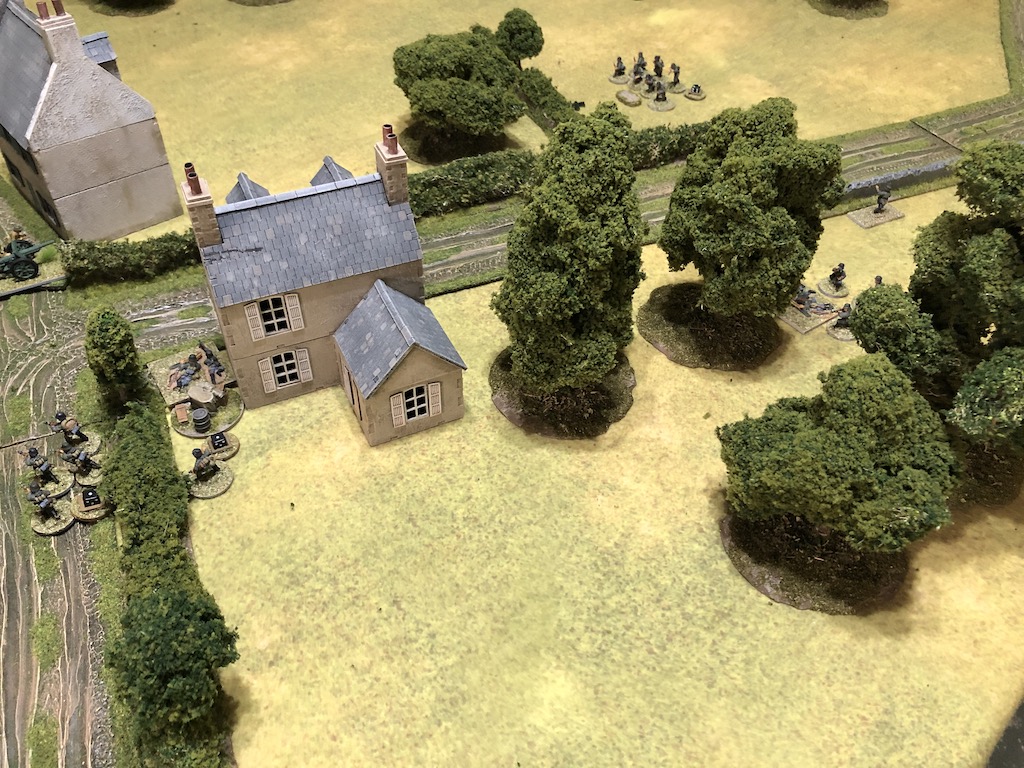
However from the French perspective the arrival of the motorcycle squad is no laughing matter. In the following phase a Groupe de Combat deploys through the Stuka bombardment to one of the buildings at the road junction. The rifle team take up cover behind the woods on the German left.

The LMG team and the Groupe sergeant on the other hand are lying in wait in the road.

They have the motorcycle squad just within close range and open fire.

The motorcyclists are fortunate to take a single casualty in the LMG team and suffer two points of shock in the rifle team. This could turn very nasty.

Fortunately a second Groupe de Combat fails to deploy. However a third is successful but the threat to the French left flank from the wheat field means they need to deploy to cover that flank. They are not looking to engage the Germans just yet, I think the key for the French right now is just to ensure there are units on the table.

The Groupe deploys into a house on their left but they keep out of sight and back from the windows having arrived suffering two points of shock as a result of the Stuka attack.

Other planned deployment is less successful with both the VB rifle grenade team and the platoon sergeant failing to make an appearance. I'm pleased to see that the Stukas have had better results behind the French lines.
However from the French perspective the arrival of the motorcycle squad is no laughing matter. In the following phase a Groupe de Combat deploys through the Stuka bombardment to one of the buildings at the road junction. The rifle team take up cover behind the woods on the German left.


The motorcyclists are fortunate to take a single casualty in the LMG team and suffer two points of shock in the rifle team. This could turn very nasty.

Fortunately a second Groupe de Combat fails to deploy. However a third is successful but the threat to the French left flank from the wheat field means they need to deploy to cover that flank. They are not looking to engage the Germans just yet, I think the key for the French right now is just to ensure there are units on the table.

The Groupe deploys into a house on their left but they keep out of sight and back from the windows having arrived suffering two points of shock as a result of the Stuka attack.

The next German command roll sees a double phase, something I want to take full advantage of to push my units forward. The platoon Feldwebel deploys to the left flank. His first command is to order the squad on the left to move forward slowly and fire on the French LMG team in the road.


The Feldwebel then turns his attention to the motorcycle squad. First he rallies off a point of shock.

He then orders them to dismount and return fire up the road.

Their fire is devastating. The French LMG team is wiped out and the sole survivor, the Groupe corporal, is hit and wounded. With the two shock points still in effect for the team the leader suffers the result of breaking and falls back (although he will lose the shock at the end of the phase). French morale drops to eight.

Over on the German right flank the squad rifle team makes its way forward through the crops and into the woods to maintain pressure on that flank.


The squad makes a good move to place it in perfect line of sight of the French and they open fire causing two casualties and inflicting two points of shock.

The Feldwebel then turns his attention to the motorcycle squad. First he rallies off a point of shock.

He then orders them to dismount and return fire up the road.

Their fire is devastating. The French LMG team is wiped out and the sole survivor, the Groupe corporal, is hit and wounded. With the two shock points still in effect for the team the leader suffers the result of breaking and falls back (although he will lose the shock at the end of the phase). French morale drops to eight.


Over on the German right flank the squad rifle team makes its way forward through the crops and into the woods to maintain pressure on that flank.


The Germans are now working their way around both flanks which should help keep the French from concentrating their defence.

The Germans enjoy more good fortune with another double phase, however this time they roll three 6s which will see the turn end and the Stuka bombardment become less effective. Nonetheless this is a good opportunity to push forward against scant opposition. The Feldwebel activates and begins barking out orders.

The first is to the squad on the left to move forward at the double towards the woods.

This they do rapidly making it to the edge of the woods in a single dash.

This is good progress for the Germans, especially with another phase to follow. The Feldwebel hopes to maintain the pressure by bringing other units forward.

He orders the motorcycle squad off the road and towards the hedges, but they take longer to move than the previous squad. The Feldwebel then moves forward himself to stay within command range of both squads.

With that the turn ends, leaving the Stuka bombardment only impacting the arrival of any French vehicles.
In the following German phase the Feldwebel rallies shock off the squad on the left and orders them into the woods. He wants them to try and close with the enemy rifle team that is lurking nearby. Unfortunately their quick sprint in the previous phase seems to have sapped their energy and they only move 3" which keeps them out of contact with the French team.


The Germans enjoy more good fortune with another double phase, however this time they roll three 6s which will see the turn end and the Stuka bombardment become less effective. Nonetheless this is a good opportunity to push forward against scant opposition. The Feldwebel activates and begins barking out orders.

The first is to the squad on the left to move forward at the double towards the woods.

This they do rapidly making it to the edge of the woods in a single dash.
This is good progress for the Germans, especially with another phase to follow. The Feldwebel hopes to maintain the pressure by bringing other units forward.

He orders the motorcycle squad off the road and towards the hedges, but they take longer to move than the previous squad. The Feldwebel then moves forward himself to stay within command range of both squads.

With that the turn ends, leaving the Stuka bombardment only impacting the arrival of any French vehicles.
In the following German phase the Feldwebel rallies shock off the squad on the left and orders them into the woods. He wants them to try and close with the enemy rifle team that is lurking nearby. Unfortunately their quick sprint in the previous phase seems to have sapped their energy and they only move 3" which keeps them out of contact with the French team.

Meanwhile the motorcycle squad move towards the hedge with the MG34 team taking up a good position to cover the road.


With the Germans making good progress on the left I decide to reinforce that push and deploy the third squad on that flank.


This has put the French under some pressure, but at least they no longer have to worry about the Stuka bombardment interfering with their deployment. The French platoon Lieutenant deploys near the road junction and within command range of the isolated rifle team.

With German units pushing through the woods the team is in danger of being overwhelmed and the French need to defend the jump-off-point.

The Lieutenant orders them to pull back behind the house.

He then commands the Groupe's wounded junior leader to join him and together they form a small band to defend the jump-off-point.

In a more ominous move a Canon de 75 m1897 breaks concealment from behind a hedge at the road junction and opens fire. The French are determined to hold the road and prevent a rapid breakthrough.

The gun targets the motorcycle squad's LMG team. They have already lost one of the crew as a casualty and so this represents quite a threat.


The HE round hits with unnerving accuracy and the crew manning the LMG are wiped out. German morale holds steady.

With their deployment now freed up more French units begin to appear. An Escouade de Fusiliers Motocycliste suddenly open fire from the house next to the 75mm gun.

They have a few potential targets and choose to focus on the LMG team in the wheat field.
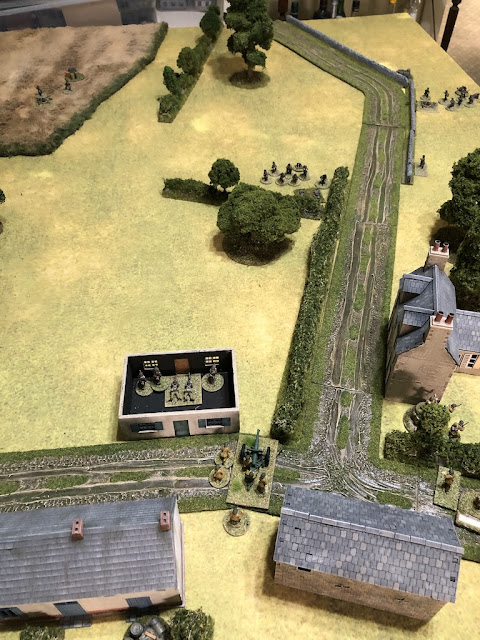

The Germans lose a man and suffer two points of shock.

This sudden appearance of French units presents quite a problem. I have chosen supports for a plan based on a quick breakthrough. However I now face French infantry in hard cover, supported by a quite powerful artillery piece. This has suddenly become a much tougher nut to crack and I'm not sure I've equipped the platoon to tackle this effectively.
However there now comes a moment of good fortune as the Germans roll another double phase. The roll of 66555(3) is not stellar but it does give me a full CoC dice and the additional red command dice justifies its selection by allowing me to activate one junior leader. I know what I need to do.
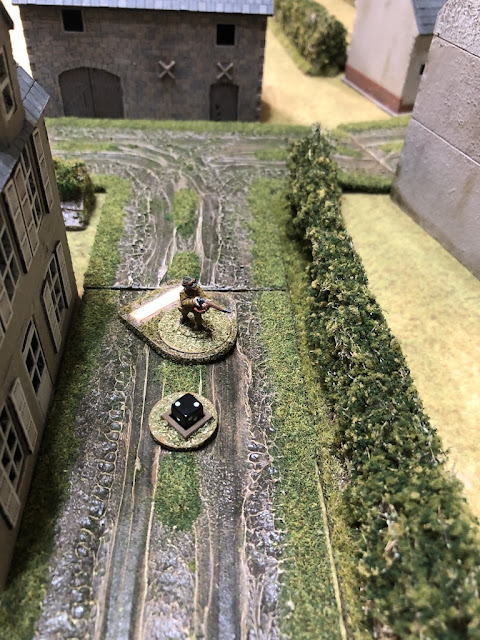
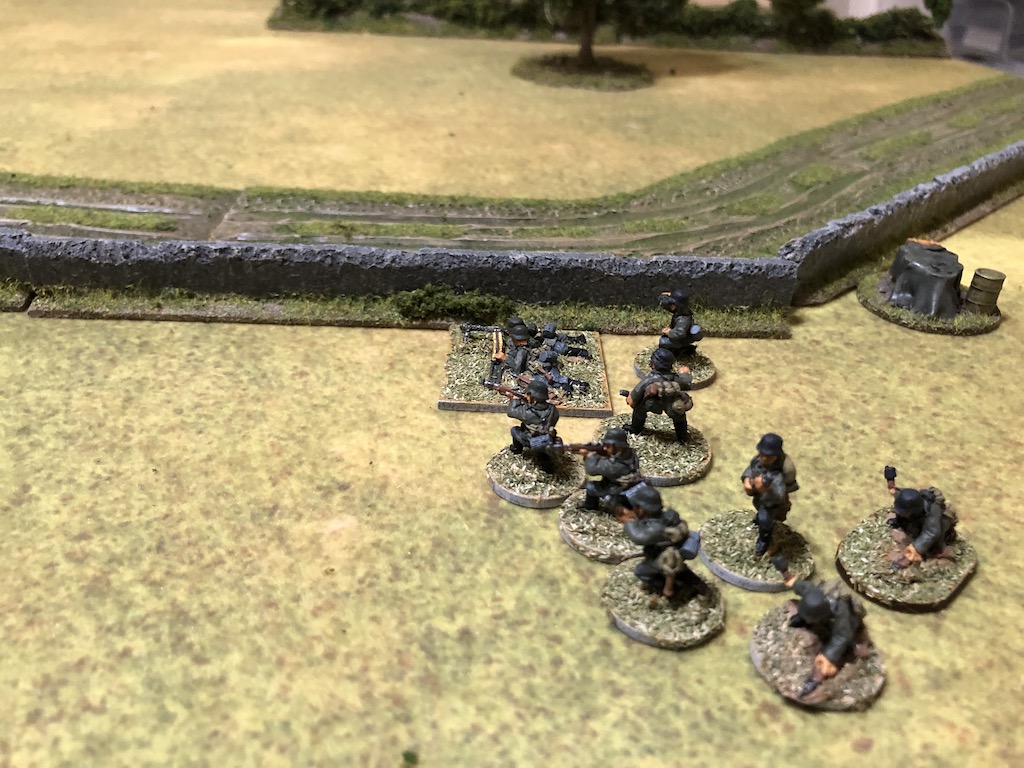
The Obergefreiter on the left flank orders the squad to move forward out of the woods and this brings them very close to the French team at the jump-off-point. Once he sees the enemy he uses his last command initiative to order one of the men to throw a grenade.

With German units pushing through the woods the team is in danger of being overwhelmed and the French need to defend the jump-off-point.


The HE round hits with unnerving accuracy and the crew manning the LMG are wiped out. German morale holds steady.


They have a few potential targets and choose to focus on the LMG team in the wheat field.


The Germans lose a man and suffer two points of shock.

This sudden appearance of French units presents quite a problem. I have chosen supports for a plan based on a quick breakthrough. However I now face French infantry in hard cover, supported by a quite powerful artillery piece. This has suddenly become a much tougher nut to crack and I'm not sure I've equipped the platoon to tackle this effectively.
However there now comes a moment of good fortune as the Germans roll another double phase. The roll of 66555(3) is not stellar but it does give me a full CoC dice and the additional red command dice justifies its selection by allowing me to activate one junior leader. I know what I need to do.
The Obergefreiter on the left flank orders the squad to move forward out of the woods and this brings them very close to the French team at the jump-off-point. Once he sees the enemy he uses his last command initiative to order one of the men to throw a grenade.

The grenade hits and inflicts two points of shock.


No matter, there are two less of the enemy to defend the jump-off-point and the squad storms into the French position.

There may be only four French defenders but two of them are leaders and this evens up the odds a little. Nonetheless it will be 13 German dice to 8 French. The Germans roll five kills (66655) and the French roll three kills (665). As a result all the French are casualties. The two other ranks are removed and we roll for the two leaders. The wounded junior leader receives a second wound but this time he is stunned. However the platoon Lieutenant is killed outright, a disaster for the French platoon. The Germans suffer two points of shock and three casualties but none of these are the squad Obergefreiter.
The outcome is catastrophic for French force morale, which drops three points for the killed platoon leader, two points for the wounded Groupe sergeant and another one point for the team wiped out. In total their morale drops from eight to two. As the wounded sergeant is stunned he cannot withdraw and so is captured. To rub salt in the wound the victorious German squad occupy the French jump-off-point.

With the scent of victory in the air the Feldwebel orders a second squad forward to the woods to reinforce the success.

In a more cautious move he orders the rifle team from the motorcycle squad to pull back tactically out of harm's way.

This now puts the Germans in a position of strength on their left flank. With the French jump-off-point neutralised and their force morale down to two, there is now an excellent chance of clearing the road junction and breaking through with the armoured cars.
Over on the other flank the Obergefreiter in the wheat field rallies the LMG team and moves them forward to join the squad's rifle team in the woods.


That last close combat was a dramatic and sudden finale to the scenario reducing French morale from eight to zero in a single phase. Two things combined to make this possible. Firstly the good fortune that delivered a German double phase. This made the squad's advance a very viable option. Secondly, the presence of the French platoon Lieutenant and a sergeant meant any resulting casualties would severely impact their force morale. So it transpired.
Some interesting twists and turns in this one. The Stuka attack looked destined to have little impact, however from Dave's perspective it was another frustrating round of failed deployments. We estimate that so far in the campaign when faced with a Stuka attack or pre-game barrage Dave's success rate for deployment is well below average, probably around 30% rather than the 50% one would expect. That certainly seemed to contrast with the German good fortune when it came to double phases in this particular game.
That said Dave was also critical of some of his decisions. Deploying the LMG team with the Groupe's junior leader into the road was a gamble and once the Germans could return fire from two squads the outcome was swift and brutal. More significant was the deployment of the platoon Lieutenant near the road junction without supporting him with another Groupe de Combat or the Escouade de Fusiliers Motocycliste team. That would have made the German close combat an extremely risky proposition and in so doing could have negated any German advantage from the double phase. As it was the Germans could exploit the double phase to push very aggressively against weak opposition, a move I may not have contemplated if I was going to have to deal with a more substantial force.
The French suffered a total of twelve casualties. Ten men were lost from a single Groupe de Combat, who also had their sergeant captured, but undoubtedly the most painful loss was the death of the platoon Lieutenant. As a result the platoon loses five men permanently with another three men wounded and unavailable for the next game. A man will need to be promoted from the ranks to take the place of the captured Groupe sergeant. The platoon Lieutenant's place is taken by the platoon's other senior leader, the platoon sergeant.
 |
| The new French platoon commander |
With such grievous losses the opinion of the men in the French platoon drops quite considerably from +8 to +3. The CO's opinion is less pessimistic and drops from +4 down to +3. Meanwhile the platoon commander's outlook declines from short tempered to sad.
The end result is a good one for the Germans. Holding the table after a scenario victory with an eight point difference in force morale means they are able to recover all their casualties from the core platoon and so keep it at full strength. The men's opinion, which was looking very grim for a while now improves slightly from -9 to -7 but still remains low. The CO is pleased to see progress and his opinion goes up from -4 to -2. There is still much to be done and very little time to do it in and so the platoon commander's outlook remains insecure. We are making better progress but they are not handing out any Iron Crosses just yet.
So we now move to Scenario 4 Get the Guns! Can the Germans maintain their momentum? You can follow what happens next in this post here.
Thanks, we've waited a while for this one. French unlucky!
ReplyDeleteThanks Doug, hopefully the wait won't be anywhere near as long before the next instalment.
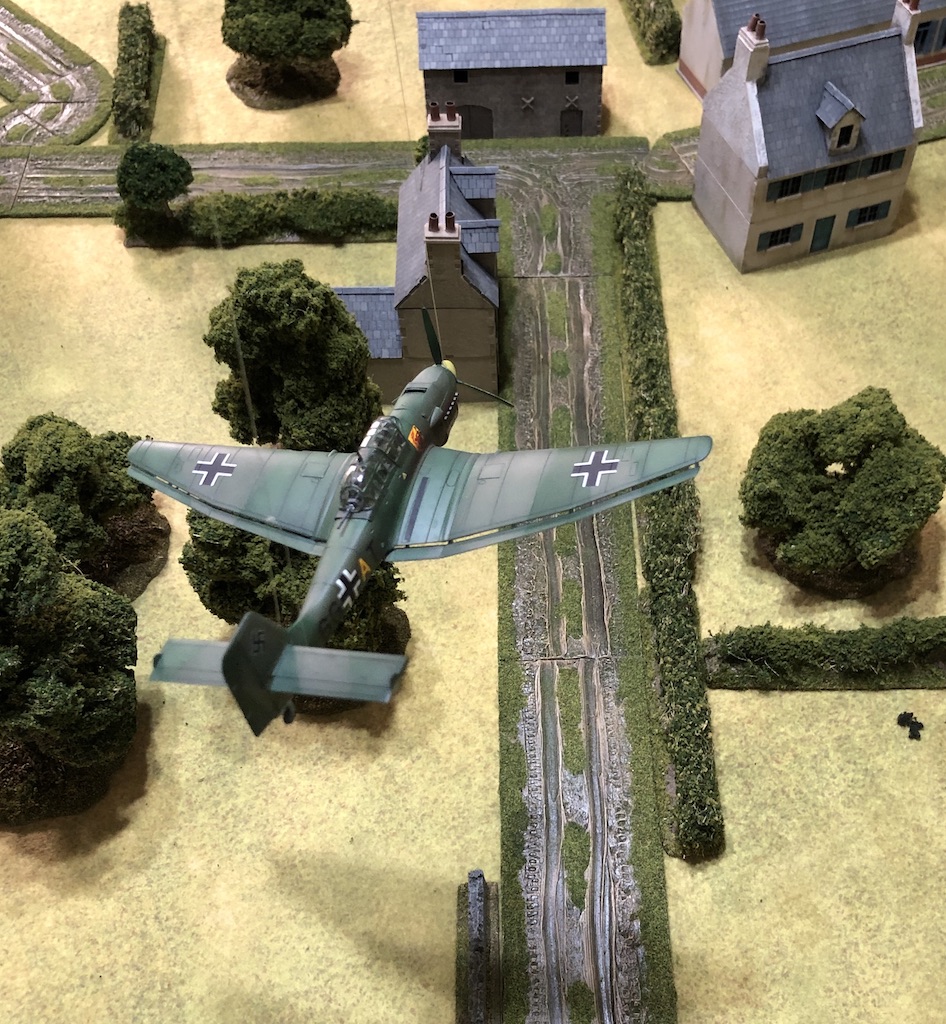
DeleteGreat AAR as always and love the shots of the Stuka in action - time to make some suitable explosions for bombs?
ReplyDeleteOne question this part - "With the two shock points still in effect for the team the leader suffers the result of breaking and falls back" AFAIK the shock dies with the team (as per 14.1 in FAQ)so no breaking for the JL. Not a biggie really but one for future reference.
Thanks. Actually I could use the same explosion markers I have for my mortar barrage, don't know why I didn't think of that earlier.
DeleteYes, not sure about that one. Dave mentioned it while we were playing something about reading the shock isn't removed until the end of the phase. It vaguely rang a bell so didn't look into it any further. Perhaps Rich has posted a reply to that effect somewhere. There's a certain logic to the leader suffering the effects of breaking under the circumstances, so overall not a big impact on the game (in fact he was captured later), but I'll ask Dave where he thought he'd read that.
Fabulous AAR,
ReplyDeleteI really like how you mount your Stuka over the table, I will look for your mounting method.
A little shocked the LMG was exposed on the road with the building to the rear, great stuff
Cheers
Matt
Thanks Matt, glad you enjoyed it. You don't have to look too hard to see the mounting method, it's about as old school and simple as it gets - if you look closely you will see some fishing line. Dave suspends the model over the table with the fishing line while I take a few pictures. Nothing fancy going on here LOL.
DeleteAh ok, I thought perhaps a roof mounted system
DeleteCheers
Matt
Sounds like a real nail biter and great looking table as always. I do hope that you made appropriate noises when moving your motorcycles down the road.
ReplyDeleteThanks Peter. I think to save both myself and the motorcycle squad too much embarrassment they were dismounted as quickly as possible. Time for Dave to paint up that squad of motorcyclists!
DeleteYes I think in this particular case the appropriate noises would be the slap of boot leather followed by : " I told you Hans we should have filled up at that last town" I hope to use my (28mm) M/C squad in a similar mission on the Many Rivers to Cross campaign tomorrow, I WILL be going Brrrrrm Brrrrm 👍
DeleteExcellent report as always! Looking forward to the next one. /Mattias
ReplyDeleteThanks Mattias, hopefully we play the next scenario in the next week.
DeleteLovely presentation, thanks.
ReplyDeleteCheers Norm, thanks.
DeleteSplendid report as usual, well worth the wait. You took full advantage of the turn in fortune and achieved a fine victory there.
ReplyDeleteThanks, it was good the get the campaign rolling again and, from my point at least, to get off to such a good start. Long may it continue!
DeleteReally enjoyed the AAR! It's almost like reading a novel and as a bonus I'm learning something new about CoC each time.
ReplyDeleteFine praise indeed, thank you!
DeleteAnother fab AAR, very enjoyable indeed!
ReplyDeleteWe too play it that the shock goes as soon as the 'ordinary' guys are slain rather than at the end of the phase.
Thanks for posting
Matt
Thanks Matt. Yes, not sure which hat Dave pulled that rule out from, I will investigate further. That said no reason for the leader to hang around given the circumstances, running away seems the logical answer LOL.
DeleteGreat write up as usual and also as usual I was rooting for you the whole time. Everyone loves an underdog. 😀
ReplyDeleteThanks Stew, you must have channeled your support into my command dice. Feel free to keep on doing that!
DeleteThanks Mark for the AAR, great reading as usual and very nice pics of the Stuka especially when it casts a shadow, like the exceptional new camo on the German motorcycles, a fitting outcome for the Germans, I guess we all look back on our deployment decisions and shake our heads, no worries Dave, its a good way of learning and prepping for the next game.
ReplyDeletecheers John
Thanks John. I'm really pleased with the way the Stuka is working in the pictures. I felt it would add something to the AARs if I could illustrate the bombardment and judging from the response it has certainly done that. Especially pleasing that it hasn't required hours of Photoshop, just some fishing line! And yes, that cammo on the motorcycles was exceptional, something from a Bond movie perhaps LOL.
DeleteAwesome as usual.
ReplyDeleteThank you sir!
DeleteGreat AAR! I don't know how you do it. Play a game , take all the right photos and no clutter in sight. I'm convinced that AFTER the game - you re-stage the whole thing from notes to take the photos! 8>D
ReplyDeleteThanks Dick, but I can assure you it is a lot less time consuming to take photos during the game than restage it all afterwards for the pictures. There is no magic formula and we always try to play with minimal clutter on the table even when I'm not taking photos. Practice helps. When I look back at some of the earlier AARs I can see how my technique for doing them has improved over time.
DeleteI think that you would do the whole hobby a service if you were to do a blog entry as to how you pa these games, get all the right photos - hints, etc.
ReplyDeleteThat's an idea, I may well put something together along those lines.
DeleteFantastic report! It is so well written and generally really riveting, I don't really know which side im rooting for! Very nice victory even without the armoured crs(which was a real surprise)!
ReplyDelete