

The German victory does present the Russians with an opportunity to take the initiative and mount a counterattack. This option is available only once to the Russians during the campaign and can be taken at any stage after the fall of Metgethen. I see no reason why I shouldn't take this opportunity immediately.
German casualties to date mean their platoon is reduced to the equivalent of two squads. They have had no time to consolidate their positions and will have to face a Russian assault with armour support. The close confines of the town should suit the limited range of the Soviet SMGs and they can back that up by calling on the powerful supporting fire of a SU122.

While the campaign notes say we refight over the same map we have adjusted this slightly to reflect the German occupation of the town.

On the heels of their victory German force morale starts high at eleven, while the Russians will start at nine. This will be an Attack and Defend scenario and the Russians start the patrol phase with five free moves. Neither side gained any particular advantage from the phase and so we see jump-off points for both Russian and German covering the flanks and centre.

The support roll will determine much about how this scenario plays out. The Russians have ten additional points to spend, but it must be on armour, which means the Germans know they need to give serious consideration to adequate anti-tank support. The German CO's Opinion is at +3, giving them the benefit of an additional support point, but they still require a support roll of 8 or more to be able to call on any armour support of their own.
 |
| A German support option if the support roll is eight or higher |
The actual roll of seven means there is no possibility of German armour, but with plenty of choices for panzershreck, panzerfaust and tank killer teams the Germans are not short of options that should prove more than adequate in this close terrain.
The Russians have a total nineteen support points. While this is a substantial amount, command and control can be an issue with a force made up of many units. The Russian squads are not formed from teams which means there will be a lot of demand for 3s in the command rolls. With three or four squads and perhaps two AFVs it is unlikely I will be able to activate all units as often as I would wish. As a result the selection of supports needs careful consideration.
My initial thoughts are to take advantage of the Russian national characteristic Wrath of the Gods and select a pre-game barrage. This will require the Germans to roll 5 or 6 to deploy in the first turn. With a one in three chance of deployment there is an opportunity for the Russians to attempt a coup de main and advance rapidly to seize jump-off points and key terrain. I consider the pre-game barrage a good choice and so with that in mind I think one of my armour choices should be the BA64 armoured car. As a wheeled vehicle it can deploy and move in the same phase. Not only that, it can also move down the road using double the movement dice. Potentially that's a move of 36" in its first phase.
 |
| The fast moving BA64 armoured car |
My other armour choice is the SU122. While it has a few limitations - restricted firing arc, no MGs, relatively weak armour compared to the T34 - it does have an extremely powerful gun, ideal for dislodging infantry from buildings.
Russian casualties to date mean I will need a support squad to bring the platoon up to strength. My final two points will be used to call on a flamethrower team, a useful addition for hitting enemy troops in hard cover.
So the plan is to try for a coup de main utilising the speed of the BA64. If that is not possible then I'm inclined to think the BA64 won't see any action and I will rely on the SU122 for the limited activation dice that will be available.
One alternative I consider is to replace the BA64 and the flamethrower team with a T34. However this makes the coup de main less feasible and runs the risk of relying on too many 3s in the command roll. It's not a bad choice but in the end I decide to stay with the armoured car and the flamethrower. That decided, we start the game.
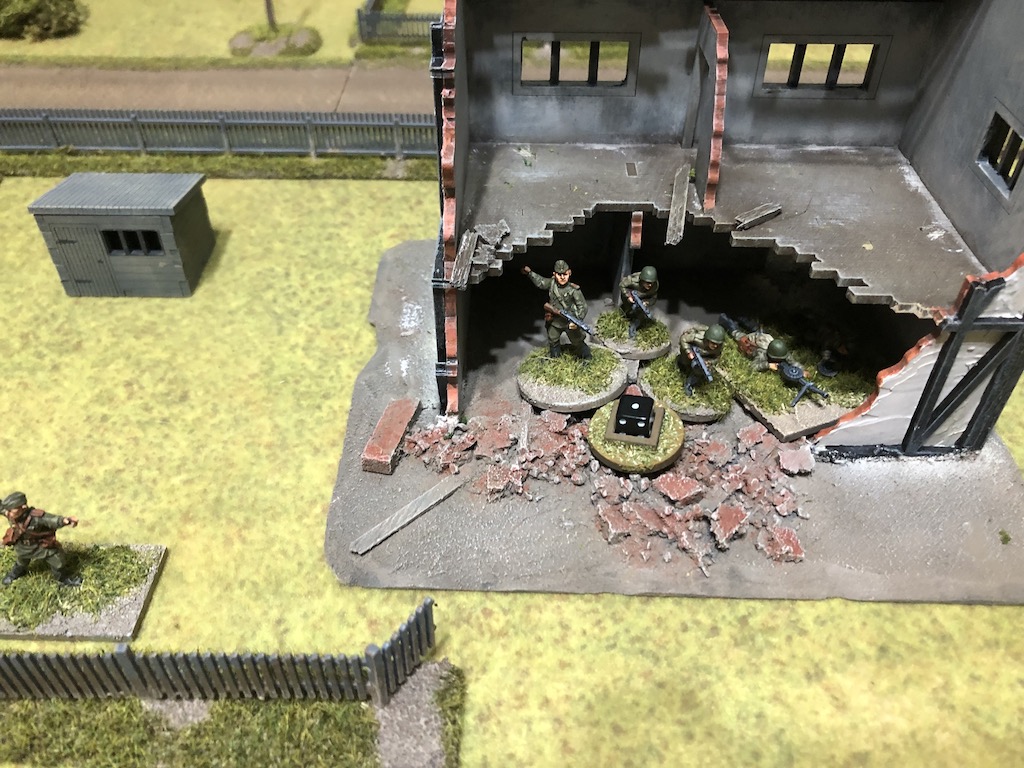
The first Russian move comes on the left where the support squad deploys tactically behind a garden fence.


Despite the Russian pre-game barrage the first German attempt to deploy is successful. Dave has had recent experience of just how effective a pre-game barrage can be (see Malaya 1942 Map 3 The Japanese Attack Again in our Malaya 1942 campaign) and he appears determined to start trying to deploy as early as possible. With a one in three chance of success it seems a wise decision. Having negotiated their way through the barrage the first German squad appears in the row of houses in the centre of the table and opens fire.


The Russians suffer a single point of shock, however I feel this is a statement of intent from Dave, he's going to conduct an aggressive defence from the start. Not only does he want to increase his chances of deploying through the pre-game barrage, he can also take advantage of his longer range.

His decision to start deploying early to avoid being held up by the barrage is validated when the next German squad that tries to deploy fails. By making as many attempts as possible he's reducing the risk that he cannot bring men into action when he needs them most. However a third squad is more successful and they appear opposite the Russians.

Only their LMG team can see out from the woods and across the garden, so it opens fire.

The Russians take their first casualty and accumulate more shock. So much for a coup de main on the heels of the barrage, first blood goes to the Germans.

The Russian command roll of 64411 is fairly restrictive, but with my squad caught in a crossfire I decide to pull them back into the woods. A movement roll of 1 puts paid to that idea. What a frustrating phase, I feel like I'm on the back foot already and we've hardly started.
The German command roll (54431) is not much better than the Russian, nonetheless the Obergefreiter facing my squad seizes the opportunity. Using maschinengewehr he devotes his undivided attention to the MG42 team and directs their fire. Four hits results in yet another casualty. All this and the Russians have yet to return fire.

Using the remaining 1 in the command roll the Germans activate the LMG team with the squad in the house and also open fire.

This adds another point of shock to the Russians, who have barely deployed onto the table before losing two men and accumulating three points of shock. Not the start I was hoping for.

I need to try and gain the initiative and so the SU122 is called forward.

The self-propelled gun cannot target any of the Germans just yet, so until it can make its way forward I pull the squad back into the woods and out of sight. Time to regroup and lick my wounds.


The Germans take advantage of the withdrawal to advance. This feels like a very aggressive defence by Dave.

In anticipation of further Russian deployment the squad in the centre houses are placed on overwatch.


Without announcing exactly what is trying to deploy the Germans attempt to bring on two 'teams', but both are unsuccessful. Given the arrival of the SU122 I don't think it takes much guessing to work out that at least one, if not both of these 'teams' are panzershreck or tank killer teams.
Another frustrating Russian command roll (65431) limits my tactical options. I need to be careful with the SU122, it will be vulnerable to a host of nasty anti-tank weapons and so it leaves the road, driving through the woodland towards the Russian jump-off point opposite the row of houses in the centre of the table.

The commander then puts the main gun onto overwatch.

The SU122 has a restricted firing arc and cannot yet target the houses in the centre, nonetheless the threat of the 122mm gun is enough to convince the Germans to move down to ground level. Meanwhile the squad on the right is placed on overwatch to cover the approaches on that flank.

The Germans attempt to deploy another team, which I'm sure is the platoon panzershreck, but they fail to make it through the barrage. While the pre-game barrage has served some of its purpose it fails to impede a third squad, which deploys on the German left flank. Conscious of the proximity of the SU122 they opt wisely to stay behind the house rather than occupy it.


The Russian command roll of 65432 is somewhat limiting and makes it hard to coordinate the attack. The squad with the two LMGs deploys in the centre where it can cover the building opposite and they are placed on overwatch. Between the SU122 and the LMGs I'm hoping this will help suppress any German activity from that direction.


Another Russian squad deploys to their left behind a ruined house and the LMG fires across the table at the recently deployed German squad.


The fire has no effect.


The next phase sees the Germans return that fire and inflict a point of shock.

The German squad on the right moves using a single die towards the road and from there it hopes to target the newly arrived Russian squad. As they come into sight they open fire at half effect.

This adds a second point of shock. That deployment might not have been the best, as I've found myself in another crossfire. I will need to move and grab the hard cover of that rubbled house.

This is what the squad tries to do in their next phase, but the shock means they move only 1". That turns out to be enough to get them close to the house and hinder some of the German line of sight. I decide the SU122 can add support to that flank and so it moves towards the road.


On my left flank I try to get the support squad moving again but a roll of double one while carrying three points of shock means they don't move at all.


On my left flank I try to get the support squad moving again but a roll of double one while carrying three points of shock means they don't move at all.

The threat of the SU122 is enough to convince the German squad to pull back into the woods.

If nothing else the SU122 is making the Germans nervous and wary of exposing themselves to its fire. The German squad in the house in the centre also pulls back and exits the buildings from the rear.


From their left the Germans continue to target the Russians around the rubbled house. The rifle team activate separately and fire while the Obergefreiter uses maschinengewehr to focus the fire of the LMG. Fortunately for the Russians the fire is ineffective.


From their left the Germans continue to target the Russians around the rubbled house. The rifle team activate separately and fire while the Obergefreiter uses maschinengewehr to focus the fire of the LMG. Fortunately for the Russians the fire is ineffective.
The Russian command roll of 65411 makes tactical coordination difficult, the only upside is they now have one full CoC die. That lack of coordination has meant the Russian attack lacks dynamism, yet I'm not sure how best to get things moving. With the Germans on my left withdrawn into the woods and those in the centre behind the houses, my only real threat are those to the right. Surely this shouldn't be enough to hold me up? I decide to deploy the flamethrower squad in the centre and push hard for the houses.

I deploy the Leytenant in the centre where I hope he can bring an element of leadership and coordination to energise the assault.

He rallies the shock off the squad and directs them toward the cover of the rubbled house.


I deploy the Leytenant in the centre where I hope he can bring an element of leadership and coordination to energise the assault.

He rallies the shock off the squad and directs them toward the cover of the rubbled house.


While my squad on the left flank has been quite ineffective I now have three squads and a flamethrower team deployed. I'm hoping with the Leytenant present they can now work together to push the assault forward.

The only German squad able to target the Russians is the one on their left and they open fire into the rubbled house. The rifle team fires and once again the Obergefreiter uses maschinengewehr to concentrate the fire of the LMG.

Despite the benefits of hard cover the Russians lose a man and take a point of shock. With the short range of the SMGs the Degtyaryov LMG is the only weapon able to return fire and so I find myself in an unequal firefight.
Once again the Russians are hampered with a limited command roll of 54432. At least the Leytenant is able to exert more control over events and I can make use of one of those 4s. To support the squads in the centre the SU122 rumbles forwards up to the rubbled house and the gunner is placed on overwatch. That should give the Germans something to consider.


The Leytenant rallies shock off the squad in the rubbled house and orders the LMG to return fire. The Obergefreiter is hit and wounded, leaving him stunned for the remainder of the turn. German force morale remains steady.

The Leytenant then orders the flamethrower team to work their way around the back of the house.


The Leytenant rallies shock off the squad in the rubbled house and orders the LMG to return fire. The Obergefreiter is hit and wounded, leaving him stunned for the remainder of the turn. German force morale remains steady.


Before the start of the next German phase Dave uses a CoC die to end the turn. That sees the pre-game barrage lift and the stunned Obergefreiter return to his feet.

With the barrage out of the way the Germans will be freed up to deploy their remaining units which no doubt include some anti-tank teams, but the German command roll of 55532 means I won't be seeing any of those teams just yet.
In the centre the German squad moves along the rear of the houses towards their right flank.


With the Obergefreiter back on his feet and the SU122 pointing menacingly in their direction the German squad on the left withdraws into the cover of the woods.


The Russian command dice deliver a handful of CoC points (55541) but once again they limit options for fire and movement. This is frustrating because for now the Germans have pulled back out of sight and I'd like to capitalise and push my units forwards. The Leytenant is well placed though and he orders the squad with the LMGs to advance forward into the scrub.

He then orders the flamethrower team to keep on moving around the house.

Finally he orders the squad to advance out of the house towards the fence. Let's see if we can break into the houses in the centre.


He then orders the flamethrower team to keep on moving around the house.

Finally he orders the squad to advance out of the house towards the fence. Let's see if we can break into the houses in the centre.


I need to keep my units moving to close the range. Other than the LMGs and the SU122 I'm not able to bring my SMG fire to bear just yet, so while it's imperative I get to close quarters, I still need to do it without exposing my men to too much fire.

The Germans are not prepared to stand by and let this happen. The squad in the centre moves to the corner of the fence using a single movement die and when they see the flamethrower team they open fire.


I have a full CoC die and could use this for an interrupt to pull the team out of sight. However I'm also concerned a German anti-tank team could emerge and I'm tempted to keep that die available to interrupt an attack on the SU122. I decide the flamethrower team will have to try to hold their ground.

The Germans may be firing with only half fire power but they have caught the flamethrower team in the open and they inflict two casualties. That's not a good result and leaves the sole survivor very vulnerable, perhaps I should have gone for an interrupt after all?

The Germans sense a kill and the squad on their right moves back towards the road, again using a single movement die. Only the LMG team comes close enough to see out of the woods and opens fire. Fortunately, because they can also see the attached Russian squad the fire will be shared with the sole survivor of the flamethrower team. Nonetheless this doesn't bode well.


There are three hits, which results in a point of shock on the squad, but the flamethrower man escapes unharmed, although not for long I suspect.

Finally a panzershreck team make an appearance on the right to cover the road. They don't have a line of sight to the SU122, but it does make that flank a lot more dangerous for the self propelled gun.


The Germans are not prepared to stand by and let this happen. The squad in the centre moves to the corner of the fence using a single movement die and when they see the flamethrower team they open fire.


I have a full CoC die and could use this for an interrupt to pull the team out of sight. However I'm also concerned a German anti-tank team could emerge and I'm tempted to keep that die available to interrupt an attack on the SU122. I decide the flamethrower team will have to try to hold their ground.

The Germans may be firing with only half fire power but they have caught the flamethrower team in the open and they inflict two casualties. That's not a good result and leaves the sole survivor very vulnerable, perhaps I should have gone for an interrupt after all?

The Germans sense a kill and the squad on their right moves back towards the road, again using a single movement die. Only the LMG team comes close enough to see out of the woods and opens fire. Fortunately, because they can also see the attached Russian squad the fire will be shared with the sole survivor of the flamethrower team. Nonetheless this doesn't bode well.


There are three hits, which results in a point of shock on the squad, but the flamethrower man escapes unharmed, although not for long I suspect.
Finally a panzershreck team make an appearance on the right to cover the road. They don't have a line of sight to the SU122, but it does make that flank a lot more dangerous for the self propelled gun.

Once again I seemed to have worked myself into a German crossfire and once again I'm feeling like the assault is lacking coordination. The Leytenant moves into the rubble of the house and from there he orders the squad to make its way to the cover of the fence.


Lastly he orders the flamethrower man to move towards cover.

However the Germans have other intentions and Dave uses a CoC die to interrupt the move.


They fire and it's little surprise the lone flamethrower man becomes a casualty. With a support team wiped out Russian force morale drops two points to seven.
I can't let this setback distract me and so the squad with the LMGs continue to make their way forward, however they don't get to the fence as fast as I had hoped and find themselves exposed at the edge of the road.


As the Russians I have a lot of open ground to cover and I really need the SU122 to provide some powerful support by suppressing the Germans. I just can't seem to coordinate the attack in the way I would like.

The squad on the German right flank can just see the Russian squad with the LMGs. Only the MG42 team can see them and so the Obergefreiter takes control of the team using maschinengewehr.

The Russians take a casualty and a point of shock. My losses are slowly building up and I've hardly had any effect on the defenders.

The rifle team then joins the LMG team at the edge of the woods which will enable the whole German squad to bring its fire to bear.


A second panzershreck team then deploys to cover the other flank and they take up position to the rear of the long row of houses.


I need to try to bring the SU122 to somewhere it can influence the action but with panzershreck teams on both flanks I need to be cautious.

The long range provided by the MG in the BA64 armoured car can help here and it advances down the road with the machine gun on overwatch.

I am hoping it can protect the SU122 from the panzershreck teams and free up my movement in the centre.

The Leytenant orders the squad with the LMGs to join him in the rubbled house.

He then orders the squad at the fence to open fire with the LMG on the Germans to their left in the woods.

The Germans lose a man in the rifle team and both the LMG and panzershreck teams take a point of shock. It's not much, but it's a start.

The Unterfeldwebel deploys to join the squad and panzershreck team on the right. He rallies off the shock on the two teams before ordering the squad to return fire at the Russians behind the fence.

The long range provided by the MG in the BA64 armoured car can help here and it advances down the road with the machine gun on overwatch.


The Leytenant orders the squad with the LMGs to join him in the rubbled house.

He then orders the squad at the fence to open fire with the LMG on the Germans to their left in the woods.

The Germans lose a man in the rifle team and both the LMG and panzershreck teams take a point of shock. It's not much, but it's a start.

The Unterfeldwebel deploys to join the squad and panzershreck team on the right. He rallies off the shock on the two teams before ordering the squad to return fire at the Russians behind the fence.

The Serzhant is hit and wounded, stunning him for the rest of the turn and the squad takes a point of shock. Russian force morale stays steady.

The squad in the centre tries to use tactical movement to slip away from the sight of the BA64, but they don't move far enough.


The armoured car gunner is on overwatch and alert and he opens fire inflicting a point of shock on the rifle team.

The squad on the left decide they can risk breaking cover from the woods and they advance back towards the garden fence.

The last German action of the phase is to try to deploy another team, but now with the Unterfeldwebel on the table they are unsuccessful (surely that's not another panzershreck team?).
The Russian Leytenant continues to drive the assault and he orders the LMG squad to gain the full cover of the house.

He then orders the squad behind the fence to fire its LMG back at the Germans in the woods, but it only manages to inflict a single point of shock.

I really need to take a few risks and so the SU122 rumbles its way forward to the other side of the house. This may seem a touch desperate as it brings the self propelled gun within range of the panzershreck and panzerfausts, but I have kept hold of two CoC dice for this sort of occasion and intend to interrupt any fire.

Finally I get the support squad on my left flank moving. This is not for lack of trying, it's just that I haven't managed to roll enough command dice to activate as many units as I would have liked. It has been a matter of focusing on one flank or another.


The German command roll leaves them unable to activate the Unterfeldwebel or the panzershreck team and so I breathe a sigh of relief.
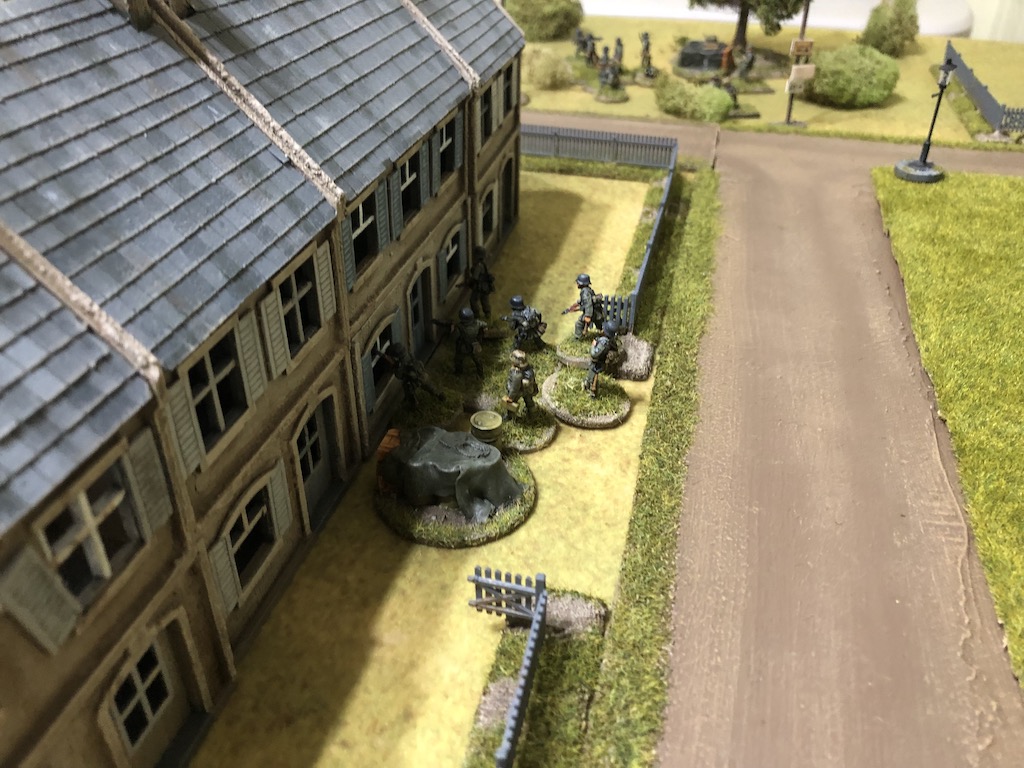
On the German left the squad emerges from the woods and take up positions at the fence. They move with one die and as they arrive they fire with half effect at the Russians behind the fence to their right.

The angle is tight, but it is just within their 180 degree arc. Despite firing at half effect they manage to kill one of the Russians and add a point of shock to the squad.

I sense the Germans feel they have an opportunity here and that seems to be confirmed when the squad in the centre moves behind the long row of houses looking like they intend to re-enter and deal with the Russians opposite.

When the Russian phase arrives the SU122 finally gets to fire off a round of HE.

The seven hits results in shock on the rifle and LMG teams but more significantly one casualty, which wounds the Unterfeldwebel who is stunned. That's a good result, but is it too late, or can I still swing the game in my favour?

The squad behind the fence sprays the Germans with LMG fire and this adds shock to their teams. I finally begin to feel like I have the Germans under some sort of pressure.

The squad with the LMGs move to the upper level of the house from where they have much better lines of sight.


I've no doubt I am about to face the panzershreck team so I am very relieved when Dave rolls 65332 in his command phase. I still have a CoC die which I'm keeping to use to interrupt any attack but that doesn't necessarily mean I am safe, not by any means.
The German squad on the left fires again at the Russians behind the fence and while they only inflict one point of shock it's enough to pin them.


As I predicted, in the centre the squad re-enters the house, ready to oppose the approaching Russians.


SU122 has dealt quite a blow to the Germans in the woods and the Obergefreiter rallies off a point of shock before ordering the men to fall back.

Before they can do that I use a CoC die to interrupt and another 122mm HE round is sent hurtling into the woods.

The fire is not as effective as the last round, but the three points of shock it inflicts means the LMG team don't have sufficient movement to withdraw. However the rifle team manage to pull back into cover, taking the wounded Unterfeldwebel with them.

Just when I'm beginning to feel I'm starting to break the deadlock and make progress I roll 55222 with the command dice. Although that means the SU122 won't be able to fire this phase it does mean I can continue to build up the pressure on this flank. The support squad keeps on pushing forward down the Russia left, but the inability to activate the Serzhant and rally off shock is slowing their movement.

Nonetheless they now represent a real opportunity to hit the Germans hard on this flank, especially while the Unterfeldwebel is stunned and they are carrying so much shock. I may end up losing the scenario but if I can take out the German platoon leader and inflict further casualties it will be a victory of sorts.


Nonetheless they now represent a real opportunity to hit the Germans hard on this flank, especially while the Unterfeldwebel is stunned and they are carrying so much shock. I may end up losing the scenario but if I can take out the German platoon leader and inflict further casualties it will be a victory of sorts.

The Leytenant orders one of the LMGs in the rubbled house to fire at the Germans in the woods. They cannot see the rifle team, but the LMG and panzershreck teams can still be targeted.


They add more shock onto both teams which is enough to pin the panzershreck team. If I can just bring the support squad around fast enough I may be able to do some real harm to the Germans on this flank.

Despite being pinned the Russians behind the fence also add their fire to the attack.

The panzershreck team take a casualty which is enough for the surviving crew member to break and fall back. German morale stays steady, but that's one less danger for the SU122.

The Russians behind the fence are hit once again by the German squad to their right. Despite seven hits the result is a single casualty. The squad is lucky to get away with this but are now reduced to three men with five points of shock so they are not far off breaking.

However the Germans are determined to finish them off and they take more fire from the house directly in front of them.

They lose another man and a further point of shock which is enough to break them and they fall back dragging Russian force morale down to five.


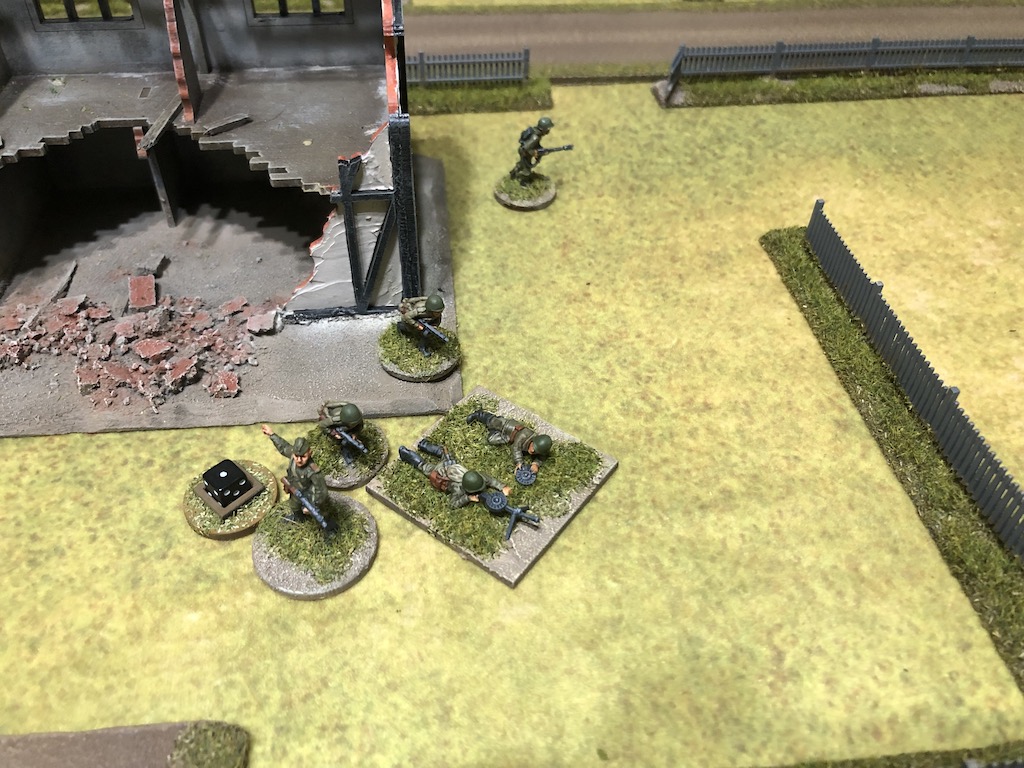
In a further ominous development the second panzershreck team emerges from behind the house in the centre from where it will be able to target the SU122.

Things take a turn for the worst when Dave uses a CoC die to announce an Ambush and a team of four Hitler Youth toting panzerfausts emerge behind the SU122.


With a hit in the rear the SU122 has little chance of escaping unscathed and although the vehicle is knocked out the crew manage to escape. Nonetheless this causes Russian morale to fall a further two points down to three.

That now makes things look very tough for the Russians, however I'd like to try and come away from this with something and I really believe I have a chance on my left flank, so I'm not ready to withdraw just yet.
The German LMG team in the woods try to pull back to join the rifle team, but I use a CoC die to interrupt and fire the LMG from the rubbled house.


The Germans take two casualties which reduces the LMG team to a single man and is enough to pin the entire squad. This convinces me I have to stay in the game and try to force the issue on this flank

Despite only three command dice the roll of 543 allows some Russian action. I would really like to get into close combat on my left but I need to move 8" to be within range.

The Serzhant activates and rallies off a point of shock but I will need a movement roll of 10 or more to get in close enough. A roll of 8 is close but not sufficient to initiate close combat. If I can activate in the next Russian phase I should be able to inflict some damage on this squad and perhaps take out the platoon leader.

The Leytenant has the squad in the house continue to fire the LMG into the woods where it adds to the existing shock. Those Germans are now a ripe target for my SMG squad. It's the best opportunity I have had all game to inflict some real damage on the German platoon.
The Germans try to get things happening on the opposite flank and move the squad through the woods to line the edge facing the road. If the Germans can just deal another few blows to Russian force morale they may yet save the squad on their right flank.


The German right flank attempts to defend itself with some fire, but the Russian support squad interrupts and adds a point of shock. Considering they are pinned and how much shock they are carrying it's no surprise that the German fire has no effect.
From the house in the centre the German squad fires at the Russian LMGs.
They inflict a casualty and it's the Leytenant who is hit and lightly wounded. That's a further blow to the Russians with morale now falling down to two.

With Russian FM at two the Germans consider which jump-off point to remove. Given the Russians are likely to need to withdraw soon Dave chooses the one closest to the squad with the LMGs.


With only three command dice I really hope I can roll enough to activate the support squad on my left, but a roll of 544 restricts me to activating the Leytenant. His aim now is to bring the squad he is with closer to the jump-off points ready for what seems to be the inevitable withdrawal. With that he moves to cover behind the house and then orders the squad to move to the lower level.


With only three command dice I really hope I can roll enough to activate the support squad on my left, but a roll of 544 restricts me to activating the Leytenant. His aim now is to bring the squad he is with closer to the jump-off points ready for what seems to be the inevitable withdrawal. With that he moves to cover behind the house and then orders the squad to move to the lower level.


We both sense this is coming to the end and Dave is eager to see the Russians driven off before the SMG squad on the left can move into close combat with the pinned Germans. The squad in the centre house moves to the upper level for a better vantage point.

The Germans on their left flank fire into the broken Russians in the brush in the hope of hitting the leader and pushing down Russian morale, but they only manage to inflict a further point of shock.


The Germans on their left flank fire into the broken Russians in the brush in the hope of hitting the leader and pushing down Russian morale, but they only manage to inflict a further point of shock.


If I can roll a combination of command dice that gets me a 2 or a 3 then the next phase should give me the chance to try to finish off the pinned Germans and possibly kill the platoon leader. Alas it is not to be. I roll what might otherwise be a lucky roll of 666, but this means the turn will end and my broken squad will rout off the table taking the wounded Serzhant with them. That's a disaster, as it brings Russian force morale down two points to zero and the end of the game. So close, but yet so far!
The remaining Russians must roll to see if they withdraw successfully. One of the squad Serzhants is dispersed and will miss the next game, but all the other men make good their escape.
The remaining Russians must roll to see if they withdraw successfully. One of the squad Serzhants is dispersed and will miss the next game, but all the other men make good their escape.

Well, that was a very frustrating game for the Russians and a very satisfying one for the Germans. With my initial plan foiled by successful German deployment my assault lacked focus and I found myself trapped in German crossfires and without the tactical flexibility or command dice to find my way out of it. There were a few brief moments of opportunity but I felt many of my problems were of my own making. I didn't really study the table enough to formulate a plan and good alternatives. Blundering onto the table with wishful thinking is rarely rewarded with success and so it was today. The final ignominy was scuppering my only decent chance to hurt the Germans with that final turn-ending command roll. It was just not meant to be.
On the other hand, credit to Dave. He chose wisely to deal with the pre-game barrage by taking every opportunity to deploy. He simply couldn't risk failing to deploy at critical moments, so better to deploy earlier than you might otherwise choose than not deploy at all. He continually moved his squads to avoid the fire of the SU122 while at the same time moving to position where he could bring the fire of several squads to bear. The Germans were able to respond quicker and more efficiently than the Russians and they took full advantage of this to inflict a steady stream of casualties.
With a significant difference in force morale the Germans are able to recover their three casualties and patch them up. They have repulsed the Russian counter attack without a single permanent casualty.
On the other hand the Russians lose two men permanently and have two wounded who will miss the next scenario. They will also be short one of the squad Serzhants who was dispersed after failing to withdraw. That now brings the Russian platoon casualties so far to eight killed. For the next scenario that means they will be short of ten men and one Serzhant - that is half of the platoon.
The Russian CO is not impressed and his opinion drops to -2. Similarly the Men's Opinion also falls, this time to -1. The platoon commander's outlook remains unchanged and for some unknown reason he is Cheerful.
The Germans have no further losses and will go into the next scenario short of the seven men who have been killed so far. The victory sees the CO's opinion increase to +4. The men's opinion makes a recovery after the losses form the previous scenario and rises to -1. The platoon commander's outlook remains Assured and he continues to look to the bottle for some comfort.
We now move to Map 4 The Signal Box at Seerappen as the Germans continue their battle to escape encirclement and you can follow what happens next in this post..
The Westwind Königsberg Campaign appears in the Too Fat Lardies Summer Special 2014. You can purchase this as a downloadable pdf from TFL Summer Special 2014.
You can find all the battle reports for the campaign on the Chain of Command AARs page.
Awesome, as always.
ReplyDeleteIncredible! After the Russian victories and heavy casualties inflicted upon the germans in earlier games, this was a surprising outcome and very well played by Dave!
ReplyDeleteGreat AAR! So close, yet so far for the Russians, and well played by Dave for his skillful handling of the German defence. I wonder if the SU122 is really worth the cost. Yes, it has the power to lay a lot of hurt on the Germans, but in the game above it really only acted as a threat in being.
ReplyDeleteThe Russians have to spend 10 support points on armour, so it's either the SU122 or a T34/85. I figured the SU122 could do more damage if it hits infantry. Both are going to be vulnerable to anti tank weapons, the only advantage the T34 has is a rotating turret and MGs.
DeleteFantastic AAR, lot of food for thought here. I've had similar game where you simply cannot seem to find a way through things and everything you do has seemingly little effect or even backfires: frustrating, but that's CoC. As you correctly point out, the lack of a proper plan is usually the root cause for such a game. But a very good defense by the Germans too: the "deploy early" tactic is one I must remember.
ReplyDeleteCdlT
Yes, Dave played this one exactly right and I could have done with giving it more thought and a better plan.
DeleteAnother entertaining report and game, one could almost feel the Russian CO's frustration. Being SMG armed also appears to add to the challenge? As I read it in the evening no coffee to go cold, had a fine Australian merlot instead. Superb finish on that SU122 btw.
ReplyDeleteThat's my kind of drink and no need to worry about it going cold. Excellent choice. Glad you like the SU122, always hard to bring an AFV to life when it comes in any colour as long as its Russian Green.
DeleteInteresting game. Pretty aggressive defense from the Germans. I'm surprised you didn't push the SMGs through the wooded approach -- the SMG squads are very potent in wooded areas and concealment covers their greatest weakness. Shame that you didn't get to shell any houses with the big 122
ReplyDeleteMy thoughts exactly, just in hindsight instead of during the game, d'oh.
DeleteTold you attacking was harder. 😀
ReplyDeleteBrilliant AAR. It seems to be a harder set up in that you had to pick armor as supports, so Dave knew ahead of time how to defend. Still, in the campaign context the lossthat the Germans suffered might pay off. Keep these awesome games going! 😀
So you jinxed me then :-) Actually, to be honest, I jinxed myself. My platoon is looking a little worse for the casualties, I'm going to need to be careful. We have three more maps to play across and Dave has to win in nine games (we have played five), so still lots of work to be done.
DeleteGreat report yet again! Frustrating game for the Russians, but still very close in the end to inflict some real hurt on the Germans. Better luck next time! /Mattias
ReplyDeleteAre your roads and plaza just painted MDF or similar or are they something more elaborate?
ReplyDeleteSorry for the delay responding. The town square was a number of element placed together. The monument I had made some time ago and I just added various elements. They were all placed on a piece of MDF that was painted to represent the roads. I will do a blog post on how I put it together as you are not the first person to ask.
Delete