
As always, after making a first attempt at playing a set of rules you come back to the rules with so much greater insight once you've actually pushed a few miniatures around on a table. Such was the case with Force on Force and so armed with the abbreviated rules and a second read through the official rules we felt much better equipped to make another attempt. To keep it straightforward we decided to play a re-run of the initial scenario Mutay I scenario from the Enduring Freedom supplement.
 |
| Straight out of the helicopters and into a hot LZ |
 |
| The objective compound is at Hot Spot 4 |
The British will have to divide their effort if they are to secure the LZ and then regroup to make their way to the compound. Time is tight, they only have eight turns and there is some distance to cover.

Turn 1
The British have the initiative and begin the first turn by focussing their attention on neutralising Hot Spot 3 and eliminating the Taliban lurking in the crop field on their left flank.

One team takes up an overwatch position while the other advances into the field. Line of sight is poor in the dense crops and units have to be within 4" to see each other. However there are Taliban on the roofs of surrounding buildings and so caution is required.

The Taliban on the roof at Hot Spot 5 react the moment the fire team enter the field.

The fire team sees them, reacts quickly and fires first, hitting two of the Taliban, one of whom is their leader. The Taliban return fire, but with two less men their fire is ineffective. As a note, the Taliban started play Hidden, which would allow them to attempt an ambush, but as the range is beyond twice their optimum range that was not going to be possible.

The British team continue their move and come into line of sight of the Taliban team lurking there, but they are leaderless and unable to decide what to do, so fail to ambush the oncoming British who have now spotted them and open fire.

Two Taliban are hit and their return fire is ineffective.

In the centre British teams on overwatch are able to keep on eye on a third team that makes a rapid move towards some cover in a crop field.

The Taliban at Hot Spot 1, also without the direction of a leader, are unable to react and so can't spring an ambush. The British fire team tries to spot them when it closes into optimum range, but can't locate them amongst the crops.

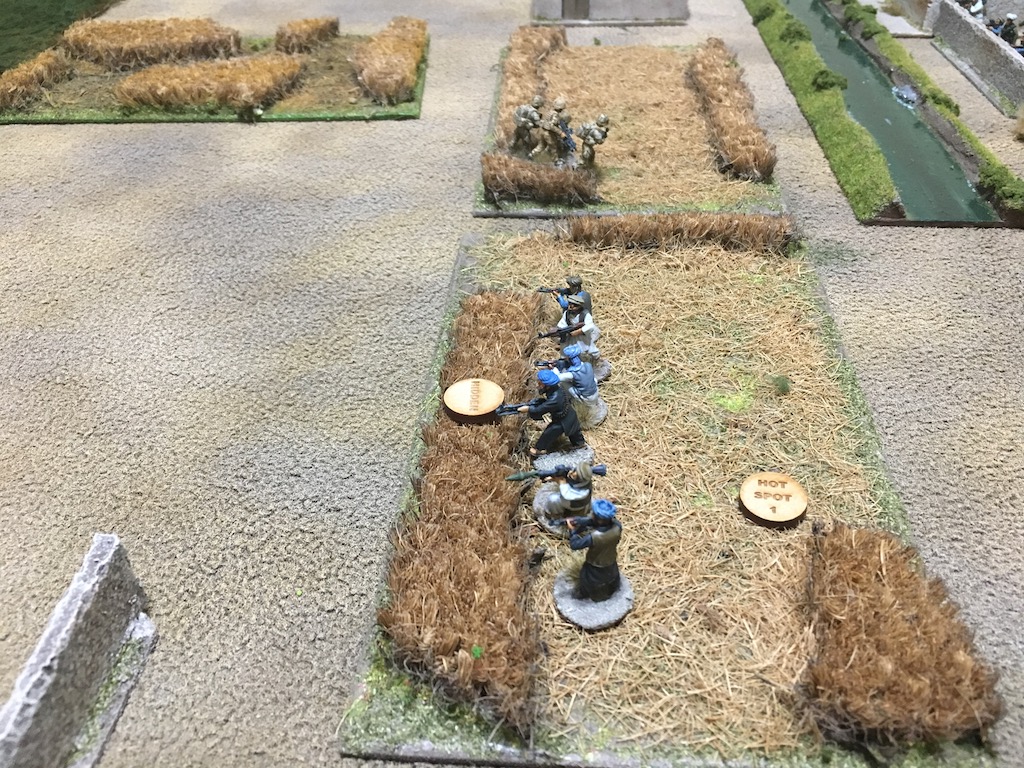
With that the initiative passes to the Taliban, who finally spring an ambush from Hot Spot 1 and the British take their first casualty. A British team returns fire hitting two Taliban, who pass their morale check, but then face the wrath of the GPMG team, who have been waiting in overwatch and pour down very effective fire, hitting the entire Taliban group.

The Taliban sniper takes aim at the GPMG crew, but fails to hit. The machine gun crew spot the location of the sniper and fire back hitting both the sniper and his spotter.

That brings the turn to an end. We are getting a good feel for the way the game plays now and it's moving at a good pace. One lesson is clear, the British regulars can dish out some very effective fire.
Turn 2
We check the status of the casualties. The one British trooper turns out to have a serious wound and will now need to be supported across the table.
The Taliban's less sophisticated field treatment means that for each casualty we roll 1D6, on a 6 the man was only stunned and returns to action. Any other result means they have either died or been whisked away by their comrades, the British will never know. In the field at Hot Spot 1 only the RPK man returns to his feet, while on the roof at Hot Spot 5 the leader is lost but the AK47 man dusts himself down and gets up again. Both the sniper and his spotter will not be seen again. All up that's eight Taliban fighters who have disappeared from the firefight.
 |
| The lone gunner staggers to his feet |
However there are more local Taliban lurking in the surrounding area and two armed with AK47s arrive as reinforcements to join the lone RPK gunner at Hot Spot 1, so it's not quite over yet in that field.
 |
| A couple of friends arrive to keep him company |

With those Taliban fighters down the British JTAC and signaller make their way around the right flank.

On the British left one team advances and fires. The Taliban take one casualty and their return fire is ineffectual.

The second British team advance in the crop field to join the firefight. The Taliban on the roof of the nearby building try to react but the Overwatch fire from the GPMG is extremely effective and hits three of them. The moving fire team pause to fire and also react faster than the Taliban on the roof and they hit all the remaining fighters. They then complete their move and fire at the Taliban in the field and hit another two. That's some fine fire and manoeuvre from the fire team. However when the Taliban survivors' return fire one of the British team is hit.


During the Taliban initiative the fighters at Hot Spot 4 take advantage of their ability to use out of contact movement to work their way forward unseen behind the building at Hot Spot 2. With a significant number of men down more fighters are needed on the front line.
Turn 3
The turn starts badly for the British when the man just hit in the crop fields is KIA. That's a blow in more ways than one as the British victory conditions will reward them if they can complete the mission without losing a man.
Most of the Taliban leave the field either as wounded or killed. One fighter in the crop field on the left gets to his feet as does a solitary man on the building roof.

However the men are joined by another sniper who emerges on the rooftop at Hot Spot 4.

With no more Taliban at Hot Spot 1 the British fire team advances onto the hot spot trying to close it down. Meanwhile on the left there's a determined effort to drive the Taliban from the field and close down Hot Spot 3.

The team that have just seen one of their members killed open fire seeking retribution but things go badly, they fail to hit any of the fighters and the return fire from the Taliban inflicts another casualty. With that the other team seek a decision at close quarters and charge through the crops. The sight is unnerving for the Taliban, who turn tail and flee.

With Hot Spot 1 and Hot Spot 3 now occupied, the British start to close on Hot Spot 5 on their extreme left. A fire team work their way carefully through a patch of crops to keep out of sight of a group of Taliban across the drainage ditch.

The group of fighters that had moved out of contact from Hot Spot 4 now use the Taliban initiative to climb on the top of the building at Hot Spot 2 and engage the fire team across from the drainage ditch.

The British are the quickest to react and their fire hits two men, one of which is the group's leader. The Taliban leaders are particularly prone to taking casualties today. The Taliban pass their morale check but suffer some shrinkage as one man decides he needs to be somewhere else (anywhere else, in fact). The remaining men fire and the British team has a member hit.

The other group at Hot Spot 2 take advantage of their local knowledge to move swiftly and unseen to Hot Spot 5 and emerge on the roof. They surprise the British who don't react fast enough and the fire team has another man hit.

The morale of the two effective men holds firm and they return fire, hitting one of the Taliban RPG gunners. The Taliban pass their morale check, but another man decides he also needs to be somewhere else and slips quietly away.

The British have pushed hard this turn but several men have taken hits as a result. That said they have dished out a disproportionate level of punishment on the Taliban.
Turn 4
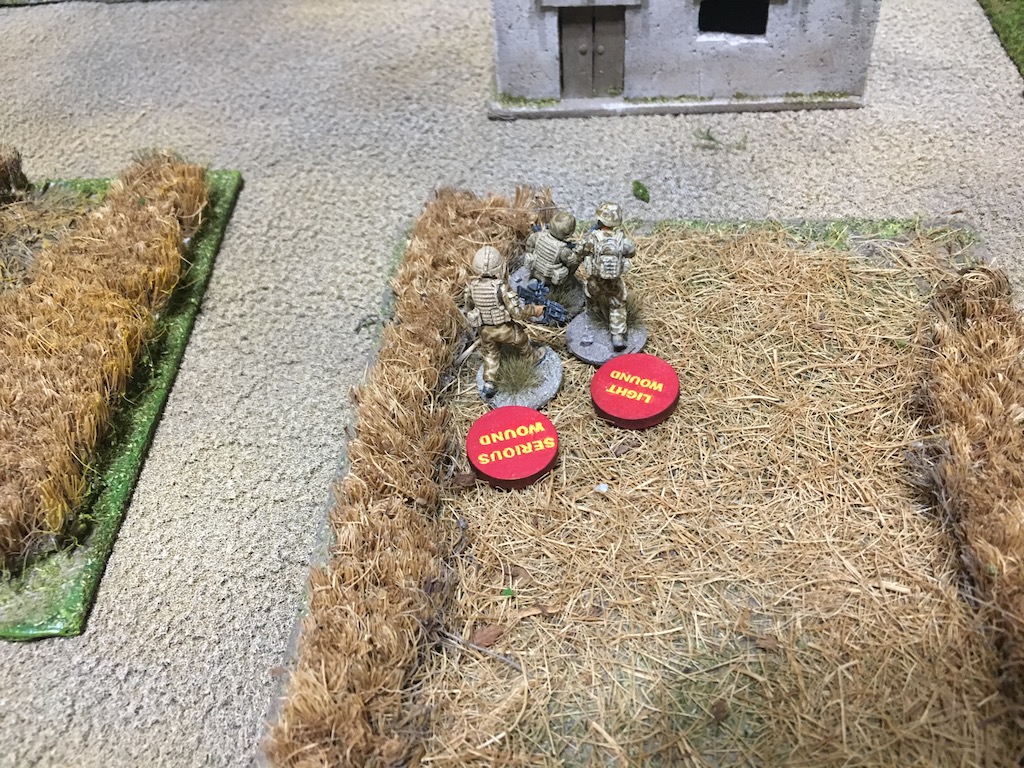
All the Taliban casualties result in men leaving the table, taking the number of Taliban out of action so far to 22. The British casualties include one man with a light wound but two are seriously wounded and their teams will need to shepherd them to safety.

The Taliban receive more reinforcements as more men come to the sound of gunfire and a group of seven men including a leader and a RPG arrive at Hot Spot 2.
 |
| More men come to the sound of gunfire |

The Taliban are now able to bring some fire to bear, however that comes at a cost of exposing themselves to some heavy return fire, something they are about to discover.
The British team holding Hot Spot 3 fire up to the rooftop at Hot Spot 5, the Taliban react very quickly, catching the GPMG team and another fire team who are both on overwatch off their guard and so get off the first shots. That's one of the few times so far the Taliban have been able to react faster than the British regulars.

Despite this, the Taliban fire turns out to be ineffective and the British team return fire, hitting three of them. The teams on Overwatch also fire back. The GPMG hits three more men and the fire team takes out another two. That results in the whole Taliban group as casualties. Note to self, irregulars standing head to head with regulars in a firefight is not a great idea.
 |
| No Taliban left standing on the rooftop |
The two most advanced British fire teams target their fire at the fighters on the other rooftop, this one at Hot Spot 2. Despite the fact the Taliban react faster than the British their fire is ineffective.

The same cannot be said for the British fire which is accurate and deadly, hitting every one of the Taliban fighters.

That's a quick lesson in the power of well armed regulars and especially when multiple teams can coordinate their firepower. The remaining Taliban behind the wall use the Taliban initiative phase to decide it's time to fall back towards the compound and reconsider how best to stall the British advance.
 |
| Back to the relative safety of the compound |
 |
| A thinned out Taliban front line |
With the end of the turn Hot Spots 1 and 3 are now neutralised and removed. The British are close to securing the LZ.
Turn 5
The Taliban lose another eight men as their casualties melt away, bringing their losses so far to thirty fighters. A solitary man at Hot Spot 2 struggles to his feet and can see another two doing the same on the other rooftop at Hot Spot 5. Back at the compound a leader turns up accompanied by a RPG gunner, "where are the others?" he asks.
Despite carrying some wounds the British fire team fires across the drainage ditch and moves forwards. The solitary Taliban fighter on the building roof is unable to react quickly and falls to the British fire.


Across on the other rooftop the other two Taliban survivors are hit again by one of the British fire teams. British pressure and firepower is beginning to really downgrade the Taliban force, the price of the Taliban trying to engage in a prolonged firefight when the odds were stacked against them.

The JTAC is now in a good position to see the compound at Hot Spot 4 and with that in mind he calls for an air strike for next turn.
 |
| The JTAC can spot them across the rooftops |
With few Taliban now in sight the British begin to push fire teams forward.

When the Taliban have the initiative they use it as an opportunity to try to hit the JTAC and his signaller. They react quickest and return fire with their weapons but the Taliban fire hits the signaller. The GPMG which has been on overwatch has a line of sight to the compound and a burst of fire sees another Taliban leader take a hit.

All four of the Taliban casualties including the recently hit leader leave the firefight. That's 34 Taliban who've been hit and slipped away (literally and figuratively). On the other hand the JTAC's signaller had only been stunned and he's back on his feet.
With fewer Hot Spots available the Taliban are fortunate to have a group of reinforcements arrive at Hot Spot 4, but someone must have heard the Apache helicopters because they opt to stay in the cover of the house.

The JTAC has successfully called in an Apache for a strafing run and the light anti aircraft defences of the Taliban have no effect. The Taliban on the roof of the compound take another three casualties and although the survivors' morale holds another man makes his excuses and leaves.
The British fire teams all push forward, but it becomes apparent that time has simply slipped away from them. With only two more turns remaining we decide it won't be possible for the British to achieve their victory conditions and so call it a day.


This was a much better experience than our first attempt as we've become a lot more familiar with the rules. The Taliban require some thought to play well and my tactics of trying to amass firepower only led to large casualties. I think much more needs to be made of their special abilities to move hidden and to ambush. Hit and run, versus a toe-to-toe firefight would be a better way to play them and would certainly feel more historical.
The action and reaction system is very dynamic but does take some getting used to, however I feel we seemed to have made some sense of it and used it correctly.
I like the idea of asymmetric combat but I think to work really well it would benefit from a campaign system of some sort. I'd expect the regulars to get the upper hand in most straightforward confrontations and so the Taliban or other irregulars need to use a different playbook - low level hit and run, inflicting casualties and playing the long game and that would work best across a series of linked games.
Nice pics and a good AAR. I’ve heard good things about force on force but it sounds like the rule set is tricky. However that’s always the case with a new set of rules that uses some unusual mechanics. Plus, asymmetrical warfare is difficult to model but fun when it’s done well.
ReplyDeleteI have been playing FonF and AA for some years now, and I enjoyed the article, this is very much a try and see it game, fun and more so with the right group of people. Best of luck with the future.
ReplyDeleteI know its been a few years but would you have an answer to my question on reactions by chance?
DeleteGood write up. Hope you stick with the FoF system - it’s treated me to many a great game.
ReplyDeleteThank you for the wonderful AAR. It is very hard to find good ones for this game which is a shame as it's one of my favourite systems. I will apologize in advance for the length of this post but I am hoping that you can help me with a pretty important rules question here. I have posted questions about this in the Ambush Alley forum but have not received an answer that is backed up with any sort of support from the rules. You always seem to reply and give well thought out answers, and as you have actually played a game I am hoping you could lend your insight.
ReplyDeleteMy question:
Part I: If an initiative unit A elects to move and fire on non-initiative unit B, which prompts a fire reaction from non-initiative units B and C. B beats A but C fails. So:
Even though you resolve attacks starting with the non-initiative unit which failed, you don’t apply the effects immediately right? C failed and therefore shoots after A fires. That means you roll C’s attack but when A fires at B you don’t take into account the effects of C’s attacks. Is this about right?
A only fires at B, as this was his action. Even though two units fire at him and even though he rolls two different reaction tests, he only ever gets to fire once.
This does mean that (with the exception of overwatch) initiative units can only participate in one round of fire, right?
Part II: After several more actions it comes time for the non-initiative player to activate any of his poor units that have not reacted yet. He activates unit D which fires on initiative unit A.
A still cannot respond correct? As I read it, an initiative unit cannot react unless they forfeit their activation or are on overwatch.
Now, I have heard some people say that a regular unit can always respond with fire when fired upon but I cannot find this anywhere in the rules. It makes sense I suppose, but rules as written I cannot see anything that supports it.
From the rulebook:
"When the player with initiative announces that he is
activating a unit to move and/or fire within line of sight
of opposing units, those units may choose to React with
fire or movement of their own. These Reactions may
result in an exchange of fire (called a Round of Fire) or
a frenzied rush for cover."
Also:
"Non-initiative units may choose to React to the actions of
an initiative unit within their Line of Sight by engaging it
in a round of normal or Suppression fire. As with
Reaction movement, a Reaction Test must be made to see
if the Reaction fire occurs before or after the initiative
unit’s declared action (See Reaction Tests, pg. 68)."
I can only find rules allowing a non-initiative unit to react to fire. I cannot find anything in the main book or the simplified version that allows an initiative unit to return fire when fired upon as a reaction.
I beg of you sir, please enlighten me!
This too has been a fustrating rule that I too couldn't understand.
DeleteInitiative units can react with fire if fired upon. This is more clearly described in the delux edition of the rules and in the sample rules/ quick start rules. In the sample rules it does says,
"initiative units that are defending themselves against
incomingfire..."
is a response to a question saying: can units fire multiple times?
My only thinking is that the aurthors thought what was written in the 'rounds of fire' section was clear enough, but alas' tis not.
It has been a long while since I've played and I've lent the rule book to a friend so I don't have it to hand. I seem to recall that the initiative player is entitled to fire back but the more it happens the less effective their fire will be, but I can't say for sure. Sorry, I'm not much help I'm afraid!
ReplyDeleteNuts! Oh well thanks! I think that interpretation is correct so I'll just go with that!
Delete