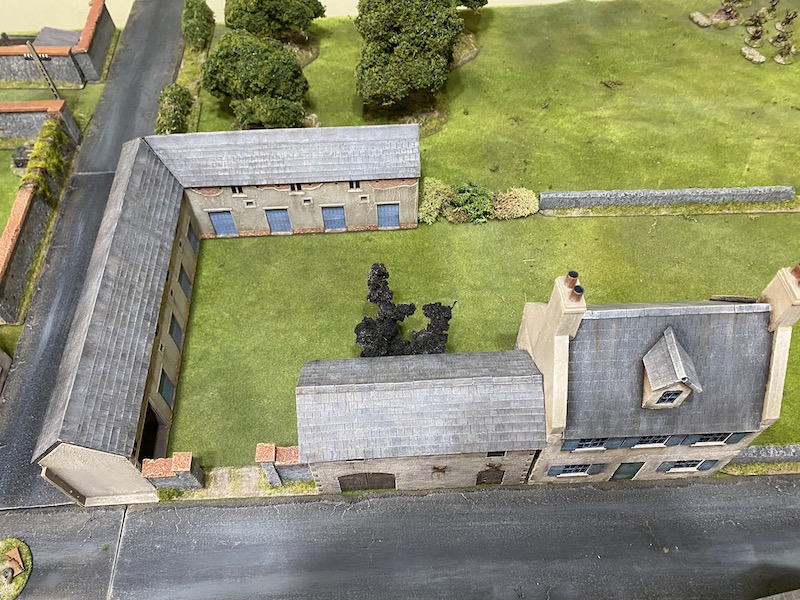
scenario and the British must either force a German withdrawal or capture the jump-off-point at the crossroads.
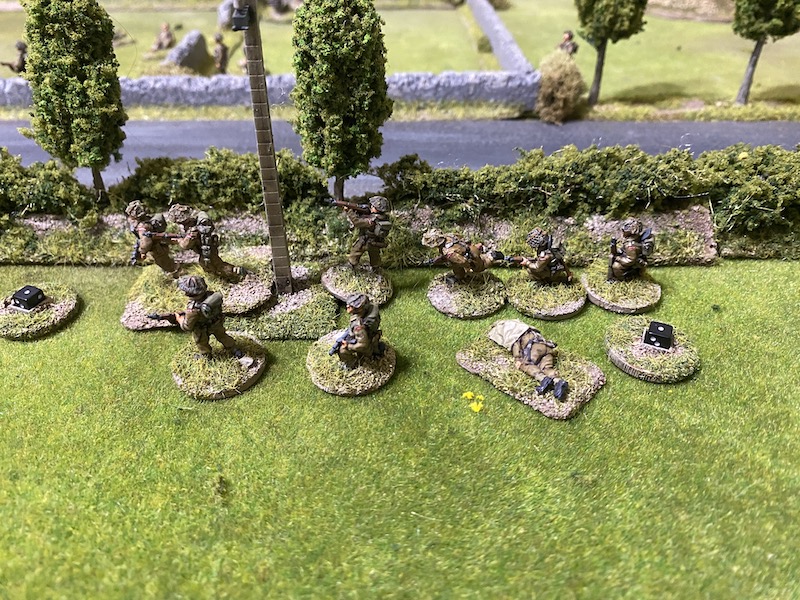
The MG42 MMG team continue targeting the section in the field. Now they find their aim and the fire is deadly. The section suffers three casualties.
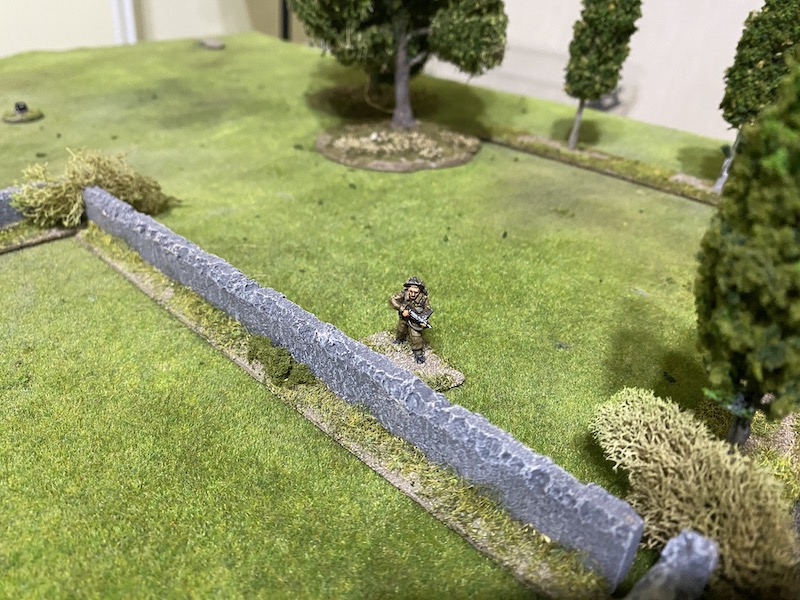
In the British phase the nearby sergeant rallies the shock and orders the exposed section to move tactically across the field toward the wall. Fortunately they do this quickly and it puts them out of the line of sight of the machine gunners.
The section on the other side of the road moves tactically along the hedgerow.
In the following German phase the platoon's oberscharführer (senior leader) fails to make it through the barrage. However, it comes as no surprise to see the PzIV fire yet again.
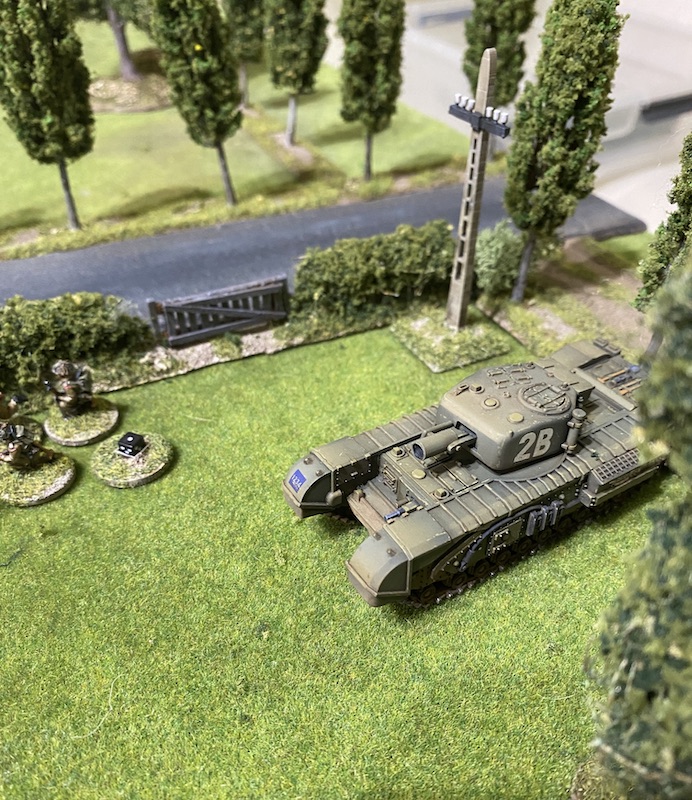
This time the Churchill's armour deflects the strike and the AP round has no effect. For how much longer can the AVRE hold out? I fear it's in dire straits.
In the British phase the AVRE commander rallies off the two points of shock and the driver is finally replaced, but will it be too late?
The section in the centre moves up along the wall staying behind the cover of the farmhouse.
To avoid the attentions of the German MMG team the platoon sergeant takes the long way around the wall towards the road.
Dave uses a CoC die to end the turn before the start of the German phase. That sees the end of the pregame barrage. I too have a CoC die and use that to maintain the 3" mortar barrage. Overall this has been a poor start for the British and the loss of the pregame barrage won't help matters. That said, I have suffered only a few casualties and I'm hoping I can recover some of the initiative. Much will depend on how the Germans react.
In the next phase the PzIV fires once again.
This time the gunner makes no mistake and a well aimed round inflicts six AP strikes. It finds a weak spot in the Churchill's armour and the tank explodes in flames. That's a junior leader killed and a support destroyed, the net result sees British force morale drop four points to five. That is a real blow and so early in the game. This could all be over very soon.
The rifle team from the nearby infantry section is close enough to suffer a single hit but fortunately that has no effect. That's a small mercy.
The MG42 MMG team in the barn have lost sight of the infantry section so they shift their focus to the forward observer.
He's hit and survives with a wound, but that means he cannot move any further for the remainder of the game.
The LMG team in the upper level of the chateau targets the section lining the hedge.
The fire is at effective range and the section survives unscathed.
So far the British opening has been a less than stellar performance. The loss of the Churchill AVRE has been quite a blow and if the forward observer was to be killed then I fear the attack would be in real jeopardy. While this hasn't been a promising beginning the game is far from lost. If the mortar barrage is adjusted to the left it would prevent the MG42 MMG team from operating but perhaps more importantly, it would clear the way for a move through the orchard. That being the case I should be able to use the nearby deployment point to feed in the uncommitted section and the Vickers team and it may still be possible to get something from this assault.
Fortune smiles at the moment I need it most and a British command roll of 66421 heralds a double phase and a number of possibilities. The first thing is to have the forward observer put in a request to adjust the barrage.
To avoid any more friendly fire incidents the section in the centre falls back toward the forward observer. This time I intend to play things a little more cautiously.
The platoon sergeant continues his move around the wall toward the road.
Once there he gives an order to the section by the hedgerow to move forward. This they do, but very slowly.
Frustratingly, the following command roll is 55521 and while the CoC points are always welcome it limits my other command options. The key thing is that the forward observer can adjust the barrage to the left. I opt for a 2D6” move and that adjusts it 7”. The only German unit hit by the mortar rounds is the MMG team in the barn. They suffer no ill effects other than to be pinned down and lose their line of sight, but that will do me for now.
Now the barrage is much better positioned and it serves to split the defence in two. This may allow me to build up a concentration on my right flank before the Germans can react fast enough.
The British now have the space they need to work their way into the orchard and around the flank.
The section leading the assault moves forward quickly.
The German command roll of 64441 leaves few options but with the pregame barrage no longer in effect the platoon's oberscharführer (senior leader) deploys without any hindrance into the barn by the chateau.
He has one of the LMG teams turn and relocate to face toward the centre of the village.
He then orders the team on the very top level to target the section by the hedgerow.
This time the fire is more effective and one of the rifle team is taken casualty.
In the British phase the platoon's 2” mortar team deploys and fires smoke.
That lands on target and shields the section from the fire emanating from the chateau.
On the right flank the section continues to push ahead through the orchard.
To keep up the pressure on both flanks the sergeant once again shouts orders across the road.
He urges the section at the hedge to keep moving.
He then moves back towards the right flank.
Once there he orders the section in the centre to return across the field to the other side. There's a lot of shuttling back and forth in this sector and these men are no doubt grumbling amongst themselves about who, if anyone, is in charge here.
In the German phase a squad deploys to face the threat from the British advance into the orchard. They are careful to avoid the risk of being trapped between the high farm walls and so position themselves to stop the British moving by the quickest route in that direction but also to allow an easy withdrawal if needed.
Over on the other flank the oberscharführer at the chateau orders the unit in the attic window to fire at the British section at the hedgerow.
Now they are in tactical positions and so suffer only three points of shock.
The oberscharführer then sends the other LMG team to join them in the upper level. That would have made a very tempting target for the AVRE had it remained operational.
The platoon's panzerschreck team deploys. As the British are yet to reveal all of their supports the Germans will want to ensure they can deal with any other allied armour that might turn up.
A command roll of 66411 gives the British yet another opportunity to press the attack. The forward observer calls the mortar barrage to request another adjustment.
The 2” mortar team continues to fire smoke to provide the section to its front with cover.
It lands on target creating a covered approach to the village.
The sergeant makes his way around the wall and has the nearby section climb over to join him.
In the subsequent British phase the forward observer adjusts the barrage 10" to the left bringing it closer to the chateau.
While the barrage inflicts no harm on the MMG team in the barn, it does at least keep them pinned down and out of action.
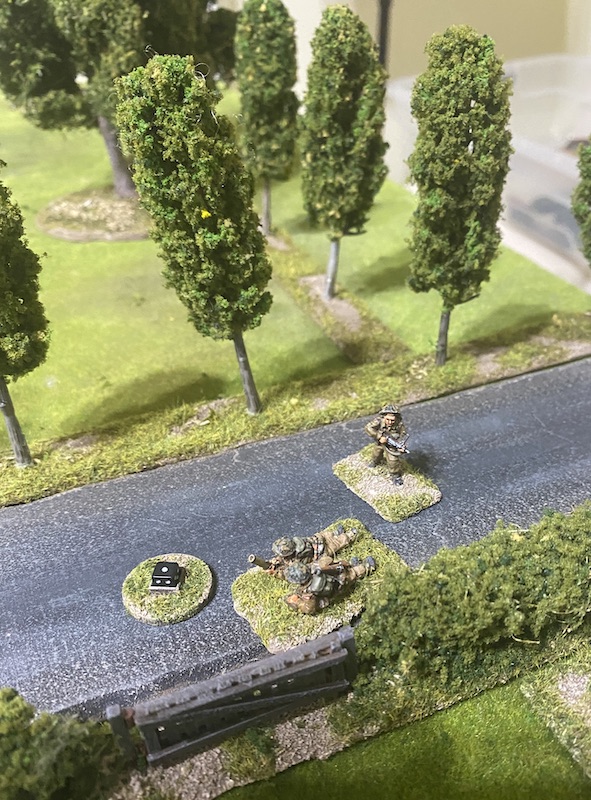
The section on the right skirts through the edge of the orchard and reaches the road on the other side.
I sense now is the time to apply maximum pressure on the right. I use a CoC die to move the nearest jump-off-point forward.
I relocate it the full 18" to the edge of the orchard. That allows me to feed in the uncommitted units and bring them forward very quickly.
No time is wasted and a fourth section deploys directly into the orchard.
In the German phase the squad opposite the orchard find themselves in a potentially dangerous situation. While they are well positioned to prevent any movement between the walls, they themselves run the risk of being outflanked if they are not careful.
They fall back toward the nearest farmhouse.
With the prospect of the barrage creeping closer to the chateau the oberscharführer sends the panzerschreck team running back to avoid being caught out in the open by the mortars.
The following British command roll of 66544 should allow them to maintain their momentum. Yet it will come at a cost. I don't want the advance to stall and so the platoon Lieutenant will need to deploy into the orchard to keep the attack moving. This is where he can be most effective, but it will mean the Vickers and PIAT teams may have problems deploying later. For the moment I think maintaining the initiative is more important.
He urges the lead section to move across the road.
This they do quickly.
And it brings them near enough to close down the German jump-off-point on this flank.
They are followed by the other section who move out of the orchard and into the road.
Seeing the opportunity to reinforce success the platoon sergeant sends the section with him moving at the double towards the orchard. They do so very quickly. That puts three sections working their way around the German flank through the orchard.
Now that the platoon lieutenant is on hand to command the sections on the right the sergeant moves back towards the left to take control of that flank.
In the following British phase the forward observer calls in another request to adjust the barrage. Meanwhile, across the road the corporal rallies off a point of shock.
He then leads the section up to the nearest building.
In the orchard the lieutenant calls the rearmost section forward to join him.
Next he orders the section in the road to climb over the tall wall.
He then moves up himself.
That puts him in a position where he can command all three sections. I'm hoping the British now have the weight of numbers they need to drive into the village and turn this flank.
I suspect there is going to be a bit of a stand off here as the British and Germans will play cat and mouse among the high walls. To be cautious the section nearest the Germans takes up tactical positions.
In the German phase the squad can sense the danger it is in.
Wisely they pull back further behind the farmhouse.
They intend to ensure there is no quick or easy way for the British to turn this flank.
It is now clear to the Germans that the barrage is edging closer to the other flank and they look quickly to take evasive action. First, the panzerschreck team continues to move back across the road towards the rear.
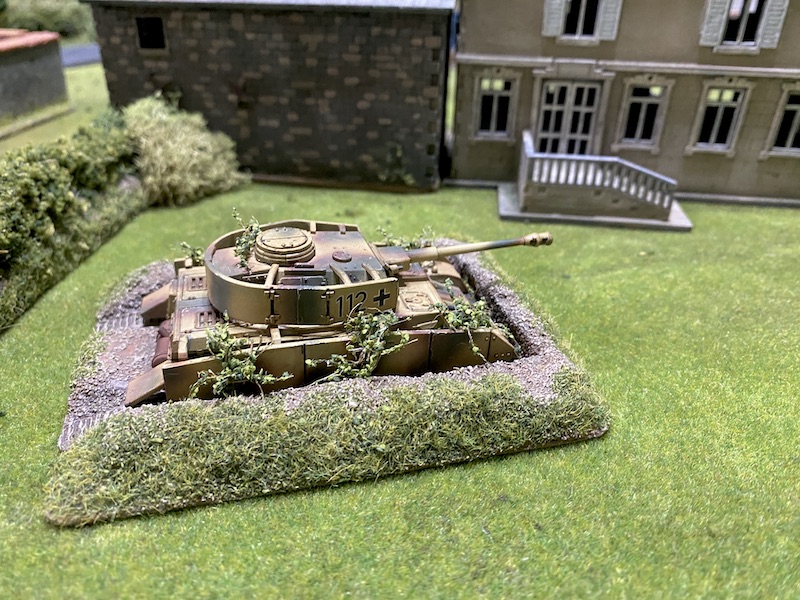
Then the PzIV reverses slowly out of the tank scrape.
Last, the squad in the upper level of the chateau move down to the next level.
In the British phase the lieutenant orders the section to his right to move further around the flank.
He then calls the section in the orchard forward.
They join him and begin to emerge onto the road.
While it's going to be difficult dealing with the German squad behind the house at least the odds favour the British.
On the left flank the sergeant moves into the road.
He then has the 2” mortar team join him.
Given the close proximity of the barrage the section at the hedge holds its ground and takes up tactical positions.
In the German phase the oberscharführer has the squad move to the ground level of the chateau where they will be protected from the mortar barrage.
The PzIV moves forward and away from the barrage.
At the farmhouse on the opposite flank the squad's scharführer puts both LMG teams on overwatch. Each covers a different approach around the sides of the building.
The next British command roll is 66553. While a double phase is always welcome the command options in this instance are very limited. The section behind the barn moves to the opposite side of the house and towards the door.
The following command roll is 66554, another phase but once again with limited command options. The lieutenant moves up to join the section between the high walls.
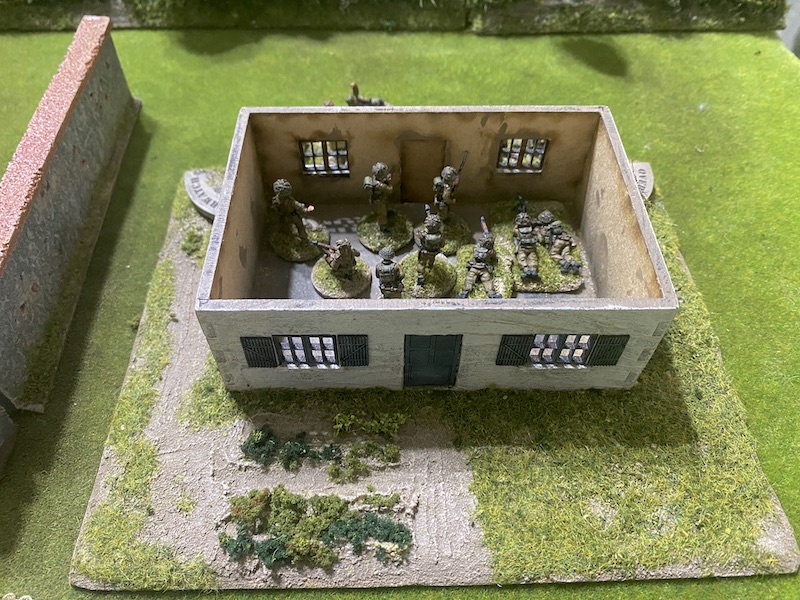
Once there, he orders the other section to go into the farmhouse.
They move quickly and take up positions at the windows.
Both German teams are on overwatch facing either side of the house and are seemingly unaware of the danger lurking so close.
Lastly, the lieutenant has the section accompanying him throw a smoke grenade to cover the side approach to the farmhouse.

The next command roll is 54321 and enables the British to press home the attack. The corporal in the farmhouse orders the section to throw two grenades out of the windows. They both explode with deadly effect inflicting three casualties, including the squad's scharführer who is killed. German morale holds steady.

The lieutenant then orders the section to engage the surviving Germans in close combat. Despite their casualties and the loss of the squad leader the panzer grenadiers are well armed and it's going to be a fairly even fight.
Twelve British dice will be matched by thirteen German and it ends up being a bloody affair. The British inflict four kills and one shock, while the Germans inflict five kills and two shock. It is technically a win for the panzer grenadiers but it sees the squad reduced to a single survivor manning an MG42. The other team is wiped out (conveniently taking its shock with it) and with that German force morale drops to six.
The British corporal is one of the casualties but he is only wounded and out of action for the remainder of the turn. That's enough to see their force morale drop to four. In addition they lose men from both the rifle and bren team and withdraw from the house.
The lieutenant then sends the section accompanying him charging in to finish off the job.
Yet things are not as straightforward as they might appear. Even a lone soldier manning an MG42 can put up a stiff resistance (as this is a fresh round of close combat and not a continuation of the first one we see no reason why the LMG won't be factored into the close combat strength of this new combat). While the British wipe out the last German he manages to inflict five kills and two shock before he falls. One of those casualties includes the section corporal who is killed and that takes British morale down perilously low to two. German morale also drops with the loss of the second team and now stands at five.
The Germans have lost an entire squad but in the process the British took ten casualties. Five of those were from the support squad and so the longer term impact will not be as great on the British platoon as it will be on the Germans. Nonetheless that was very nasty. In hindsight I probably didn't need to commit the second section to close combat, it may have been wiser to take on the lone machine gunner in a firefight or toss a grenade his way.
Despite the casualties the British still have men remaining. Two of the junior NCOs are out of action, one permanently and one with a wound but the platoon lieutenant is on hand and should be able to coordinate the remnants of the two sections. His last act of this phase is to call the third section forward to join him.
With the lieutenant committed to the table my attempt to deploy the PIAT team on the left flank to tackle the PzIV is unsuccessful. So to try and escape the attention of the tank the section at the hedgerow scrambles over to the other side and on to the road.
With British force morale down to two the Germans remove one of the British jump-off-points and no surprise Dave chooses the one opposite the PzIV. That prevents the PIAT team deploying into a firing position.
In the following German phase the PzIV targets the 2” mortar team and the attached platoon sergeant.
The mortar team is lucky to get away with suffering a single point of shock.
The oberscharführer puts the teams in the chateau on overwatch.
The next British command roll is 66621 which means the Turn will end at the completion of the phase (in hindsight this was an error, with British FM at two I should have rolled three command dice not five but neither Dave or I noticed this at the time). I have a CoC die available and I intend to use that to keep the barrage in action. It may not have inflicted any casualties but it has been very effective in suppressing the Germans and preventing a coordinated defence. If it can be adjusted far enough to the left this phase it will pin down the squad and the oberscharführer at the chateau and effectively take them out of the game. The barrage is an asset I'm very reluctant to lose.
The forward observer adjusts the barrage to the left and as I had hoped it blankets the chateau. The squad on the ground level are immune to the hits but they are now pinned, as is the platoon's oberscharführer.
On the British right flank the section with the lieutenant clamber over the high wall and capture the German jump-off-point.
That done the phase ends and so does the turn. The wounded British corporal at the farmhouse gets back on his feet. I play the CoC die to keep the barrage in play and the captured jump-off-point is removed. That brings German morale down to three and the game teeters on a knife edge.
Despite rolling only three command dice the British command roll of 432 allows them to maintain some of their momentum (at this point we'd realised our error with the command dice).
The two weakened teams that make up the support section take up position along a nearby hedgerow.
From behind the farmhouse the corporal who recently recovered from his wound leads what remains of his section to join the others at the hedgerow.
They can now threaten the German jump-off-point at the rear of the table.
In the centre the sergeant rallies the 2” mortar team.
He then has them fire smoke to screen off the PzIV.
The Germans have few options in their phase and, like the British, are now reduced to three command dice. One squad has been wiped out while the other is trapped under the barrage with the oberscharführer. That leaves only the PzIV, the panzerschreck team and one uncommitted squad. The squad comes into play this phase and deploys at the rear, facing the oncoming British.
Having captured the German jump-off-point the lieutenant and his accompanying section find they cannot advance directly ahead without walking into the barrage's beaten zone.
Instead they spend the phase climbing back over the high wall. They will have to take the long way around to avoid risking any friendly fire.
In the German phase the PzIV turns its turret seeking a new target and fires at the forward observer.
I sense Dave is desperately trying to find a way to push British morale to zero, but the fire has no effect.
In the next British phase the lieutenant rallies shock and moves the section towards the others at the hedgerow.
I'm hoping the British can gather enough of the remnants of the platoon to overwhelm the single German squad facing them. Ideally I can also deploy the Vickers MMG and feed that into any firefight.
The sergeant has the 2” mortar team fire more smoke.
That successfully blinds the PzIV and gives it no targets.
The sergeant then makes his way forward up the road to join the section in the centre.

The game hangs in the balance but the odds seem to have tilted towards the British and Dave begins to sense there may not be much more to be gained. The barrage is still in effect and the British have superior numbers that could slowly overwhelm the squad at the rear, especially if the Vickers MMG can be brought into action. There is of course the PzIV, but this is an asset Dave has been very careful not to lose. While the PIAT team may not have yet made an appearance they remain a threat. Ideally the Germans keep the tank in action for as long as possible in the campaign. It has certainly proved its worth so far.
With casualties as they stand a German withdrawal now would constitute a losing draw and Dave decides that's an outcome he's happy to live with. At the start of the next phase the Germans concede defeat and withdraw.
Well, given how badly the British started this wasn't an outcome I could have foreseen earlier in the game. The loss of the AVRE was a blow and I came very close to losing the forward observer. Had I done so I think the outcome would have been very different. On a more positive note I can have no complaints about the barrage which remained available throughout the entire game and played such a key role in suppressing the German defence. It certainly made the move around the right flank possible and that was probably the one that most unhinged the defence.
I'm liking the draft amended rules for the mortar barrage. The increased cost as a support option; the less precise way it can be adjusted, and, the beaten zone all feel more appropriate. Yet it hasn't lost any of its potency when it does come crashing down on to the table. That feels about right.
Despite a couple of bloody close combats, casualties overall were not that heavy for either side. The British took eight from the core platoon and five from the support section which also had its NCO killed. Those casualties see the men's opinion drop to -1. On the other hand another victory has made the CO very pleased and his opinion rises to +3. That will earn the platoon an extra point of support in the next game.
German casualties were not severe either, although all eight did come from the core platoon and it included the loss of one of their NCOs. The opinion of the men is at zero while the CO's opinion is -1.
With the British capture of this table the Germans have two options. One is to fall back to the farm of St Nicholas on the fourth map and fight there or alternatively they play the campaign wild card, the Punch from Wunsche and mount a localised counterattack on this table with an armoured unit. Dave has decided that the terrain at this table doesn't lend itself well to an attack and so he will fall back to defend the fourth map. You can find out what happens next in this post.
If you've enjoyed following along and would like to Buy Me a Coffee to help cover some of the costs of running the blog you can click through at the link or on the tab in the right hand column of this page.
You can find all the game reports for this campaign and for many others on the Chain of Command AAR page.


Another in your long list of nail-biting AARs. Halfway through the narrative, I was sure you would call it quits, but you held on to eke out a win. You certainly managed to convey, even to a casual reader, how CoC is such a rewarding set of rules to play
ReplyDeleteThanks Dennis, glad you enjoyed it. I was very close to throwing in the towel at one stage, had I lost the forward observer then I think that would have been the end, but in the end I'm glad I stayed the course.
DeleteThanks for putting the amazing amount of work into this post to share. I love your table and figures - a great inspiration.
ReplyDeleteThanks Norm, always really appreciate the positive feedback. It is indeed a lot of effort but I do enjoy it and it's always good to know that others enjoy reading it.
DeleteA welcome and gripping return to the campaign your tenacious attack paying off in the end and rewarding your decision to continue to press on.
ReplyDeleteYes, I almost lost heart but I've been gaming long enough to know when there's still a glimmer of hope. Persevering with this one paid off in the end. British grit and a stiff upper lip!
DeleteAnother great AAR thanks Mark. I didn't think the Germans had a PzSchreck option? We're currently playing the same campaign and are about to conclude it on the final map in the final turn. Its worth the Germans playing the wildcard at this point, partly for fun and partly because it delays the British advance.
ReplyDeleteOoh, good call on the panzerschreck, just checked the PSC again and you are absolutely right. It hasn't caused any damage so far in the campaign and it certainly won't in the future now you've set us straight. Thanks for that, much appreciated!
DeleteTugboat - Sadly the Germans cannot play the Wildcard after Turn 6. The Epsom assault started on the morning of 26th June and Panzer Lehr's tanks were diverted to face of this new attack on the flank of Martlet!
DeleteDon
Hi Don - its worth treating your PzIV like gold then, we stupidly lost ours early on and have been harvesting our meagre resources ever since!
DeleteWhat a great way to wake up on sunny, nippy but nice, Sunday morning, in bed with a cup of tea and a great new CoC AAR.
ReplyDeleteDave must've been spitting blood with all those failed deployments through the pre-game barrage - he has my sympathy. On the other hand I was seized with envy for your smoke screens delivered by 2" mortar; in my last game I could not get one in the right place for love nor money.
This was a much tougher fight than the previous one and like some of the other commenters I was surprised when you pressed on with such a low force morale as I've found that 3 Command Dice is pretty hard going. You obviously made the right call by taking into account your advantage position, force balance and your opponent's problems.
I must try out your mortar and AVRE house rules. I've talked about house rules for CoC but so far have held off making any for fear of unbalancing the game. The two that tempt me most are:
1). Re-rolling casualties in hard cover, requiring a 4+ to confirm (anything else being a miss) as I just can't get past the feeling that it's wrong that your chance of being killed in hard cover is the same as in soft cover.
2). Treating 'kills' by German MGs as a 'kill' AND a 'shock' as the number of dice (8-vs-6) doesn't seem to do justice to the MG42-vs-Bren.
Fascinated to hear your thoughts on these - too much?
Thanks, it was definitely a disheartening start but perseverance paid off. By the way, the two house rules are not mine but were sent to me by Don Avis who is part of the Lardies local club and play test group. While these are not 'official', they were devised by Rich and I suspect if there is ever a v2 of the CoC rulebook the barrage ones will be included as will the AVRE amendments. Generally I'm loathe to make house rules myself in case they throw other elements out of balance. Yours seem fairly reasonable though, but probably need a fair bit of testing to see how they change play overall.
DeleteI think upping the power of the MG34/42 is a bad idea - despite the headline RoF being much higher than e.g. a Bren Gun, the effective RoF of the MG34 was only 150 rounds/min. Comparing with the Bren's effective RoF of 120 rounds/min, I reckon that gives you a conversion factor of 1 dice per 20 rounds/min pretty perfectly - with the MG34/42 being rounded up to represent the gunner's ability to push it a little further.
DeleteHi Gresley, thanks for the comments and I am worried that it will over-egg the German MGs and unbalance the game.
DeleteI'm not sure about the RoF bit though a quick look on Wikipedia (hardly authoritative but honest?) gives the Bren 500-520 rpm and the MG34/42 800-900/900-1500 rpm. Your figures are what Wikipedia calls 'practical' RoF and probably includes belt change / barrel overheating, ammo supply, etc. In CoC the firing in a turn probably represents just a burst or two and I think the higher RoF will make a difference there.
That said, my thinking is based more on how they're generally used (Bren to fire at targets & MG42 to suppress areas); and, the contemporary Allied comments about the German guns and how they seem to pin everyone down (hence looking to increase only the shock and not the casualties).
I am NOT an expert on any of this but reasonably well-read and would be very interested to hear whether you think this is tosh or worth exploring?
Like Rob, I'm sitting here with a cuppa on a really cold day and enjoying another of your game reports. Nail biting all the way! I was sure the loss of the AVRE would scupper the plan, but you held steady and got there in the end. Looking forward to the next episode!
ReplyDeleteThe loss of the AVRE was a real blow, but at that stage I still had a reasonable force in play. Had the forward observer been killed then I think it would have been game over. Glad you're enjoying following the campaign.
DeleteAnother brilliant report. This was a challenging table for both sides. The high walls around the buildings made it difficult to co-ordinate the defence. We were lucky in that the AVRE was not knocked out - however it's ability tom roll three 6's from 16 HE dice to destroy buildings was appalling. It was equally poor at rolling two 6's to knock down high walls.
ReplyDeleteWhat is interesting is how the buildings and walls chosen change the challenges. Most of our walls were high, funnelling everything down the main road or through the orchard. Our buildings had limited windows on the out facing walls so the Germans couldn't sit in cover firing (the presence of the AVRE stopped this tactic too!)
On to St Nicholas's farm - another challenging table for the Brits!
Don
Thanks Don. From the map in the PSC it looked like those walls in the middle were low walls but I must have got that wrong. Not sure it made a huge difference in the end. Losing the AVRE was careless play by me though, no one to blame but myself. We are liking the revised rules for the mortar barrage, they seem to have found the right balance in keeping it effective but not so easy to bring down and move.
DeleteTell Dave, not to counter attack on this table. Tables 4 and 5 have better tank country. However don't miss the wild card counter attack, as it is withdrawn after Turn 6!
DeleteDon
That looking game and even greater narrative as always. Also as always o was rooting for you the whole time; though in the beginning it sure looked like it was for nought. Glad my support won through to the end. 😀😀
ReplyDeleteI hope Dave picks the counter attack. That sounds very WWII German to me.
Lovely post as ever.
I don't know what I'd do without you, I could feel that support travelling the oceans!
DeleteThat was a proper nail-biter, wasn't it? Well done for bringing on 2nd Lieutenant Percy Veering and not giving up! Give him a slap and tell him next time to SHOOT the sole surviving German MG42 gunner, instead of charging him, WW1 style. The claustrophobic nature of the combat in the village seemed to perfectly reflect everything I've read about the actual fighting in this campaign. (Btw, I can't recall you EVER getting to use a British tank you've brought on - they all seem to get knocked out almost instantly. Are you using my dice, by any chance?)
ReplyDeleteYes, the attack with the bayonet is so...so...yesterday. Steel not flesh, that's what I keep on telling them. Also tanks are so vulnerable on a CoC table, especially later in the war, timing is everything and my timing is awful. Onwards!
Delete