We reach the second map of our Operation Martlet campaign for Chain of Command. Having withdrawn from the northern edges of Fontenay following the previous game the Germans are now holding a line deeper into the sprawling village. This is close terrain with sturdy farms set amongst orchards. It has all the potential to make for a strong defensive position.

The mist that hampered British deployment in the first two scenarios has now lifted and that should make it a little easier to coordinate the opening of the attack. On the other hand the Germans will continue to suffer the effects of a particularly heavy pregame barrage that I hope makes their ability to respond much less predictable.
Casualties so far in the campaign have been light. The British have only one wounded man from the core platoon who will miss this game. The Germans have a man wounded but they have also lost one man permanently.
Looking at the table I can see two locations that could be made into strongpoints - the walled farm in the centre of the map or the solitary farmhouse near the rear.

All the buildings offer hard cover and the Germans have the option to strengthen one of them into a bunker. It's the type of solid defence that makes me inclined to call on a Churchill AVRE as a support option. As is the case in nearly every scenario of this campaign the British benefit from considerable support, so that is certainly an option.
If I was playing the Germans I'd be hesitant about building my defence around the central farm building. That's for the simple reason that there's a good chance the pre-game barrage will delay deployment. If that were to happen the British could quickly close down jump-off-points and unhinge the defence. I'd be inclined to think a more rearward defence would be the wiser move.
The British start the patrol phase with only a single free move which means they won't be able to prevent the Germans from claiming the central farm area for a jump-off-point should they wish to do so. In the end the Germans play an aggressive patrol phase but then opt to build their defence further back around the building at the rear of the table.
That farmhouse could make for a tough position to attack. It's surrounded by open ground which will allow the Germans to bring the superior firepower of their MG42s to bear. I'm inclined to think the Churchill AVRE might be just the weapon to make that location untenable, even if the Germans fortify it. That's going to be my first support choice (note that we will play with a few unofficial house rules for the AVRE that you can see listed at the end of
this post).
As powerful as the AVRE can be it has little ability to deal with German armour. I know I can expect to see at least one PzIV so I'm going to add an additional PIAT team as support. If the PzIV turns up I hope to turn the close terrain to my advantage and stalk it with the two PIAT teams. At the same time I plan to use smoke to provide additional cover and hinder German line of sight using a second 2” mortar team.
I will also call up a fourth rifle section, as I'm hoping to stretch the German defence and come at it from several angles. Last but not least, I will have an Adjutant. That will enable both senior leaders to be on the table to help coordinate the attack.
The patrol phase had a sluggish start for the British and their prospects don't look any brighter when it comes to their force morale. That starts at eight while the Germans are at eleven. With that the game begins.
The Germans have the first phase but elect to do nothing until they see what the enemy has planned. There is no reason for the British to delay and in their first phase the support section deploys from the jump-off-point on the right flank and takes up tactical positions behind a hedge row.
A section from the core platoon deploys from the central jump-off-point and they too take up tactical positions.
Now seems as good a time as any to bring on the Churchill AVRE, after all, it has the furthest to travel. It appears to the left of the road, heading in the direction of the large orchard.
Once again the Germans choose to delay any deployment, deciding instead to watch and wait. In the British phase the Churchill moves flat out towards the orchard.
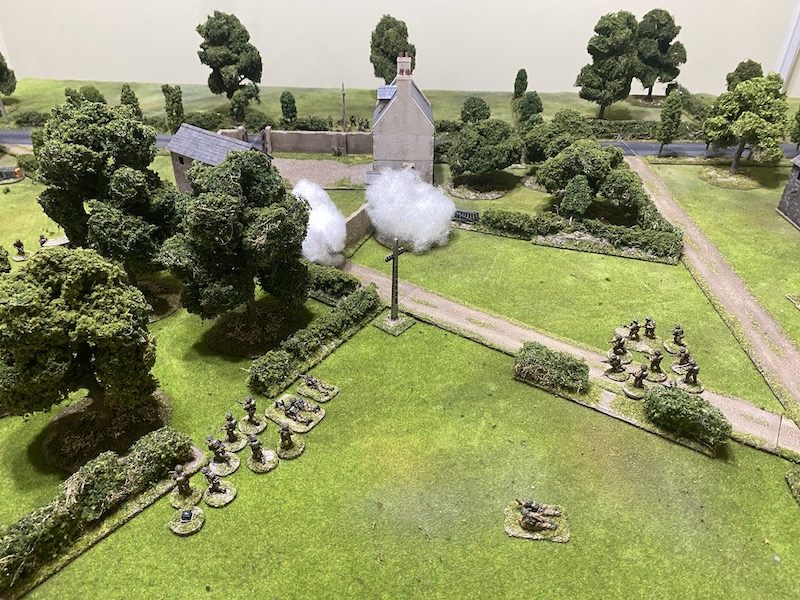
The platoon's 2” mortar team deploy and fire a round of smoke in an attempt to block lines of sight along the road on the British left flank.
Unfortunately their aim is off and the smoke lands to the right of the target.
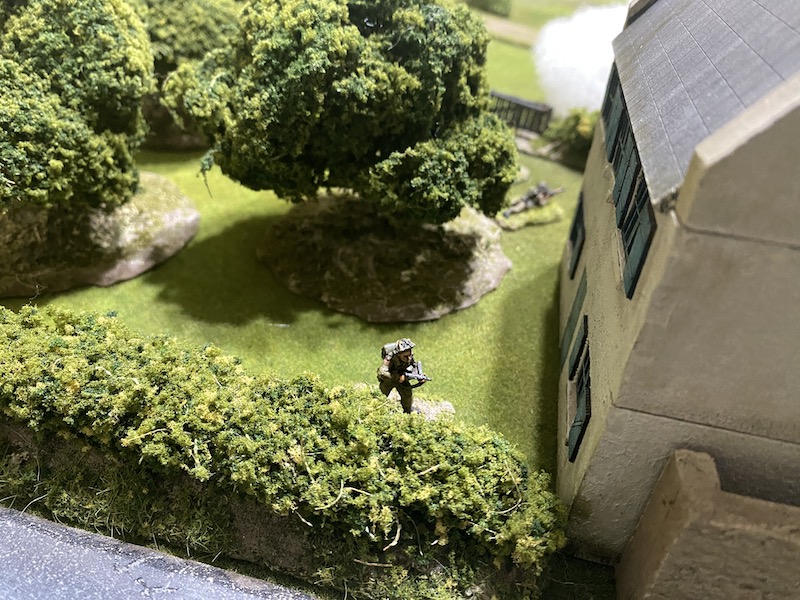
The support section on the right flank moves forward over the hedge.
I'm intending to use this section to sweep around the German flank. There's a risk it may get caught in the open but that may be enough to draw German attention away from the stronger push I intend to make around my left flank.
The next German command roll is 66421 and Dave decides to try to make the most of the double phase, however his initial attempt to deploy a squad through the barrage fails.
The subsequent command roll is 65321 and the Germans decide they may be better off biding their time and make no further attempt to deploy.
In the following British phase the 2” mortar team make a second attempt to fire smoke into the road. This time they're successful.
The platoon sergeant then deploys from the central jump-off-point.
He's close to the section near the road and orders them to move across to the orchard.
Next he orders the support squad to his right to move at the double toward the next hedge line.
They move quickly and that has both sections advancing at a similar pace.
Once again the Germans decide to bide their time and wait.
The British command roll is 66211 and I take the opportunity to move quickly. The sergeant barks his first orders to the section near the orchard.
He urges them to press on toward the nearest farmhouse.
The sergeant then moves forward and follows them into the orchard.
From there he can give instructions to the support squad on the flank and he has them move over the hedgerow.
The next command roll is 55444, not quite what I was hoping for as I'd like to keep the Churchill rolling forward. Nonetheless the sergeant continues to direct the advance.
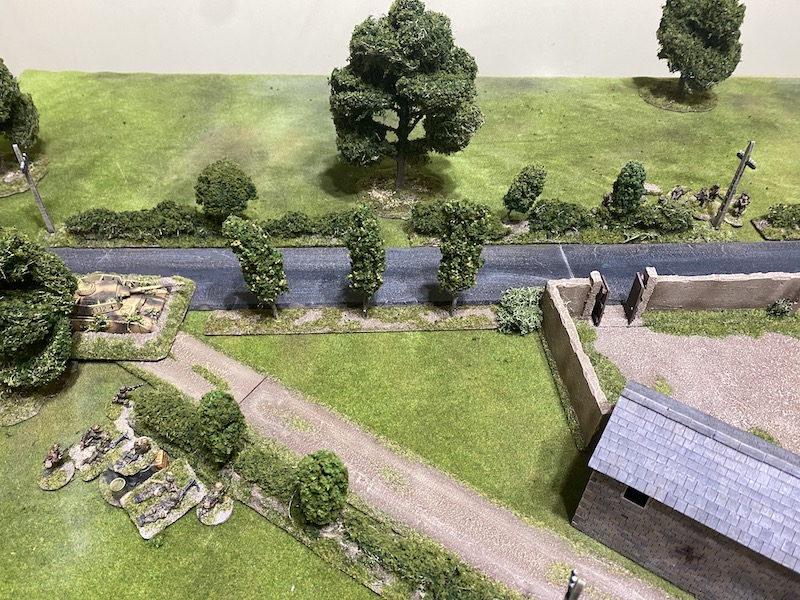
I don't see much point entering the farmhouse. The German jump-off-points tell me it's not a position they plan to hold and the farm itself offers few if any advantages for the attacker. Instead the section works its way across the orchard.
The sergeant orders the support section to move towards the hedges lining the road. They move slowly and only the bren gun team get that far.
The sergeant then moves to the rear of the farmhouse from where he can command both sections.
While the support squad will continue making its way along the hedgerow on the right flank I can see that the mortar smoke now presents a good opportunity to begin to shift the main British effort to the left flank.
In the German phase there are three attempts made to deploy units, none are successful but I note that many of these were using 3s and I strongly suspect one of the deployment attempts was the PzIV. If I'm not careful a successful deployment of the tank or a squad on the right flank could have nasty consequences for the support section.
When the British phase arrives my first action is to deploy one of the PIAT teams on the right flank. If a tank does turn up in that area I'll have at least one anti-tank weapon on hand to try and deal with it.
The sergeant continues to urge the sections forward.
The support squad all move up and take positions along the hedgerow.
He then has the section in the orchard clamber over the hedge and move towards the left.
The Churchill AVRE moves flat out towards the road to catch up with the infantry.
With smoke effectively blocking the road the 2” mortar team moves forward to the hedge, ready to fire more smoke towards the orchard should the Germans make an appearance.
When the German phase arrives every one of their attempts to deploy results in failure. The heavy pre-game bombardment appears to be working as planned.
In the British phase the PIAT team makes its way forward.
A third section deploys on the British left alongside the Churchill.
The support section over on the right flank begins to move more cautiously.
It edges slowly along the hedgerow moving tactically (and frustratingly slow as it happens!).
The section in the centre shows far less caution. Taking advantage of the plentiful cover provided by the smoke and the orchard they make a rapid dash across the road. Moving at the double they cover quite a distance.
The 2” mortar team climb the hedge and move forward to join them.
The German command roll is 66554 and while it adds useful CoC points and a double phase it offers little for deployment. The following roll is 53331 and that gives the Germans a much better opportunity. However the barrage continues to play havoc with their deployment. From four attempts only one is successful and a panzergrenadier squad takes up overwatch positions on one side of the orchard on the British left.
That will certainly give the British pause for thought.
In their next phase the sergeant continues to direct the platoon from behind the farmhouse.
He's within command range of the support section.
And urges them to continue moving cautiously along the hedgerow.
He then moves back to within command range of the PIAT team and orders them forward to the corner of the hedgerows.
From there they can cover the open field on that flank or the road.
The platoon lieutenant deploys on the British left near the Churchill.
He orders the 2” mortar team to continue advancing.
He then sends the section nearest him forward along the road.
They can use the cover of the smoke to move in the open, thereby avoiding the hedgerows and catching up with the section near the orchard.
The Churchill AVRE rumbles forward to join them.
That now sees the British making a strong push on their left flank while still maintaining a threat with the support squad on their right.
The fourth section, accompanied by the second PIAT and 2” mortar teams, remain in reserve. I'm intending to commit them when I have a better idea of German deployment. If I have a CoC die I'll be very tempted to move one of the jump-off-points forward and use it as a springboard to bring those units closer to the front line. Before that happens I want a better understanding of where the Germans intend to make their stand.
Just when I think my plan is ticking along nicely the German command roll is 66644. It's a dramatic and unexpected turn of events. Ironically, just prior to making the command roll I know Dave gave serious consideration to using the one CoC die he has currently to end the turn. Now it looks like his command dice have done him a favour and ended it for him.
There is nothing good in this from the British perspective. When the turn ends the smoke disappears, as does the effect of the pre-game barrage. As if that wasn't bad enough, the Germans have a second phase and one with no hindrance to their deployment. That British section in the road suddenly looks very exposed.
The following German command roll of 63332 couldn't be much better for them, allowing for a swift and no doubt aggressive response. Immediately the squad at the orchard are returned to overwatch.
A second squad deploys from the jump-off-point near the crossroads.
That allows them to cover the other flank and try to impede the progress of the support section. They open fire.
The turn end has seen the support section lose its tactical positioning and so they are fortunate to suffer only four points of shock.
German deployment continues and a third squad appears in the upper level of the farmhouse.
They too can target the support section but this time only at effective range.
The hedgerow provides a reasonable amount of cover and the section find this initial burst of fire from the Germans has no effect.
More ominously, a dug-in PzIV reveals itself at the crossroad.
It has a clear line of sight to the section in the road and wastes no time sending a round of high explosive their way.
It explodes, killing two of the section.
The double phase and turn end have totally changed the complexion of the game. The Germans have emerged with a vengeance and a British command roll of 65532 restricts the ways in which they can respond. The most immediate need is damage limitation and nothing is more urgent than moving the section in the open to cover, or at least out of the line of sight of the PzIV. They move at the double and reach safety.
On the right the corporal of the support section rallies a point of shock and has them move tactically while trying to pull back. The shock means they move only 1". It’s not enough to escape German line of sight, but at least they find better cover.
All along it's been my intention that the support section draws attention away from the left flank, but that plan only works if I can apply enough pressure there. I need to do that quickly.
In the German phase a forward observer deploys into the upper level of the farmhouse. That's a real concern. For now the observer makes no attempt to contact the mortar battery. The main reason for that is because the house rules we are testing consider the barrage to be in effect from the moment the battery is contacted (you can find the house rules for the barrage at the end of this post). As Dave knows I have a CoC die obviously he's concerned I will use it to end the turn and have him lose contact with the battery.
The forward observer could cause real problems. Fortunately the British are quite close to the German positions so it will limit the options for where the barrage can land.
The PzIV turns its turret and its attention to the support section on the flank. This time the round of HE is much less effective. There is only a single hit and it leaves the section unscathed.
The nearby panzergrenadiers engage the same target.
The hail of MG42 fire is more deadly. The rifle team suffers a point of shock and one of the Bren team is taken casualty.
The platoon's oberscharführer (senior leader) joins the forward observer and squad in the farmhouse. He uses the German characteristic maschinengewehr with one of the MG42 teams to add to the weight of their fire. Once again they target the support section on the flank.
Despite the hail of MG42 bullets there is only one man hit in the rifle team. Nonetheless the shock and casualties are starting to mount. I'm not sure how much more of this the section can withstand.
In the British phase the second 2” mortar team deploys on the left flank with a clear line of sight to the PzIV.
They fire a round of smoke that not only blocks the line of sight of the tank but also that of the nearby panzergrenadiers.
The other 2” mortar team also fires smoke. They don't have direct line of sight but the support section does.
The smoke lands on target.
That gives the support section considerably more protection.
They are not totally free from harm. A single MG42 team in the upper level of the farmhouse could still target them.
The PIAT team climb over the hedge and into the road.
For now the smoke keeps them concealed and they can make their way forward in relative safety. If however for some reason the smoke clears I want them in a position to target the tank should the situation arise.
The platoon lieutenant moves to within command range of the two sections on the left.
He directs the section in the centre to move up to the farm wall.
He then has the section on the left work its way around the orchard.
With the two German squads preoccupied by the move on the right it might be possible to approach from this side of the orchard and catch them in the open. If nothing else it's a move the Germans cannot afford to ignore. I'm also seriously considering using my CoC die to move a jump-off-point forward and then deploying my reserve section. If I can time that with a successful move around the orchard I could trap two German squads in the open.
On the opposite flank the platoon sergeant orders the support squad to move to safety.
They make their way across the road and to the cover of the tall farm wall. That puts them out of sight of the Germans in the upper level of the farmhouse.
Before rolling his command dice Dave ponders the situation. It's clear to see his predicament.
Those two panzergrenadier squads at the hedgerow have very few places they can move to safely should they be threatened from the rear.
A move back to the farmhouse is fraught with danger and yet the option of moving to the other side of the hedge puts them potentially at risk from other British units.
Worst case, the British enjoy a run of phases and the Germans suffer casualties they cannot afford to sustain this early in the campaign. That's enough to convince Dave it might be best to withdraw now before further British manoeuvre puts them in a perilous position.

While I didn't see that coming, in hindsight it makes a lot of sense. Even more so when you consider the British were going to be in a position to bring a jump-off-point forward and deploy a fourth squad to where it could have made an immediate impact. Not that Dave knew that at the time.
That was an interesting game, even more so when you consider the outcome was determined much more by movement than by firepower. In fact, other than a few smoke rounds from the 2" mortars the British didn't fire a shot. That said, the effects of the considerable weight of artillery fire represented by the pre-game barrage shouldn't be discounted.
I think the Germans made the right decision to defend towards the rear. The weakness in the position was the inability to counter an enveloping move from both flanks, especially one that could catch some of the squads in the open without a good means of escape.
In the end that proves a cheaply won British victory. They took four casualties, but only two were from the core platoon. A relatively low cost to capture what could have proven to be a difficult table. With that success the men's opinion rises to +2 as does the CO's opinion.
The Germans may have suffered a defeat but they did so without taking any casualties, leaving them in good shape for the next games. The men's opinion is at +1 but the CO is a little less impressed and his opinion drops to -2.
The British now move deeper into the village of Fontenay itself and you can find out what happens next in this post.
If you've enjoyed following along and would like to Buy Me a Coffee to help cover some of the costs of running the blog you can click through at the link or on the tab in the right hand column of this page.
You can find all the game reports for this campaign and for many others on the Chain of Command AAR page.


Thanks for the report. Both of you seemed to have well thought out plans, but your barrage and skillful use of smoke saw you carry the day. Of course, a bit of help from the dice added a welcome touch of luck to overcome a strongly held position. You both played a masterful game.
ReplyDeleteWell that was quite splendid, your attack was building up nicely. It was a shame the Germans bugged out, but a wise decision by Dave nonetheless. Well played by both of you.
ReplyDeleteAnother breathless read - you need to make these AARs shorter or I'll pass out! That was a cracker of a game, great to see a side forced out of its position by manoeuvre alone - score one more for campaigns over stand-alone games. Also, score one for the Royal artillery - what a barrage! The Hun must've been spitting blood at all those failed deployment attempts.
ReplyDeleteThe tension built all the way through the account. I could sense that support section's unease as they advanced, uncertain of what might await them. The British manoeuvres played out brilliantly, and it's difficult to see what else the Germans could've done after coping with the weight of the barrage. I'm looking forward to more.
ReplyDeleteGreat AAR - very interesting to read. Eagerly awaiting the next one after Dave's trip to France!
ReplyDeleteExciting game! Very cool to see it decided by maneuver to this extent!
ReplyDelete