I've played two campaigns using Chain of Command set in the Far East - Malaya 1942 and Last Stand on Opium Hill. Both take place during the early stages of the war when the Japanese were in the ascendancy and on the offensive. They are a challenging side to play and to play against and this made for excellent gaming. Once the Far East Handbook is published I expect to be playing a lot more in that theatre. Invariably there will be games set later in the war with the Japanese on the defensive and so with an eye to the future I've gone about making suitable fortifications.
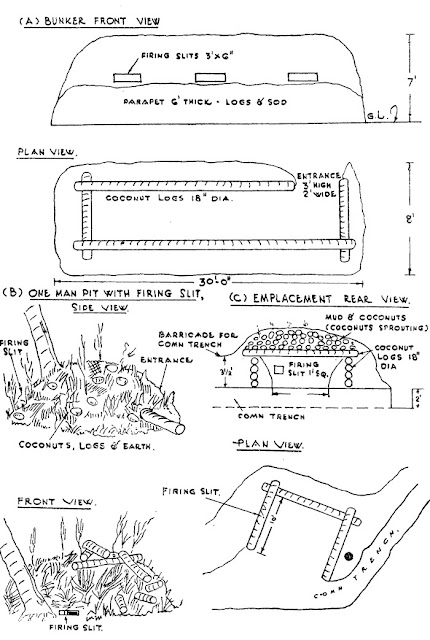
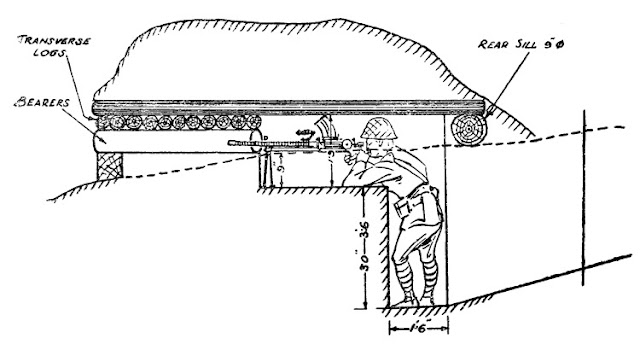
The Japanese made much use of bunkers, very often as part of intricate and mutually supporting positions that combined other bunkers with entrenchments and spider holes (one-man weapon pits). They were notable for being particularly well concealed and of solid construction using local materials like palm logs. The illustrations below come from the publication Japanese in Battle published by GHQ, India Military Intelligence Directorate in May 1943 and provide very useful descriptions of typical bunkers and weapon pits.
As you can see the majority of the bunker is below ground level which presents a few problems when it comes to the wargame table.
While it would be ideal to put figures into the bunkers I couldn't find a workable solution. In the end I decided to focus more on having them conform to the terrain, which meant figures would have to be placed off table in some sort of holding box (I have in mind a variation of my platoon boards).
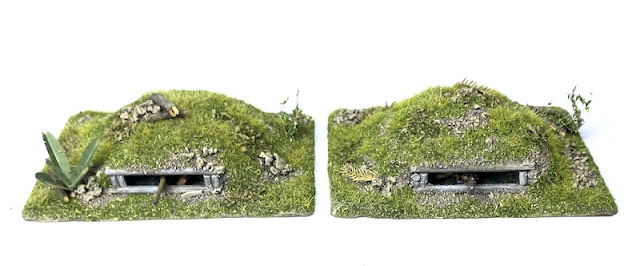
I've made four types of bunker and the construction was the same for each. Given they weren't going to have removable tops it was very straightforward, essentially all you are making are glorified mounds of earth. The core construction elements were a base of MDF and then a shaped piece of XPS insulating foam. Bamboo BBQ skewers would be used to simulate the wooden logs.
With the XPS foam cut to shape the skewers were used to construct the bunker apertures. The mound was then textured with household filler which was covered with sand and cat litter.
The first two are small LMG bunkers that will be used for a squad's defensive position.
Here you can see a few of the added figures. I think they help to create the illusion that much of the bunker is below ground level.
These were supported by individual weapon pits for the riflemen of the squad, sometimes referred to as spider holes. These would be positioned in mutually supporting positions close to the LMG bunker. 172 Scale Miniatures make a set of these and all I've done is put them on slightly larger bases so that I could texture the terrain to match the bunkers. They include a mix of figures including men in caps and camouflaged helmets which match well with my Japanese figures from various other manufacturers.The second bunker type is slightly larger than that for the LMG and houses an MMG team. The MMG barrel is another spare from one of the plastic figure sets.
Of a similar size is a bunker to accomodate a small anti-tank gun. Once again I've raided the spares box for a suitable barrel (or not so suitable in this case, I think it's a Russian 45mm barrel from one of the PSC sets, but who's to know?).
I think having the protruding barrels works well and I'm pleased with the way those two have come out. If I can't have the bunkers occupied with figures from the game I can at least have them looking like they are.
Last, but not least there is a double bunker that can house two teams.





Lovely work, as usual. I think that it is your attention to detail that makes your game reports such a joy to read.
ReplyDeleteGreat stuff. Definitely the right choice to have the figures in the bunkers, it really does help give the impression that they do extend below the ground. I have some laser cut plants too, they look fantastic but I agree they are too expensive to be very useful for most wargamers.
ReplyDeleteExcellent work on all. The bunkers look especially good with the figs.
ReplyDeleteAnother great set of kit for gaming. I still find the visual immersion is the part of the game that gives me greatest pleasure. I'm only sorry I won't get to play with your toys.
ReplyDeleteReally awesome work. As great as the bunkers are, I love the vehicles.
ReplyDeleteGreat look for bunkers. Interested to hear you intend not putting figures inside but putting them in a holding pen while in the bunker. I do something similar with my resin buildings that don't have lift off roofs - I place them on a 1:1 floorplan to track movement within the building.
ReplyDeleteExcellent stuff.
ReplyDeleteAwesome work on the bunkers. The figures inside really add to them.
ReplyDeleteAwesome looking army. I love the bunker with the pair of Japanese soldiers peering out, nice touch.
ReplyDeleteCracking work on those bunkers and trucks mate.
ReplyDeleteCheers
Matt
Thanks Matt, it was good to use the bunkers in our recent Nunshigum Ridge game.
Delete