My collection for the Far East has been very much focussed on the British and Commonwealth forces with a view to fighting actions in Burma, Malaya, Singapore and Hong Kong. I have Australians that can also be used for the South West Pacific theatre and so it was inevitable that at some stage I would consider adding the Americans for the same theatre.
Eureka Miniatures sent me a sample Marine with one of my orders and I really liked the look of the figure. I was tempted but restrained myself. However, knowing there was a Far East Handbook for Chain of Command to be published in 2024 and one for the Pacific to follow I felt the irresistible urge to embark on a US Marine project.

No surprise the initial batch of figures to make up the platoon came from the Eureka Miniatures range sculpted by Mike Broadbent. A large proportion of my Japanese figures are from the same range so I knew they would be a good fit.

I really like these figures, in fact I think they are the best of the Eureka 20mm range and I've been really pleased with the way they paint up.
The men are dressed in the Marines' distinctive HBT uniform (more often described as utilities or dungarees) and their unique camouflage helmet cover like the one on display below in the Imperial War Museum.
The core Marine platoon evolved during the war and that change is mainly reflected in the number of BARs (Browning Automatic Rifles) in each. Starting initially at only one the later structure of the platoon included three BAR gunners forming the key basis for three separate fire teams.

As the BAR is not significantly larger than the M1 Garand it is less easy to distinguish at this scale. So I've decided to break with my usual convention of putting individual figures on a 20mm round base and in the case of the BAR gunners put them on slightly larger bases, not dissimilar from those I use for senior leaders.
While the BAR gunner has an assistant I don't feel the need to base the two together as the BAR is not a belt fed gun like the German MG34/42. I'm hoping the larger base will help distinguish the figures and without the assistant on the same base I can handle casualties easily.
Even with the larger base the BAR gunner still doesn't stand out that much.
In Chain of Command terms the senior leaders represent the Lieutenant and Platoon Sergeant in the platoon headquarters. As is my usual convention for basing senior leaders these are on rectangular bases.
The individual squads are led by Sergeants, who function as junior leaders in Chain of Command terms and these are based on the same 20mm round bases as the enlisted men. To help differentiate them the bases have a few rocks and the figures are all adopting suitable poses for NCOs.
The two basing styles make it easier to distinguish between the senior and junior leaders.
I have enough figures from the Eureka range to make up four squads with anywhere from one to three BARs. In the case of a 1943 squad you can see below, it is made up of twelve men led by a Sergeant. The majority of the men are armed with the M1 Garand rifle. The squad includes two men armed with Browning Automatic Rifles (BAR).


The Hawaii Army Museum has a very good collection of American small arms and other weapons including a BAR, M1 Garand and M1 Carbine.
The Marine company has a weapons platoon with a light machine gun section and a mortar section. The light machine gun section was made up of three machine gun squads each armed with one M1919A4 machine gun. I've decided to make sure I have enough of these so I have four machine gun teams.
Once again the Army Museum in Hawaii has a fine example of the M1919 machine gun.
One of the issues with the Grubby Tanks website is that many of the ranges have no pictures of the figures. This was unfortunate because I placed an order for 50cal MG teams from the Britannia range and what I actually received was M1917 water cooled MGs. While they certainly look the part for a sustained fire MG role, they are not the heavy calibre of the 50cal, but they will have to suffice for now. Using the dedicated loader figures and a couple of others, I can make up a five man team.


The mortar section was also made up of three squads, each armed with one M2 60mm mortar. Which leads me to make a small confession. When I was ordering the figures from Eureka I had noticed that the range does not include any heavy weapons or gun crews, so when I saw they had mortars and crews I made the quick assumption these must be 60mm mortars and I didn't look too closely (and it doesn't help that the calibre of the mortars is not mentioned in the listing for the figures). Looks like I made a mistake by not examining these more closely because these mortar have longer tubes than the M2 and look much more like the 81mm M1 mortars. Unfortunately Eureka don't do any other mortars so initially I was using these to substitute for the M2.


To fill gaps I've acquired figures from a couple of other ranges. This can occasionally be fraught with danger as not all ranges work to similar sizes or sculpting styles, but I'm pleased to say I'm reasonably happy with how this has worked out. The lack of M2 60mm mortars has been addressed by using sets from Britannia Miniatures (sold through Grubby Tanks).
If I have an issue with these figures, it's to wonder why they've been sculpted with backpacks and with a fixed bayonet? I would imagine the operators would most likely have removed this in order to operate the mortar more efficiently. It's not a big issue for me, but it does seem a bit odd.
The Marines made much use of flamethrowers as the war progressed, to the point in May 1945 they established a battalion level Assault Platoon armed with twelve flamethrowers and nine bazookas. Prior to that they were parcelled out in various ways to platoons and squads. The Eureka range includes an assault set which contains three man pack flamethrowers.
They have one on display at the museum in Hawaii.
There is also one in the Imperial War Museum.
Bazookas proved particularly effective against Japanese bunkers and so I have four teams. The two below are from Eureka.
The other two teams are from Britannia Miniatures (on the left) and Kellys Heroes (on the right). Once again the Britannia figures are fully encumbered with backpacks, while the Kellys figures look more casually dressed and more fitting to a combat role.
Once again the museum in Hawaii has a good example of a bazooka (also note the 60mm mortar behind it).
I wanted a couple of men throwing satchel charges and so converted two of the men with grenades. I made the satchels using Milliput and carried out some very basic sculpting but they serve their purpose.
I have since acquired figures from both Kellys Heroes and Britannia Miniatures who have specific sculpts with satchel charges.
As with their other figures, the Britannia figure is fully encumbered with a backpack. Frankly, it's hard to imagine that someone wanting to move as quickly as possible to undertake a quite hazardous task would want to be weighed down with all that kit. The Kellys Heroes figure (on the right), seems more appropriately dressed for the occasion.
To complement the men with satchel charges I have added a few other figures carrying out engineering tasks. These are all from Kellys Heroes and include teams clearing minefields and barbed wire.
One other specialist is a sniper figure. While 'sharpshooter' was a qualification attained for marksmanship, the actual role we might consider of a more traditional sniper was different and was sometimes referred to as a 'scout-sniper' or simply 'sniper'. It goes without saying that most snipers also held the sharpshooter qualification. To help differentiate the figure, I've painted this one in full camouflage, not just the helmet cover.
Overall, the additional figures sit comfortably in size and proportions to those from Eureka. The Britannia figures may be slightly chunkier, but not excessively so.
While the bazooka didn't make an appearance in the Pacific campaign until 1944, the 37mm anti-tank gun, which had become obsolete in other theatres, gave service throughout the war. It remained capable of knocking out most Japanese tanks and fired a very deadly canister round against infantry. The gun below is from an s-models set of jeeps. The crew are mainly Kellys Heroes, with one Eureka figure thrown in to make up the numbers.
In terms of heavier weapons, the Marines were equipped with several types of American tanks but as a force designed for amphibious assaults it is their water craft that are particularly iconic parts of their equipment. While not exclusive to the Marine, the LVT was an AFV that was a key feature of many campaigns.
Star Decals do a number of suitable sets and these in turn provided inspiration for colour schemes. From what I can see most of these schemes appeared later in the war. Judging from the film footage I have seen, a variation of a navy grey is probably a more common colour, but where is the fun in that?
I particularly liked the scheme at the bottom in the picture below:
The large yellow stripes are not included in the decal set, but were simple enough to create using masking tape and spray painting.
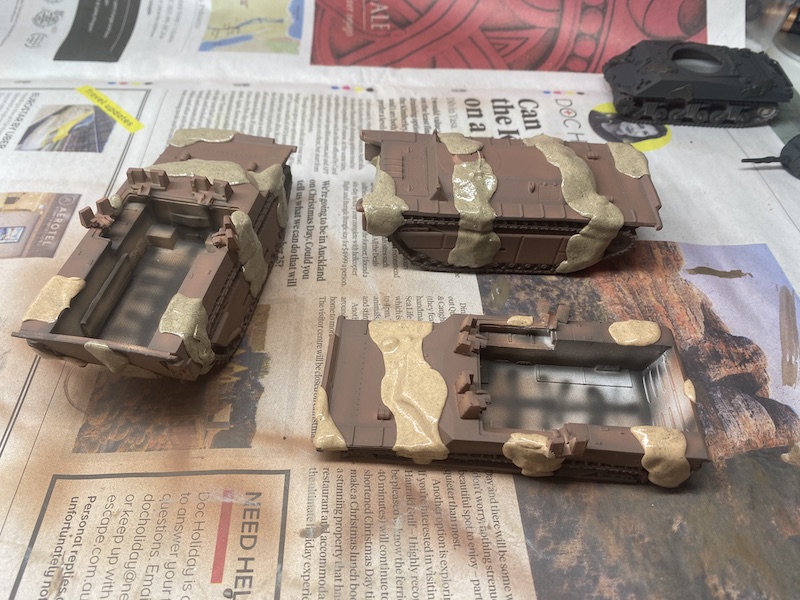
The two colour camouflage scheme was spray painted and the masking was done with Silly Putty which does an excellent job, can be re-used repeated times and doesn't pull any paint off when removed.
The whole vehicle was sprayed brown and then the Sill Putty applied.
It was then sprayed green.
Once the paint is dry the Silly Putty is removed and I was ready to move to the next stage. This was more fiddly than the putty, mainly because I needed to ensure the yellow stripes were the same width and parallel.
Needless to say I was very pleased with the end result.
I've seen a few LVTs in museums. The one below is in the Australian Armour and Artillery Museum.
The one in the Musee des Blindes at Saumur is complete with all machine guns in their mounts.
The LVT4(A) was a variant designed to provide more supporting firepower during an amphibious assault.
With a short barrelled 75mm gun it could provide close quarters HE support on the beachhead.
They also have one of these variants at the Australian Armour and Artillery Museum:
I also saw one in Beijing in their military museum. What is unusual about this one is that it mounts a 37mm M6 gun (as in the Stuart). This is a uniquely Chinese adaptation carried out by the PLA. They had captured several from the KMT during the civil war, but had insufficient ammuntion for the gun. They did however have quite a few captured M3A1 Stuarts and quantities of ammunition for that gun.
That gives me some appropriate support choices for the platoon.
Of course the LVT wasn't the only way the Marines arrived on the beach and no collection would be complete without the ubiquitous Higgins boats or LVCP. These two below are from Airfix and are particularly nice little kits.
The M3 75mm halftracks was used by the Marines in several campaigns. These two below are from the Italeri quick build set which comes with two in a box. Given the relative simplicity of the kits they are reasonably well detailed. All I did was add a few piece of stowage and a crew. Unfortunately, for now at least, the crew is something of a fudge. I didn't have any suitable Marine figures and so I've 'repurposed' a few ETO Americans by simply painting them as Marines.
The Sherman didn't make an appearance in the Pacific until late in 1943. Over the following years most variants saw service, both in Marine and Army tank battalions. I've taken advantage of the fact I have several Shermans of all variants left over from various sets from PSC and Armourfast from my ETO US Army project.
Once again a set from Star Decals was the inspiration for one colour scheme.
This was for a Sherman M4A3, in this case from Trumpeter.
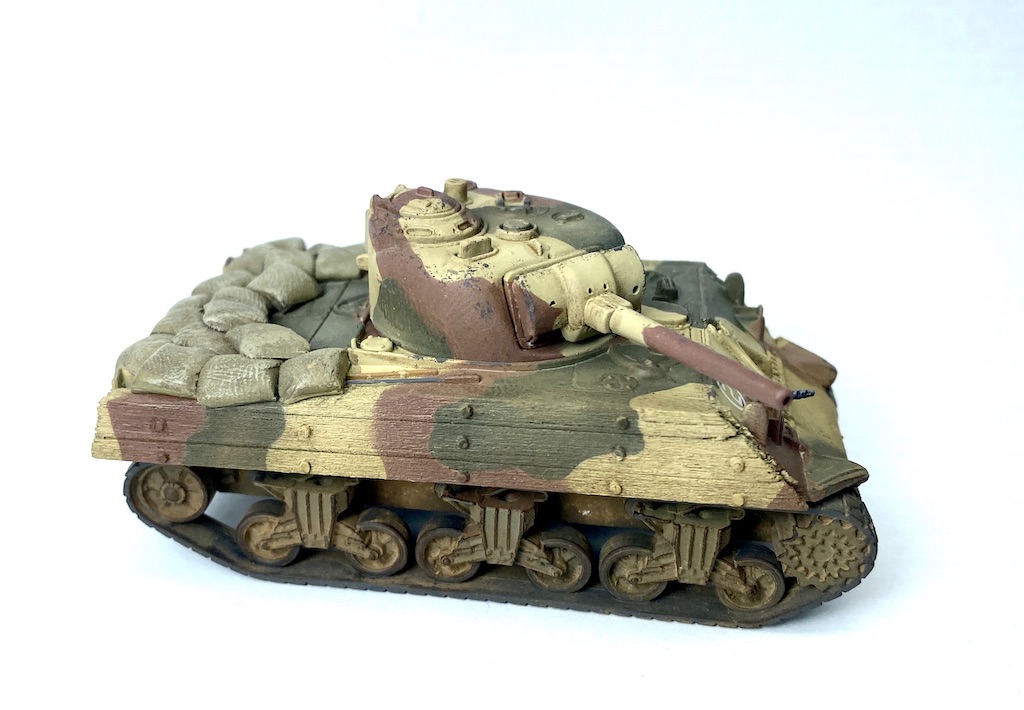
Staying with camouflage schemes I also wanted to make one of the Shermans with appliqué wooden armour and other field adaptations to counter Japanese infantry anti-tank weapons like magnetic mines. In this case I converted an Italeri M4A3 inspired by various pictures like the one below.
The wood was designed to counter Japanese hollow charge and magnetic weapons. Sandbags often covered rear engine decks for protection against satchel charges. The wooden armour was made from balsa wood with rivets cut from plastic rod. The sandbags were sculpted from Milliput.
They made for ungainly, but very distinctive looking battlefield adaptation.
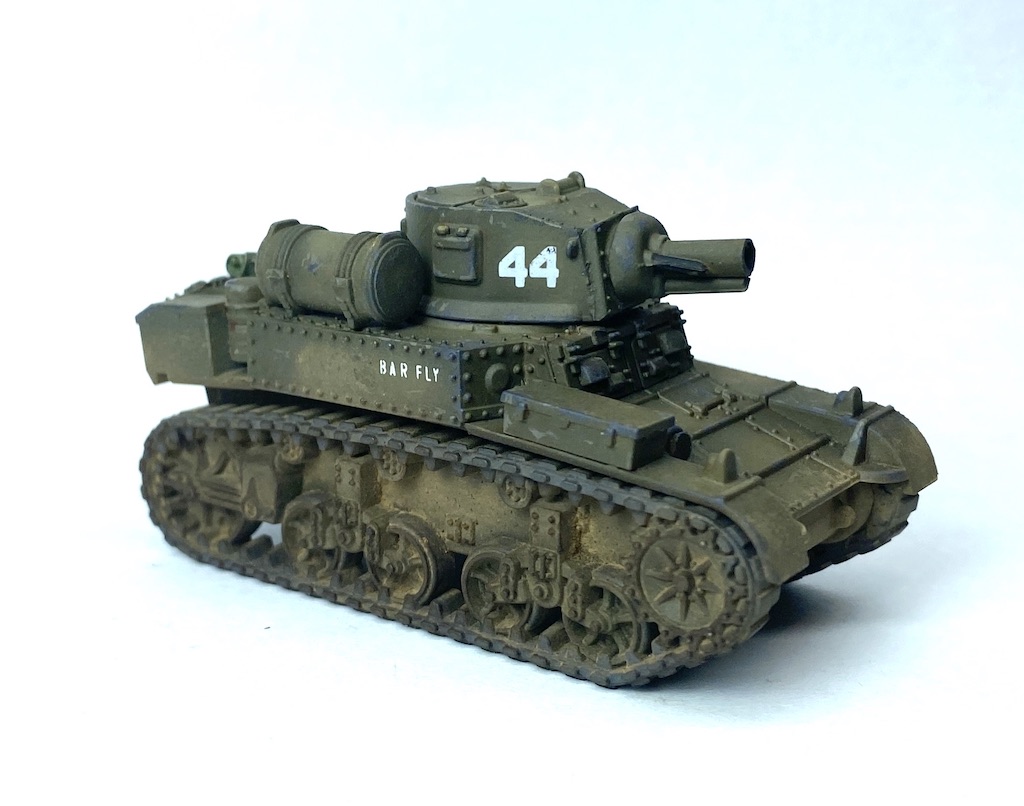
Prior to the introduction of the Sherman, the M3 was the main tank in use in the theatre, but its vulnerability to Japanese anti-tank weapons soon saw it phased out. However, the need for a more powerful platform for a flamethrower than the manpack version saw a field expedient where a flamethrower was mounted into the bow of a M3A1. This was later followed by the adaptation of the Ronson flamethrower mounted in the turret. A total of 24 were made and they served in time for the campaign in the Marianas. I had a spare M3A1 left over from one of the PSC sets and so made a simple conversion to create the M3A1 Satan. Replacing the barrel and covering off the bow machine gun sponson.
In the majority of cases tanks were used in their original olive drab colour and I've stuck with this scheme for several Shermans, like this M4A1 with composite armour from PSC.
The Australian Armour and Artillery Museum have a great example of an M4A1 with composite armour in the collection.
As far as I'm aware, the Marines didn't use the M4A3 (105) but they were used in the Pacific and Phillipines by the Army. This is one from Armourfast left over from my ETO project.
While the M4A2 saw the most service, the later M4A3 served with the Marines in Iwo Jima and Okinawa. The one below is another from Italeri and the markings are from a tank photographed in service in the Phillipines.
The one thing that disappoints with these Italeri tanks is the complete lack of any detail on the inside of the tracks. Given that there is quite good detail on the models this seems to be quite an omission.
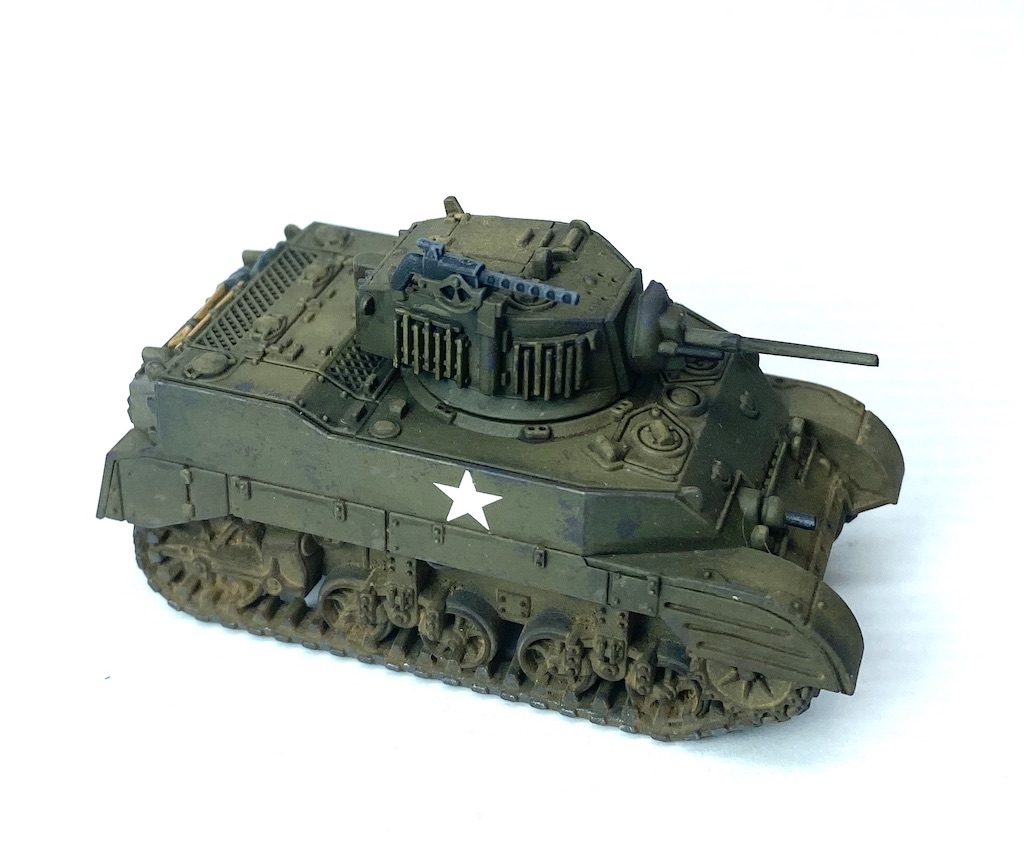
The M5A1 replaced the earlier models of the M3 as the Marines light tank. This one is from PSC.
The extensive collection at the Australian Armour and Artillery Museum also has one of these on display.
While most tanks used by the Marines were standard vehicles in service with the Army their field variations like the Satan flamethrower and different colour schemes gives the collection a slightly different look from the European theatre.
When it is published, I fully expect the Pacific Handbook for Chain of Command to include air support for the Marines. As usual, I can't help myself and so I've made up a F4 Corsair, just in case. I've always found the Corsair an attractive looking plane, there is something quite elegant about the gull wings. With little encouragement needed I picked up an inexpensive 1/72 kit from Hasegawa.
As I've done with the Zero for the Japanese, I've modelled this without the propellor blades, so that it doesn't look too static. I did experiment with discs of clear plastic to represent the spinning blades, but they ended up looking like, well, discs of clear plastic. I think the impression of movement is just as obvious with nothing there.
There is always more to add, but this gives me a lot I can work with and, after all, I have their opponents ready and waiting (you can see more about the Japanese
here).
I was able to pull together much of the collection to run four participation games at the Cancon convention in 2025. Using Chain of Command as the rule set, the scenario was set on Saipan in 1944. It was based on the Japanese counterattack against the Marine landings in the early hours of their second morning after landing. There's a much longer post with more pictures which you can see in
this post.


You seem to just snap your fingers and the complete US Marine Corps materialises with enough support assets to scare even the most fanatical members of the Imperial Japanese Army. How do you so it and at the same time achieve such a high standard?
ReplyDeleteThanks. Semi-retired and work from home in the same space as my workbench. Just a matter of changing chairs. This helps. Also having a permanent workbench means I can leave things out and fit in a quick 30 mins of painting when I can.
DeleteGreat stuff! I've been working on a similar project off and on. Found some prepainted 1/72 cale tanks on eBay from Hong Kong for my Japanese. Just did some weathering on them, ready to go. Your LVTs are great.
ReplyDeleteThanks. Did something similar for some of my Japanese tanks too, although I have a feeling I may have gone as far as repainting a few! Can’t help myself.
DeleteVery fine work there Mark. Those Eureka Marine figures are indeed fabulous, you have certainly done them justice.
ReplyDeleteThanks Phil. I really think they are the best of the Eureka 20mm ranges I’ve painted so far, just wish the range was bigger so I could fill a few gaps (like gun crews etc)
DeleteSuper work on the marines and all the tanks etc, really top notch.
ReplyDeleteThanks very much.
DeleteSmart work indeed! Those vehicle conversions are excellent.
ReplyDeleteThanks, was pleased with the way they came out and good to make creative use of a few spare kits.
DeleteExcellent work - all very nice indeed. I have just got the Far East handbook myself and it is tempting to start a new project - especially as I already have lots of jungle terrain from years of 40K gaming! Tempted to try 20mm...though the 28mm Eureka Australians and Japanese are also very nice figures.
ReplyDeleteThanks. While I think 20mm might be the Goldilocks scale I can also understand why others would choose 28mm particularly if that's the scale the others around you are collecting. There's also logic to it if that fits your terrain scale too (although I find trees and the like are fairly flexible in that regard, much less so than buildings).
Delete