
This is the first scenario in our Many Rivers to Cross campaign for Chain of Command set in the Netherlands during May 1940. We have based this loosely on actions around the town of Dordrecht where there were several engagements over river, canal and waterway crossings. The German 9th Panzer Division is advancing rapidly to seize an important bridge and the Dutch must try to stop them. Having already crossed one waterway the Germans are pressing hard to seize the next important river line before Dutch engineers can blow the bridge there.

The campaign has been designed for Chain of Command and it was published in the Lard Magazine 2018. The first map is the location of the German's earlier river crossing, where their engineers are now hard at work constructing a bridge so that heavier equipment and vehicles can join the advance elements that have already crossed by raft.
However the campaign does not start there, it begins on the second map. The first map will only come into play if the Dutch can halt the Germans and mount a counterattack. So our campaign commences on Map 2: The Village with a Hasty Defence scenario from the Blitzkrieg 1940 Handbook. The defenders in the area of Dordrecht came from a mix of units, but for this campaign we will base them on a standard Dutch infantry platoon from one of the first line regiments.
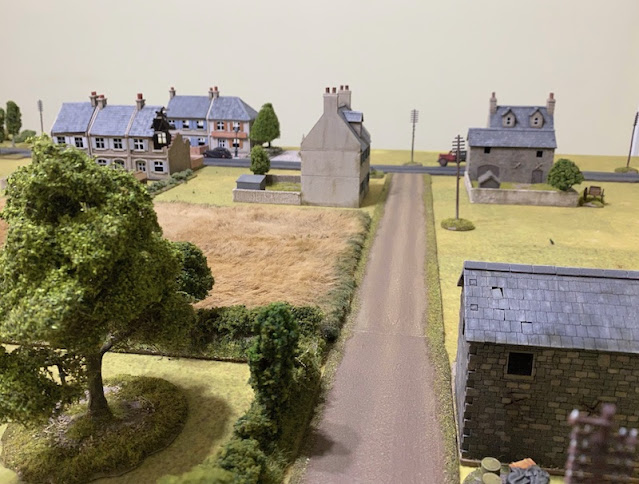
The map for this game is below and the Germans will approach from the blue area at the top. My immediate thoughts are to recognise the potential for the Dutch to form a solid defensive line combining the hard cover of the buildings with fortifications.

The Schützen squads of 9th Pz Div have two MG34 teams each, which will make them formidable opponents. However, while the squads have good inherent firepower, until the engineers have built the bridge across the river behind them they will be attacking without heavier support. All this makes crossing the open ground and breaking into a well defended village a tough looking proposition.
My initial thoughts are to deny the Dutch any jump-off-points in the buildings nearest the ploughed fields. If I can achieve that, then I think they may have trouble covering an attack on their right flank. It does mean the Germans would have a large expanse of open ground to cross, but if the Dutch are not in those buildings they have few vantage points from which to oppose such a move. Their best options would be to site fortifications there or take the less attractive option of coming out into the open and exposing themselves to German fire.
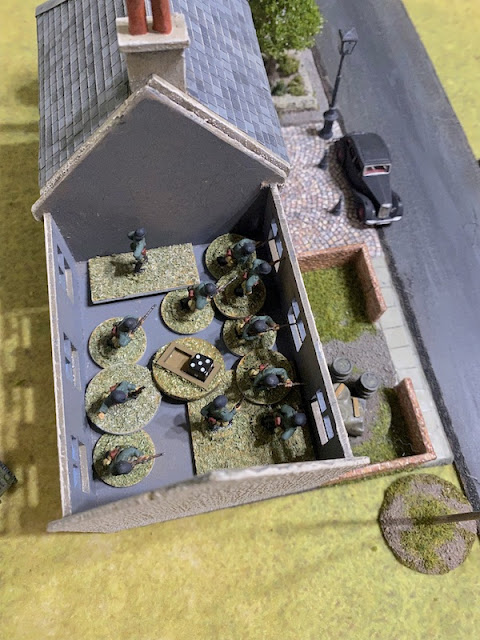
The Dutch are able to place two patrol markers at each red location, which means they could potentially counter my plans. I decide that my main priority is keeping them out of those houses and so focus my patrol markers in the centre of the map. Fortune is kind and I have three free moves and this gives me the head start I need to close down the houses. As a result the patrol phase plays out as I had hoped and jump-off-points are placed as below.

Two Dutch jump-off-points are in the rear of the village. While that can make for a decent defensive position it's not ideal - if they want to defend the forward buildings, they must deploy first and then move forward. Meanwhile that buys some time for the Germans to negotiate the open ground.

The view from the German jump-off-points show how difficult things might have been had the Dutch been able to deploy directly into those houses.


The German plan has three parts (see map below). The main manoeuvre will come out of jump-off-point 3 and aim to work around the flank of the village. Jump-off-point 2 will be the base for a move into the central part of the village and attempt to deal with any Dutch that deploy from their central jump-off-point. Lastly I plan to keep a squad in reserve that could make use of jump-off-point 1 to either set up a base of fire to prevent any movement into the village from the other flank or to take advantage of any opportunities that might arise should the Dutch leave that flank weakly held while they deal with my attack on the other side of the village.

I think this is a situation that calls out for a preliminary Stuka bombardment, as it's yet another chance to deny some of those buildings to the defenders. It also has the added bonus of hindering Dutch deployment once the game has started.
Unknown to me at the time Dave rolled a two for his support, giving him four support points plus the force rating difference for a total of eleven. He uses this for an Adjutant; AA MGs; four sections of barbed wire; a Kazemat and a trench, and a Carden Loyd carrier with an MG.
The first I know of the Dutch support choices is the appearance of fortifications. Dave has divined my intention to break into the village as quickly as possible and has put a stop to that by laying an extensive barrier of barbed wire.

As I expected there is a Kazemat, which is placed on the Dutch left flank. I wasn't expecting to see one there but it certainly suits my intended plan of attack.

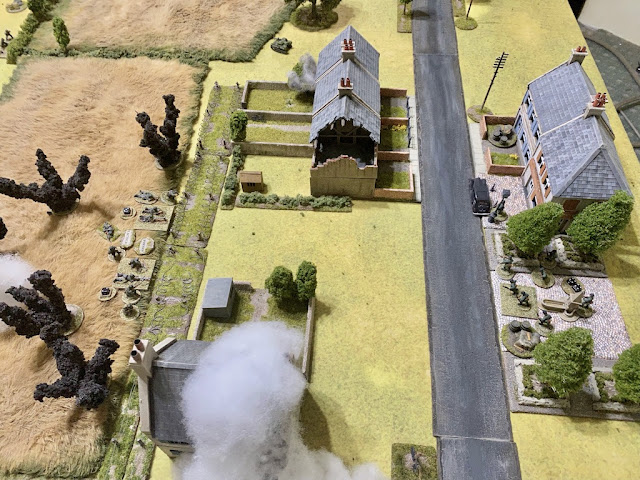
Before the game begins the Stukas make their appearance.

One of the terrace houses takes a hit and becomes unstable. That's the sort of result I was hoping for and it should limit the options for the Dutch defence.


A potential friendly fire incident occurs when a barn close to one of the German jump-off-points is hit and becomes unstable.

However they do score a direct hit on a key building on the edge of the village.


Not a bad result for the Stuka bombardment which could have been more damaging were it not for the AA MG fire from the Dutch (that said, we timed the Stuka bombardment incorrectly as it should have taken place before the patrol phase. In our case the damage to buildings had no impact on the jump-off-points that had been placed, so there was no need to make any changes, but something to remember in future).
Force morale begins at nine for both sides and with that we are ready to start the game with the Germans holding the initiative.
There seems no point delaying German deployment. The Feldwebel, the platoon's second in command, joins a Schützen squad and they take up overwatch positions behind the hedge on the left flank.

In the Dutch phase a diminutive Carden Loyd carrier successfully circumvents the road delays caused by the Stuka bombardment and appears at the back of the village.


Given the possible disruption caused by the Stuka bombardment Dave doesn't want to delay trying to deploy and so he wastes no time calling units forward. The first Mitrailleurgroep is successful, but they arrive much the worse for wear, suffering five points of shock from the effects of the dive bombing.

Unfortunately their line of sight is not a particularly good one and the Schützen squad may be able to take advantage of the blind spot created by the row of terrace houses.


To cover the squad's move forward the tripod mounted MMG team deploy behind the hedge. From there they have a line of sight to the upper levels of the house and they open fire.

Despite the hard cover the Dutch take one casualty and suffer a further point of shock.

The subsequent German command roll is 64442, not the most useful right now, but enough to have the Feldwebel activate and order the MMG team to put covering fire on the upper level of the house.


He then orders the Schützen squad to move forward with him. The only thing stopping them moving faster is the broken ground of the ploughed field. Nonetheless I sense there's a good opportunity for the Germans to break into the outskirts of the village if I can keep up this momentum.

To support the move a second Schützen squad deploys in the centre. From there it can cover the central Dutch jump-off-point near the water pump and horse trough.

In their phase the Dutch target the German MMG.

However the combination of shock and the covering fire makes the fire far less effective than it might otherwise be and the crew are unharmed.


The Dutch command roll is 66431 and now it's their turn to enjoy a double phase. The Luitenant deploys successfully despite the Stuka bombardment, which so far has failed to impose any delay on Dutch movement. He arrives in the upper level of the house and immediately rallies off two points of shock.


The rifles fire on the squad in the centre but that is less effective and they are unscathed.

The Carden Loyd carrier attempts to move flat out but finds the going difficult and makes little progress.


The following Dutch command roll is 65411 which comes as a relief for the Germans as it means, for the moment at least, the Carrier commander is distracted. However the Luitenant rallies a further two shock from the men in the house and has them open fire. Once again they split their attention between the MMG and one of the LMG teams from the squad in the centre.

The fire has no effect on the squad, but the MMG crew lose another man and suffer a point of shock. That machine gun team seems particularly vulnerable to Dutch fire today.

In the German phase the Obergefreiter of the Schützen squad in the centre orders the men to move forward tactically.


The other squad begins to move into the backyard of one of the houses but the rows of garden walls means they won't be able to move fast enough for the whole squad to escape the line of sight of the Carden Loyd carrier. There is a risk in making this German move. The nearest terrace house suffered a hit during the Stuka bombardment and is unstable. Should there be a sudden turn end there's a chance the building could collapse and the squad hit by falling rubble. It's a gamble, but I think it's one worth taking.

The Feldwebel clambers over the hedge and behind better cover.


I'm not quite sure what to do about the Carden Loyd carrier. I don't have an anti-tank weapon capable of destroying it, so one option is to ignore it and concentrate on getting into the village and dealing with the Dutch infantry. If I do try to deal with it then my only hope is with machine guns in an attempt to force it backwards or the crew to abandon. I'm uncertain where best to place my energy and firepower, but decide given the threat to my LMG squad near the terrace houses that I should try to drive it off with the MMG.

The carrier has armour of two but manages to roll an armour save with one of those dice. If I'm going to do this successfully with machine guns then I suspect I'll need the combination of concentrated MG fire, not to mention a bit of luck.

In the Dutch phase the Mitrailleurgroep’s sergeant rallies off a point of shock.

He then detaches two men to go to the ground level and take up positions at the window.

The Luitenant then removes the final remaining two points of shock and has the men fire once again at the squad in the field and the MMG team. The Germans in the field are unharmed.

However the MMG crew suffer a further point of shock. I need to be careful here, the crew is down to three men and it won't take much more shock to see them pinned or broken.

The commander of the Carden Loyd carrier now recognises the threat on the flank and responds by driving slowly across the road.

As he does he opens fire with the Vickers MG on the LMG team from the Schützen squad.

The Germans are caught in the open and they're fortunate to suffer only one point of shock. The sooner they can move into those backyards and out of the carrier's line of sight the better.

The next German command roll is 66421 and it couldn't come at a more opportune moment. The first thing the Obergefreiter does is rally off the point of shock.

He then orders the squad over the walls and into the backyards. I'm relieved. The squad has made it this far without taking a casualty and this move gives the Germans their first toehold in the village.

The Feldwebel moves up to join the MMG crew.

He rallies off a point of shock and orders them to fire into the building.

The Dutch find good protection in the hard cover and suffer only two points of shock.

The subsequent German command roll is 65542 which will limit how much can be carried out this phase.
First, the Feldwebel rallies a point of shock from the MMG crew.


At this point I think about moving the Feldwebel away from the MMG given how vulnerable it is at the moment. Instead he orders the 5cm mortar team to fire, which in the end is a bit pointless, as it has no effect on the Dutch occupants of the house.

More significantly the squad at the rear of the terrace houses make their way over the low garden walls and towards the rear doors.

In the next Dutch phase the Luitenant rallies shock and once again orders the men to fire.


The fire from its Vickers machine gun cuts down another German, reducing the crew to two men.

In the German phase I'm faced with a dilemma. The command roll is 55221. Essentially my choices are split between using most of those dice to activate the Feldwebel and moving him and/or the MMG out of harm's way or choosing instead to press ahead with the squads. In the end I decide I would rather keep up the momentum of the attack. With that the Schützen squad makes its move into the terrace houses ready to take on the Dutch across the street.

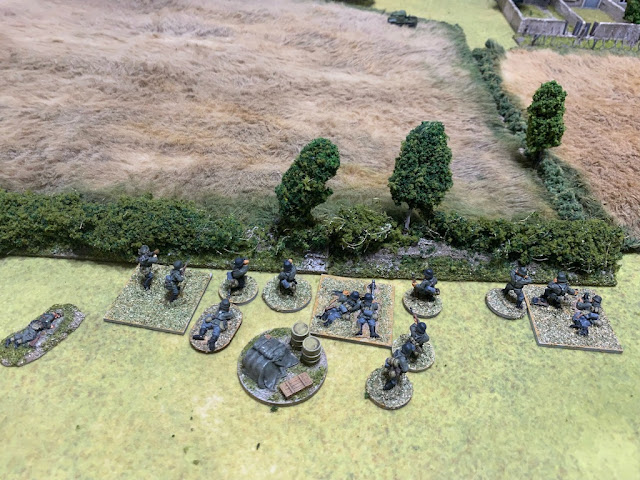
The squad in the field moves tactically up to the barbed wire. That now puts the Germans in a very strong position where they can exert a lot of firepower into the village.

Instead of trying to move the MMG team I decide to continue firing on the upper level of the house. This time the fire proves deadly, causing two casualties, although fortunately for the Dutch neither of those are the sergeant or the Luitenant. At least for now my decision not to move the MMG feels justified.

In the Dutch phase the Carden Loyd carrier moves forward normally trying to close down the range to the hedge.


One of the Dutch Mitrailleurgroep tries to deploy to the jump-off-point by the water pump and horse trough, but cannot make it through the Stuka bombardment. However a second Mitrailleurgroep are more successful.

While they make it through the bombardment they do arrive a little worse for wear, carrying four points of shock.


Despite the Germans' tactical positions the fire from the newly arrived Mitrailleurgroep proves particularly effective and the Schützen squad suffer five points of shock.

The Dutch in the house are about to open fire on the Germans across the street but I have a CoC die and elect to use it now to interrupt and fire first.

Despite the large volume of fire the Dutch suffer only one casualty and two points of shock. That might not be much, but it is better than their return fire which has no effect at all.

The Dutch then have a surprise for the Germans. The Kazemat is wired into a Dutch Fireplan and they choose this moment to call down a short but immediate mortar barrage on the squad in the field.

That's an unwelcome turn of events and the mortar rounds come crashing down catching the German squad in the open. Fortunately this is a short barrage with only one attack on each team before the barrage lifts, although it will leave the squad pinned in the next phase.

It results in only two hits but the Germans take one casualty. Unfortunately the man hit is the squad's Obergefreiter and..... he is killed. Ah, the misfortunes of war. The loss of the leader brings German morale down to seven.

In the German phase the two Schützen squads focus their fire on the Dutch around the water pump. The mortar barrage has left one squad pinned for now but between them the two German squads can still generate a fire attack of twenty eight dice. The Dutch are in light cover, but this is a lot fire to take.

It is perhaps not quite as devastating as it could have been, but nonetheless they lose two men and suffer a further four points of shock.


The loss of the Obergefreiter in the mortar barrage was a blow and has the potential to stall the momentum of the attack in the centre. I decide now is a good time to deploy the pioneer squad.


The Dutch command roll includes a 5 and that gives them a full CoC die, which I'm sure Dave will be eager to use to end the turn. First though, the Luitenant rallies shock in the house.

He then orders the Mitrailleurgroep to fire at the only LMG team in the field that it can see.


That fire proves deadly, inflicting two casualties and three points of shock. Suddenly that squad is starting to look very fragile indeed.


The commander of the Carden Loyd carrier must be sensing his vehicles invulnerability and he continues directing the driver to move slowly towards the German MMG team.

Having moved to close range he now spits out a burst from the vehicle's Vickers MG.

The burst of fire kills a fourth crew member and inflicts three shock which is enough to see the remaining man break. Given the weak state of the team I've been very unwise keeping them exposed like this and to make matters worse the Feldwebel is still attached.

As if that isn't bad enough they are very close to the edge of the table and end up routing off the edge, taking the Feldwebel with them. Disaster! That's a tremendous blow to German morale which plummets from seven to four.

I was beginning to feel the Germans had gained the upper hand here and overall the platoon is in good shape, except of course, for their morale. It would serve me right if allowing the Feldwebel to be left in such a vulnerable position was enough to cost the Germans the game. It's not over yet, so let's see what can be salvaged.
With only four command dice the German command roll of 5443 is fairly limiting, but it's enough to activate the Obergefreiter in the terrace houses to fire at the Dutch at the water pump.

Both their MG34s dish out a lot of firepower at close range. It's enough to cut down four of the Dutch including their sergeant who is hit and killed. They suffer another point of shock and become pinned. Those casualties bring the Mitrailleurgroep very close to breaking and was just what the Germans needed to maintain pressure on the Dutch defenders. The loss of the sergeant brings their morale down to eight.
After the loss of the Feldwebel that was just the sort of result I needed to refocus my attention on the job in hand. The Germans are certainly not short of troops, the problem will be the limited number of command dice available and the danger of their force morale dropping further.

With the Feldwebel gone it is time for the Leutnant to take control and he deploys in the centre.

He orders the pinned squad at the wire to fire at the Dutch opposite.


The German fire is reduced by the amount of shock and the Dutch defenders are now in better cover, so little surprise it has no effect.

The Leutnant then orders the Pioneer LMG team to engage the Carden Loyd carrier. This time the crew are rattled by the burst of machine gun fire, they suffer one point of shock and reverse. Perhaps there is hope of driving the pesky carrier off with machine gun fire after all?

At this point Dave uses his CoC die to end the turn. This lifts the effect of the Stuka bombardment for his infantry deployment. We also roll to see what happens to the unstable buildings, but for now their status remains the same.
In the Dutch phase the Luitenant rallies shock off the men in the house and has the Mitrailleurgroep at the water pump fire at the pinned German squad opposite. They manage to inflict a single point of shock.

The men in the house then fire at the Germans in the terrace houses across the street.

This fire is more effective and the Germans lose one man and suffer a point of shock.

The commander of the Carden Loyd carrier rallies the shock, turns slowly on the spot and fires at the German squad at the barbed wire.

It has no effect, but the carrier probably represents the best chance the Dutch have of inflicting casualties on the Germans and driving down their force morale. I really do need to deal with it.

The sergeant in the house has one of the men throw a smoke grenade out of window. That's my first indication that the Dutch may have had enough. They've lost nine men, including one NCO and there's a good chance they could take more losses from the men at the water pump, so despite pushing down German force morale they may be considering withdrawing before losses become too severe.

With the Dutch in the centre close to breaking the Germans focus their attention on driving them off. The squad in the terraces opens fire at close range. That inflicts four more points of shock and does the job.

They break and retreat off the table taking Dutch morale down to seven as they do.

The pioneer LMG team have demonstrated that firing machine guns at the Carden Loyd carrier is not entirely futile and so I decide to deploy the platoon's third squad on the left and have both their MG34s target the carrier.
My confidence may have been misplaced, for the carrier simply shrugs off the fire. What I would do right now for something as simple as an anti-tank rifle!

The Dutch command roll is 65542 and all Dave chooses to do is have the Luitenant bring the men in the house back from the windows and away from the attention of German fire.

The German command roll of 5521 is fairly limiting and so I decide to channel all my attention on the Carden Loyd carrier. This time the squad on the left fires both LMGs and the pioneer LMG team contribute their fire as well. Surely this carrier crew are not going to enjoy the battering of that many MG34s?


It does take a significant barrage of fire, but this time the crew are indeed shaken, suffering two points of shock and reversing 8".

Come the Dutch phase Dave decides he can see the writing on the wall. The Carden Loyd carrier is his last good hope of inflicting the sort of casualties he needs to drive down German morale and yet with the attention of this many machine guns the crew are unlikely to stay around much longer. With that the Dutch withdraw, saving their platoon to fight another day.
That leaves the Germans in possession of the battlefield but with their force morale lower than the Dutch they won't be able to recover any of their casualties. Yet their losses have been relatively light, with four casualties and one NCO killed from the core platoon plus another four casualties from the MMG team. That will leave them with two permanent casualties, one wounded, one man returned immediately and the need to replace the killed NCO with a man from the ranks.
The Dutch suffered eight casualties and one NCO killed, all from one of their core platoons. That sees them lose four men permanently, two wounded, two returned and the need to promote a man from the ranks to replace the NCO.
That was an interesting game and although, overall, things went to plan for the Germans it was not without a few unexpected turns of events. Most obvious was allowing the Feldwebel and the MMG team to be shot up and broken in the way they were, that was simply sloppy play on my part and I was rightly punished for it. Losing the Obergefreiter in the mortar barrage was more down to misfortune, but if nothing else it shows how the loss of one important NCO at a critical point can disrupt the best laid plans. That threw a spanner in the works but I was able to adjust to the situation and that's all part of playing the game.
Other than that, the decision to try a hook around the flank worked well. Had the Dutch placed a Kazemat or entrenched units on that flank it may have been a very different story and a much tougher battle.
Failure to stop the Germans means the Dutch will be unable to counterattack onto Map 1 and disrupt the bridge building operations. Instead the Germans press on to Map 3: Farm & Forest. They have the option to carry out a 'blitzkrieg' and immediately attack that map but with only whatever units survived this game. Right now I don't think that's an attractive option, especially without any heavier support and so even though time is working against me I will wait until Campaign Turn 2 to make the attack. You can follow what happens in that game in this report.
If you've enjoyed following along and would like to Buy Me a Coffee to help cover some of the costs of running the blog you can click through at the link or on the tab in the right hand column of this page.
You can find links to all the games in this campaign and several others on the Chain of Command Campaign AAR Page (link from here or at the top of this page).
Splendid report as per usual Mark and an interesting game to follow. Looking forward to following this campaign.
ReplyDeleteThanks Phil, almost 12 months since we finished Bloody Bucket, so it's good to be back with another CoC campaign.
DeleteSplendid report Mark. Lovely looking game too. Really enjoy your after action blog posts.
ReplyDeleteCheers
Matt
Thanks Matt, striving to make the terrain more complete every time we run a new campaign, so I'm happy you liked the look of it.
DeleteThe terrain and figures are excellent and I have rarely read a more detailed game report...the only part I wasn't so happy about was the outcome....routing for the Dutch you see!
ReplyDeleteThanks. I can't take credit for the figures, those are all Dave's, but glad you liked the look of it all. This is our 10th CoC campaign and I've written more than 70 AARs for them so far, so I like think I've got a method for doing this that makes it easy to follow along as a reader. The Dutch are very much the underdog aren't they? But at least they are the good guys!
DeleteThat's a great report: really gets you into the feel of the battle.
ReplyDeleteThank you, I've always wanted to write the AARs so that readers can follow and understand what's happening, so that's great to hear.
DeleteAwesome AAR with surprising result.
ReplyDeleteYes, it wasn't looking that great for the Germans for a while there (my own fault of course!).
DeleteYour AARs are the benchmark for all others. Nice game, and a surprisingly close result.
ReplyDeleteVery kind of you to say so and glad you enjoyed the game.
DeleteFantastic stuff as usual Mark, looking forward to the rest of the campaign. Also great to see the Dutch on the table.
ReplyDeleteThanks Iain, been looking forward to this one for a while, always nice to have something slightly different on the table so I think this is going to be an interesting one.
DeleteGreat AAR and sounds like a tense game that hung in the balance to the end. I'm not sure Dave could have employed the Kazemat on the other flank without potentially giving you the option of changing focus to the undefended side. Looking forward to the next instalment anyhow!
ReplyDeleteThanks. I guess my thinking with the Kazemat was the other flank offered no hard cover for the defender and so few options. On the side he chose to place it there were two buildings and he had a jump-off-point in one of them, so at least that option existed if I did choose to go that way. Ah hindsight, it's a wonderful thing!
DeleteIndeed, half the fun of wargaming is the analysis afterward of what went wrong I guess!
DeleteAnother CoC campaign and as usual a treat of an AAR. I particularly liked that you got the Stuka sequence wrong - if you can make those sort of errors it makes me feel less silly about mine as it seems every game involves doing someting wrong. The Carden-Lloyd is both cute and fun and I'm looking forward to more such early war interest.
ReplyDeleteThanks Rob, turns out the Stuka wasn't the only thing we got wrong, but fortunately nothing that impacted the outcome of the game. Machine guns can only have an effect on an AFV shooting at close range, so one or two of my early shots at the Carden Loyd carrier with the MMG were probably incorrect and were made at effective range (although not that 'effective' as it turned out). We normally play the advanced rule about not being able to spot infantry in buildings beyond 18" unless they fire or you observe them entering and so my very first shot with the MMG at the Dutch in the upper level of the house we wouldn't normally have allowed. After a bit of a break from CoC we've become a little rusty with the rules but will no doubt get up to speed quickly now we are back playing regularly.
DeleteIt seemed a major mistake of the Dutch not to move the first squad into the terraced houses, as the distance from the jump off point in the road looks the same?
ReplyDeleteIt may have looked the same but a 6" deployment would have left them close to the front of those houses and so a further move would be needed to actually enter them. That doesn't mean it wouldn't have been viable for them to try, given the Germans were going to need several phases to approach the houses. Also keep in mind that one of those houses was unstable and so you wouldn't want to actually occupy it for fear of a collapse. But you have a point and perhaps Dave was too cautious in his defence.
DeleteGreat to see you back with another CoC campaign
ReplyDeleteThanks Rich, it's good to be back!
DeleteGreat write up and lovely table as always. I have both of these forces painted up,to do exactly this campaign so I can’t wait to see how it goes!
ReplyDeleteTwo points if I might? Firstly you say “ The following Dutch command roll is 65411 which comes as a relief for the Germans as it means, for the moment at least, the Carrier commander is distracted.” however the carrier, being small vehicle, is allowed to activate on a 1 also? (The carrier is actually very effective in our games, as there tend to be few serious anti tank assets on the table.)
Secondly, is it a requirement that the kazemat deploys at the start? In the video (at 14:50) below Richard Clarke plays it as per an entrenchment, ie. It only deploys with the team inside. He’s basing this on the fact the bunker would be camouflaged. I think you can also argue to play it your way, and I know Rich sometimes gets it wrong, but we’ve always played it the way he did here. Have we got it wrong?
https://youtu.be/NjbGVA3vCRE
Thanks Karl and you raise two interesting questions.
DeleteFirstly, the carrier, I assume you are referring to rule 11.1.2 'Small Fighting Vehicles'? My interpretation of that rule tends to be for jeeps and motorbikes that have no inherent crew but are driven by members of a team or squad. So, for example a jeep would activate on a 1 if occupied by a team without a leader, or on a 1 or 3 if occupied by a leader. Because the vehicle has no crew of its own, it activates like the team that occupies it, if the team leave the vehicle it does not activate at all. I think the key difference is in the next paragraph 'Tanks and Armoured Cars' - where it says "these.....normally have more than one weapon or *crew* position. These are usually commanded by a Junior Leader....". A small vehicle does not have more than one crew position (in fact they don't really have a crew position at all, in terms of the rules the occupying team are the crew but only for as long as they occupy it). We have treated the Carden Loyd carrier exactly the same as a small two man tank, the crew being composed of the commander/gunner (junior leader) and a driver. The driver can activate on a 1 only if the tank is uncommanded (ie the junior leader has been killed).
I haven't watched the video, but I'm surprised Rich only reveals the kazemat on deployment, especially when all other fortifications like wire, roadblocks etc are revealed after the patrol phase. Perhaps a Japanese log bunker in jungle terrain but I'm not sure a concrete kazemat that is raised above ground with cleared fields of fire would be the same? Looking at 1940 images of kazemat most are in flat ground and while they are partly in the ground I don't think they are harder to see than barbed wire. From my reading I also know that before war was declared German officers took 'walking holidays' in Holland and made many observations of Dutch defences. I think entrenchments are different because in CoC terms I've never thought these represent well dug trenches but more like foxholes and so I understand why these can be revealed on deployment. I see pillboxes more like larger fixed defences such as wire, minefields and roadblocks. Perhaps if the Kazemat was placed in terrain that gave cover, like woods but I'm not sure that was the case with most of those in Holland. We could ask Rich but I'm never sure if the answer he would give today would be the same one he'd give tomorrow :-)
Have you ever thought of making your AARs into a physical book? It's probably too much trouble but they are THAT good. It's exciting to have another campaign underway.
ReplyDeleteThanks. To be honest the book idea hasn't crossed my mind, although I do wonder if there truly is enough interest, I suspect the blog serves most people's needs, but it would be nice to see them all together in a physical book. Perhaps it can be a future vanity project for me if I come into a stack of cash!
DeleteVery much enjoyed the report, as usual. As I have said many times before, it's the next best thing to actually playing. Also like that it's not just another 1944 scenario.. Looking forward to the next game.
ReplyDeleteThanks Doug, it good to be backing back playing a campaign and writing it up for the blog (it's a bit like playing twice). Your comment also made me go back and look at all our campaigns - we've played two in 1940, two in 1942, one in 1943, three in 1944 and two in 1945. While the 1945 campaigns are obviously late war they don't feel like your normal '44 games, they have more of a Gotterdammerung feel to them .
Deletegreat report mate, and looks fabulous too
ReplyDeletecheers
Matt