The arid terrain mat I made for the Sudan project using caulk and canvas was a first attempt at a homemade mat. Despite a few bumps along the way I ended up happy with the result. The next job was to create pieces to add as terrain and scatter to dress the table for a game. Looking at period paintings and sketches the terrain in the Sudan looks generally flat but is broken up with distinctive rocky outcrops and it was some of these that I wanted to make first.
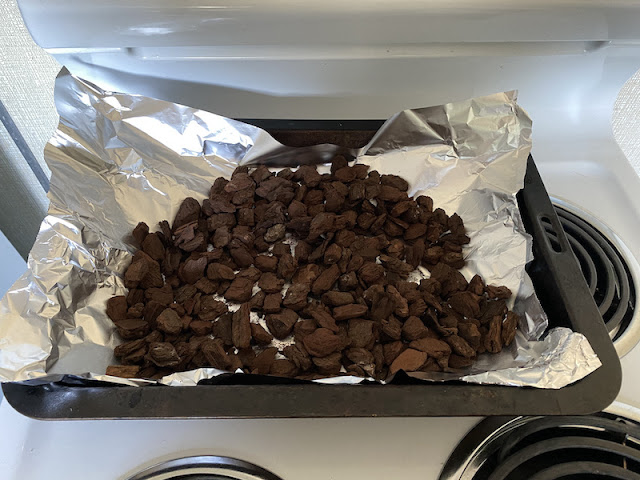
I've seen railway modellers using cork bark to make cliffs and thought I would try my hand at something similar. I looked for bark at local garden centres and found a bag of pine bark pieces that were about 25-30mm long and appeared as though they would make a good starting point for boulders.
As it comes the bark needs some treatment before it can be used for terrain making. From the warmth and condensation in the bag it was fairly obvious that there was living matter at work, after all, the bark is intended to decompose and provide fertiliser to plants. The best solution I could find was to dry it out in a very warm oven for an hour or so which seemed to do the trick.
Each terrain element would need a base and so several pieces of MDF were cut to irregular shapes and their edges bevelled with a Dremel rotary tool to give a natural look.
Next I sifted through the bark looking for pieces that best resembled rocks and boulders. I tried to find shapes that would work well grouped together. In some instances I intended to build up the rocks in layers, in others I would use single pieces.
I made up two pieces initially, really as a proof of concept and to be sure the method would work. I was really impressed how once painted the bark takes on the appearance of rocks. The layers of bark look remarkably similar to layers of sedimentary rock and that looks just right at 28mm scale.
The only issue I had was with the colour of the rocks. I'd been extremely unimaginative painting them grey, a bit like always painting water blue it seems grey is a natural default for the colour of rocks. While they didn't look bad, they didn't look quite at home on the new game mat either.
Photographs of the Sudanese desert show a much darker colour to the rocks and one from the same colour palette as the sand (no surprise really given the sand is probably no more than the eroded residue of the rocks themselves).
So I tried painting them a darker brown colour followed by a dark wash. These looked much better and with that I settled on the colour scheme before beginning the more ambitious pieces.
The first of those was a larger rock outcrop or small hill. I was aiming for a look that showed the rocks aged and layered over time, as if they had been exposed slowly by erosion. The basic shape was cut out of insulating foam and stuck onto the MDF with a hot glue gun. I then built up the bark in layers around the edges, trying to make sure the grain in the bark was always running in a similar direction.
Most of the sand you see in the picture is loose, where there was large gaps in between the piece of bark I poured sand onto the exposed glue that was between each rock. Once dry the loose sand you see was shaken off.
The impression I was after was of layers of exposed rock and so I wanted them to appear as though they had emerged through the surface of the desert. To achieve that effect the top area was left free of rocks and was filled with household filler and then textured with sand.
Once the sand had dried additional texture was added using cat litter to represent smaller clusters of fallen and eroded rock.
The whole piece was then sealed in diluted PVA glue prior to painting. I do this for two reasons. Firstly I find that the PVA forms a thin plastic layer over the whole terrain piece and that makes it much easier to paint. The paint flows easier and is not absorbed by the sand or filler so you find that you don't use anywhere near as much paint as you would if it were unsealed. Secondly, despite drying out the pine bark in the oven, I thought it would do no harm to further seal it against damp or any other infestation.
Once the glue had dried the whole piece was painted a base coat of Dulux acrylic emulsion. I buy sample pots from the local hardware store, a 250ml pot costs about the same as a 17ml dropper bottle of Vallejo acrylic. As it comes the paint is too thick to use at this scale (it fills in a lot of small detail) and so I dilute it at about 2:1 with water which also helps it flow easier. This base colour is the very suitably named Brown Land. Well, of course it is.
Once the paint was dry the first thing to do was to wash the rocks (ie the pine bark) with Agrax Earthshade to bring out the texture.
Next the top surface layer of earth and sand was painted using a mix of Dulux Scarab and Deep Bamboo.
Once dry it was dry-brushed with Arava, careful not to get any on the pine bark rocks.
The rocks themselves are then dry brushed, but this time with the base colour used for the sand and earth.


That completes the painting at which point you could leave them as they are, however vegetation has the ability to emerge in even the most inhospitable places and looking at images of the Sudan desert that's certainly the case.
I wanted to add a few pieces to break up the monotony of the colour and add more character. For that I used two things. One was to make a few plants myself using rubberised coconut fibre.
The other was to use a few ready-made tufts from the Army Painter.
I tried to place these in small crevices and those areas where moisture might collect or flow.
I did this quite sparingly, just enough to give a hint of vegetation.
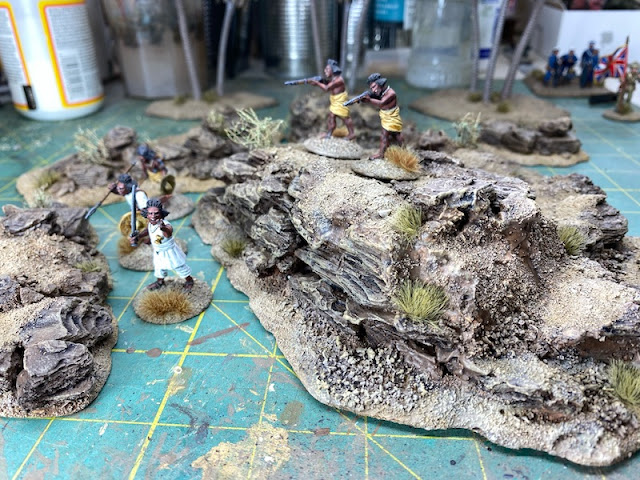
With that the pieces were complete and ready for the table. For a sense of scale and how they work with figures here they are with a few of the Perry 28mm Beja.
While Palm trees seem like a bit of a cliche for the desert and more of a Hollywood trope they do grow along the banks of the Nile and so are not totally out of place for a game set in the Sudan. As it happened I had several palm trees left over from my 20mm Pacific project for the Second World War and they were just about tall enough to pass muster for a 28mm table.
The trees were bought cheap on eBay and were painted first. You can follow how I did this in this post about making the
palm groves for the Pacific.
I made a few simple bases textured with sand and painted to match the other desert terrain.
It was then just a matter of drilling holes and attaching the tree trunks before adding a few tufts to finish them off.
If you've found this post useful and would like to
Buy Me a Coffee to help cover some of the costs of running the blog you can click through at the link or on the tab in the right hand column of this page.


Lovely work Mark
ReplyDeletechees JOhn
Thanks John.
DeleteFunny how just a few sparingly applied tufts absolutely lift the scene. Very nicely done. Thanks for posting.
ReplyDeleteExactly what I thought as I was doing it, the moment I put the first one down you could see how well they would offset everything.
DeleteA fine how I did piece. Some realistic looking rock formations there, too stuff.
ReplyDeleteThanks Phil, garden centres will never be the same again!
DeleteGood d.i.y. adventure with some fine results. The adding of small details, like the small rocks from coarser sand and aligning the grain of the bark is informative. And the `_fuzzies' look quite at home!
ReplyDeleteThanks. I think they should be quite versatile for a range of different locations, while I want them to work for the Sudan project I wanted to ensure they were generic enough to work elsewhere.
Deletestunning work - i must try this and look for a good bark stockist
ReplyDeleteThanks. I'm trying to find larger pieces, apparently they are popular with orchid growers so that might help narrow the search.
DeleteGreat work! I have done similar in the past, but these reminded me I have to do some for my Afghan project! Thanks!
ReplyDeleteBest wishes,
Jan
Thanks Jan, glad they've inspired you to get back to your project.
DeleteExcellent work. Keep the terrain stuff coming.
ReplyDeleteThanks, I've enjoyed the desert terrain, it's been something different and a nice change from more European/Nth American terrain.
DeleteVery nice looking outcrops. :)
ReplyDeleteNote to self - need to do some of these for my New Guinea terrain collection.
Thanks Tamsin, I hadn't thought about something like this for the Pacific but you've given me an idea!
DeleteThe new rock colour looks lots better - any chance of seeing it on the terrain mat to see how well they blend in?
ReplyDeleteAh well, that will be possible at some stage but I'm back in Sydney now and there wasn't room in the car for the new mat (and the family and the dog and the bags.....).
DeleteNow that’s looking rather excellent and I have to agree the new rock colour looks way better
ReplyDeleteThanks Nick, that darker colour makes all the difference. Despite what most gamers think rocks don't have to be grey (says someone guilty of doing just that originally).
DeleteThose came out looking quite excellent! Nice walk through of the process. And you nailed the right amount of weeds. Well done all around and I really like your terrain posts. 😀
ReplyDeleteThanks Stew, glad you like it. I think the key with the vegetation was less is more, I had to restrain myself from doing too much ("it's the desert, don't forget, it's the desert"). The bark is great, don't know why I didn't get on to it earlier.
DeleteThey look great. Some day I will have the space to make some terrain.
ReplyDeleteThanks, but believe I don't have the space, just ask my wife!
Delete