We are fortunate to have a beach house at a beautiful spot about 200km south of Sydney. With a three week mid-winter school holiday we planned to spend four days down there at the start of the break. As usual I packed a few current gaming projects to work on for the few days we planned to spend there. Nothing unusual in all that except as we left Sydney an outbreak of the COVID delta variant had just surfaced. This was a cause of some alarm given Australia has, up until now, carried out a very successful elimination policy that has seen the country avoid the high levels of infection and death experienced in other countries.
To cut a long story short, Sydney has gone into lockdown. What was initially two weeks has been extended to four and with signs the outbreak is not yet under control the lockdown could be longer. So we are still here, where restrictions are not as tight and there is no lockdown. This is of course a good thing, I can enjoy time on a beautiful beach like this instead of staring at four walls. I realise how fortunate this makes me and for that I am extremely grateful.
The flip side is, with more time on my hands than planned, I’m frustrated knowing I have painting projects and all my paints sitting on my workbench at home in Sydney. A trip home to fetch them is out of the question - once back I’d have to remain there. Fortunately all is not lost and I’ve been trying to make the most of what I have here.
My last completed painting project were nine Perry 17th Light Dragoons for the AWI. These seemed to take forever to complete but came out really well.
We are planning to run a short campaign set during the AWI using the Lardies 'Sharp Practice' rules and the campaign supplement 'Dawns & Departures' and hopefully once lockdown is lifted we can get started on that. This has fired up my enthusiasm to work on a few more units for that period including loyalist militia and more rebel militia (it seems militia are like trees, you can never have enough of them). With that in mind I brought down enough sprues of Perry plastic 28mm Continentals to make up another twelve militia, including a leader. They are now made, based and the base textured, as much as I can do before priming and painting (which will have to wait until I’m back home).

Continuing on the AWI theme I also brought down a Sarissa 28mm 'house with porch and stone chimney'. This is a variation on one I made earlier, this new one is slightly more elaborate, with a covered porch at the front. As usual I have added tiles to the roof (once again using those from Charlie Foxtrot Models). I have also made the chimney breast deeper by cutting a piece of cork floor tile to the same shape and gluing it on. I will then wrap it with embossed wallpaper with a brick effect, as I did with the earlier house.
MDF buildings can have a very characteristic look if you are not careful and I like the way many people see them as the basis for a building rather than an end in itself. I made a simple chimney pot from Milliput. MDF buildings are often characterised by particular shapes and sharp angles and it helps to try and break that uniformity up a little. I've found that it's often these extra details that make a difference and help give each building a unique character.
The brick wallpaper isn't applied until after the building has been painted, mainly to avoid accidentally getting paint on it, so the next stage is to give it a coat of primer to tie all the elements together. It will be mounted on a small base and so I've cut that from a sheet of MDF and chamfered the edges to give a more natural finish.
The brick wall paper comes in A4 sheets and you simply cut to shape and attach with diluted PVA glue. It bends easily to conform to the shape you want and if you allow the PVA a little time to soak into the paper it becomes even more soft and pliable.
The exterior was painted using acrylic craft paints. I try to avoid a uniform colour for the roof tiles and mix up slight variations of the base colour and pick out individual tiles. It's not as fiddly or time consuming as it may appear but well worth the extra effort in my opinion.
Here it is glued to its base. The next job is to add texture but once that's done I can do no more until I return to Sydney to paint and add flock. A simple enough job and so this should be ready for the table once lockdown is over.
Sticking with the AWI I've been reading 'Long, Obstinate and Bloody: the Battle of Guildford Courthouse' by Lawrence Babits and Joshua Howard. I have read Babits earlier book 'A Devil of a Whipping', which is an excellent account of the Cowpens battle.
Babits has carried out an extraordinary amount of research to give a very detailed description of the action. It gives a wonderful insight into tactics and leadership, the sort of detail wargamers love. What marks out his accounts is a particular source he has used. In the years following the war wounded veterans could apply for a pension. They had to submit a written application that essentially proves they were there and the injuries they suffered. In order to justify their claim the veterans went into considerable detail of not only which unit they were in and under which commander but the events of the day leading up to their wounding. This has provided a rich source of additional detail that has helped Babits reconstruct the battles and add to the other existing first hand accounts. If you're interested in the period I can't recommend either book highly enough.

Once we've completed our AWI Sharp Practice campaign we will return to Chain of Command for a campaign set in the Netherlands 1940 based on the "There are Many Rivers to Cross" pint-sized campaign that appeared in Lard Magazine 2018. I suppose given it's based there we should rename it "There are Many Canals to Cross". It will give Dave an opportunity to use his newly painted Dutch platoon and recall his early war German platoon that last saw action in the very enjoyable "Taking the Gembloux Gap" campaign.
I will supply the terrain and while I have everything we need I thought I would try to give the table more of a Dutch flavour with a windmill. No one seems to make one of these for 20mm in MDF, fortunately this is where gaming in 20mm has its advantages - there is a good supply of model railway scenery in OO scale that's perfectly suitable. Dapol now manufacturer the old Airfix model railway line (which I think Airfix may have acquired from someone else). These molds must be well over 50 years old but they do a nice post windmill at a very reasonable price.
I brought the kit away with us, intending to put it together over our planned four days so it was one of the first projects I worked on. Despite its age it holds up very well. There was a bit of flash that needed cleaning up but other than that everything went together very easily.
I've made a base and added texture. However I want to paint it using my airbrush which means this is as far as I will get at the moment.
One other small project was to use the space available down here to do a few messy jobs that are harder to do in our smaller backyard in Sydney. The main one being cutting MDF bases for terrain and more particularly using my Dremel to roughly chamfer the edges for a more natural look. It's a messy, dusty job but with plenty of space to do it in I've set about making bases that will be used for a number of things when I get home. They include the 12mm WWII project - more hedgerows and clumps of trees and 28mm split rail fencing (yes, more!) for the AWI and patches of scrub. I'm able to shape these and texture them ready for paint and flock.
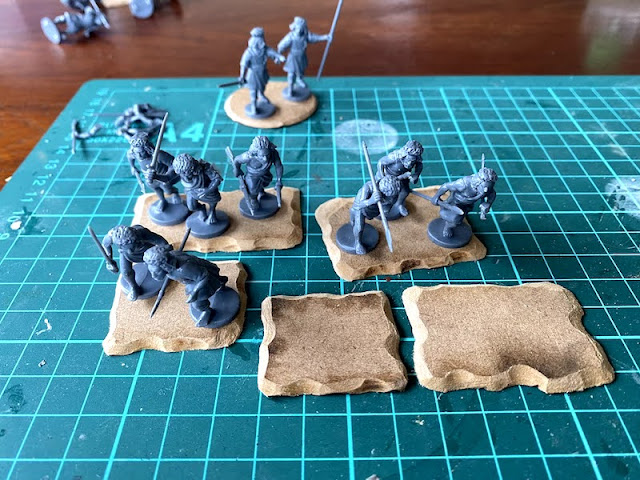
While I bring things down to work on while we are here I also keep a set of modelling tools here and a small stash of projects that are on the list for 'getting around to one day'. Well, circumstances have dictated that day has arrived. Part of my stalled colonial project are two boxes of Perry 28mm Mahdist Ansars.
I made a start on the Perry British infantry during the lockdown last year but with the inevitable distractions that draw us from one project to another they are yet to be completed. Having said that I made a start on the first twelve and perhaps this will be the perfect incentive to finish them.


I'm not sure what rules I would use to play the period but I have a copy of Daniel Mersey's 'The Men Who Would be Kings' that is part of the Osprey blue book series of game rules. They are a variation of the Lion Rampant system and by all accounts give a fairly good game. Those rules suggest a unit size of irregular foot infantry as 16 figures which means if you are looking at 6 or 7 units for a game that's around 100 miniatures. So even though each Perry box contains 40 figures I'm still going to be short. The option is to reduce the size of all units (they suggest 12 figures for a regular infantry unit, so you could reduce both by 25% to give 9 figures for regulars and 12 figures for irregulars, which might be more manageable). Either way a fair few miniatures are required.
While I plan to base regulars individually on 25mm rounds and use sabot bases when they are formed up, the irregulars don't have such tight formations. Rather than use sabot bases for them I'm thinking I will base in 1s, 2s and 3s using slightly irregular base sizes. That way I can move them more easily; remove figures as casualties, and, maintain the look of a more loose formation of troops. With that in mind I've used the MDF frames left over from the Sarrissa house to make up bases in different sizes. To avoid a uniform look I've taken my Dremel to them to help create a more natural look.
I'll use this round base for a leader and man with a banner.
Other bases I will use to group figures in twos and threes, while using 25mm rounds for individual figures.
Given the number of figures I've been giving thought to how best to paint the fabric of their clothing. I've considered a few ideas and thought that perhaps this is the time to try the Citadel contrast paints. It strikes me that this is an application where they could work well. I don't have any of those and while I could order some online I thought I'd make this an excuse to visit a game store in the largest regional town which is 45km away (where we are is very quiet with only the one general store and the nearest town 25km away). If nothing else it would be good to support a local business and especially one that promotes the hobby.

While its main business is board and card games they have a stock of Games Workshop products and a few paint options. I was fortunate that the only customer in there at the time was, as the shop assistant told me, "our painting master". He turned out to be a fount of knowledge on contrast paints and helped me pick out what I might need. So after parting with about $100 I left with a bag full of paints, primer and a couple of brushes. That gives me something to be getting on with and so I'll give those contrast paints a try and post a few pictures and thoughts. Onwards!


