
The first attempt to force the Russians out of the Girls School was rebuffed in the previous game. This came as an unexpected setback to the Germans so early in the campaign and they need to make amends or risk falling behind schedule.

The German platoon will be short of six men for this scenario - four lost permanently and two wounded, who will not return until the next game. As a result Dave will field one weakened squad in order to bring the other two squads closer to full strength.
The Russian platoon has lost two men permanently and so I plan to field a platoon of two full squads and one weak squad made up of four men and their Serzhant. As a result of the victory in the previous game my Russian defenders can consolidate their position by adding one static defence to their supports.

As previously, the Germans will be making a flank attack which will stretch the Russian defence. I misjudged the patrol phase in the previous scenario and that allowed the Germans to place a jump off point close to the rear of the school. I wanted to avoid this happening again. However the Germans start this patrol phase with four free moves and they push aggressively down the Russian left flank through the long grass of the water meadow. Simultaneously they threaten from the opposite flank and as neither movement can be ignored this stretches the Russians to the limit.

The end result is that once again the Germans manage to place a jump off point close to the rear of the school. Not on the same flank as last time, but no less threatening.
Things continue well for the Germans, their Force Morale will start at ten while the Russians will be at eight. Neither side will have as much support this time around as the support roll is seven, with the Germans receiving to support list seven and the Russians to list five.
While I had some luck in the last game I still took seven casualties from German fire and so my intention in this game is to wait until the Germans are much closer to the school, where I can take full advantage of my SMGs. As I envisage the fight taking place at close quarters I decide to add a flamethrower team as a support. If the Germans get a foothold in the school then a flamethrower will be one powerful way to try to drive them back out. That said, it's a tough choice for the Russians, as seven support points will allow the Germans to call on armour support should they wish, which means I have to consider some form of anti tank weapon. I decide this will be left to a tank killer team armed with three panzerfausts. A minefield will be laid as part of the consolidation of my defensive position and I will add an entrenchment for one team.
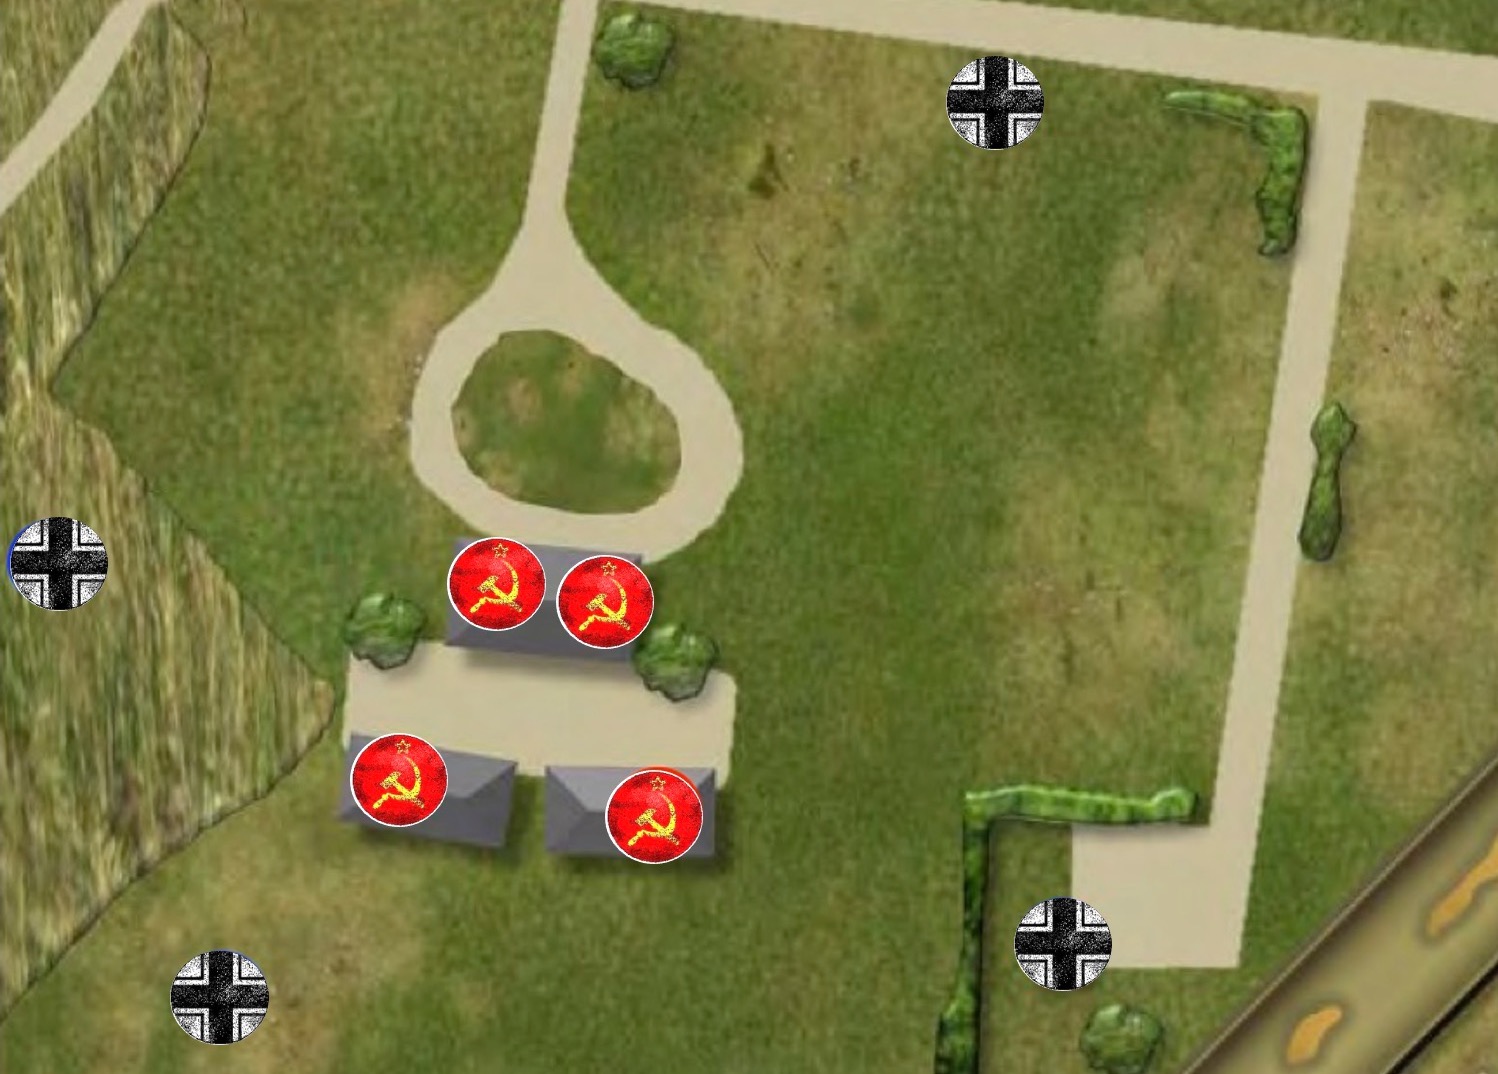
Once Dave announces he has chosen his supports we are ready to start and so I place the minefield where it blocks one of the access routes into the school grounds from a German jump off point. While there is a jump off point to my rear it is in open ground and I suspect the Germans will want to take advantage of the cover provided by the long grass over on this flank as they approach the school buildings.


The first German command roll doesn't offer many options. Dave uses it to deploy a reinforced LMG team and Obergefreiter (JL) from the house behind the hedge on the Russian right flank, they are all that remain of a squad from the core platoon.


In a repeat of the last scenario the Russians roll a double phase, but at this early stage it is of little use as I want to hold back my deployment until the Germans are closer.
The next Russian command phase is also a double phase, but once again there is little to be gained from deploying. I do contemplate trying to close down the rearmost German jump off point, but on second thoughts it is not the wisest option. If we assume I can close it down in the subsequent phase, what then? It is in the open and without a turn end it can't be captured. That would mean my squad would have to remain in the open risking fire from two possible German deployment points. That's seven men in open ground taking fire from a possible 28 dice fire attack. I can only see that ending badly.
The Russian run of phases ends in the next command roll but does see the accumulation of two CoC points.
The Germans now take a turn at rolling a double phase. A squad deploys from the rearmost German jump off point which instantly brings it very close to the school. This could spell trouble. Perhaps that would have been a better location for the minefield? Easy to say in hindsight.

Just in case the next command roll for the Germans is a bad one, Dave wisely has the squad take up tactical positions.

Over on the other flank the German LMG team move up to the hedge and from there they can target the school buildings. I'm feeling under pressure already.


The subsequent German command roll is 55443, not ideal but enough to activate the squad near the school. They make a rush for the nearest door and most of the men make it into the building. It's enough to bring them within 4" of the Russian jump off point and close it down.


While I fully intended to wait for the Germans to close in on the school before deploying I was not expecting such a rapid advance. This aggressive moves calls for an immediate Russian response and it was for occasions such as this that I had called on a flamethrower team for support. They deploy into the building to tackle the German intruders.

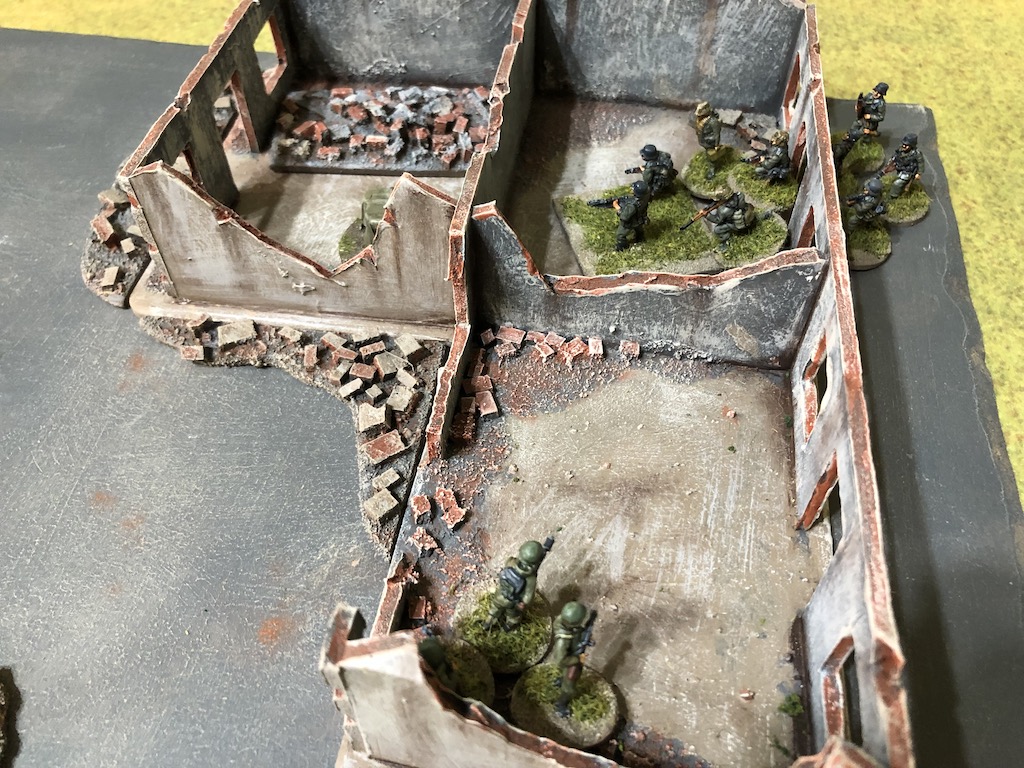
Unfortunately the flamethrower attack doesn't inflict the sort of damage I was hoping for, with only four hits on the Germans. Nonetheless it's enough to cause two casualties and inflict two points of shock. It's nowhere near enough to drive the Germans from the building.
I don't want to leave the flamethrower team isolated, a small three man team like this is very vulnerable, and so I deploy my weakest squad to join them. Unfortunately the distance from the jump off point is such that I can't deploy them into the building and so they can't fire on the German squad, but at least they can support the flamethrower team.

From their other jump in the long grass the Germans deploy a Volkssturm squad.


They manage ten hits and with four sixes rolled the Russian squad loses four men. The leader is not hit, but that's enough to wipe out the squad. That sees Russian morale drop two points down to six. That was ugly and even had the squad been in hard cover the result would have been the same.

That has changed the odds and the Germans now give serious consideration to charging in to close combat. Those members of the German squad that can see the flamethrower team fire at half fire power before advancing. The fire has no effect, but we will witness a round of close combat.

The Germans may have more men but they are taking something of a risk, as the odds will be against them in close combat. The combat will see thirteen Russian dice versus nine German. The result is identical with both sides rolling two 6s. One of the flamethrower team is killed and the Russian Serzhant is lightly wounded, which sees their morale drop a further two points to four.


Having lost the close combat the sole Russian survivor, the wounded Serzhant, falls back 9".


As Russian FM is at two the Germans can remove one of the Russian jump off points and so they take the one from the other building at the rear of the school. With one Russian jump off point already closed down, this leaves only the two in the building at the front of the school.


With force morale at two the Russians are also down to three command dice. Not only that, they are restricted to deploying into a building that has German units or jump off points all around them. With only four casualties from the core platoon so far and with such limited tactical options there seems little point fighting this out much longer. We have managed to hold the Germans up for one campaign turn already, so now seems a good time to cut our losses and withdraw in reasonable shape to fight another day.

Once again the German ability to set up a jump off point so close to the school has proved a problem for the Russians. Despite that, my counterattack might have succeeded. I did wonder in hindsight if I would have been better deploying a squad into the building instead of the flamethrower. At that range the squad would have generated a lot of firepower - six for the LMG and twenty for the SMGs. Twenty six fire dice sounds a lot, but with average dice I could expect thirteen hits and with a target in hard cover that would work out to be something like two kills and two shock. On the other hand the flamethrower with twelve dice could expect six hits but with the target considered in open ground I could expect two kills and four shock. So actually there wasn't much in it either way. In the end it didn't matter, not only did the Germans stand firm their aggression reaped rewards.
As is now obvious to me, I should have placed my minefield much like I did in the previous scenario and tried to block access to the school from the rearmost German jump off point. Not sure what I was thinking when I made that decision.
As is now obvious to me, I should have placed my minefield much like I did in the previous scenario and tried to block access to the school from the rearmost German jump off point. Not sure what I was thinking when I made that decision.
We ended with German force morale at ten and Russian at two, quite a difference. Despite inflicting four casualties on the Germans the Russian withdrawal when the difference in force morale was eight points means all those German casualties can be collected and patched up to fight again. With a wounded man returning for the next game the Germans will be missing only their four permanent casualties.
The Russians suffered four casualties from the core platoon. One man will return immediately but two are lost permanently, with another wounded and missing the next game. In total the Russians will be down five men for the next game.
This victory means the German CO's Opinion rises to +1 and the Men's Opinion rises from -2 to 0. The platoon commander's outlook also improves and is now Secure.
The Russian CO is less impressed and his opinion drops to 0. The Men's Opinion also takes a drop and is now +1. The platoon commander's outlook remains unchanged and he is Cheerful.
From here the Germans press on to the town of Metgethen, each scenario victory bringing them closer to a breakout. You can follow what happens next in Scenario 3 Gardening in Metgethen.
The Westwind Königsberg Campaign appears in the Too Fat Lardies Summer Special 2014. You can purchase this as a downloadable pdf from TFL Summer Special 2014.
You can find all of the game reports for this and other campaigns on the Chain of Command campaigns AARs page.
Great AAR as always and apart from missing 16.1.2 WHAT ELSE CAN ENGINEER TEAMS DO?
ReplyDeleteIf an enemy contacts them in Close
Combat they will surrender immediately.
It looks like it went to plan for the Germans. I now always deploy at least one section to stop me losing a JOP to a quick snatch and grab like Dave performed - even when the rest of my platoon is waiting for the enemy to close. You never know when that double turn may arrive!
Bearing in mind the result even without applying 16.1.2 perhaps a full section of SMG armed tank riders may have been a better support choice?
TT the snatch and grab wasn't really the plan but when the opportunity was presented...I took it. I don't think 16.1.2 really affected things in the wash up as due to the difference in FM I got my casualties back anyway. Thanks for following along!
DeleteI figured you moving JOPs to surround the school was a deliberate tactic to allow you do a Smash and Grab but I do wonder why Mark allowed you to do it .....twice! :)
DeleteAs the defender can set up their patrol markers anywhere in the table quarter (you only get 3 in this mission as defender normally) but it would be a simple matter to place one in such a way that stopped you running them down the board edge?
The issue is covering both flanks while mainaining the 12" distance between markers. I ensured I have the other flank covered this time, but if both flanks are covered it means you have no flexibility with your middle patrol marker, with four free moves I was afraid he would get a foothold in the school from the front if I was too tied up guarding the rear and flanks. I overestimated this possibility, but once he locked down my patrol marker on the other flank I was stretched to maintain the 12" distance and cover the other flank. I would have liked to lock down all my markers quickly but Dave played a canny game by locking down one quickly and that meant I had less flexibility with the others. It probably needs illustrating to get the point across. I think if I'd worried less about an advance from the centre I could have covered the flanks. Placing minefields as I did in the last game was also an option. I paid the price!
DeleteGreat AAR! Really interesting to see the performance of the SMG platoon. Boeing surrounded from the start is a difficult task no matter what weapons you have however. :-)
ReplyDeleteI look forward to the next one.
A splendid report again, that one was swift and brutal indeed.
ReplyDeleteThe Germans did much better the second time around. Fun read.
ReplyDeleteDo you guys just bring your entire collections to the game so you can pick supports right there or do you plan them ahead of time and just keep it secret?
Thanks Stew. We play at Dave's house, even though most of the minis and terrain are mine and for a campaign we tend to leave it all at his place. I just make sure I bring what we need for the campaign in terms of supports, so no need to bring the whole collection, just what's in the campaign support lists.
Delete