
The Australian regular platoon has been worn down to a handful of men in the previous game and they are no longer capable of sustaining a defence. These are desperate times and the only platoon available to replace them is composed predominantly of rear echelon men with limited training. In game terms they are green.

The Japanese on the other hand can field a full strength platoon of regulars. The CO has a good opinion of the platoon's leadership, as do the men. Having successfully pushed the Australians back to the river they have begun to scent victory.
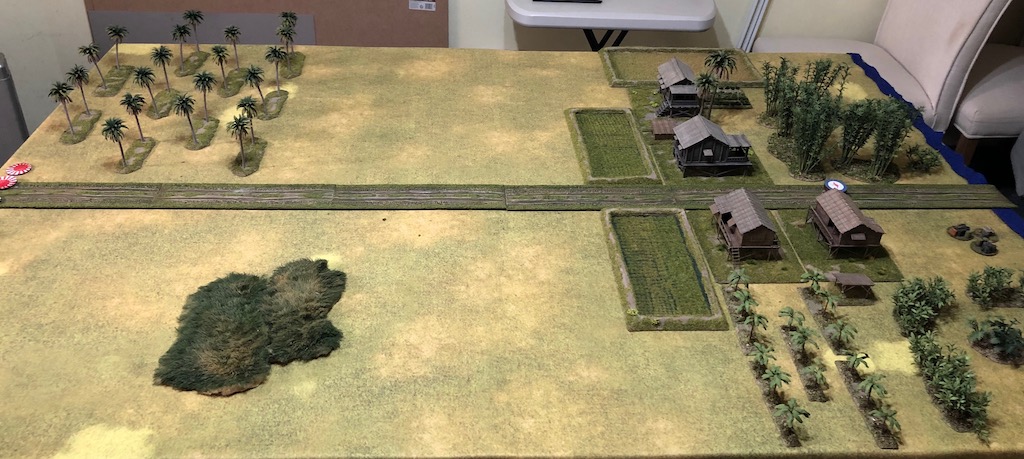
Unlike previous games that have been set amidst jungle, this map features more open, rural terrain, with paddy fields and other plantations around a cluster of village huts. This will make for a very different encounter.
Looking at the table I'm concerned as to how I'm going to cross the open ground in front of the village. Even green troops should be able to turn this into a killing ground. Ideally I would build up a base of fire from the rubber plantation and make it difficult for the Australians to build a firing line behind the paddy fields. However I suspect Dave will be wanting to give his inexperienced troops all the support they need and I've no doubt a mortar barrage will be on his list of priorities. That means I can't sit anywhere for too long or concentrate in one single area, for fear the barrage will bring everything to a crashing halt.
I think speed is the key here. I need to get across that open ground and into the village as quickly as I possibly can. Sitting back is only going to invite a barrage. This may be the one game where tanks could really help me, so the support rolls will be significant.
We place our patrol markers and the Japanese roll for four free moves. Force Morale sees the Japanese benefit from +3 (Men's Opinion, Japanese campaign rule and Platoon Leader's Outlook) and so is at eleven. That's a good start. The Australians are at nine.
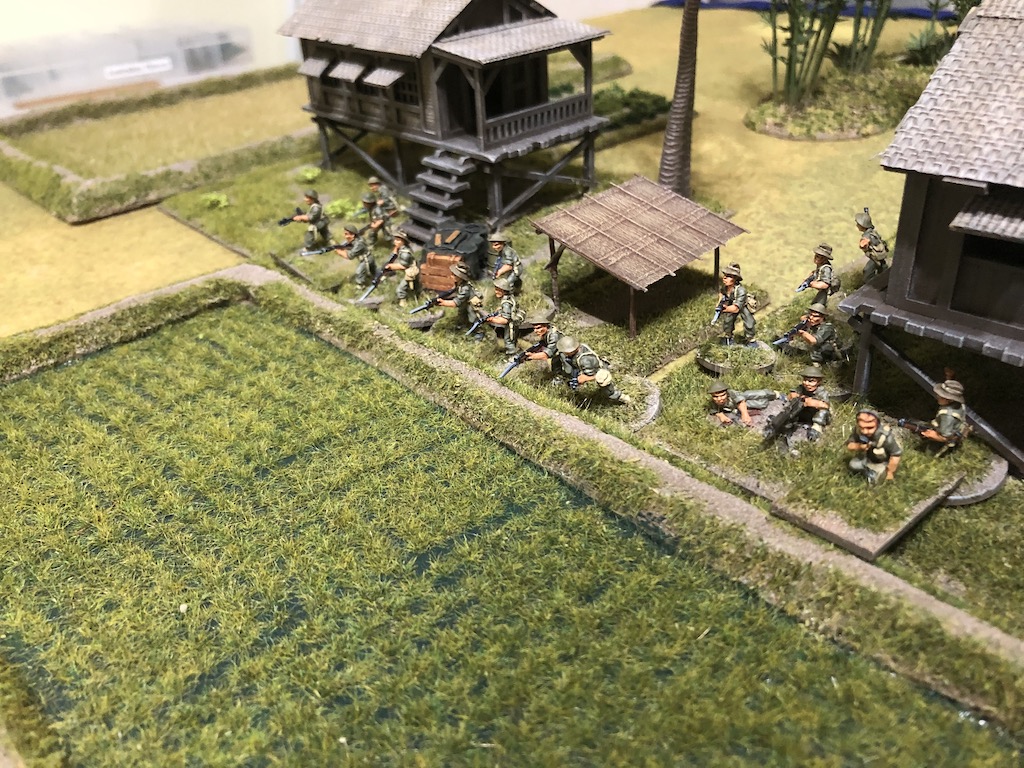
With the initiative the Japanese start the patrol phase. As much as I would like to get a foothold in the village, it is simply not possible and so I settle for JoPs spread across the table. The Australians need to keep in mind that their green troops can only deploy 4" from a JoP, so they are carefully clustered in the village. The Objective point for the scenario is placed on the road towards the rear of the table.

The support roll is six. The Japanese receive an additional two points for the CO's Opinion, giving them a total of eight. The Australians receive three, plus seven for the difference in force rating, for a total of ten.
Eight supports gives me just enough for three Ha Go tanks (the first Ha Go only requires two points, subsequent ones are three). That's a radical choice, but I think it's worth a try. By taking three tanks I can form a tank platoon and have one tank commanded by a senior leader who can use his CIs to command the other two.
We noted that the rules call this 'command by radio' yet we know that the only Ha Go tanks that were equipped with radios were those of the platoon commanders. Historically a Japanese tank company in Malaya was made up of three platoons of three tanks each and the platoon commander was able to provide limited command to the other tanks, which was standard Japanese practice. With this in mind we have limited the command range for the tank platoon leader to extend to only those tanks in his line of sight.
Having a single senior leader in the Japanese infantry platoon means that rolling more than one four with the command dice limits activation choices, so I'm hoping this tank option will allow me to make more use of any 4s that I do roll. More importantly I'm certain Dave won't be expecting to see three tanks. While he may expect one, I'm hoping he'll assume the platoon anti-tank rifle will be sufficient defence against that. If I'm wrong and he opts to call in the two pounder then I'm going to be in serious trouble. The plan is to drive the tanks fast into the village and threaten the Australian jump-off points and the scenario objective. There is the outside chance I might pull off a coup de main and capture the objective, but I won't be banking on it. What I hope will happen is that the tanks prove enough of a distraction that they cover the advance of my infantry across the open ground. We will see.
Lastly, before play commences Dave places two sections of barbed wire across the front of his left flank. That could be a problem, but with three tanks I can always create a gap by driving through it.

The first Japanese command roll provides a good choice of activations and I start by deploying the grenade discharger squad in the rubber plantation.


Conscious that speed is at the heart of my plan I am fortunate to be able to deploy all three of the Ha Go tanks and place them on overwatch. As an aside, I only brought two of my Ha Go tanks for this game, so the Chi Ha will stand in for the command Ha Go (and will operate as a Ha Go for rules purposes). One other thing to note is that the rear turret machine gun of the Ha Go was operated by the commander/gunner. The Japanese didn't see it so much as a rear facing machine gun, rather it was an alternate main armament depending on what the mission required. Given the relative weakness of the 37mm HE rounds and that I expect to be fighting infantry, I think this mission is better served using the MGs in the forward position, hence all the turrets appearing to be 'backwards'.
Dave looks a little aghast at the sight of the three tanks. I take that as a good sign that he doesn't have the two pounder available.
Dave looks a little aghast at the sight of the three tanks. I take that as a good sign that he doesn't have the two pounder available.


The Australian command roll includes three 6s, so it's just as well I hadn't chosen a pregame barrage for this particular scenario. Despite the prospect of another phase Dave decides to keep his units concealed for now and so with the turn ending the Ha Go's lose their overwatch status.
In the subsequent phase the Australians once again opt to remain hidden and so the Japanese stare across the open space at an eerily quiet village.

In the next Japanese phase the Ha Go commander orders all the tanks forward flat out and they make good progress. This is exactly what I need to happen if the Japanese blitzkrieg is to work. While that is happening a squad deploys into the area of brush and is placed on overwatch, ready to deal with the Australian anti-tank rifle team should it appear.

The grenade discharger teams are also placed on overwatch for much the same reason.

The Australians decide to continue to hold their fire and stay concealed. The Japanese on the other hand are wasting no time. The Ha Go commander urges his platoon forward and his tank ploughs a path through the wire.


With the tanks making good progress I decide to deploy a second squad and have them follow across the open ground. This is a bit of risk, but I'm hoping the tanks can provide suppressing fire to cover their advance.

I now have three Japanese squads deployed to support the Ha Go platoon as it leads the assault towards the village.


This gives Dave a very clear idea of what the Japanese are trying to achieve and I've no doubt he will respond soon.

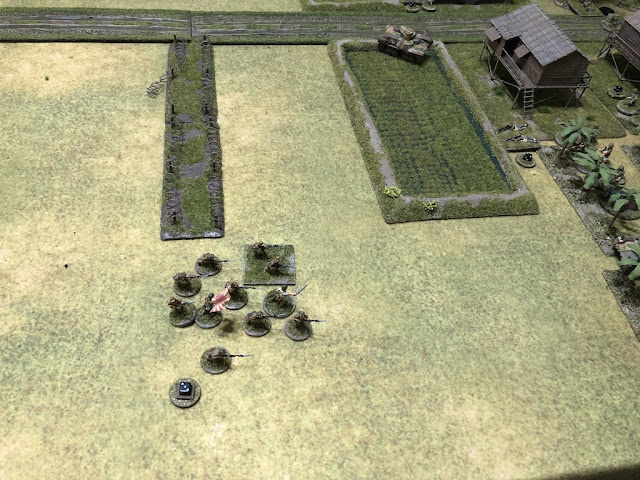
The Japanese squad in the open proves an irresistible temptation to the Australians and a section deploys and opens fire from the paddy bank on the Australian right flank.


The Japanese take one casualty and two points of shock. They will need to get moving or find cover as they are now very vulnerable.

Sensing the chance to inflict more damage on the Japanese, a Vickers MMG team deploys next to the section and opens fire. Despite catching the Japanese in the open the fire has no effect. The grenade discharger squad is on overwatch and they respond by sending a hail of HE rounds in the direction of the Vickers team, but with the benefit of the hard cover from the paddy bank they are unharmed.

The Australians deploy the 2” mortar team in the patch of bamboo at the rear of the village and they fire a round of smoke that successfully blinds the Japanese squad in the brush.


The Japanese Gunso deploys into the rubber plantation. His first task is to order the grenade discharger team to fire their only smoke rounds to provide some cover for the squad in the open.

With a clear line of sight their aim is good and a blanket of smoke screens off the paddy field, blinding the Australian section and Vickers team.

With that the Gunso orders the squad in the open to move forward as fast as possible.


With a clear line of sight their aim is good and a blanket of smoke screens off the paddy field, blinding the Australian section and Vickers team.

With that the Gunso orders the squad in the open to move forward as fast as possible.

Just as Japanese pressure is really starting to gain momentum the Australians roll a double phase. That's bad timing from my perspective.
A second Australian section deploys, this time behind the paddy field on their left flank. From there they have a clear line of sight to the Japanese in the open and they unleash a hail of fire in their direction.


Two of the Japanese are hit, one of which is the squad corporal, who is killed, and this takes Japanese morale down to ten. Not only that, they have now accumulated six points of shock and without an attached leader that is unlikely to reduce in a hurry.

The Australian platoon sergeant deploys on the right flank, where he is well positioned to command the Vickers team, the section and the 2" mortar team.

He orders the mortar to fire another round of smoke in front of the squad in the brush. It lands on target and completely blocks off their line of sight.


With the tanks drawing closer the Vickers team are ordered to direct their fire at the commander's tank, but the fire fails to have any effect on the hardy little Ha Go.


More concerning is the sight of an Australian FO deploying on their right flank. He wastes no time and contacts the mortar battery.

A second Australian section deploys, this time behind the paddy field on their left flank. From there they have a clear line of sight to the Japanese in the open and they unleash a hail of fire in their direction.


The Australian platoon sergeant deploys on the right flank, where he is well positioned to command the Vickers team, the section and the 2" mortar team.

He orders the mortar to fire another round of smoke in front of the squad in the brush. It lands on target and completely blocks off their line of sight.


With the tanks drawing closer the Vickers team are ordered to direct their fire at the commander's tank, but the fire fails to have any effect on the hardy little Ha Go.


More concerning is the sight of an Australian FO deploying on their right flank. He wastes no time and contacts the mortar battery.

The second Australian phase sees the Vickers once again target the commander's tank, but the bullets only rattle off the steel exterior. The section on the left continues to take advantage of having caught the Japanese in the open and they unleash more fire at my exposed squad.

Another Japanese soldier is killed. Things are not going well for this squad, not only is it caught in the open, it is leaderless, facing mounting shock and rising casualties.

A third Australian section now deploys, joining the one on their left flank behind the paddy field. They too direct their fire at the Japanese squad in the open.


This kills yet another Japanese rifleman. They have been caught in the open for two consecutive enemy phases and it's clear the squad won't be able to stand up to this sort of punishment for much longer. At least the smoke from the grenade dischargers is protecting them from the Vickers and the other Australian section.

On the Australian right the platoon sergeant orders the section behind the smoke onto overwatch. Sensing the chance to inflict yet more casualties he orders the 2" mortar to fire one of its few HE rounds at the squad in the open, but fortunately for the Japanese the round misses.

It then comes as no surprise when the FO calls down an immediate barrage without waiting for a ranging shot. This looks very ominous for the Japanese and is made worse by coming down exactly on target, blanketing all the lead Japanese units under the barrage.


The mortar rounds kill yet another man from the squad in the open. The squad in the brush is more fortunate and suffers a few points of shock. The Ha Go platoon commander's tank also takes a hit and that puts the crew under three points of shock and forces the tank back 6".

For a moment things appeared to be going well for the Japanese attack, but the double phase and the barrage have certainly turned the tables.
They take a turn for the better when the next Japanese command roll includes two 5s, enough to bring up my first CoC die, one which I will be using to end the turn. First though the tank commander activates and removes all three points of shock off the crew. With that done the turn ends, the barrage lifts and all smoke and other markers are removed. Hopefully that will put an end to the mortar barrage, but not before the residual smoke from the barrage keeps my units out of sight from the Australians in their upcoming phase. It's not all bad!

The Australians put the sections on their left flank on overwatch, choosing to spend their phase preparing for when the smoke and dust from the barrage finally settles and they have line of sight to the Japanese once again.

The platoon sergeant orders the section on the right and the Vickers to target the grenade discharger squad, who are not hidden by the remaining smoke from the barrage.


The Japanese take one casualty and a point of shock.

Saving the most important for last, Dave activates the FO and rolls to see if he can contact the battery. To my horror he rolls a five and has immediate access to another barrage. Just when I thought I'd seen the last of it.....
Well, that means there really is no time to waste. In the following Japanese phase the Ha Go platoon ploughs forward aggressively and into the outskirts of the village.


The squad in the open needs to get itself out of danger and tries to move forward tactically. The shock means they can't get anywhere, but at least they can now benefit from the light cover that comes with being tactical.

That does not mean they are out of danger and as they go to ground they come under fire from the two Australian sections on overwatch.

The hail of fire causes twelve hits that result in one kill and eight points of shock, enough to pin the squad.

The Japanese infantry may be having a hard time, but the Australians cannot ignore the arrival of the Ha Go tanks in the village.


It is no surprise to see the platoon anti-tank rifle team make their appearance, although the Australians are careful to keep in good cover, lying low in the bamboo patch near the 2" mortar team.

It fires at the lead Ha Go and hits with the first round. This inflicts two points of shock and kills the tank gunner. It will take two phases to replace him.


Meanwhile the Australian sections continue to target the Japanese infantry, with the platoon sergeant ordering the Vickers to fire at the pinned squad in the open. He's determined to finish them off.

The fire sees another Japanese casualty and with a further four points of shock the remaining men break and run back, the sight of which brings Japanese morale down to nine.

The Australian section on the right then fires at the grenade discharger squad, inflicting two points of shock on one of the teams.

The FO calls in the new barrage onto the rubber plantation. Once again he doesn't wait for a ranging shot, he just calls down an immediate barrage. Once again it is unerringly accurate and so there is more pain for my Japanese.


The broken squad loses another two men and continues running to the back of the table.

The Gunso is wounded and stunned, dragging Japanese morale down to eight, and the grenade discharger squad loses a man.


It is no surprise to see the platoon anti-tank rifle team make their appearance, although the Australians are careful to keep in good cover, lying low in the bamboo patch near the 2" mortar team.

It fires at the lead Ha Go and hits with the first round. This inflicts two points of shock and kills the tank gunner. It will take two phases to replace him.


Meanwhile the Australian sections continue to target the Japanese infantry, with the platoon sergeant ordering the Vickers to fire at the pinned squad in the open. He's determined to finish them off.
The fire sees another Japanese casualty and with a further four points of shock the remaining men break and run back, the sight of which brings Japanese morale down to nine.

The Australian section on the right then fires at the grenade discharger squad, inflicting two points of shock on one of the teams.

The FO calls in the new barrage onto the rubber plantation. Once again he doesn't wait for a ranging shot, he just calls down an immediate barrage. Once again it is unerringly accurate and so there is more pain for my Japanese.


The broken squad loses another two men and continues running to the back of the table.

The Gunso is wounded and stunned, dragging Japanese morale down to eight, and the grenade discharger squad loses a man.


With the Japanese infantry taking a hammering under the mortars it will be up to the Ha Go platoon to try to break the deadlock. The platoon commander fires both his MGs at the section across the paddy. It kills two of the Australians and inflicts two points of shock. That's the first Australian casualties of the game. At that point the lead Ha Go turns and drives towards the Australians behind the paddy bank.

Before it can go too far Dave uses a CoC die to interrupt and fires the anti-tank rifle. It hits and causes two armour strikes. With only two armour and carrying two points of shock it looks like the Ha Go could be in trouble, but it manages to roll two armour saves and the result on zero net hits is no effect. The tank has a charmed life it seems.

Undeterred the Ha Go drives aggressively, rolling 9" of movement. It ploughs forward into the Australians who have to attempt to roll higher than their level of shock to escape the tank tracks. First the bren team makes a lucky 2" escape and plunges into the paddy field.

The rifle team are not suffering any shock and make a swift escape 11” into the banana plantation.

Scattering Australians as it goes the Ha Go grinds on towards the bren team of the second section.

With no shock the bren team can evade and move 7” into the banana plantation.

Even if it has failed to inflict any casualties the Ha Go has managed to scatter the Australian firing line and in so doing drive them from the hard cover of the paddy bank. Will it be enough to make a difference?

With the Australians driven from their cover, the squad in the brush opens fire at the section who have recently fled into the banana plantation.

The fire is very effective. The bren team take two points of shock, but the rifle team has three men killed and a point of shock. If I can keep up the pressure I may be able to break through on this flank.

The Australians are determined to take out the lead Ha Go and in their next phase the anti-tank rifle fires again, this time with a shot to the rear.


On the other flank the Australian platoon sergeant has the section and Vickers focus their attention on the Japanese squad in the brush and they all open fire.

The Japanese take seven hits, which kills three of the squad and inflicts two points of shock. The tanks might be making some progress, but without any infantry to accompany them they are unlikely to achieve much.


The sergeant instructs the FO to move the barrage across the road. That's more than the broken squad can take and that's the last we will see of them in this game. Fortunately there is no leader with them, so there's no adverse effect on Japanese morale.


The mortar rounds continue to inflict damage on the grenade discharger squad who lose a man and accumulate a further three points of shock.

I still have one Japanese squad to deploy and the tanks are beginning to scatter some of the Australian sections and force them back. However the Australians have taken few casualties and I will need infantry in the village to really make a difference. It's looking tough, but not impossible. At the very least I need to inflict more casualties on the enemy platoon, if only to weaken them for any future games.
In the Australian phase the remaining rifle team behind the paddy bank retreat away from the rampaging Ha Go.


Before it can go too far Dave uses a CoC die to interrupt and fires the anti-tank rifle. It hits and causes two armour strikes. With only two armour and carrying two points of shock it looks like the Ha Go could be in trouble, but it manages to roll two armour saves and the result on zero net hits is no effect. The tank has a charmed life it seems.

Undeterred the Ha Go drives aggressively, rolling 9" of movement. It ploughs forward into the Australians who have to attempt to roll higher than their level of shock to escape the tank tracks. First the bren team makes a lucky 2" escape and plunges into the paddy field.

The rifle team are not suffering any shock and make a swift escape 11” into the banana plantation.

Scattering Australians as it goes the Ha Go grinds on towards the bren team of the second section.

With no shock the bren team can evade and move 7” into the banana plantation.

Even if it has failed to inflict any casualties the Ha Go has managed to scatter the Australian firing line and in so doing drive them from the hard cover of the paddy bank. Will it be enough to make a difference?

With the Australians driven from their cover, the squad in the brush opens fire at the section who have recently fled into the banana plantation.

The fire is very effective. The bren team take two points of shock, but the rifle team has three men killed and a point of shock. If I can keep up the pressure I may be able to break through on this flank.

The Australians are determined to take out the lead Ha Go and in their next phase the anti-tank rifle fires again, this time with a shot to the rear.

Well there won't be a better chance for the AT rifle and sure enough it makes three armour strikes on the Ha Go's rear. Is this the end? No, once again the Ha Go proves tougher than I thought and with two armour saves there is only one net hit. Enough to add a further point of shock and prevent the tank activating in the next phase, but not enough to put it out of action. That could have ended very differently.

On the other flank the Australian platoon sergeant has the section and Vickers focus their attention on the Japanese squad in the brush and they all open fire.

The Japanese take seven hits, which kills three of the squad and inflicts two points of shock. The tanks might be making some progress, but without any infantry to accompany them they are unlikely to achieve much.


The sergeant instructs the FO to move the barrage across the road. That's more than the broken squad can take and that's the last we will see of them in this game. Fortunately there is no leader with them, so there's no adverse effect on Japanese morale.


The mortar rounds continue to inflict damage on the grenade discharger squad who lose a man and accumulate a further three points of shock.

I still have one Japanese squad to deploy and the tanks are beginning to scatter some of the Australian sections and force them back. However the Australians have taken few casualties and I will need infantry in the village to really make a difference. It's looking tough, but not impossible. At the very least I need to inflict more casualties on the enemy platoon, if only to weaken them for any future games.
In the Australian phase the remaining rifle team behind the paddy bank retreat away from the rampaging Ha Go.

The Japanese now get a bit of fortune with a double phase, but the activation dice limit what actions are possible. It's either infantry or tanks, but not both. I decide the tanks seem to present the biggest threat and activate the tank platoon commander. He orders the Ha Go on the left to fire at the Vickers team with the turret machine gun. The fire is accurate with six hits out of six, but the paddy bank provides excellent cover and the Vickers team escape unharmed.

The commander moves his tank forward, firing at the bren team in the banana plantation as he goes, but it has no effect.


The commander moves his tank forward, firing at the bren team in the banana plantation as he goes, but it has no effect.

In the subsequent Japanese phase the tank commander activates again and orders the Ha Go on the left to drive into the paddy field to try and overrun the bren team.

The bren team manage to evade and run across the road to join the other section and the Vickers team.

The Ha Go in the centre continues to drive at the Australians, who successfully manage to side step and they let it pass, before moving forwards ready to take on any following infantry. These Australians may be green and inexperienced, but they have plenty of guts.

The commander then advances his tank, scattering the bren team and the weakened rifle team.


The tanks have been very aggressive, but so far all they've managed to do is scatter the Australian sections without causing them any casualties. That will have to be the job of the Japanese infantry.
With that the Rikugun deploys in the brush. He rallies some shock off the squad and then sends them forward at double time to follow the tanks into the banana plantation.

The Rikugun has clearly inspired them, as they race forward covering 16".

This has brought them much closer to the village, but they are still exposed in the open and not yet out of harm's way.

This has not gone unnoticed and the platoon sergeant has no hesitation in ordering the Vickers team and the section to turn their attention to their right and fire.

The Japanese are hit with a hail of bullets which inflicts four points of shock, but more significantly the squad corporal is wounded and another man killed. That wound takes Japanese morale down to seven.

The sergeant then orders the AT rifle to take another shot at one of the tanks, but they are now more difficult to target in the banana plantation and the shot misses. Meanwhile the FO moves the barrage across the road towards the Japanese jump-off point in the brush.

The grenade discharger squad are still under the barrage, this hits the Gunso who is attached and it kills him. Yet another blow to Japanese morale which now drops two points down to five.

The platoon lieutenant deploys on the Australian left and immediately removes shock from one of the teams before ordering the section to open fire on the Japanese squad that was moving rapidly from the brush.


Two men are hit, one of which is the squad corporal, who takes a second wound which kills him. That drags Japanese morale down another two points to three.

At this point it's clear the Japanese tank gambit has failed. While the tanks have done well enough to break into the village, they need the infantry to mop up the scattered Australians and they have simply been shot to pieces trying to cross the open ground. Between an effective barrage and small arms fire the Japanese simply cannot make headway, suffering twenty one casualties including the loss of the Gunso (the platoon second in command) and two of the squad corporals. In the next Japanese phase they withdraw.
The Australians on the other hand end the scenario with a force morale of nine, which means their five casualties will all return, leaving the platoon at full strength for the next scenario. That's some fine work for a green platoon and it's enough to deny the Japanese their minor victory in eight campaign turns.
That defeat has been a hammer blow to the Japanese men's opinion which drops from +5 to +1, they are distinctly unimpressed with this level of casualties. The CO's opinion drops slightly, but remains positive at +6, while the Platoon Leader's outlook is now Aggressive.
The Australian CO's opinion rises from -2 to -1, but the Men's Opinion is much higher and rises to +6. However, the Platoon Leader's outlook is still cautious and goes from Worried to Guarded.
I think we both expected this to be a Japanese victory, with little hope for the ability of the green platoon to hold out, but the terrain worked in their favour and their steady and continuous fire was more than enough to hold off the Japanese attack. The attempt at a Japanese armoured thrust was not a complete failure, but it required following infantry to be effective and they were unable to cross the fire swept open ground.
I wonder, will the green Australian platoon prove to be the heroes of the hour?
Man best game yet I reckon
ReplyDeleteIt was a cracker and made all the more interesting by the presence of all that Japanese armour. First time I've tried to control three tanks in a game.
DeleteGreat AAR. These campaign write-ups are great. Keep them coming!
ReplyDeleteThanks, at least one more to come from this campaign (and there was me hoping this was the last one and would end with a Japanese campaign victory, sob sob....
DeleteExcellent game in every sense. And I am glad that we get another serving of this ripping yarn!
ReplyDeleteYes, despite my best intentions, no Japanese victory, on the upside we still have at least one more game to play.
DeleteExcellent read once again Mark and what a outcome!
ReplyDeleteThanks, it was a blast getting the armour into the village, just a shame my infantry took such a pasting crossing the open ground.
DeleteMark, do you think it would have been better to have sections follow the tanks in behind, using the tanks to block LOS from the Australians.
DeleteIn IABSM there is a rule where troops following tanks can move together but at the infantry rate of movement, It would be good if COC had something like that eg if attached rear of tank , a team may move with the tank? anyway just a thought.
cheers John
Another great AAR and a hearty "Bravo!" to the green Aussies
ReplyDeleteIndeed. I don't think either of us had high expectations of that green platoon but Dave handled them very well (unfortunately for me!).
DeleteExcellent AAR- valiant defence by the rear echelon. Loving this campaign series
ReplyDeleteWho would have thought the cooks and mechanics would put up such a stiff fight? Not me, that's for sure.
DeleteTerrific action. That green platoon can hold their heads high for what they did.
ReplyDeleteAbsolutely, they fought like seasoned troopers, much to my regret.
DeleteGreat report and great to see the green Diggers see off the baddies.
ReplyDeleteI certainly wasn't expecting such a stiff fight, I think we both expected to see the green platoon crumble once they were under pressure, but not so.
DeleteAmazing. You reports always make for great reading, but this one was really good. Well-played for both sides, lots of action and reaction that built a brilliant narrative: I really did not know how things would end until they did!
ReplyDeleteCdlT
There always seems a few moments in any game that define the scenario and its outcome, but I think the pendulum swung a few times in this one and it really wasn't clear what the outcome would be. This has been a very enjoyable campaign.
DeleteA corker of a game and a fine report, good to see the green white hats triumph against the odds.
ReplyDeleteFantastic reading.
ReplyDeleteExcellent AAR.
ReplyDeleteGreat report. As a minor issue I believe you are only allowed to deploy one tank per phase in standard CoC.
ReplyDeleteChris
Great game! I like the idea of using a tank to scatter the enemy firing line. just drive it right at them. I may have to give that a try.
ReplyDeleteFirst time I've ever attempted it (helps to know the best AT weapon your opponent has is an AT rifle!). Of course if I'd inflicted more shock on the enemy then there's the rather unpleasant prospect that they won't scatter but be run down by the tanks instead. Just as well these are only little lead soldiers, eh?
DeleteGreat series of AARs. It is good to see your plans and watch how they unfold. I was also impressed with your maps. I need to produce something similar for the Players at CANCON and I was wondering where/how you got the graphics and what App or software you used. Any leads would be appreciated.
ReplyDeletePlease keep the AARs coming.
Hi Steve, I create the maps using PowerPoint based on an article in one of the TFL Specials where Rich tells Sidney Roundwood how he does this in one of the Roundwood Report articles. I just can’t remember which Special unfortunately. Hope that helps.
DeleteYes that does help. I will track it down. Now this might seem a bit cheeky, but I hate to reinvent the wheel. Is there any chance you could flick me a copy of the PPTs you have used? (This can be via Messenger or via email or TFL Forum) I can then share with you the additional terrain types I add for CANCON. If that is too hard, that is fine. The lead is appreciated.
ReplyDeleteIt’s the Christmas special 2014, but I’m happy to share the files. I’ll email them to you later today.
DeleteYup ... tracked it down. TA Muchly!!
ReplyDeleteI don't seem to have an email address for you. PM me at tacticalpainter01 at gmail dot com and I'll send the files over.
DeleteAs always a cracking battle report. I like your approach to the Japanese tank commander command and control limitations. One of the great things about CoC is how we can tinker with things like this to try to capture some of the idiosyncrasies of different vehicles and weapons.
ReplyDelete