
In the previous game and for the first time in the campaign, the British came up against the Fallschirmjager in a well defended position with approaches covered by wire and minefields. At one point a gap in the wire, created by engineers, allowed a lone British section to make a rapid advance and it looked as though events might be developing in their favour. Yet it was only a single section, without sufficient support, and the Germans responded aggressively to wipe them out. From then the game swung more and more in the German's favour, to the point the British decided that assaulting this position called for a re-grouping and a second attempt.
The British have called forward their second platoon for this task. They had suffered five men killed thus far, so for this game Dave would reassign the PIAT team to join one of the weaker sections in order to make up the number of riflemen. To compensate, they would be backed up with a wider range of supports from the main column. Unknown to me at the time, Dave had rolled 11 for his additional support, which meant he had a hefty 23 support points to draw upon.

The Fallschirmjager, on the other hand, would be holding on with what they had, their defences were still in place, except for one stretch of wire that the British engineer teams had successfully removed. Much like the British platoon, they had taken five casualties and would not be at full strength. Their only support was a Pak 40, but so far that had demonstrated an inability to hit a thing.
My original reasoning for defending this table was the large wooded area that provided good cover for the defender. That reason becomes much less appealing once the British can call on a mortar barrage. The barrage can cover a large section of the woods, leaving the Germans with few areas suitable to defend. To make matters worse, the air burst effect of the mortar rounds in the trees increases the chances my men will take hits.
To be honest, I don't expect to be able to delay the British for another turn. I suspect between an effective barrage and additional support the Germans will be hard pressed to hold on. Despite that, I will have held up the British for two campaign turns and with the casualties I inflicted in the last game I have to consider that a good result under the circumstances. After all, the British are now behind schedule - we are only at map four and yet this is campaign turn 6. To win the campaign in eight turns with four maps remaining is not impossible, but will require victory here, some good fortune, perhaps a German surrender somewhere along the way, and, last but not least, some 'swanning' whenever they find a map clear of the enemy. It's still all up for grabs.
The force morale rolls saw both sides start at nine. The roll for initiative saw it go to the British, who followed that up by rolling six free patrol moves prior to the start of the phase. In effect seven moves before the Germans get to move a thing. This was a good start for the British and meant they could keep the German JoPs back from the hedge line and almost guarantee themselves a safe passage across the open ground. The jump off points ended up like this:
The force morale rolls saw both sides start at nine. The roll for initiative saw it go to the British, who followed that up by rolling six free patrol moves prior to the start of the phase. In effect seven moves before the Germans get to move a thing. This was a good start for the British and meant they could keep the German JoPs back from the hedge line and almost guarantee themselves a safe passage across the open ground. The jump off points ended up like this:

The British deploy quickly, looking to establish a base of fire and to make an early thrust to take the hedge line. The 2" mortar deploys into the farmyard, backed up with a Sherman, sheltering in the lee of the house. The German JoP on the far flank is a likely spot for an anti tank weapon and the Sherman commander is careful not to present an easy target. A British section deploys from the JoP at the table edge near the wire, ready for a move to the hedgeline.

Despite the copious amount of support points the British had not called in a pre-game barrage and so German deployment could go ahead unimpeded. However, at this early stage, I saw little advantage in deploying. It would take at least two German phases to get units to the hedgerow, possibly longer if movement was slower. That would give the British plenty of time to deploy an FO, not to mention have units placed on overwatch, ready for their arrival. I think the best German strategy is to try to set up a hot reception for any British units climbing over the hedge into the woods.
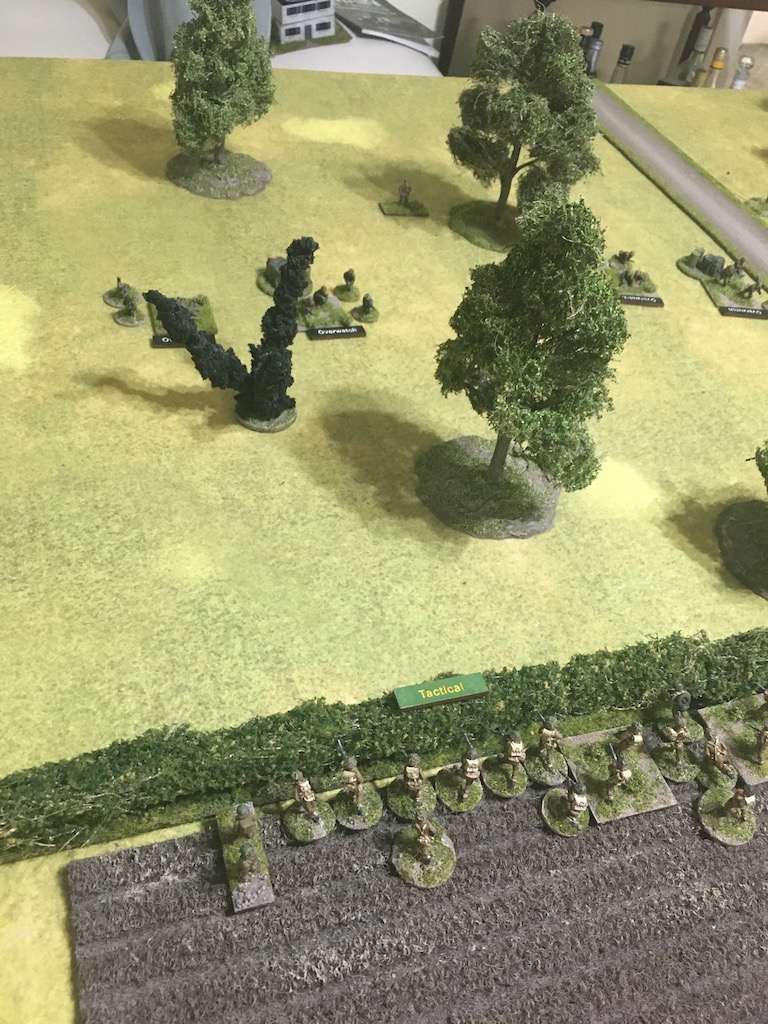
The British deploy another squad from the farmyard and they take up a tactical position in the ploughed field. The 2" mortar fires what I suspect is the first of a vast amount of smoke. The aim is slightly off and the smoke drifts to the left, but I've no doubt there's more where that came from. With open terrain like this the smoke from the 2" mortar must surely be one of the platoon's most useful assets.


Despite the copious amount of support points the British had not called in a pre-game barrage and so German deployment could go ahead unimpeded. However, at this early stage, I saw little advantage in deploying. It would take at least two German phases to get units to the hedgerow, possibly longer if movement was slower. That would give the British plenty of time to deploy an FO, not to mention have units placed on overwatch, ready for their arrival. I think the best German strategy is to try to set up a hot reception for any British units climbing over the hedge into the woods.
The British deploy another squad from the farmyard and they take up a tactical position in the ploughed field. The 2" mortar fires what I suspect is the first of a vast amount of smoke. The aim is slightly off and the smoke drifts to the left, but I've no doubt there's more where that came from. With open terrain like this the smoke from the 2" mortar must surely be one of the platoon's most useful assets.

The Germans continue to wait. Come the British phase it is no surprise to see the Forward Observer team deploy. Dave has probably surmised I will deploy deep in the woods and so he needs the FO to get to the hedge where he can have a better line of sight.
The platoon sergeant joins the FO and orders the nearby section to move out into the gap in the wire. Back at the farm the weakest of the three British sections deploys. Dave is obviously eager to push forward fast.

The FO is alone with the platoon sergeant and they both make a very tempting target for a sniper. So I deploy my sniper team into the open where they have a line of sight around the hedge. It's a slightly exposed position for the sniper, but the opportunity to take out either the FO or the Sergeant is too great a temptation. The sniper fires and gets a hit, but we only manage to inflict shock which will have no effect. That was a rare moment to have a single event really influence the outcome of a game. Somehow I doubt the sniper will find either target in his line of sight come the next German phase, a fleeting opportunity has passed. A British section on overwatch back at the farm tries to locate the sniper, but has no luck.

The FO is alone with the platoon sergeant and they both make a very tempting target for a sniper. So I deploy my sniper team into the open where they have a line of sight around the hedge. It's a slightly exposed position for the sniper, but the opportunity to take out either the FO or the Sergeant is too great a temptation. The sniper fires and gets a hit, but we only manage to inflict shock which will have no effect. That was a rare moment to have a single event really influence the outcome of a game. Somehow I doubt the sniper will find either target in his line of sight come the next German phase, a fleeting opportunity has passed. A British section on overwatch back at the farm tries to locate the sniper, but has no luck.

Meanwhile the 2" mortar continues to build a smoke screen. The FO and the Sergeant make haste to escape the aim of the sniper, joining the section that's approaching the hedgerow.


 |
| With smoke between them and the sniper, the FO and Sgt can breathe easy. |
The 2" mortar continues to drop smoke and the British sections all advance towards the hedge. I can't see a way that deploying is going to give me any advantage and so I bide my time.

Ominously a British engineer section deploys, complete with a flamethrower team and they join the general move forward, while the carrier probes up the road. Is the carrier just bait for my anti tank weapons? The way the Sherman is cowering behind the farmhouse would suggest this might be the case.


With the British closing on the hedge I begin to get concerned that we might see a double phase that catches me unprepared to defend my JoPs. This might be a bit premature, but I decide to deploy a squad and put them on overwatch. They are sitting back from the hedge so that they won't have a line of sight until a British unit climbs over. That's fine by me, because it means the British can't reciprocate and what I don't want them to do is engage in a firefight with multiple British sections lining the hedge. The enemy can come to me.


The British move cautiously up towards the hedge. They want to be sure they can cover each other should Germans suddenly emerge in the woods. With the prospect of a mortar barrage I'd like to find a way to deploy in close proximity to British units to limit the effectiveness of the barrage, but that's going to be a difficult plan to execute. The engineer section splits into two teams. The mine clearing team heads towards the minefield while the corporal and the flamethrower team head towards the hedge to join the two sections.


The Germans roll a double phase, but frustratingly it's not really a lot of use. I can't move forward fast enough to try to engage the British and I'm not sure that would put me in a good position anyway. Deciding I should be ready for any sudden British move or double phase, I deploy a second squad and one of my senior leaders. Is this wise? Am I giving away my position too soon and only inviting a barrage?


A second Sherman appears near the farm and this prompts the 2" mortar to fire smoke in front of my left flank JoP. Having spotted German activity in the vicinity and judging it a possible location for the Pak 40, Dave is trying to mask off any threat before the Shermans advance. In this case the smoke drifts off target, but I'm sure we'll be seeing more.


The platoon lieutenant deploys into the farmyard to provide additional direction to the 2" mortar and the section behind the fence.

Meanwhile across the ploughed field, under the direction of the platoon sergeant, the other sections, engineer team and FO finally reach the hedge.

It's at this point I start to wonder if my deployment makes any sense. There is nothing I can do in my command phase, but sit and wait. I really should have kept these squads back and waited longer. With the FO at the hedge, I'm just going to get stonked by the mortars. I do nothing with my phase. No surprise then that the FO makes contact with the battery in their next phase.
An engineer mine clearing team has been making its way to the minefields and presents a target for the sniper, he hits, but only inflicts some shock.


The British now roll a double phase. The lieutenant at the farm sends the section forward and has the mortar fire more smoke at the JoP where they suspect the Pak 40 could be concealed. The FO calls in a ranging shot, which comes down on target. Here comes trouble. What was I thinking deploying like this?


The platoon lieutenant deploys into the farmyard to provide additional direction to the 2" mortar and the section behind the fence.

Meanwhile across the ploughed field, under the direction of the platoon sergeant, the other sections, engineer team and FO finally reach the hedge.

 |
| The FO peers through the hedge and contacts the mortar battery |


 |
| The interruption sees the squad fall back to safety |
 |
| Not so the Feldwebel, who is doomed |

With the British clearly holding the initiative I decide I must do what I can to wrestle something back. While there is still a small gap in the smoke I deploy the Pak 40 and take a shot at the carrier. It misses. Well of course it does, that carrier seems destined to make it all the way to Bremen without a scratch. Meanwhile the second squad moves across the road in the direction of the Pak 40 to try to put some distance between it and the barrage.

The British react quickly to the emergence of the Pak 40. The section on overwatch fires at the crew and inflicts three points of shock. Then in the British phase the mortar finally fills the gap in the smoke with another smoke round that completely cuts off the anti tank gun's line of sight.

 |
| Small, low profile......very hard to hit. |
The British react quickly to the emergence of the Pak 40. The section on overwatch fires at the crew and inflicts three points of shock. Then in the British phase the mortar finally fills the gap in the smoke with another smoke round that completely cuts off the anti tank gun's line of sight.

In the woods the barrage creeps back 6” and this time my squad have no escape. Fortunately their tactical stance has found them some decent cover and they only take a point of shock.


With the barrage advancing forwards, the sections and the flamethrower team take the opportunity to come over the hedge. I can't really see how I'm going to be able to hold this lot off, my defence is looking very shaky already.


 |
| Some shock and a wounded leader, is it enough? |
The Fallschirmjager leutnant (SL) deploys and orders the squad that is across the road to advance quickly to the left flank of the recently deployed squad, ready to bring fire to bear on the British sections. There's clearly some confusion and the squad creeps forward painfully slowly (2"!).
 |
| They needed to move a lot faster |
The platoon sergeant has the FO adjust the barrage back 6" where it continues to pound my squad, this time killing a man from one of the LMG team and inflicts more shock. More worrying, moving the barrage opens up the line of sight for the engineer flamethrower team.
The British section returns fire at my recently deployed squad, as does the flamethrower, which is just in range. Things could be worse, but we suffer a kill and five shock. The section on the British left pivots itself with a single dice to fire at half effect. It only manages to bring the Bren team into range, but it produces three hits which add another three shock, enough to pin the squad. Trying to capitalise on my discomfort the 2" mortar lobs an HE round at the squad, but the lack of a direct line of sight means it can't find the target.

From the rear the British advance their weakened section, while the first Sherman edges into the farmyard. Having finished their brew, they finally decided to join in the action. What a tanker!

From the rear the British advance their weakened section, while the first Sherman edges into the farmyard. Having finished their brew, they finally decided to join in the action. What a tanker!


The squad across the road finally gets moving to come to the pinned squad's aid and the accompanying Leutnant, now within 4" of the pinned squad, uses all his CI to rally off more shock. I should be able to improve my odds now on this flank.

However, just as I feel I can influence events the British roll a double phase. This is awful timing from my perspective.

The FO comes over the hedge to stay within sight of the barrage, at the same time the Platoon Sergeant moves into a position where he can exercise control over the maximum number of units.
The section on the British left tries to pivot with one dice and fire at half effect but only manages to move 1" meaning the Bren team is the only team with a line of sight. This matters less when their fire is added to the flamethrower and the section to its right. The fire could have been worse, but it results in two men killed from one of the LMG teams which wipes them out, leaving eight shock on the surviving team. German FM stays steady, but it's about the only thing that isn't going backwards for the Germans at the moment.


The following British phase sees the second Sherman emerge from behind the farmhouse. I'm not sure Dave even needs their help, he seems to be doing just fine without them.


Up in the woods the platoon sergeant orders one of the sections to fire at the pinned squad, but for once, it has no effect. He then climbs over the hedge and orders the flamethrower team to move tactically towards the LMG team and close the range.
The section on the British left finally completes its pivot, moving a full 6" and fires, but this also has no effect.

The German phase sees the leutnant and the obergefreiter rally four points of shock off the LMG team before they fire back at the nearest British section. They only manage to inflict a point of shock. I want to keep that LMG team in the fight if possible and somehow group my squads to make best use of their impressive firepower, something that's just not happening at the moment.

The German leutnant rallies off some of the shock, but it's clearly getting too dangerous to stay attached to this team and he orders the other squad he is with to fall back and he accompanies them. We must abandon that LMG team to its fate.
The end is not long coming when the two British sections pour fire at the team. The three kills see the LMG team wiped out and the leader wounded. Surprisingly the German FM doesn't drop.
The end is not long coming when the two British sections pour fire at the team. The three kills see the LMG team wiped out and the leader wounded. Surprisingly the German FM doesn't drop.

The FO moves the barrage further back and it crashes down again on my hapless squad, to no effect this time.


The leutnant moves his accompanying squad back into the cover of the woods. Having accumulated another CoC dice I now play it to end the turn. Dave also has a CoC dice and he may use it to keep the barrage, but overall I think I'm better off if I can clear the smoke and get the Pak 40 into action given the number of potential targets. Knowing this might be the case and feeling as though the barrage has probably done it's job, Dave decline to use his CoC die this way. I'm certain he's saving it for an interrupt.

I'm probably going to lose this one, but it would be nice to take a Sherman out on the way. The next phase I activate the Pak 40 and it's no surprise Dave plays his CoC die to interrupt. He activates the 2" mortar to fire smoke at the Pak 40, but it's not accurate and drifts to my left. The Pak 40 takes aim at the Sherman and.....misses.

What is it with my anti tank weapons on this map, they can't hit a thing? Over by the road, the leutnant puts the squad on overwatch, ready for the approaching British.


It looks all set for a shoot out in the woods. The Germans can still muster some decent firepower, but they need to exert that on the British sections before the armour arrives to support them.

The 2" mortar fires yet another round of smoke, this time blinding my squad by the road. As that happens the Platoon Sergeant marshals the sections and the engineers to take on my squad at the rear of the woods. One section moves with a single dice and fires, but it has no effect.

 |
| The first British squad moves and fires |
 |
| The flamethrower team moves up |
My squad in the wood is low on men but activates and fires. The British section takes ten hits, but this only produces four points of shock. The Leutnant orders the other squad to cross the road and link up with the squad in the woods. They arrive and the Leutnant does what he can with his remaining CIs to rally off more shock. We are now lined up for the big shoot out.


The British return fire in their phase, killing two men in one LMG team and wiping it out. German FM drops to five.
The Germans return fire, but can only inflict a few points of shock. The Germans just cannot bring their fire superiority to bear. I finally do something I should have done earlier and have the sniper target the 2" mortar team. It has no effect, but given the aggravation their smoke has caused, I should perhaps have made them a priority much earlier.
The next British phase sees shock accumulate on the Germans, at which point it seems clear that it really is all over for this map. The British have used superior force and a head start in the patrol phase to launch a very effective, coordinated attack from a good springboard.
I think there are several things I could have done better, but I doubt they would have changed the final outcome. I'm annoyed that I've lost this without inflicting more casualties though, because that was probably the best I could have hoped for. However the difference in FM and the low level of British losses in this game means they have been barely scratched. That said, we've dragged this out for two games and so the British move on to Map 5 in game turn 7. The clocking is ticking, but I can't defend every map, so it still feasible that the British can make their timetable.
Scenario 5 (game turn 7)
With that in mind we rolled dice to work out when the next fight would be, if there would be one at all. The British now approach Map 5. This looked like a good spot to mount a defence until I considered how easily the British could get into the village from the patrol phase. The advantage in previous games has been the amount of open ground the British need to cross, but I didn't think that was the case here and so I decided this would be the place for a Kriegsmarine supermine.
I rolled to see what the outcome might be, but all the British find is a rather large crater in the road and what appears to be the scattered remains of a farmer, a horse and a cart. The British recce team scratch their chins and ponder what might have happened while sending instructions that the village was clear of the enemy. The British commander, sensing time is against him, instructs the units not to consolidate and move fast. That's exactly what they do and so for the first time in the campaign the British swan across one of the maps.

Scenario 6 (game turn 7)
As a result we remain on game turn 7 and the British press on to Map 6 and the bridges over the river. While Map 3 offered a difficult river crossing, I wasn't so sure about this map. The Germans have so few places from where to defend their side of the river that I couldn't possibly see how I could drag this out over two games. Having used up my two supermines, I decided this was a map to gift to the British.

The British advance teams approach the bridges to find the locality eerily quiet. No shots are fired, no nasty explosions in the road and both bridges intact. They send another message back and are told to press on and make haste. With the units on a roll they speed along the road and swan over the bridges. It looks like the drive to Bremen may yet stay on schedule and so once again we remain at game turn 7 and the British press on to Map 7.
As they approach the factories at the outskirts of Bremen the advanced units begin to see more ominous signs and they advance with caution. They are suddenly taken under fire and pull back to report the swanning might be over and they have bumped into more resistance. It's still game turn 7, but the British are going to have to fight for Map 7.
This one looks like it might come down to the wire, a finely balanced campaign.
The next scenario AAR is here The Road to Bremen Scenario 7
All the campaign AARs are here Chain of Command campaign AARs
The next scenario AAR is here The Road to Bremen Scenario 7
All the campaign AARs are here Chain of Command campaign AARs
Very enjoyable! thanks once again.
ReplyDeleteThanks GReg, glad you're continuing to enjoy it. I can't say I played my best game and could have done a few things much better, but hey, we can't win them all!
DeleteVery nice report thanks
ReplyDeleteThanks once again Colbourne.
DeleteI’m really enjoying these write-ups. I actually let out an “Oh no!” when the 2” mortar failed to block the PaK 40’s line of sight. Good job they need to go back to gunnery school!
ReplyDeleteLovely, that's so nice to hear. I really enjoy writing these, it's great to relive the key moments in the game, so it's very satisfying to know others enjoy coming along for the ride. Back to gunnery school indeed, they need to be lined up against a wall and shot, although the way things are going they'd probably survive, none of my men seem to be able to hit a thing.
DeleteAnother splendid read, some wonderful "what if" moments of war. On tenterhooks for the next one now.
ReplyDeleteThanks and yes, lots to ponder about what might have happened. Hindsight, eh?
DeleteGreat report sir, lovely pictures, terrain and figures!
ReplyDeleteCheers Phil, glad you’re enjoying it.
DeleteGood stuff! I'm looking forward to more.
ReplyDeleteShame about the enforced break for a few weeks, we’re so close to the end. I can’t wait to get back to it, we have it all to play for.
DeleteWhat a great AAR and series of posts! It's nice to see a campaign going so well, as every time I've been involved in one it was more trouble than it was worth. The drawn maps are also very helpful. Excellent blog! i've added this blog to my bog roll so I can stay abreast of updates easier.
ReplyDeleteThanks Stew, I’ve really enjoyed all the campaigns so far, they’ve been full of ups and downs, yet balanced enough that they’ve not been decided until the last scenario. By the way, I’m sure you meant to say you would add me to your ‘blog roll’ rather than consign me to the lavatory! Predictive text, eh? LOL
DeleteOh my, yes! I’ll also blame predictive text and my fat fingers. 😀
DeleteExcellent work. Very much enjoying the reports, keep them coming. It's my little vicarious pleasure since I am not getting much gaming in these days.
ReplyDeleteDo PzFsts regenerate between rounds? Tough game, The luckiest carrier in the war. Barrages a just killer, I think I would have ate the one round of artillery, and used the CoC die to end the turn hoping the Brits run out of missions. If not little you can do but take your lumps.
ReplyDelete