
If they succeed the Germans will attain only a minor victory. This in turn will have a knock on effect on our next campaign The Scottish Corridor as it will determine how many platoons the Germans will have available. For that reason there is still much to play for.


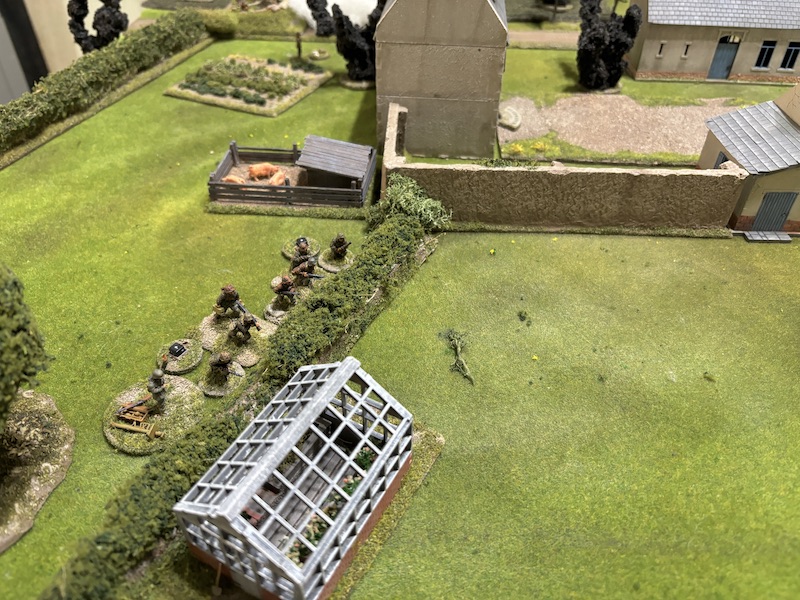
A second deploys into the orchard behind them and they too take up tactical positions.


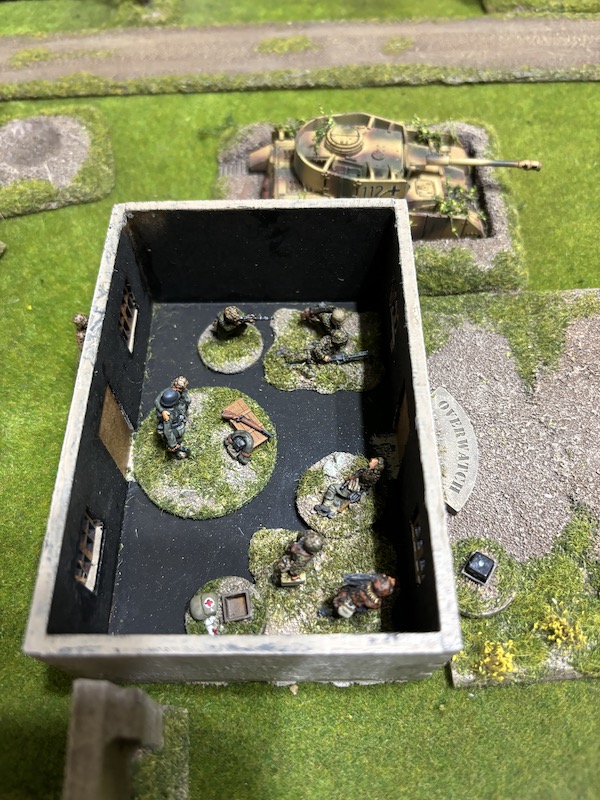
They are joined by an oberscharführer (senior leader) who remains outside.

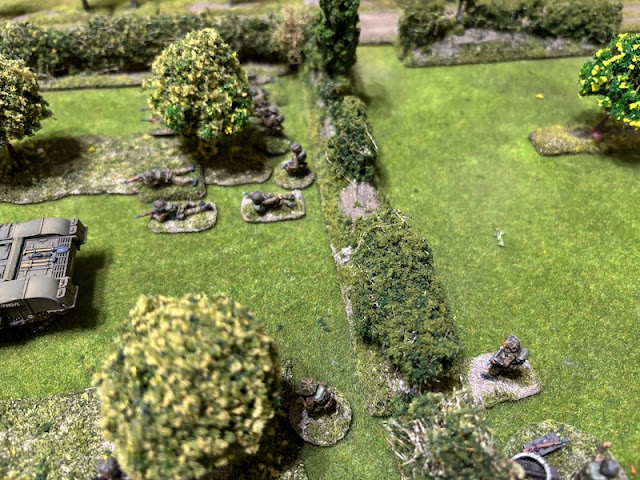
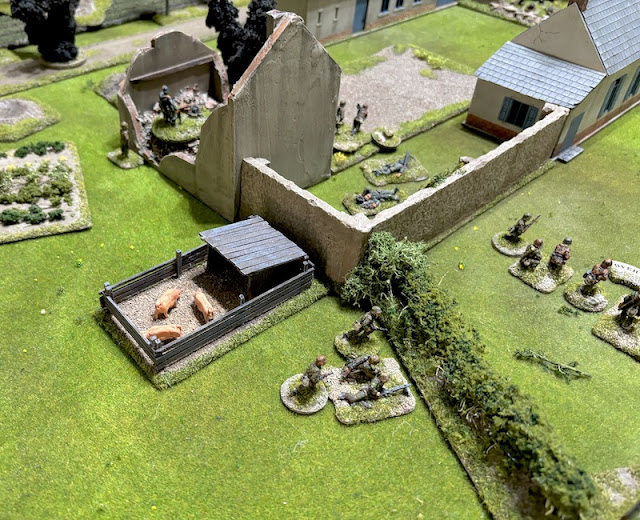
The squad's LMG teams take up overwatch positions covering both the farmyard and the breach in the farm wall.


They are hoping to block German line of sight along the road and give the British an option to work around that flank of the farm complex. Unfortunately the crew are off target and the smoke round lands in the farmyard.


Despite being pinned their accuracy is much better - just as well, their survival depends on it! The smoke round lands right on target and obscures the gun.


That's enough to break the team. They fall back and as the platoon sergeant is attached he will go with them.


The Germans lose one man and suffer two points of shock.

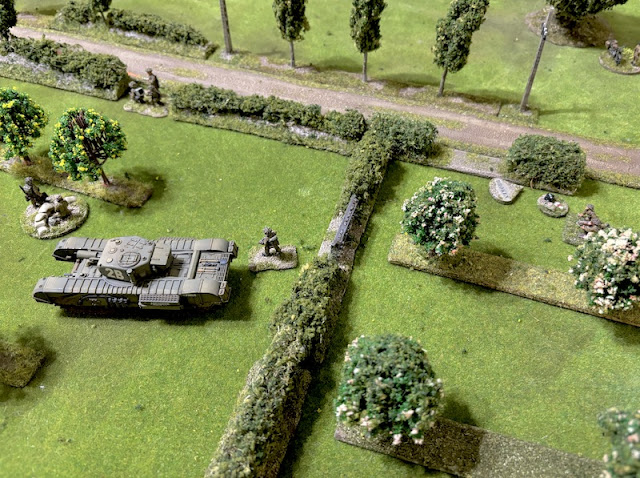
I want to push ahead with the infantry to ensure the Churchill is not isolated. There's always the danger the Germans try to spring a panzerfaust ambush from the farm. Close infantry support virtually guarantees the short range panzerfausts won't have the reach to hit their target.


He has only a short distance to move to exercise command.


It lands right on target in front of the Pak40.


They have a line of sight to the lone leader and while it's at long range the entire section can target him.


They move as fast as they can in the hope they are clear.


It won't be long before the buildings come into line of sight.


The platoon sergeant moves up to the hedgerow in the orchard and into command range of the sections ahead of him.

He orders the one to his right to advance towards the farm ahead of the Churchill AVRE.
They move quickly taking care to stay behind the cover of the smoke and the farm buildings.

He orders the section to his left to move forward more cautiously knowing that the farm buildings are occupied by the enemy.

That should ensure there are no opportunities for a panzerfaust ambush when the Churchill advances closer to the farm.

The section in the field takes full advantage of the cover the barrage now offers. With no Germans in sight they move forward as rapidly as possible.
They still have some way to go but there is a good opportunity to approach the farm from a flank the Germans may have difficulty covering.


He then orders them to move at the double towards the hedgerow alongside the farm buildings.

From there they can cover the German right flank and, for now at least, it puts them further from the barrage.


He has them take up tactical positions.

Likewise he gives a similar instructions to the section to his left.


Once there he puts one of the squad's LMG teams onto overwatch to cover the farmyard.


Fortunately it has no effect, but that section is in a bad position and British morale is sinking fast.


As if things are not going badly enough the Germans trigger a nasty surprise in their next phase. A PzIV has been lying concealed in a tank scrape by the farm and it now reveals itself by firing at the Churchill AVRE.

Despite waiting in ambush the gunner's aim is off and the AP round fails to strike the tank. That's a fortunate escape for the Churchill.


They fall back to within 6" of the table edge and British morale drops to five. I'm beginning to fear a collapse in British morale will be my undoing.


This is what the Churchill AVRE was designed to do and it has done it well.

In one resounding explosion it has broken the centre of the German defence, but with force morale low, have the British run out of time to take full advantage?


He calls it in on the same spot and hopes the battery can stay on target.


One of the LMG teams of the squad at the rear hedgerow are less fortunate but they suffer only one point of shock.


Aside from that lone MG42 gunner there is now a gaping hole in the centre of the German defence.


He orders the nearby MG42 team to move up to the hedge to the right of the farm.
It looks like the Germans are trying to avoid the barrage and make a push around this flank.


However the PzIV crew suffer more shock.

As does the LMG team at the rear.


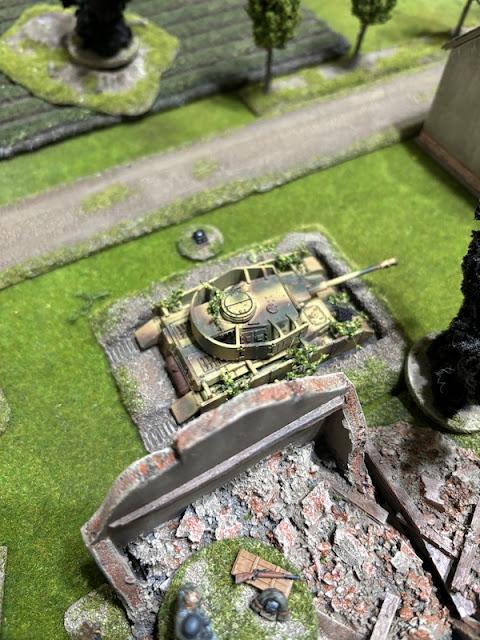
He then orders the driver to reverse out of the tank scrape.


The panzer grenadiers are never short of firepower but they remain in a vulnerable position in the open.

If I can bring British fire to bear from the orchard I should be able to gain the upper hand - with more firepower and from better cover.


The Vickers team then opens fire.

And they are joined by the section.


It's enough shock for the squad to break. That takes German force morale down two points to two.

The squad is forced back and they move right off the table taking their scharführer (junior leader) with them. That's another big blow to German morale, which crashes to zero.

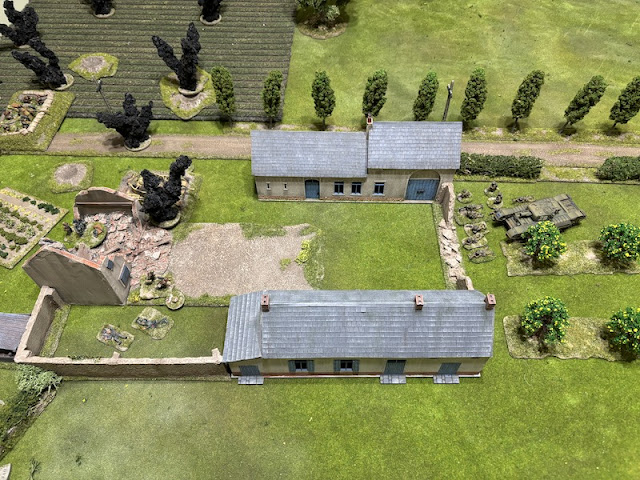
So here we are at St Nicholas Farm. Again. The ground is more than familiar to both sides and we are now well aware of how things could play out. In the previous game a Churchill AVRE blew a breach in the farmyard walls and I'm hoping that might have made it a slightly less formidable obstacle.

The British have three free moves at the start of the patrol phase and make some progress into the orchards but no more than that. The German jump-off-points are in almost identical positions to the previous game.

German force morale will start at ten while the British are only at nine. However, the British have ample support points with twenty two available. For this game I've decided to focus on taking out the German infantry. I'm hoping a 3" mortar barrage will neutralise anti-tank weapons and restrict how flexible the Germans infantry can be in response. A Churchill AVRE will be on hand to blast the enemy out of any positions. An extra infantry section and a Vickers MG team are there to add additional firepower and manoeuvre elements. Lastly an extra 2” mortar team will be on hand to provide covering smoke.
A reminder that we are using a few playtest/house rules for the 3" mortar battery and the Churchill AVRE and you can find them at the end of this post.
With the higher force morale the Germans have the first phase but elect to do nothing. As the British I see no point in lingering and make that intention quite clear when the first thing that appears is the Churchill AVRE. It has some way to go, so the sooner it starts the better.

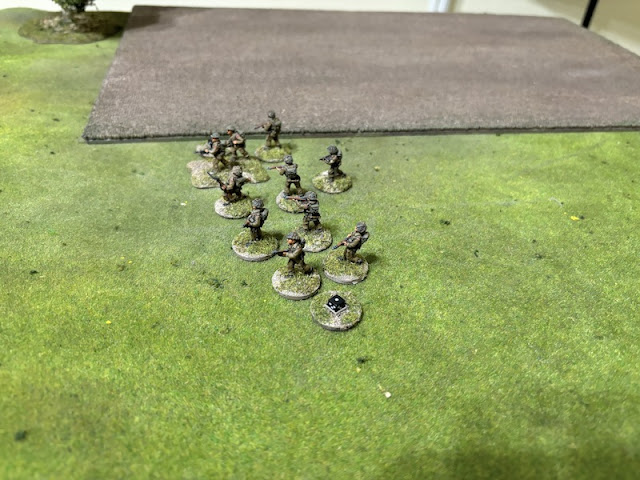
The first of the rifle sections deploys into the orchard closest to the farm. They take up up tactical positions.


With the British already making their presence felt the Germans wisely deploy one of their panzer grenadier squads into the main farmhouse.


In the British phase the platoon's 2” mortar team deploys into the road and fires a round of smoke.


The forward observer takes up a position in a gap in the hedgerow near the mortar team. No time is wasted and he makes contact with the 3" mortar battery.

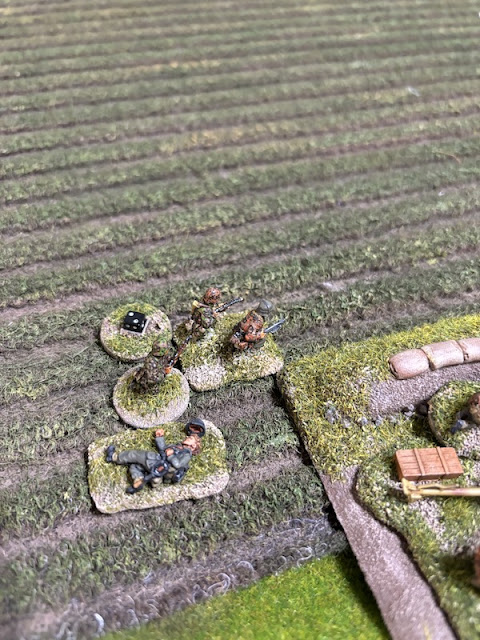
They are in for a nasty surprise. The Germans have an entrenched Pak40 concealed near the road and the sight of the forward observer and 2” mortar team proves too tempting a target for them to resist.


The HE round finds its mark and the 2” mortar team are lucky to escape without suffering any casualties. That said, they do suffer three points of shock and that pins them.

The British platoon sergeant is sent to restore some order. He joins the 2” mortar team, rallies off two points of shock and has them fire a smoke round at the Pak40.


The section nearest the forward observer then advances up towards the hedgerow as the Churchill makes its way slowly behind.

The following German command roll is 66321 and heralds a double phase. A squad deploys from the rearmost jump-off-point near the Pak40 with one LMG team on either side of the gun.


One of those teams can just spot the 2” mortar team and they open fire.

It may be at effective range but the mortar team are caught in the open and are fortunate to suffer only a single point of shock.

In the following German phase the LMG team fires again.

This time the fire is more deadly. One of the crew is killed and the surviving member suffers three more points of shock.


Fortunately they don't rout off the table. Had they done so they would have taken the platoon sergeant with them and that would have been a bit of a disaster. Nonetheless British force morale drops to eight.

The oberscharführer tries to enter the farmhouse but makes it only as far as the door.

In the British phase the sergeant rallies two points of shock from the 2” mortar team. He then moves over the hedge. That keeps him in command range of the broken mortar team but no longer attached. I don't want to risk an unexpected turn end that sees him rout off the table with the crew.

A third British section deploys on the British right in the open field. They open fire on the LMG team that targeted the mortar crew.


Meanwhile the British continue to push through the orchard and the section on the right crosses the hedgerow.


In the German phase Dave wants to move the vulnerable LMG team to cover but the command roll of 42222 limits his options. The oberscharführer at the farm takes control of the situation.


While he makes it to within command range he doesn't make it to cover himself.

Nonetheless he ensures the LMG team do move to cover behind the smoke screen.

In the British phase the forward observer calls in an aiming round.


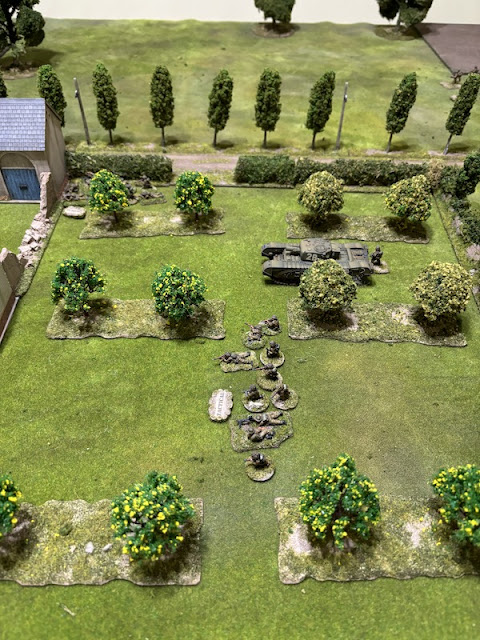
Meanwhile the Churchill AVRE continues rumbling forward through the orchard.


At the rear the platoon sergeant rallies the remaining shock off the surviving member of the 2” mortar team. They may not see much more action in this game but at least they won't rout off the table should the turn come to an end.

The fact the oberscharführer didn't make it to cover has not escaped the attention of the section out in the field.


He's hit and suffers a light wound that puts him out of action for the remainder of the turn. That's enough to see German force morale drops to nine.

In the German phase the squad's scharführer (junior leader) rallies the remaining point of shock. He then orders all the men to move at the double before the impending mortar barrage rains down upon them.


It's no surprise that the first thing that happens in the British phase is the forward observer calls down the barrage.

Fortunately for the Germans the squad has moved far enough to avoid the impact. On the other hand the Pak40 crew and the wounded oberscharführer are not so fortunate, yet they survive the initial bombardment unscathed.

The Churchill continues to drive forward towards the farm.


With the shock removed from the 2” mortar team the platoon sergeant makes his way through the orchard toward the front line.


In the German phase the scharführer at the rear rallies off a point of shock before ordering his squad over the hedge and further away from the barrage.

In the British phase the forward observer calls in a request to move the barrage.


The next German command roll is 65532. While it doesn't offer many options for activations it does give them their first CoC dice and I think it's fairly obvious how Dave might want to use it. The end of the phase would be an ideal time to end the turn and with it the barrage. That's unfortunate timing from the British perspective.
The scharführer rallies the last remaining point of shock on his squad.


That's the only German action of the phase and it comes as no surprise to see Dave use that full CoC die to then end the turn.
From my point of view that's a bit of a blow. The British were making good progress up until now. Unfortunately, while I'm very close to a full CoC die myself I don't have one to keep the barrage active. With the mortar smoke removed and the barrage about to lift I have a horrible feeling things may be about to take a turn for the worse.

The wounded oberscharführer also gets back on his feet. He is still under the barrage but given that is shortly coming to an end he will soon be free to move again.

The only benefit for the British sees the lone survivor of the 2” mortar team back in action.

When the British phase arrives I need to consider my options. Most significant is whether or not the barrage will be available. The forward observer tries to get hold of the battery. To my relief it's not lost completely, but it isn't available this phase.
Meanwhile the section in the open field needs to make the most of what cover they can find and they move tactically.

What looked like a good move only a couple of phases ago now looks very risky.

In the orchard the platoon sergeant moves up to the Churchill AVRE.

That puts him in command range of both sections. With the smoke gone the section by the farm buildings could find itself exposed to fire from the farmhouse.


With the phase completed the barrage lifts and the British must wait to see how the Germans respond.

The following German command roll is 66611 and that doesn't bode well. A double phase and a turn end. If there is any consolation it's that the forward observer failed to make contact with the mortar battery. Had he done so then the turn end would have seen it lost before it had even begun.
Dave is determined to put a more drastic and permanent end to the barrage. The Pak40 targets the lone forward observer with a round of HE.

He suffers four hits and one of those is a casualty. That results in a wound that means he won't be able to move for the remainder of the game, but at least he's still in action.

With that the turn ends and all the British sections are no longer in tactical positions.
In the subsequent German phase the oberscharführer has the Pak40 target the forward observer once again but this time the gunners fail to find their target and it has no effect.

The oberscharführer then wisely moves himself to a safer location behind the farm house.


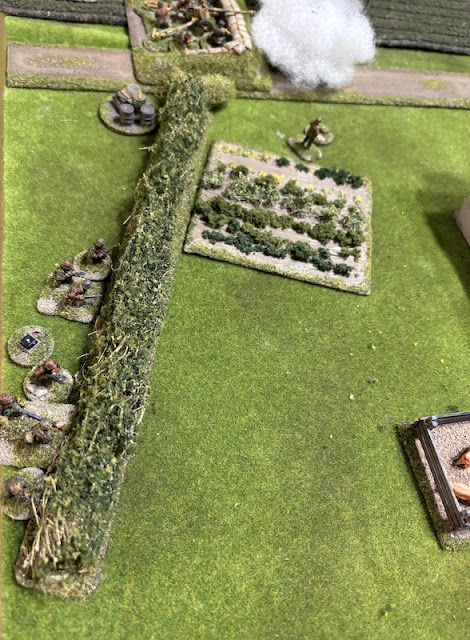
More ominously a third panzer grenadier squad deploys at the rear hedge.

From there one of the teams can target the British in the field (the other MG42 team has their line of sight obstructed by the Pak40 team).

Nonetheless a hail of automatic fire sweeps the open field. The result is deadly. The entire Bren team is wiped out and the rifle team suffer a point of shock. That brings British force morale down to seven.

The squad at the hedge on the other side of the farm takes up tactical positions. Once again St Nicholas Farm comes back to haunt the British as a very tough position to assault.

The next British command roll is 55522. The CoC points are certainly very handy but the activation options are rather limited. I really need to bring the Churchill AVRE into action and see if the mortar battery can drop another barrage. For now the British must pause and so both sections in the orchard take up tactical positions.


During the German phase the oberscharführer has the second LMG team in the farm also take up overwatch positions.

Meanwhile the squad at the rear hedge continues to target the British in the open field.
The MG42 fire continues to scythe down the hapless section. It inflicts a further three casualties and lightly wounds the section corporal. They suffer more shock but not enough to see them pinned down. The sight of the wounded corporal is enough to take British force morale down to six. This isn't going well.

The Pak40 fires a round of HE in an attempt to do even more damage.


On the other flank the panzer grenadiers at the hedgerow are placed on overwatch.

In the British phase there's a ray of hope when the forward observer's request to the battery for another fire mission is successful.
In the orchard the Churchill AVRE makes its way forward, taking care to use the cover of the farm buildings to avoid the attention of the Pak40 crew.

More importantly it now has a line of sight to the farmhouse. That puts the Germans in a difficult position and has the potential to unhinge their defence.

Lastly, the wounded corporal in the field has the remnants of the rifle team move tactically in a desperate attempt to find some cover.


The same cannot be said for the section in the open field. The panzer grenadier squad at the rear maintain their fire.
It continues with deadly effect. The rifle team lose another man and a further two points of shock is enough to see the survivors break.


Much now hangs on what the British can do in their next phase. Fortunately the command roll is 43221 and that will allow much to happen. The time has come for the Churchill AVRE to show its worth. It lobs a 230mm round of high explosive at the farmhouse.

It it explodes with devastating effect. The Germans suffer eleven hits resulting in three casualties and a point of shock.
More significantly the attack roll included five 6s meaning the farmhouse collapses immediately. Amidst the carnage of falling masonry a further two Germans are taken casualty. The three surviving men of the squad - two LMG teams reduced to a single crew member each and the squad's oberscharführer all stumble out into the farmyard.


Time is indeed of the essence and the forward observer decides to forego an aiming round. He must risk bringing the barrage down immediately.


The barrage descends to the right of the aiming point but will still do much to limit the German response. The mortars have no effect on the Pak40 crew but they are now pinned down and without a line of sight.


The PzIV receives a hit and that inflicts a point of shock on the crew and puts it out of action for the next phase.

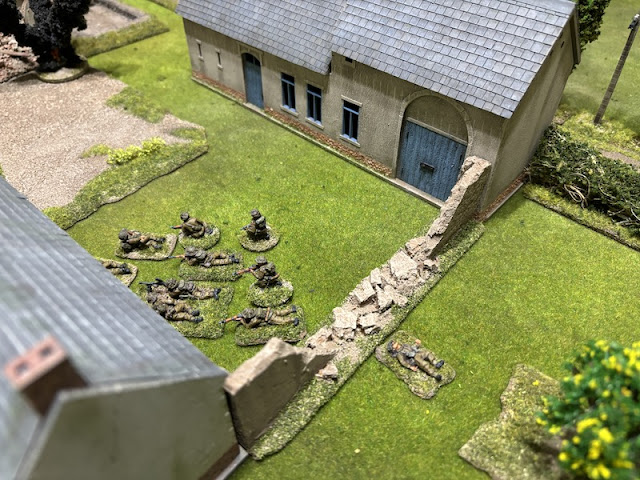
That leaves only the surviving members of the squad from the farmhouse holding the farm. They may be just a handful of men but they are armed with MG42s and caution is called for. The section in the orchard moves slowly up to the rubble by the breach. Only the bren team and a couple of riflemen move far enough but they are able to fire at half effect into the farmyard.

The surviving member of one of the LMG teams is killed, as is the squad's scharführer. That brings German force morale down to eight and leaves a single survivor.


The second British section in the orchard moves forward towards the breach in the farmyard wall.

The platoon sergeant moves up to join them.

Just when I feel the British have recovered their momentum the German command roll is 66221 and I must face a double phase. The squad scharführer at the hedge by the farm rallies off a point of shock.

Then in what appears to be a very aggressive move he orders the whole squad over the hedge.

They may be looking to simply close the distance with the British and avoid the barrage should it shift in their direction. Whatever it is, I'm not sure what the Germans have planned but I have a CoC die available should I need to interrupt.

The lone MG42 gunner in the farmyard returns fire at the British section and inflicts a point of shock.

The squad at the rear has one team pinned down in the barrage but the remaining team move over the hedge towards the right hand side of the farm.

In the following phase the platoon's oberscharführer deploys to join the squad on the German right flank (it turns out the other oberscharführer is a support leader).

He rallies shock and puts both teams on overwatch.

The support oberscharführer is at the rear of the farm.


The lone MG42 gunner in the farmyard continues to hold his ground. Once more he fires at the section near the breach.

He proves quite a nuisance and the rifle team suffer a casualty and another point of shock.

The PzIV commander rallies the shock from the crew.

The German double phase was not as bad as it could have been and fortune finally favours the British with a command roll of 66511. There is not a lot that can be done during this phase but I'm hoping across the two phases I can adjust the mortar barrage. The forward observer places a call to the battery requesting an adjustment.

The Bren team at the breach attempt to wipe out the lone German in the farmyard.


He's clearly made of heroic stuff and refuses to go down easily. He suffers a single point of shock.

The subsequent command roll is 66421 and could not come at a more opportune time to keep the initiative with the British. The platoon sergeant has the Bren team fire into the farmyard again.


There is only so much one man can take and he is killed. That sees the LMG team wiped out and takes German morale down to seven.

The platoon sergeant then rallies shock from the rifle team.

The forward observer wants the barrage shifted to the left and I opt for a 2D6" move. In the end it's not quite far enough to bring it down on the other side of the farm but it will still restrict German line of sight and movement. Once again the Pak40 team seem impervious to damage from the falling mortar rounds.


The fourth British section deploys on their left flank in the orchard and takes up tactical positions.

With the remaining German infantry on this flank I need to be sure I can win the firefight.

Fortune really is smiling on the British at the moment and a command roll of 66532 sees the run of phases continue. The Churchill AVRE spends the phase reloading while the newly arrived section makes its way forward through the orchard.

The following British command roll is 63211 and the run of phases will not continue, but I can have no complaints. The forward observer calls down the barrage again. This time the Pak40 crew show they are beginning to get rattled and suffer a point of shock.

The LMG team at the rear also suffers a point of shock.

Just as I'm bemoaning the lack of casualties caused by the barrage the support oberscharführer is hit. He is lightly wounded and that brings German morale down to six.

The barrage continues to inflict more shock on the crew of the PzIV and that rises to two.

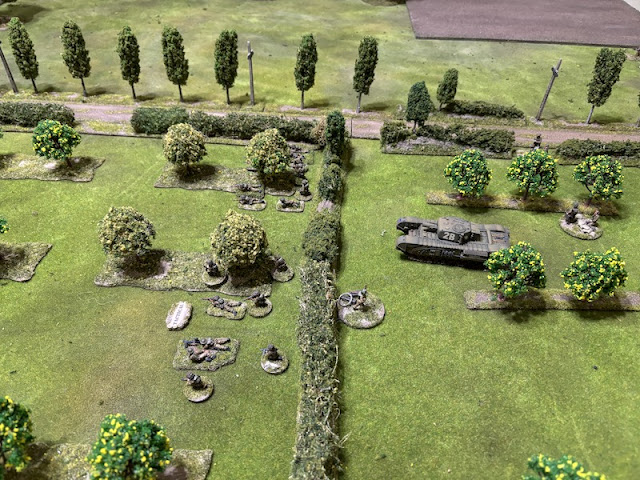
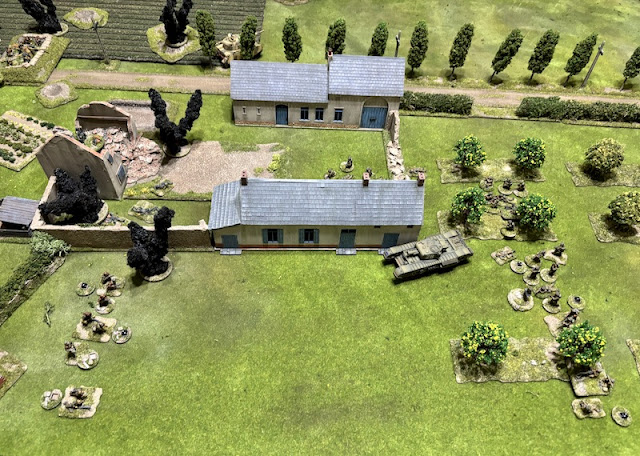
While the barrage keeps some units suppressed a real threat is now developing at the side of the farm and that's where the British now need to focus. The Churchill makes its way around the outskirts of the buildings.

The recently arrived section in the orchard moves forward tactically knowing they are likely to come into range and line of sight of the Germans.

The move does just that and the waiting Germans are on overwatch. They open fire immediately.

The rifle team lose one man and suffer a couple of points of shock.

Lastly the Vickers MMG team deploy into the orchard on the British left.

If they can move up to the edge of the orchard that should give the British the upper hand in any firefight.

In the following German phase the scharführer under the barrage rallies the shock from the attached LMG team.

The commander of the PzIV rallies a point of shock.


The oberscharführer orders the LMG team behind the hedge to come up and join the squad. He then orders one of the other teams to open fire on the British in the orchard.

Another rifleman is taken casualty and the section suffers two more points of shock.

The oberscharführer then orders the remaining LMG team to lay down covering fire.


The following British command roll is 55543 which brings me a second CoC die. There might not be a lot of command options but maybe just enough to maintain the pressure on the Germans.
The Churchill AVRE makes its way around the farm buildings to the edge of the orchard.

That puts the Germans in a very dangerous position.

The platoon sergeant orders the Vickers MG team to join the section near the edge of the orchard.

He then orders the section to fire. They may be under covering fire but the Germans are at close range and in the open.

They lose two men and the oberscharführer is hit and lightly wounded. That's another blow to German morale which drops to five.

The section at the farmyard breach make their way towards the door of one of the farm buildings.

In the German phase the commander of the PzIV rallies off the last point of shock from the crew.

He then orders the driver to advance and try to escape the barrage.


The oberscharführer orders the squad by the farm to open fire but before they can do that I use one of the British CoC die to interrupt. It will be the AVRE of course.

The massive HE round explodes amidst the panzer grenadiers. There are four casualties and whilst these all come from the LMG teams none are wiped out. Two are reduced to a single gunner while one has two surviving crew members. The squad's scharführer is also hit and lightly wounded. That brings German morale down to four and below that of the British for the first time in the game.
The remaining Germans now get to complete their action. The two teams from the squad both open fire. The nearby LMG team will join in, but they must move before having a line of sight and so fire at only half effect.

The Vickers team suffer two points of shock.

The section lose another man. More significantly the section corporal is hit and lightly wounded and that bring British morale down to four.

The game is now balanced on a knife edge. This is an Attack & Defend scenario and the British cannot win if their morale drops below three. Dave spots an opportunity that could bring it down two points. He uses a CoC die to end the turn which means the broken survivors of the section that tried to cross the open field must rout from the table - taking their corporal with them. A roll of 3 or more on the Bad Things Happen table would result in British morale dropping by two and all hope of victory lost.

My heart sinks.....I feel so close to driving the Germans from the table. In the heat of the moment I'm not thinking clearly and then I remember I still have a full CoC die. There is no better time to play it than now and avoid that force morale roll. That's exactly what I do.
The British are down to four command dic, but a roll of 4321 is enough to do what I need to do. The platoon sergeant joins the section in the orchard and rallies off shock.


The German LMG team with two crew members loses another casualty and the squad suffers a further five points of shock.


Talking about snatching a victory from the jaws of defeat! That was a very tense and close run game and could so easily have gone either way. The British supports made the difference today - the barrage effectively closed down sections of the battlefield and the Churchill AVRE proved devastating once it finally had a chance to target the farmhouse. Yet when all is said and done we may have won a battle but we lost the campaign. The only consolation being today's victory prevented the Germans from achieving the major victory that they came so close to winning.
So that brings the campaign to a close with a minor victory for the Germans. The aim of Operation Martlet was to clear the flanks before the start of Operation Epsom. As happened historically, the British were not entirely successful. Given we intend playing The Scottish Corridor campaign this result will have implications for the number of platoons available to the Germans. A minor victory in Martlet means the Germans have three platoons but one will be withdrawn after two games (a major victory would have given the Germans three platoons available for the entire campaign).
Many thanks for following the campaign. It had several twists and turns, making for a very enjoyable playing experience. I hope I've managed to capture some of that in the AARs.
If you want to see how this follows on into the Scottish Corridor campaign, you can find the report of the first game in that series in this post.
If you've enjoyed following along and would like to Buy Me a Coffee to help support the blog you can click through at the link or on the tab in the right hand column of this page.
You can find all the game reports for this campaign and for many others on the Chain of Command AAR page.
A Hollywood finish to an exciting campaign. I look forward to your Scottish Corridor sequel.
ReplyDeleteThanks for sharing.
Thanks, it was the perfect end to a campaign full of twists and turns. Thanks for following along (and the coffee!).
DeleteSimply stunning climax to the campaign and so close! I enjoy reading these AARs so much.
ReplyDeleteIt was great to see the AVRE finally justify its points cost in what was a great game, albeit a Pak 40 targeting individuals with HE is a tad gamey. Is there an identifiable point in the campaign where you think it was lost?
Enjoy the coffee... :o)
It’s been a very entertaining campaign that certainly had its twists and turns. Glad the AVRE had a chance to show what it can do and yes, the Pak 40 trying to gun down the forward observer might stretch credulity! I suspect my decision in Scenario 5 (Winning your Spurs) to go without any armour and ending up vulnerable to the PzIV was a turning point.
DeleteAnd thanks for the coffee!
DeleteWhat a splendid nail biter of a game….
ReplyDeleteAn excellent AAR…
All the best. Aly
Thanks Aly, it was a great way to end the campaign and I’m glad you enjoyed it.
DeleteIt's always a treat to find a new AAR on your blog, and what a nail-biter it is! Right down to the wire. Thanks for sharing. I'm looking forward to the Scottish Corridor campaign.
ReplyDeleteThank you, it was a very tense and enjoyable game and hopefully I managed to convey some of that in the AAR. A great way to finish off the campaign, thanks for following along.
DeleteGreat AAR as usual and what luck you had that CoC die yo skip the morale test.
ReplyDeleteEven if lost the campaign, it’s fun to go out on a victory. 😀
Thanks, yeah, good to go out with a good game and a tactical win even if the campaign was lost. No complaints, it’s all about the journey.
DeleteWhat a battle - a fitting end to the campaign! Thanks as always for the great work you do in creating these AARs and I look forward to the Scottish Corridor campaign in due course!
ReplyDeleteGlad you enjoyed and thanks for following along.
DeleteA sort of splendid end to the campaign, the British have fought hard for a win through out.
ReplyDeleteThanks Phil, it was a nice way to round off a very intriguing campaign with plenty of twists and turns.
DeleteWell written and interesting AAR of the decisive game of the campaign.
ReplyDeleteGreat terrain by the way!
Than you - glad you like the terrain too!
DeleteAs always, You AAR is better than most movies.
ReplyDeleteHow exciting! I must say that the CoC rules look a bit on the difficult end to learn.
ReplyDelete