When I first returned to miniature gaming it was to play Crossfire in 20mm. All my initial buildings were scratch built using foam core and I made them specifically with Crossfire in mind, a set of rules which works particularly well for urban fighting.
For ease of gameplay it made sense to construct each model as a roofless ruin with interior rooms conforming to the size of building sectors in the rules. That made construction less complex and it meant that roofs and tiles were the last things on my mind.
Those buildings still see use and have made great ruins for other games using Chain of Command. They featured prominently when we played The Road to Bremen campaign, as the final games took place in the ruins of the city itself.

As the units in Crossfire were on 40x40mm bases I limited the amount of rubble in each building as I've never liked the sight of large bases balancing precariously on mounds of debris. While there's no doubt that was functional it had a tendency to leave the ruined terrain looking somewhat sparse. I do have a longer term plan to rework many of them to include a lot more rubble. That's partly for aesthetic reasons but also because now I base most of my figures individually.
I used the same building technique only recently to create a new ruin. We were in the midst of playing another campaign for Chain of Command and a hit on a house by a round of 150mm HE caused it to collapse. As we were refighting over the same map in the following game I wanted a ruin that would match the exact footprint of the original building. A scratch build with foam core was the simplest and quickest solution.
The main structure is cut from foam core and glued together using PVA glue. I find a few pins inserted through the foam core are a good way to hold things together while the glue dries. The interior and rubble were added using coffee stirrers, household filler and cat litter.
To keep it versatile I made a detachable pile of rubble that could be placed adjacent to the building if space permitted.
The window shutters were a last minute addition from my spares box and were left over from a Sarissa MDF building.
This was a quick build and was ready to replace the earlier building in the next game in our campaign.
Having avoided making roofs for the initial buildings for Crossfire I realised that with a little bit of work I could repurpose one to make the Opium Factory for our 1942 Singapore based campaign
Last Stand on Opium Hill. I built a simple frame using balsa wood that would allow the roof to be removed during games and covered that with pieces of corrugated cardboard. At the same time I used wire gutter guard from a hardware store to make very simple window frames. It gave the building a new lease of life.
Foamcore comes in a variety of thicknesses and for my 12mm Second World War project I used the thinner 3mm sheets to make a series of ruined buildings in much the same way as I had in 20mm.

Construction is very straightforward as you can see.

By peeling back the paper coating and revealing the inner foam you can then scribe bricks or other shapes.

The foam core can be textured and for this I use regular household filler.

The end result are a number of light but sturdy buildings made at very small cost.
The beauty of scratch building is that you have complete control over the dimensions, which means you can be sure they are sized to work with the basing of your figures.
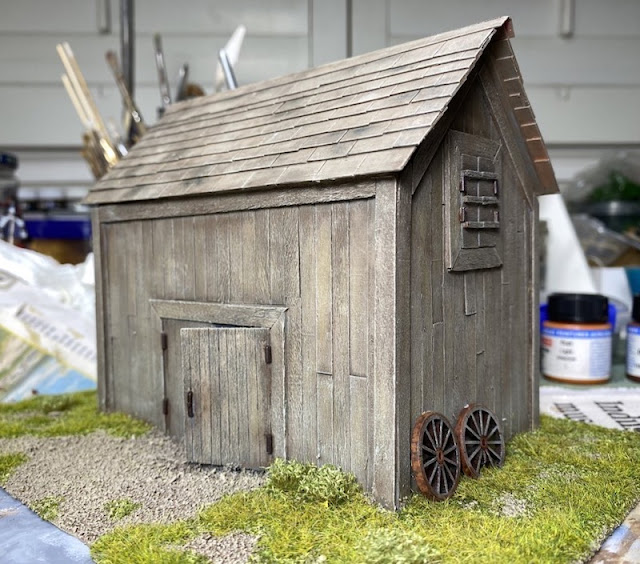
While it's fair to say I've used foam core to make a lot of ruins I've also found it useful to build the basic shape of a complete building. I used it in this way to make a 28mm wooden barn (you can follow the full build in
this post).
This gave me the main shape and a strong base onto which I could attach wooden coffee stirrers.
The detachable roof was made in exactly the same way except the roof shingles were made by cutting up a cardboard cereal box.
I've found foam core to be a very versatile material. It's light but strong and yet easy to cut to shape with a craft knife. PVA glue works for most applications and extra detail can be added using a variety of different materials. The factory below was one of my early builds for Crossfire and the chimney was made from the inner roll of kitchen foil. To be honest that's very obvious if you look at it closely, something I've always intended to address!
If you've found this post useful and would like to
Buy Me a Coffee to help cover some of the costs of running the blog you can click through at the link or on the tab in the right hand column of this page.


I like the idea of the detachable rubble and also the ability to give the suggestion of a factory with those sloping structures to accommodate skylight glazing, which are hard to come by commercially or expensive - photo 2.
ReplyDeleteI’ve tried to find a balance between form and function. The modeller in me wants to go for maximum visual effect, but the gamer in me wants it to be functional for the tabletop. I think detachable rubble ticks the box for functional and also keeps it versatile.
DeleteMore inspiring stuff.....I do something similar but just use standard 2 or 3mm card most of the time....I also used cork floor tiles for a while, mainly for Afghan compounds when I was doing a 'War on Terror" collection. I did spot the giveaway line on the kitchen foil tube....mainly because I have used similar raw materials when I built a minaret for a mosque!
ReplyDeleteI’m a fan of cork floor tiles too and I’ve used them in a similar way as you (see the buildings in my Sudan project for example). I think both cork and foamcore are excellent, they are easy to work, strong yet lightweight. Now if they only came in tubes 😉
DeleteExcellent article - I have a built a few buildings from foam core and found it to be the easiest material to build with that I have so far come across. Some good tips in here for newbies and experienced builders alike.
ReplyDeleteThanks. It’s a great material given how versatile it is - easy to cut and glue, lightweight but strong, lots to like about it.
DeleteExcellent work on these buildings, they look very effective.
ReplyDeleteThanks Ray, glad you like them.
DeleteMighty fine building bashing going on there.
ReplyDeleteThanks Phil, it’s such an easy material to work with it’s very tempting to get carried away.
DeleteReally inspiring
ReplyDeleteI imagine Barn full of buildings all ready todeploy.
ReplyDeleteI wish I had a barn to store all this stuff in rather than a small attic cupboard!
DeleteAnother good reason why every scratch-building wargamer should own a cat!
ReplyDeleteThese are a world away from my foamcore buildings, albeit mine were deliberately intended to be 'old-school' - they can be seen towards the bottom of this blog post: https://thehintonspieler.blogspot.com/2016/10/if-cap-fits.html
ReplyDeleteGreat stuff Rob, you’ve definitely captured that old school look.
DeleteNicely done! Foamcore's an excellent medium for scratch-building. I use it a lot for my tabletop buildings.
ReplyDeleteThanks. It is a great material and so versatile.
DeleteI have long thought that chimney's should have spiral grooves on them. Your models look excellent.
ReplyDeleteHaha, don’t they all? I’m actually tempted to try wrapping it in the brick wallpaper I used for the factory.
DeleteThose are very effective and not as expensive as MDF etc. 🎂
ReplyDelete