Wednesday, 23 July 2025

Saxon Warband? What Saxon Warband?

Yes indeed, I have a Saxon warband. How did this happen? 

Let's just step back a few months. Regular readers may recall that earlier this year I added Victrix Germanic tribes heads to six figures from a Gripping Beast set of Dark Age Warriors to make up a group of slingers for my Infamy, Infamy! project.

Those Gripping Beast figures were bought at the same time as a box of their Vikings and Saxon Thegns. This was a few years ago, when we first heard about the Saga rules from Studio Tomahawk. It turned out those rules were not my cup of tea and so the figures were consigned to the stash. In fact, I sold the Vikings and Saxon Thegns at a Bring & Buy a few years later, as I had no apparent need for them. I hung on to the Dark Age Warriors, imagining they might be useful to make up groups of warrior infantry for Lion Rampant. Not that I did much about it, they lingered in storage for some time.

Putting together the slingers was the motivation I needed to do something with the remaining figures. I had a few sets of Little Big Men shield transfers for the Saxons and so I used those as part of the project. My initial impression of the Gripping Beast figures was not great, especially when compared with the lovely Victrix figures I had just been working on. As a result, I decided I wouldn't base them individually, they would look better packed tighter together using multi-basing instead of sabot bases.


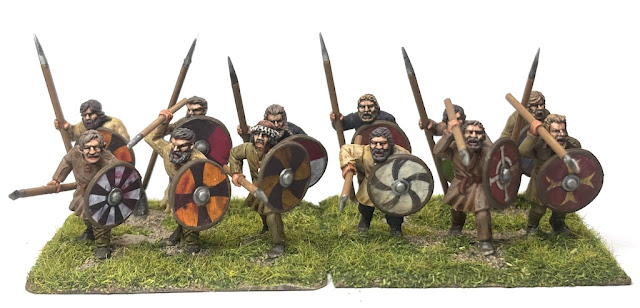
While multi-basing can be restrictive, I tried to think about making the figures as versatile as possible for different rule sets. A group of warrior infantry/light infantry in Lion Rampant is twelve figures, a group of warriors for Dux Britanniarum is six figures, and, a base width for Midgard is 120mm. These were all rules that I might consider using. So, the solution was six figures to a 60mmx60mm base. Two bases would give me the right width for Midgard or a group of twelve for Lion Rampant. As both Lion Rampant and Dux Britanniarum require casualty removal, I would include a mini-dice frame on each base to record losses.


That gave me enough figures for six bases, with a couple of figures to spare.


I wasn't happy with the original slingers and ended up converting Victrix figures to make these for the German tribe. At the same time, I added a group of archers to the tribe using Victrix's Dark Age Archers set. It occurred to me that their clothing closely resembled the Gripping Beast figures. 

As these were for my Infamy, Infamy! project, they were based individually. It then occurred to me that, four archers or slingers are part of a warband in Dux Britanniarum. I could make up 60mmx60mm sabot bases for Midgard to accomodate two figures each for skirmishers. Six archers/slingers or a mix of these would work as skirmishers/archers for Lion Rampant. Just to be safe I thought I should add another half dozen archers from the Gripping Beast set.

Suddenly, I had the makings of an early medieval warband. Not Dark Age note, I'm hip to the new terminology. So, with archers, slingers and warriors carrying Saxon shields, it would make sense to add groups of Thegns. Before I knew it, three frames of Gipping Beast Saxon Thegns were in the cart (yeah, I know, I know, I sold the original set I had).

That gave me more than enough to make up three groups of warriors and two of hearthguard for a Saxon warband for Dux Britanniarum.

I had the warriors, I had the archers, all that was missing were suitable figures for the nobles. That was an easy enough fix. I tracked down a single frame of the Gripping Beast Saxon Thegn command and a similar single frame of Victrix Saxon command. The Gripping Beast figures (below) obviously fit in well with the existing warrior figures.


I like the Victrix figures, but was a little concerned at first, as they were noticeably bigger than those from Gripping Beast. That said, they are lovely figures. They gave me an impressive warlord and his champion.


The starting warband for Dux Britanniarum requires a Warlord, his champion and two nobles. The Victrix figures gave me those.

My initial concerns on figure sizes didn't appear so bad once they were painted and based. Here below, the Gripping Beast commander (second from right) is not too obviously smaller.


Generally, the larger size is not noticeable, even when they are with the groups of warriors.


Although, it does depend on the angle. In the pictures below, it is more obvious.


So, there you go, suddenly, hey presto, there's a warband for Dux Britanniarum.


With thirty six based warriors that also gives me three units of warrior infantry for Lion Rampant.

When added to two units of Elite Infantry that then gives me an early Anglo-Saxon warband for that rule set.

Now, it gets worse. Making up the GB Dark Age Warriors gave me more figures than I would need for a Saxon warband for Dux Britanniarum, in fact, I've worked out that if I were to buy another twenty or so figures of Romano-British or Arthurian types, that would give me enough figures for both opposing warbands for Dux Britanniarum. Hmmm, twenty figures, that's not a lot now, is it......

Of course, all of this makes little sense. Dave and I have been playing a Dux Britanniarum campaign quite happily using his figures. While I do have other gaming opponents, I'm not at all certain I need all these. But hey, who am I kidding, this is an illness, as much as it is a hobby. I need them.

Wednesday, 16 July 2025

The Scottish Corridor Scenario 3: Counterattack at Bas de Mouen

In the previous game the Germans launched an attack on Le Valtru at 0800, the second campaign turn. The assault was repulsed and that handed the British the campaign initiative. So, with the aim of delaying the Germans for one campaign turn (the 0900 turn), I will mount a very limited counterattack back at Bas de Mouen, the site of our first game

While recapturing the map would be a real bonus, the chances of that occurring are very slim. The British will be outnumbered and have little support. As a result, I intend this to be no more than a spoiling attack. I could counterattack on the other flank with more support, but I'm aware the Germans are attacking there with an additional platoon gained from their success in Operation Martlet. That platoon will then be withdrawn and so any casualties inflicted on them will have no lasting impact. On the other hand, casualties inflicted on this flank will be losses to a core platoon for the whole campaign.

For this game we will use the Attack & Defend Mission rules from the v2 rule book. This requires the Germans to place two Objective Markers and we will represent those with a couple of the new ones that I made recently (that you can see in this post).

One is placed near the road junction.


The other behind a hedgerow.

In the patrol phase, the British focus on trying to gain ground along the covered approaches through the orchards on their right flank. The Germans are able to cover their front. 

This could prove a tough position to crack, even with adequate support, but with only five points the British are very hard pressed. One option is to consider a pre-game barrage in the hope I can make a dash to close down a German jump-off-point. That entails a degree of risk. Units trying to reach the jump-off-point could find themselves caught in the open if they don't move fast enough. That rarely ends well. I prefer the idea of supporting armour. That goes some way to negating the panzer grenadiers advantages in small arms firepower. The best I can do is an M5 Stuart, so that's what I select.

The British start off with a couple of CoC points and their force morale at eleven. The Germans are at ten. 

The British have the opening phase. They accumulate another two CoC points which immediately gives them options to react fire or hit the dirt should the Germans make an appearance. With that, a section deploys into the orchard on the right flank.


They put the orchard opposite under suppressing fire. I'm hoping that makes it harder for the Germans to deploy and, if they do, their firepower won't be quite as effective.


That optimism is quashed with the following German command roll of 662211 (the roll includes a Red Dice, which they've added as a support). That gives them plenty of options to respond and the subsequent phase. 

It turns out I've also made a few assumptions that are about to prove false. Firstly, the Germans can deploy from the jump-off-point in the farmhouse into the area behind the orchard and, in so doing, remain outside the suppressing fire zone. While that may not be the end of the world, what I hadn't factored was the orchard itself is less than 6" wide. The panzer grenadiers can see through it, which means they can fire through it. 


Two sections deploy, one entrenched beside the farmhouse. 


The other beside it.


Both can see through the orchard. Each section's scharführer (junior leader) orders one of the LMG teams in their respective sections to use maschinengewehr (note that the other team can fire without the need for an order as they deploy. This is a unique benefit of deployment - a section may fire automatically when they deploy, it doesn't require an order, which leaves the junior leaders free to use a national characteristic).  

In short, the British section is about to receive fire from four MG42 teams. As if that's not bad enough, two of them will be using maschinengewehr, with the bonus of storm of steel and the additional firepower dice from the leader. This is about to get very ugly.


I have four CoC points and use three immediately to have the section in the orchard hit the dirt


They need as much cover as they can find, before the orchard is assailed with gunfire.


The better cover helps, but it doesn't prevent the loss of two men from the rifle team and a point of shock on the Bren team. 


The Germans have the next phase and the sections are joined by the Oberscharführer (senior leader). 


He joins the Germans NCOs in maximising the section's firepower through use of maschinengewehr


The orchard is raked with gunfire once more.


This time it is absolutely deadly. Five more men are hit, including the section's corporal, who is stunned. They suffer more shock and with only three men remaining, that's sufficient to see the section break.


They leave their stunned corporal behind to his fate.


That vicious German response has swept the section out of the orchard and, in the process, brought British force morale crashing down from eleven to seven in a single devastating phase. 


That's a dreadful start and I wonder if I should even consider continuing the game. After all, I've achieved the key objective of delaying the Germans. While my brain is telling me it's time to go, my heart says we've only just started the game, surely we can't finish yet?

Against my better judgement we continue. The 2” mortar team deploys into one of the orchards. 


They fire smoke towards the entrenched panzer grenadier section and block their line of sight.


If I could inflict a few casualties before I withdraw that would be a bonus and so the M5 Stuart is called forward.


I'm not sure if Dave is expecting British armour and he may be equipped with only panzerfausts. That could make the diminutive M5 Stuart more of a threat than it appears. It certainly won't survive for long if the Germans have a more potent anti-tank weapon with a longer range.

In the German phase a tripod mounted MG42 deploys in the orchard by the farm and targets the 2” mortar team. 


The crew immediately hit the dirt.


The oberscharführer directs the MMG fire using three orders for maschinengewehr


Another hail of deadly firepower sweeps the orchard and wipes out the entire mortar team. British force morale drops to six and now I'm certain I should have listened to my brain and not my heart. 

Just in case I'm contemplating deploying any more units, one of the panzer grenadier sections puts down suppressing fire into the orchard. 


The other section advances alongside the MMG team. This is humiliating. Are the Germans really contemplating counterattacking my counterattack? The ignominy.


The following British command roll is 55542. The CoC points are always welcome, but to deploy a fresh section unsupported would be to gift the enemy another easy target. I choose to do nothing and see what the Germans have planned.

As I suspected, they are bold enough to move forward. One section crosses the open ground to the other orchard where they contact the stunned corporal and capture him. This is turning rapidly into a debacle. British force morale has dropped to four and they are yet to inflict as much as a point of shock on the Germans.


I suspect that only for want of a target the oberscharführer puts the MMG on overwatch. 


A third panzer grenadier section deploys in the centre of the table, behind the hedgerow. 


They lay suppressing fire on the windows of the barn opposite.

At this point I've seen more than enough and the British withdraw. Their key aim of disrupting the German timetable has been achieved, but at far more cost than I planned. The British platoon will be replaced with a fresh one, however the impact on the Men's Opinion will be more lasting. Those casualties, including the loss of an NCO, see their opinion drop to -4. A vote of no confidence in the decision to mount a hasty counterattack without sufficient support.

What a short and brutal game. An object lesson in the deadliness of panzer grenadier firepower when concentrated and making full use of maschinengewehr. Ironic that it was only last week that I updated my article about Dealing with Panzergrenadiers. Despite the drop in the Men's Opinion there are no other lasting ill effects for the British. On the other hand, we have caused the Germans the loss of a campaign turn and that may prove of more significance. Time will tell.

The German victory here means the next game in the campaign must take place on the opposite flank and so for our next encounter we will return to Le Valtru.

You can find all the game reports for this campaign and for many others on the Chain of Command AAR page.