
I've always wanted to try my hand at making my own terrain mat but frankly the prospect has always been fairly daunting. Having a small terrain project go a bit wrong is no big disaster, but a 6x4 terrain mat and all the time and material involved was another matter altogether. On the other hand I've seen a lot of people making their own on their blogs and in videos, so finally I decided to pluck up the courage and give it a go myself. A desert mat for my Sudan project seemed a good place to start, not least because it wouldn't require flocking and had the potential to be fairly straightforward.
The plan was to use a tried and true method by applying acrylic caulk to fabric (sorry, no original ideas here folks!). So the first place to start was finding the best sort of fabric and I settled on a good quality painter's drop cloth. These come in various thicknesses of fabric and in different quality. I looked at those with plastic backing and while they are relatively inexpensive the weave of the fabric is very coarse and I wasn't convinced this would work well for the project. Working on the basis that you get what you pay for I invested in the best quality canvas drop sheet at the local hardware store.

The sheet comes folded and so I let it hang for a couple of days to let the creases drop out.

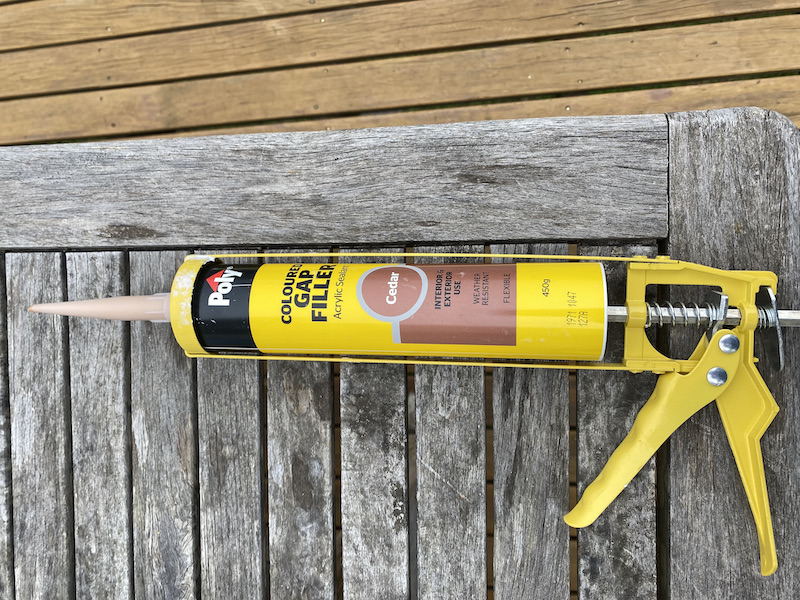
I used a small section to conduct a few trials before embarking on the full size mat. Caulk is readily available at hardware stores and I've used the material before when making roads. It normally comes in white but is also available in a range of colours. The advantage of a coloured caulk is you won't get any unsightly white blemishes appearing if the surface of the mat is damaged or chipped. I managed to find a caulk coloured 'Cedar' which was a dull brown and conducted tests spreading it and working out how to apply texture.
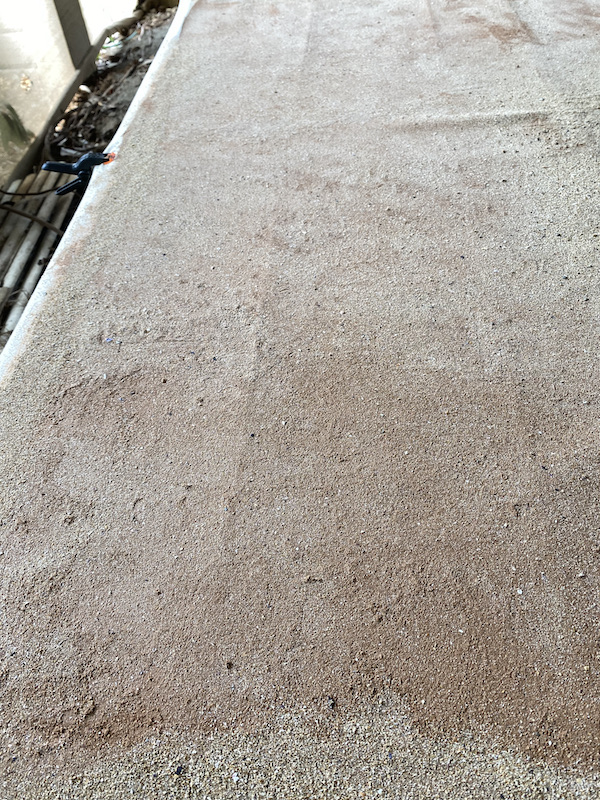
I've seen two methods used, one is to apply the caulk and then sprinkle sand and other texture material onto it while it's still wet. The other is to make up a mix of caulk, PVA glue, water and sand and then apply the mixture. You can see the result in the pictures below. On the left is the surface after sprinkling sand while the caulk is wet, on the right after applying a ready mixed caulk/sand combination.


I think either would work okay but settled for sprinkling the sand onto the surface of the wet caulk. In either method I was impressed with the adhesive quality of the caulk which stuck well to the surface of the fabric and also held the sand very rigidly. Once dry it was almost impossible to remove the sand and was an indication that under normal usage it should prove robust enough for storage, transportation and gaming. As extra insurance I thought there was no harm adding PVA to the caulk for even more adhesion.
Here's a close up of each, first with the sand sprinkled on top of the wet caulk.


Once I'd settled on the technique I moved on to attempting the full size mat. I don't have a single table large enough and so was using two trestle tables pushed together. I was doing this under the house on ground that is not completely even and therein was the first lesson. Ideally you have a perfectly flat and even surface to do this on, for reasons that will become apparent.
I've heard stories of caulk and paint seeping through fabric and in the worst cases adhering the mat to the table. To avoid either of these I put a layer of plastic sheet under the fabric first.

To avoid the effects of shrinkage it's advisable to clamp the fabric securely. If nothing else it holds the fabric firmly in place while you spread the caulk.

As it turns out this wasn't quite as bad as it appeared. The caulk remains soft and pliable (which is what makes it so suitable for a game mat) and so anything placed under the mat will make an impression on the surface. However this is mostly temporary, in other words, once you remove the object making the impression then the mat falls flat. Once I removed the plastic sheet and hung the mat for a day during warm weather then the creases fell out, which was quite a relief. That said, the lesson learned is to do this on the flattest surface possible.


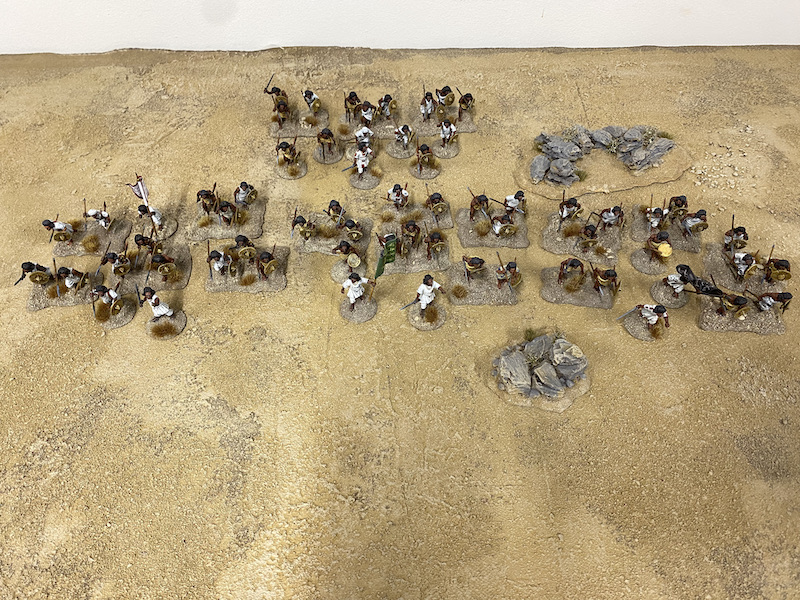
I've been working on scatter terrain to add to the table and the small rock formations you see in the pictures above are the first of these. They are made using dried tree bark. I know this is something railway modellers have been doing for decades but I've never tried it myself. I've no idea why, because they are very effective.


I'm not quite happy with the colour of the rocks, I've been very unimaginative painting them grey and looking at photographs I'm going to go back and try them in a more reddish brown base colour.


Really enjoyed that, thanks. I am about to try some caulk roads, so your ‘experiment’ comes at the right time. Also, like the idea of the tree bark. I have just done similar with cork and mine, despite a lot of work, looks poor, so I will be adopting the tree bark idea. Good post.
ReplyDeleteThanks Norm. Caulk is fairly versatile and as I say, very pliable once dry. I’m thinking of trying some roads on the same canvas material as they would conform nicely to terrain. I really like the tree bark, I can’t believe it’s taken me this long to try it.
DeleteGreat stuff! I have been using pine bark nodules for rocks(when I can get it) and outcroppings for years as well as caulk for roads but you have given me the ambition to try a game mat! I also play a lot of Peter Pig's "Patrols "In The Sudan" and definitely need a new desert mat.
ReplyDeleteAre you finally at home? I hope so - miss those battle reports.
All the best
Thanks Dick, yes, can’t believe it’s taken me so long to discover pine bark, it’s great stuff. Not home yet, but we head back next week and hopefully gaming returns to some degree of normality soon after.
DeleteA very effective result.
ReplyDeleteThanks A J, it’s definitely inspired me to give this another go for a more fertile terrain.
DeleteThat looks the business! One day I would like to make a similar mat. Your colours turned out really well - the photos of the battle sites in Mike Snook's "Go Strong into the Desert" show quite muted grey & brown landscapes, with a bit of sandy yellow. The battles were fought over a decent sized geographical area with a lot of local variation in terrain, your mat should do well anywhere.
ReplyDeleteThanks, I want to make sure the mat is fairly versatile so happy that the colours remain fairly neutral. I really must get my hands on that book, everyone gives it a thumbs up.
DeleteActually kinda surprised that you haven’t done something like this before. Even no talent lazy imbeciles like me have made game mats with some success. 😀
ReplyDeleteMine have held up for about 5 years without too much damage. One though is starting to get some permanent creasing in it.
Your came out really great! One of the benefits of having the custom made mat is that when you use the same stuff for scatter terrain it all blends together really well. Nice job! 😀
Thanks Stew, I’ve admired your work, which is excellent. I think you’ve hit the nail on the head talking about scatter terrain to match, that sort of detail really brings it all together and look like it all belongs there.
DeleteThe mat looks brilliant - you've a real talent for terrain making and always inspirational. I'm interested in two elements. Firstly, it looks like you have some sections with some slightly larger sand and pebbles incorporated. Was this also direct on the wet caulk in the same way as the rest of the mat, or where some additional steps required for these? Secondly, how do you store mats like these?
ReplyDeleteThanks Damian. So, confession time. Where I was making the mat is under the house and the ground has a layer of fine gravel and so, in a totally unplanned moment while sprinkling sand I spotted the gravel, took a handful and sprinkled it randomly while the caulk was wet. It worked extremely well and added a nice feature to break up the monotony of the sand. I’ve since gathered up a jar full of the gravel for future use. As much as I’d like to take credit for being creative it was just serendipity and a moment of inspiration. As for storage, the mat can be rolled quite easily as the elasticity in the caulk makes it flexible. Folding would leave permanent creases I suspect. For storage people recommend either rolling it around a cardboard tube or a piece of PVC plumbing pipe to prevent it getting crushed. Alternatively you could get a wider piece of pipe and store it rolled up inside. I haven’t decided what to settle for just yet, a trip to Bunnings is called for to assess the various weights and lengths of pipe.
DeleteThat looks tremendous. You’ve captured the textured mat and scatter superbly well.
ReplyDeleteThanks Carlo, glad you like it.
DeleteNice work Mark, great looking desert mat, I really like the effects you have achieved with the fine sand and the painting, oddly enough last weekend I finished a smaller grass land version, 2 x 2 foot mat using caulking for a Beer and Pretzels wargame and used tape to hold down the ends while applying the caulking. A table tennis table comes in handy for large projects like the one you just tackled.
ReplyDeletecheers John
Thanks John, some of the effects have come about as much by chance as design. In some ways randomly applying caulk and sand has given pleasing effects, no need to be too precise, in fact the opposite if you want a more natural effect. Next up will be one with flock but I might start with a 4x4 for smaller skirmish games. Yes, a table tennis table would be perfect!
DeleteNot much to say, everyone has already said it all and you've commented on how it rolls up.
ReplyDeleteIMO the yellower colour is better, even if not so good a match to you figure bases, it makes the mat looked like a planned effect rather than just cr*ppy old cloth you found under the house.
Your photos of the Sudan make grey the right right colour for rocks but a much darker grey like basalt possibly even stained with some iron ore (the original bark colour was probably closer) - the mid grey with pale dry brushing makes your rocks look more like weathered granite. Go bold, go dark.
How big was the final mat?
Thanks Rob. I keep on trying to decide whether I should go back and do some touch ups on the basing, it wouldn’t take much to introduce a little bit of the yellow, ha, I should have made the mat first of course! I’ve experimented with rock colours based on the original Brown Land base colour I used on the sample pieces and I think I’ve found something that works better for this terrain.I’ll post new pieces when they are done. The final mat size is 6’x4’3”.
Deletegreat stuff - looks fabulous
ReplyDeleteThank you!
DeleteThis is really well done, so good and clear and is something I'm keen to follow. About how much mat does one tube of caulk cover?
ReplyDeleteThanks. I’d say one tube covers about 2’x2’. So for this 6’x4’ I got through about 6 tubes.
DeleteThis is one project that I have considered tackling for at least the last 2-3 years, but never taken the plunge. Having read your how-to guide, along with the lessons learned, I might just give it a go. I have ended up building solid base boards (one winter and one desert), but these are really cumbersome to move around. A single flat base board would have been better, with different mats laid on top, just like the one you have created. Excellent work and thanks for sharing!
ReplyDeleteBrilliant work as always!
ReplyDeleteThank you for showing us what you did. I've been thinking of making my own gaming mat. Have you ever tried static grass?
ReplyDeleteThanks. I use static grass when basing figures and when making terrain pieces but I've never tried it on a mat. The main concern would be storage, as you wouldn't want to crush the static grass when rolling the mat, not sure how you'd solve that.
Delete