
To keep the road free from enemy fire now they need to clear the village of St Germain du Pert. They are aware of a threat from 'mobile 88mm guns' in that location and so the area needs to be secured. Those 'mobile 88mm guns' are in fact two Marders and while they were available to fire from off the table in the previous scenario, in this game they will be available to deploy onto the table as support.

In this encounter a fresh German platoon will take on a fresh American platoon as they attempt a flanking attack on the small village.


Here at St Germain du Pert I hope the Germans can put up a stiffer resistance than they have previously. While it's not anticipated that they can stop the American attack completely, it is critical that they delay them as long as possible so that other units can withdraw across the bridge at Isigny.


The village church is a prominent feature of the map and this particular scenario was a key incentive to add a church to my terrain collection. This one is from Sarissa Precision and there is a blog post here with more details about how I made it.


My plan is straightforward. This German platoon has only one mission and that is to fight and hold the village. Unlike the platoon in the earlier games, this one makes its only appearance defending St Germain du Pert. While casualties are not irrelevant, if it can hold up the Americans for one game or more then it has served its purpose well. Aside from the platoon there are no support points for the Germans, instead they have the two Marders available. Those self propelled guns pack a powerful punch and will help to deal with the Shermans that support the American assault. That said, the Marder's weak armour and open bodies make them quite brittle and so they need to be used carefully.
The Americans have 19 support points, however they must use 12 of those for two Shermans, which leaves 7 support points yet to be accounted for.
We start the game with US force morale at nine and German morale at eight. While the Americans can afford to take casualties they will fail in their mission if their force morale drops below three, so they cannot be too cavalier in their approach.
With the Americans able to run patrol markers from two flanks my main focus during the patrol phase is to deny them jump-off-points too close to the village. That means I won’t be able to do much to slow US progress on the other flank unless I can have all my patrol markers locked down very quickly and bring the phase to an early close.
I'm reasonably successful doing this and it's easy to see from the placement of jump-off-points where the main weight of the attack is likely to come from.

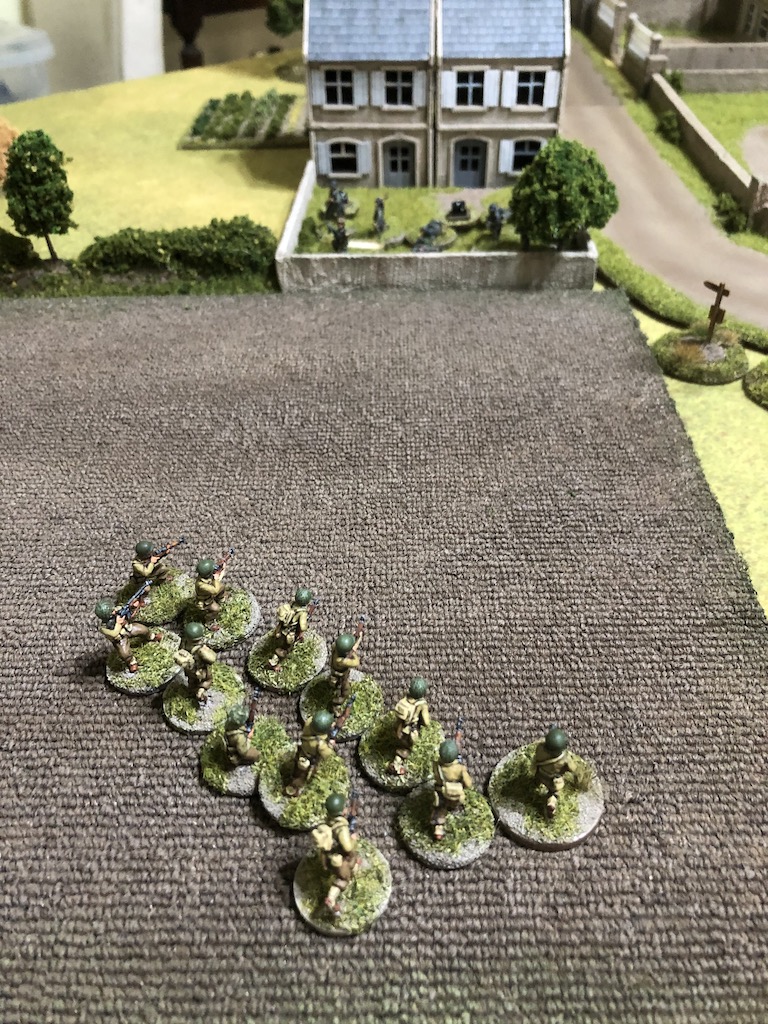
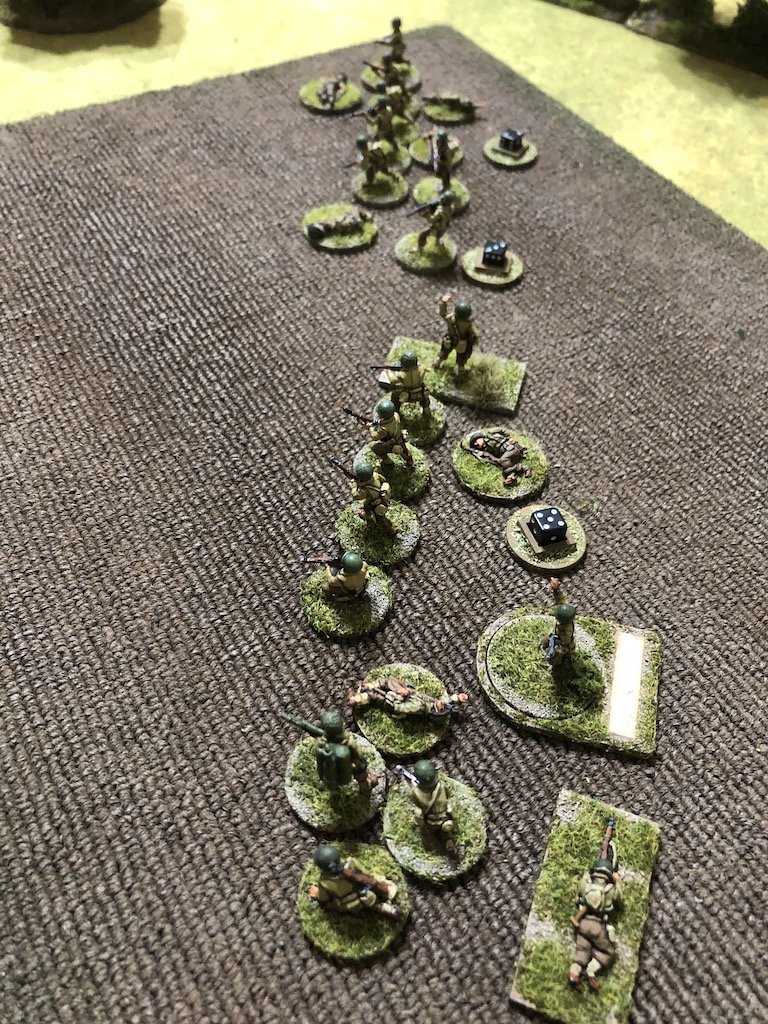
The Americans get off to a brisk and aggressive start as two squads deploy into the ploughed field in close proximity to the village. The platoon sergeant is accompanying them and places both squads on overwatch.


Well, that's a very clear indication of American intent and simply cannot be ignored. It is also an extremely inviting target that is within close range of any Germans deploying into the nearest house. I decide there is no point in holding back. With the Americans on overwatch I'll receive return fire, but given I will be deploying into hard cover and my targets are in the open it's a risk I think worth taking.

The first German squad deploys behind the garden wall of the nearest house and opens fire.


The Americans begin taking casualties immediately. A rifleman is hit and so is the squad sergeant on the US left. He is wounded, putting him out of action for the remainder of the turn. That results in US force morale dropping a point to eight. The BAR team also suffer some shock.

As anticipated the Americans return fire immediately and a hail of bullets rain down on the squad.

The hard cover of the wall provides good protection for the MG42 team, but not so for the rifle team. The Americans' semi-automatic fire cuts down three of the men and inflicts a point of shock. That was ugly. So much for being in better cover.
Yet with so many Americans in the open it seems pointless not to take full advantage of the opportunity to inflict further casualties and so a second German squad deploys into the upper level of the house.

They too open fire.

One American squad loses a man from the BAR team and they suffer a point of shock, but other than that the fire is fairly ineffective. With so many targets in the open I had hoped to have inflicted more casualties than this.

What happens next comes as a nasty shock. The American command roll is 66442. A double phase and with the platoon sergeant on hand they have plenty of activation options. It looks like I will have to undergo several rounds of US fire before I can fire back. The platoon sergeant bursts into action issuing commands.

He uses his first command initiative to have the squad nearest the Germans open fire.

This time the Germans do benefit from their hard cover and only suffer a point of shock to the LMG team.

The platoon sergeant then uses his remaining two command initiatives to have the second squad move forward using the US national characteristic Marching Fire. They advance 4" across the ploughed field, firing their semi-automatic rifles as they go.


This time one of the German LMG team is killed and the Obergefreiter is lightly wounded, the sight of which takes German force morale down to seven. I seem to be rolling a high proportion of sixes for my hit effect rolls.

On the other flank a third American squad deploys and they go tactical. That threatens my jump-off-point near the church. If that squad gambles on moving quickly in the next US phase they could possibly close it down.


The following US command roll is 44332 providing ample activation options. The squad in the field is ordered by the squad leader to keep up its marching fire and they begin slowly closing in on the village.
They maintain their semi-automatic fire as they go.

Despite only three hits and defending in hard cover I manage to roll two 6s for the hit effect and that sees another couple of men lost from the rifle team, which is now reduced to a single man. Fortune certainly doesn't favour the Germans today.

Meanwhile the platoon sergeant rallies shock off the nearest BAR team and sends that squad forward, also ordering it to use marching fire as it goes.

While they barely move any distance forward they manage to pour forth a torrent of fire.

The Germans lose the remaining member of the rifle team and with that team wiped out their force morale drops again down to six. The combination of US fire, their double phase and my bad fortune with the dice has made these last two phases particularly murderous.

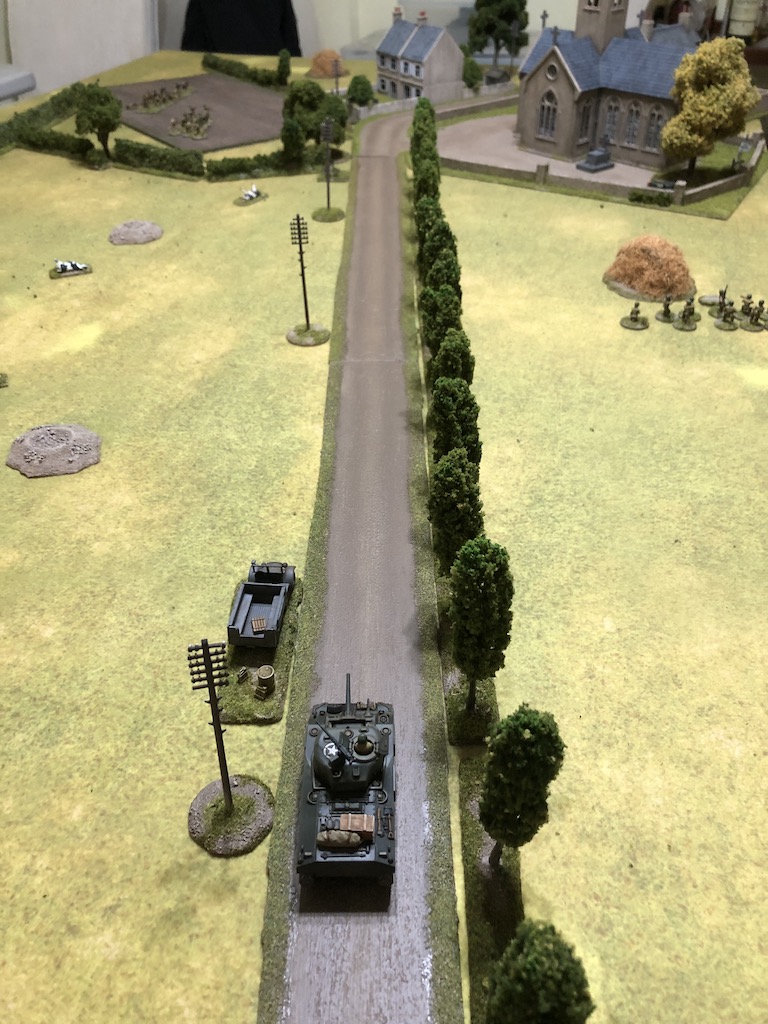
The pain is not over yet. From the other end of the table a Sherman rumbles into view.

The commander orders the gunner to fire a round of HE directly down the road and into the walled garden.
The exploding 75mm round inflicts only a point of shock on the LMG team and I count myself lucky.
The Sherman commander then orders the bow machine gunner to fire at the same target. They manage four hits and somehow I manage to roll another couple of sixes. That sees the two remaining men of the LMG team killed. With that team wiped out all that remains of the squad is the wounded Obergefreiter. The only consolation is this latest setback doesn't impact on German force morale (although I can't say the same for my personal morale!).

Over by the church the Americans decide to gamble on a dash towards the jump-off-point. It pays off with the squad managing to make it within 4" and so close it down.

That now puts the Germans under considerable pressure as the Americans close in from both flanks.

The Germans are not helped by their command roll of 64411, which limits options. With only a single senior leader and no adjutant it is too early to deploy the platoon's Unterfeldwebel and so all that remains is to make use of the two 1s.
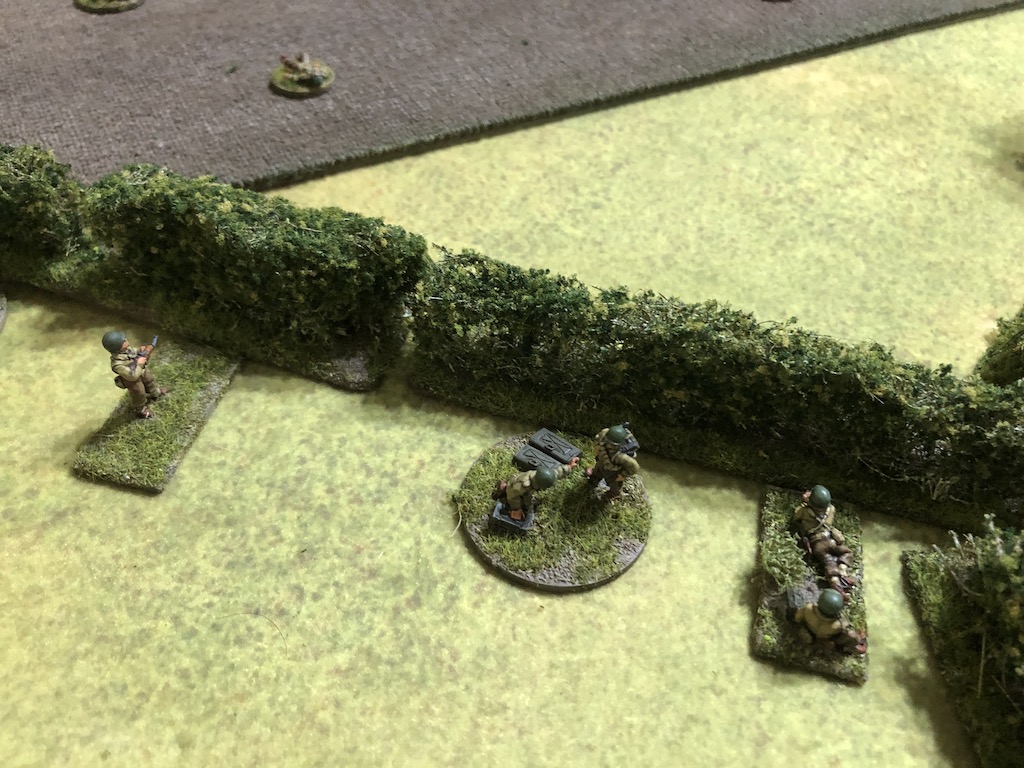
The Sherman is an inviting target but it is at the extreme limit of the range of a panzerschreck. Nonetheless it's worth a shot as a 7 or more will hit the tank and so the panzerschreck team deploys behind the wall.

A hit from a Panzerschreck’s 88mm rocket has a good chance of destroying the Sherman and that loss would be a real blow to US force morale.

Sadly the dice are unkind once again and with a hit roll of only 6 the 88mm rocket steers wide of its mark.
Meanwhile the MG42 team in the house fires into the ploughed field hoping to inflict more casualties on the Americans while they are exposed in the open.

Despite the lack of any cover the Americans escape with only a couple of points of shock on each team.

In what seems like the mere blink of an eye the Americans are back in action again. The platoon sergeant rallies the nearest BAR team and orders the squad to keep on advancing using marching fire.

Their target is the lone, wounded Obergefreiter behind the wall. While he may be only one man, the squad want to avoid engaging him in close combat. After all, a leader with a sub-machine gun in hard cover can still inflict a disproportionate number of casualties. The Americans move forward firing but it has no effect on the Obergefreiter.

The other US squad moves forward, but they have accumulated some shock and that slows them down to a crawl.

The Sherman commander orders the gunner to deal with the panzershreck team and he sends another HE round hurtling down the road.

The panzerschreck team survive the blast but suffer three points of shock which is enough to pin them. The Sherman's bow MG also targets them but is has no effect.

American pressure builds up with the arrival of a forward observer who immediately makes contact with the mortar battery.

I'm not sure how much of a threat this will prove to be as the American infantry are now very close to the village. There could be a “danger close” situation developing here.

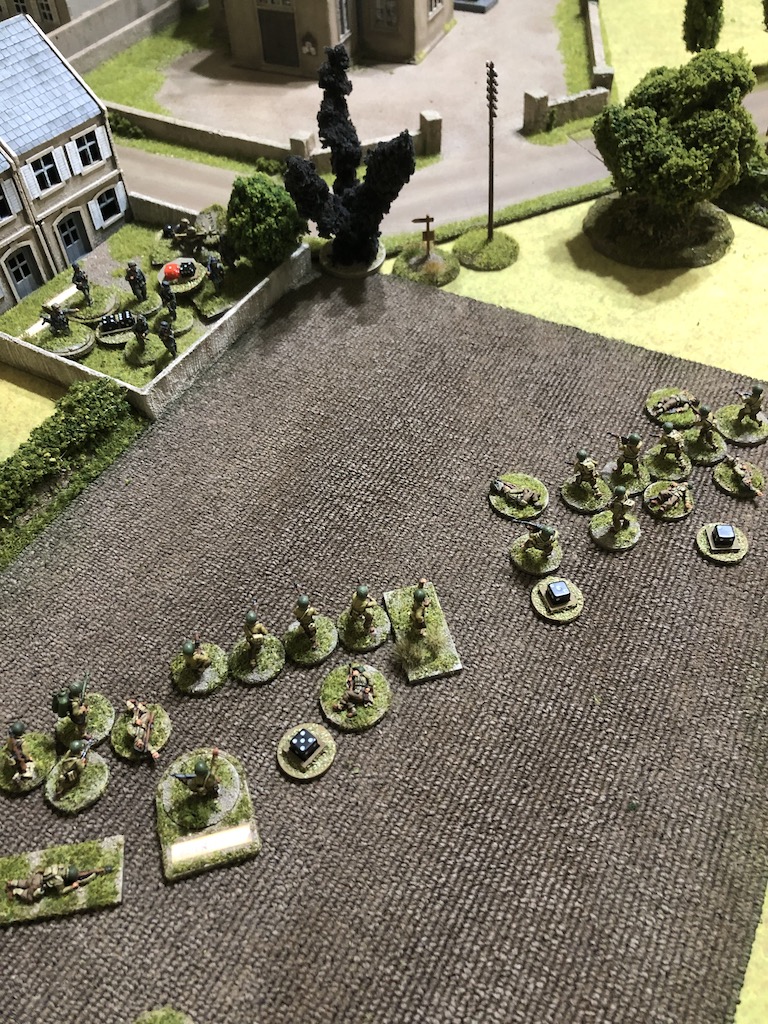
What concerns me much more is the arrival of an engineer flamethrower team who deploy into the ploughed field.

That brings them threateningly close to my men in the village.

I feel under a lot of pressure. It's been demoralising to see a whole squad wiped out and to lose a jump-off-point, but the Americans remain out in the open and I still have units to deploy, so this is far from over.
The German command roll of 65433 is very useful and allows me to try and deal with that Sherman. A Marder deploys at the rear of the table and can see the Sherman over the hedges and walls.


A round of 75mm AP is slammed into the breach and the gunner's aim is good. The round hits the Sherman with an AP strike of six and the tank erupts in flames. That's a blow to US morale which drops down to six for the loss of the support and the tank's commander.


That relieves some of the pressure and I'm determined to prevent the Americans in the ploughed field from breaking into the village. If I can cause casualties amongst the leaders and wipe out a team or two that could be enough to drag US force morale down another four points and so deny them scenario victory.
With that in mind the third German squad deploys behind the wall in the garden. The sight of so many of their dead comrades cannot be pleasant but it is an excellent vantage point from which to engage the enemy.


This time around the German fire cuts down more of the Americans and they take casualties across several of their teams. The BAR team of the nearest squad loses a man and is now reduced to a single soldier.

The other squad's rifle team also lose a man and accumulate shock.


The Unterfeldwebel deploys into the house and immediately rallies two points of shock off the panzerschreck team. The combination of being pinned, three points of shock and firing at extreme range had meant the panzerschreck would need a roll of 12 to hit any Sherman deploying on to the table and so it's important to try to improve those odds before we see any more US armour.

The leader then orders the squad in the upper level to shoot into the ploughed field. German fire is starting to take its toll and while the American NCOs seem relatively immune they see another two of their men killed and shock start to build up.

Just as I'm starting to feel as though my platoon might be able to turn this around the Americans roll 66431 with their command dice.
The platoon sergeant is ideally placed to coordinate the squads in the ploughed field. He rallies shock off the BAR team and then orders both squads to fire at the nearest Germans.


For once the hard cover of the wall does its job and gives my men the protection I was counting upon. The American fire results in only one point of shock on each team.

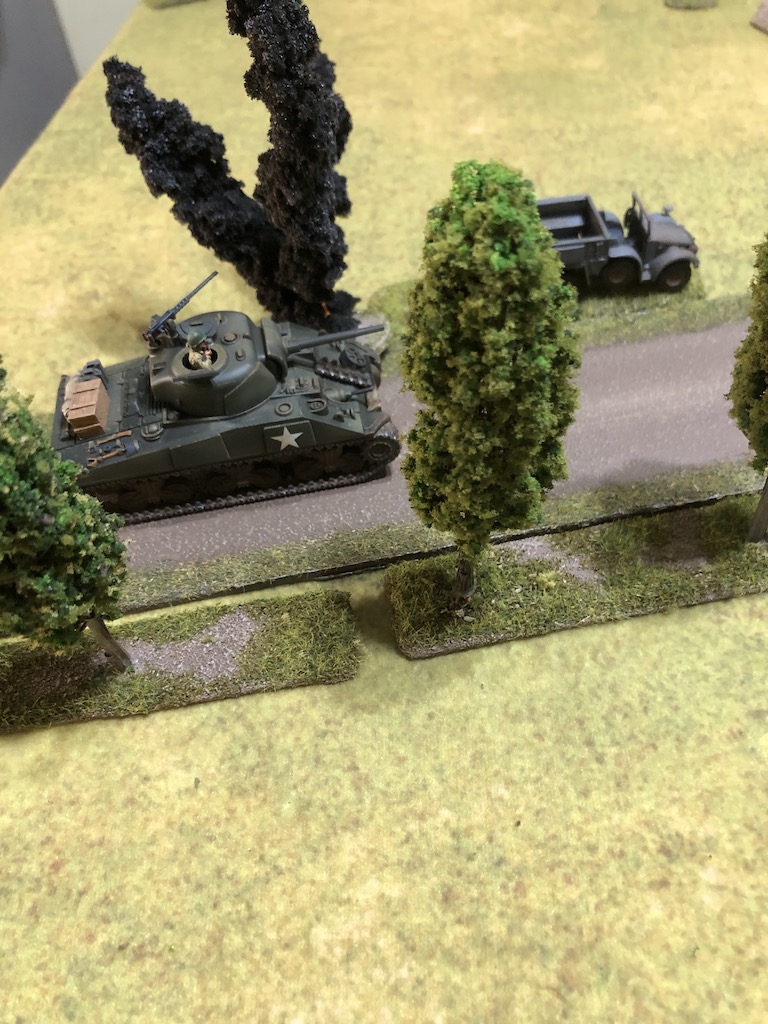
Dave uses the double phase to take every opportunity to claw back the initiative. A second Sherman deploys near the road.

The commander is well aware of the danger posed by the Marder and orders the gunner to fire a round of AP.


The round is on target and strikes the Marder. While the self propelled gun survives the hit, the crew are badly shaken. The gunner is killed and they suffer two points of shock.

Ominously the engineer flamethrower team makes its way forward through the ploughed field to join the squads.

I don't have a CoC die for an interrupt or any units on overwatch, so there is little I can do to react.

Matters only become worse when the next American command roll is 66321. I sense it could get very painful. The Sherman gunner fires another round at the Marder.

The self propelled gun is very fortunate. The round strikes the AFV but results in zero net hits. Nonetheless the resulting point of shock is pushing the crew very close to abandoning their vehicle.

One of the squads in the ploughed field continues to engage the Germans behind the wall.

This time they only inflict a single point of shock.

However trouble is never far away and the flamethrower team unleash a jet of burning fuel.


The flamethrower is a vicious weapon and it's little surprise it kills three of the defenders and wounds the Obergefreiter, who is stunned. The resulting shock is enough to pin the squad. German morale drops down to five.

The run of American phases comes to an end, but a roll of 64432 means there is still much that they can do during the phase. The platoon sergeant orders the flamethrower team to fire again.


The Germans lose a man from the LMG team and the shock accumulates to the point the squad is only one short of breaking.

The American squads try to finish off the Germans with semi-automatic fire but by now their casualties and level of shock are starting to take their toll and it has no effect.

The Sherman commander is determined to rid himself of the Marder and he orders the gunner to fire again. This time it's enough to break the morale of the crew, who abandon their vehicle and flee to the rear. The loss of that significant support is a blow to German morale which drops two points down to three.

The US platoon lieutenant deploys behind the hedge row and tells the forward observer to call in a ranging shot on the house.


The shot comes in wide of the mark and lands in the church yard.


It could have landed in a number of directions and hit friendlies, but the Americans remain safe from their own fire for now.

With force morale low the Germans are down to three command dice, so a roll of 332 is very fortunate. I'm not so lucky when I try to deploy the second Marder. With the Unterfeldwebel on the table the deployment of units lacks coordination and the self propelled gun fails to arrive this phase. That was disappointing not least because I don't have the command dice to activate the panzerschreck team or have the nearby Unterfeldwebel do it.
With the Americans still in the ploughed field I'm hoping there might just be a chance I can hang on and cause enough casualties to drive down their morale. The squad in the upper level of the house opens fire.

Their fire proves deadly and sees the loss of four Americans. However, once again, the NCOs seem impervious to fire, at this rate the leaders will begin to outnumber those they lead.


The American command roll of 55422 will mean the Sherman won't be active this phase but it still leaves many options. The platoon lieutenant tells the forward observer to try and call the ranging shot down on target.

It moves closer but still falls wide of the aiming point.

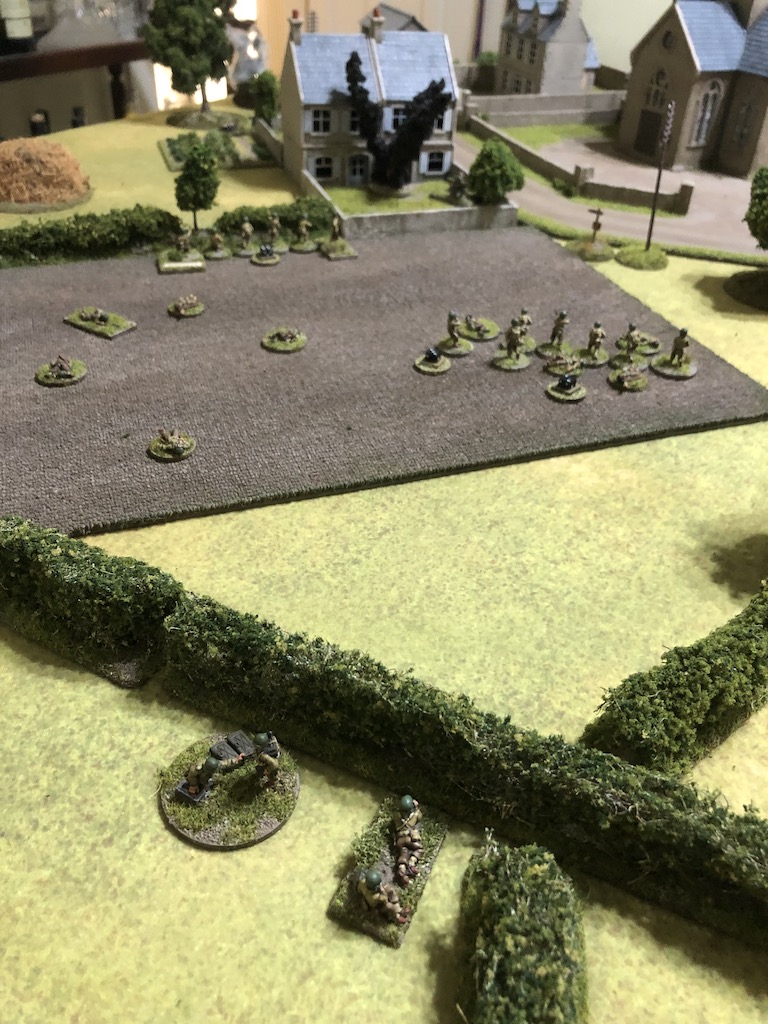
The lieutenant then makes his way around the hedge row and into the field.

This brings him just within command range of the flamethrower team. He orders them to use the last of their fuel to try to clear the Germans from the wall.

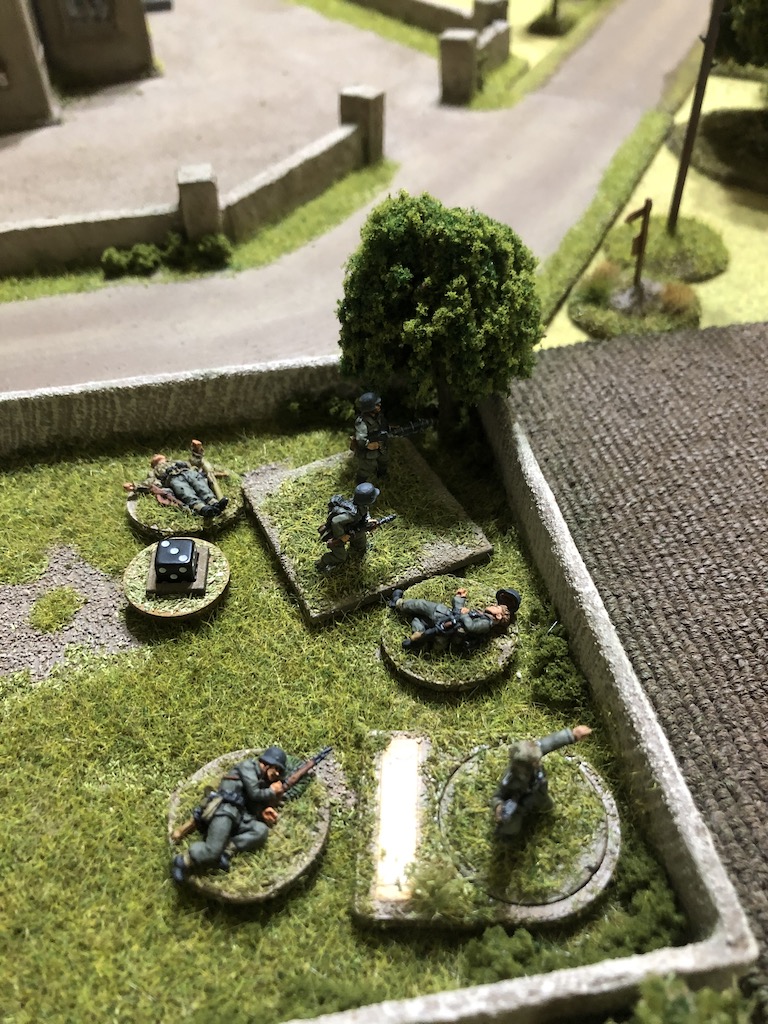
It comes as little surprise that this is more than enough to do the job. The LMG team is wiped out, two of the rifle team are killed and the survivors break. All in all that's enough to bring German morale crashing down to one.

The broken survivors fall back 14”, no doubt much relieved to have escaped the inferno created by the flamethrower.


The platoon sergeant orders one of the squads to place covering fire on the upper level of the house. He then rallies shock off the rifle team and leads them forward to the hedgerow.


The Germans are down to two command dice and a roll of 61 doesn't leave many options. The key is to do whatever I think will have the greatest impact on US force morale. I can see two possible options. Firstly, I consider whether I should activate the panzerschreck team to fire at the Sherman. If they manage to hit then there's a very good chance it could destroy the tank. That could cause US morale to drop by as much as four points (loss of support, junior leader killed). However, to hit the Sherman I need to roll 10 or more, quite poor odds.
On the other hand the LMG team in the upper level of the building could fire at the US team behind the hedgerow. It's an attractive target because it includes two leaders. Killing or wounding one or both would also significantly impact American morale. The LMG team is made up of the MG42, a rifleman and the Obergefreiter, who's machine pistol is also in range. That's a decent amount of firepower, only offset by the covering fire. I decide these are better odds and so activate the LMG team.

Despite the covering fire the Germans manage five hits but unfortunately it does no more than inflict a single point of shock.


The American command roll is limited and means the Sherman is pre-occupied this phase but with two senior leaders in play there is much that can be done with other units.
The Lieutenant orders the forward observer to try once again to call a ranging shot on target.


This time it is called down successfully, landing on top of the house.
The exploding round kills one of the rifle team and inflicts shock on the LMG team.

With that done the Lieutenant makes his way forward across the ploughed field.


He orders the squad to maintain its covering fire on the house.

Meanwhile over by the church the squad moves towards the road, but only manages to move very slowly (a combination of shock and bad dice).

The German command roll is 53. The option is a gamble on deploying the Marder or firing the full squad in the house down at the platoon sergeant and rifle team at the hedge. I decide to fire the squad. This time there's a better result with two kills and two points of shock. However once again the American NCOs manage to remain unscathed but the loss of two men is enough to see the unit pinned.

While the Americans appear to have the upper hand Dave is acutely aware that with a bit of good fortune the Germans could manage to push US force morale low enough to deny them victory. He decides to take a risk. The Lieutenant tells the forward observer to call down the barrage despite the fact it will fall on some of his own platoon.

The barrage crashes down, blanketing one side of the village.

And just catches the platoon sergeant and the remnants of the squad under the blast.


On the other hand the Americans by the hedge don't escape unscathed. In fact, there's a momentary glimmer of hope for the Germans when the Americans suffer a casualty. The man hit is the squad sergeant who is already stunned, having been wounded earlier. He takes a further wound but this only stuns him again and, even more frustratingly, US morale holds steady. I just don't think it's my day.

The platoon lieutenant then moves up to join the squad in the field and rallies off some of their shock.


The German command roll is 63 and the best option is to try and deploy the second Marder, but once again it fails to arrive. However it all comes to nothing when the American command roll is 66655. It signals the end of the turn and with force morale rolls to be made for two German leaders routing off the table and the loss of a jump off point it's clearly the end for the Germans.
When we come to tally casualties the odds are surprisingly even. The Americans had lost 14 men and the Germans had lost 17. What did seem disproportionate was the way in which those losses occurred. The Americans lost the vast majority of their men while in open ground, while every German casualty was a man in hard cover. As for the AFVs, one Marder had been abandoned but not destroyed, while one of the Shermans was now a burning wreck. In the latter stages US force morale was down to six, so despite the Germans feeling like they were on the receiving end for most of the game, it was a closer run thing than it would appear.
The luck certainly did not favour the Germans at times. I rolled a disproportionate number of sixes for the hit effects on my men in hard cover. In a similar way my command rolls often limited the possible scope for German action. On the other hand the Americans undoubtedly benefited from a couple of double phases that arrived at quite crucial moments in the game. Despite that it was a game with few dull moments and fairly intense action right from the opening phases. It certainly gave my casualty figures a good workout - both German and American.
The German CO's opinion would most probably drop further if we had communication with the HQ at Isigny, but since the naval bombardment we have lost touch with the CO. Given today's outcome this is no bad thing and so until we restore contact the CO's opinion will not be adjusted and so remains at -3. On the other hand the heavy casualties have seen the Men's opinion drop and it is now -2. Little surprise the platoon leader's outlook has gone from Worried to Irritable.
So, the Americans succeed yet again and now they have cleared their left flank. They have just received news of the discovery of an enemy position on the right flank which now needs to be cleared. That will be the next game in the campaign and you can follow what happens there in this post.
You find reports for all the games in this campaign and many other campaigns on the Chain of Command Campaign AAR page here.
Once again, you provide an interesting and exciting report.
ReplyDeleteGreat read! Table and figures look lovely! I have one more scenario before getting to this on in our campaign - looking forward!
ReplyDeleteYou need to get better dice ;) Great report once again! The americans seem to get so many double phases in each game its a little bit too much...half the time it feels 'too easy'. Curious to see how this unfolds in the following games!
ReplyDeleteA superb read as usual, and a cracking game but for the dice could have gone either way. I think I enjoy your reports more than actually playing.
ReplyDeleteAnother very enjoyable report, thank you for posting.
ReplyDeleteCheers
Matt
Great stuff, as always. Thanks for the report, highly enjoyable...
ReplyDeleteGreat game report. A shame about the dice.
ReplyDeleteGreat stuff, I haven't been keeping up with wargaming stuff lately--too much real life stuff going on--so I've just caught up with these 3 campaign reports. Very good reading, and hopefully the Germans can catch a break soon!
ReplyDeleteImpressive but there's something uncool about the Americans. Their helmets are too green and their formations look like Napoleonics. Would like to see more realistic, tactical formations across the ploughed fields. Also, since you have all the SFX props, when they burnt out that German defended wall would have liked to see a smoked out/burned out marker representing the area behind the wall being burned out. Still, very impressive. I need artillery impact markers like yours. My game isn't due to kick off for 6 months though.
ReplyDelete