

I think the image below sums up the sort of terrain to aim for:

I bought a selection of buildings, including a couple of single terrace houses, one destroyed single house, a double fronted house and an end cafe/shop. I like the Sarissa buildings, but as with all MDF models they need a bit of work to give them some individuality and character.
Once assembled I found I didn't like the way the different building levels had been designed to attach to each other. The fit was a bit tight and I could see the potential for a lot of fiddling around in the course of a game whenever I needed to remove a level and put it back again. So the first task was to remove the MDF plugs.


I then used some of the off-cuts from the inside of the windows and doors that often remain with the models and used them on the base of the upper levels to help hold those floors in place.

The next job was to fill the holes where the plugs would fit and to fill the other holes from the assembly of the walls. I used general purpose filler for this job.


I then gave it all a light sanding with a fine grain sandpaper.


The exterior walls lacked texture and so I used a semi-textured house paint from a hardware store to provide some character to the exteriors.


I take care around windows and doors, as you don't want to lose the finer details.


This is the end terrace roof and as you can see it has those nasty looking plugs and it is the one thing that really screams out that this is an MDF model. The less said about the 'chimney pots' the better.
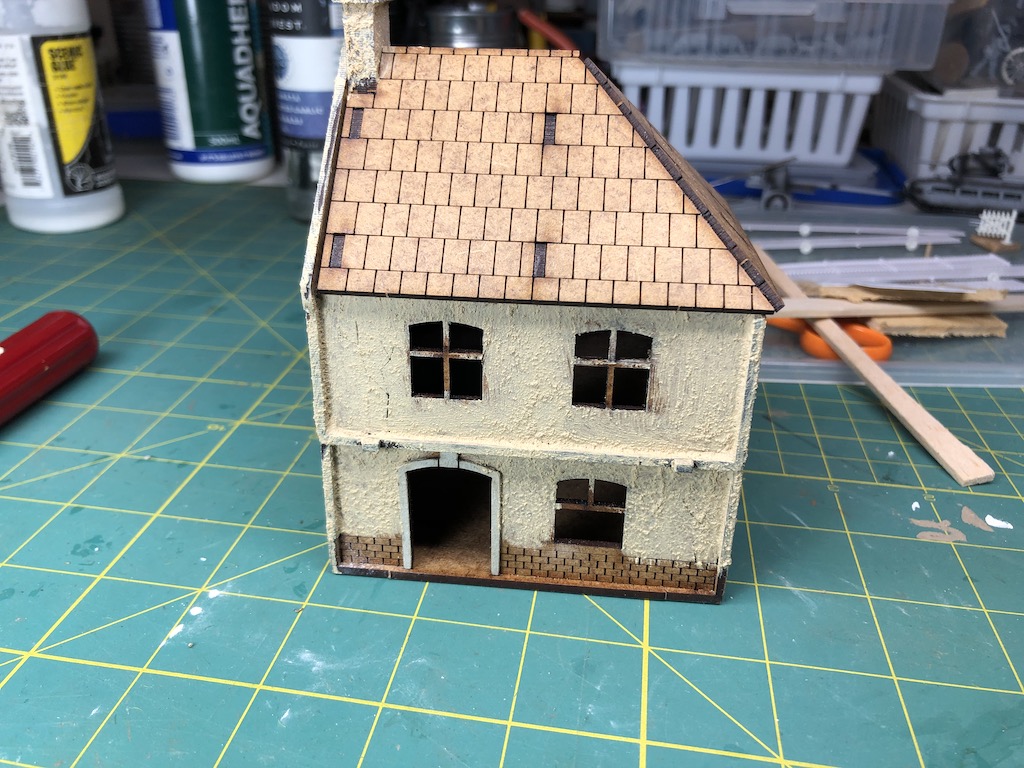

There are plenty of potential solutions, but I like to use laser cut roof tiles from Charlie Foxtrot Models. These come in A4 sheets and you simply cut out the lengths you need and glue them down.


Once trimmed to the shape of the roof I then add a strip of capping where the sections meet. This was made from an off-cut from the sheets of paper that the tiles are cut from.

The destroyed terrace roof required a little more creativity, but the base were the laser cut tiles. These tiles were from an earlier set I had bought from Charlie Foxtrot which came in black but are essentially the same as the lighter coloured ones.


I added some internal beams to give the damaged roof a bit more character.


The other issue is the chimney pots. They are those rather sad looking sticks of MDF protruding from the chimney and they really won't do.

I looked around the web to see what was available for model railway buildings. There were lots of options in resin, 3D printing or metal. I also stumbled across some pre-printed on card that you simply cut to shape and rolled to the size desired. I was about to order those when I thought, hang on a minute, surely that's simple enough to make myself and then paint. It was all simple enough. Find some thick art paper and cut a stip to the height you want the chimney to be.

Cut a suitable length (in my case for a 20mm scale building I thought about 30mm was sufficient). I then rolled it around a small piece of dowel and glued it together with PVA.


To give them additional strength I glue them over the MDF sticks on the chimney and then covered them in a very generous amount of undiluted PVA, inside and out, as this hardens and makes them very durable.


Once painted they come up well.


The end terrace cafe comes with two MDF rectangles to attach for signs. I found some suitable signs on the web, adjusted the size and then printed them off before using diluted PVA to stick them to the MDF.


I then added the doors, window shutters and other features that are printed on grey board and that come with the Sarissa models. The signs are not glued on yet as the buildings will need painting first.

The destroyed terrace needed to have some additional rubble to give it more character. I built a fire place and added some rubble made out of broken up cork. I think with all terrain there is a need for a fine balance between realism and playability. I'm not a big fan of based miniatures balanced precariously on top of mounds of rubble. So I've put just enough to give the impression of damage without making it impractical. This is really just a mater of taste.

The appearance of the damaged walls was looking very uniform and regular and so to break it up I decided to add some pieces of thin cork sheet torn to shape.


With the base of the buildings complete I then give them a coat of primer prior to painting.

The more I looked at the destroyed building the more I wanted to add rubble around it. My first thought was to put it on a base, but to do that would mean it would have to be a stand-alone piece and not part of a terrace. So my solution was to create a separate pile of rubble that I could sit around the building if needed. I used the remains of one of the frames from the MDF kit to make a right angled base that could sit around the corner of the house. I then used my dremel to bevel the edges and give them an uneven look.


This would allow me to place it around the building like this.

I built up the rubble using some insulating foam and then coated it with filler to which I added sand, cat litter and other pieces of debris.


The buildings were given their base coat and then dry brushed with various lighter shades to bring out the highlights. I try to make sure the roof does not look too uniform and paint the tiles in different shades. This can look a bit stark at first but once dry brushed and weathered they tie together.


The chimney pots are painted and I used the same Terractotta paint to pick out some of the brick work in the walls of the damaged house.


The roofs were weathered using dry brushing, highlighting the tiles but also adding streaks of dirt and grime. Finally the window shutters were painted and the houses were as good as complete.


Finally the additional rubble was painted to match the building.

I like the versatility this now offers to make up various rows of terraces. It also gives me the option to use all the buildings independently should I need to.


I can also add variety by introducing different size buildings, for example this Tabac from Charlie Foxtrot.


Next I need to consider how best to do the walled back yard areas for the houses. While it is all well and good to say I have a lot of options with the house arrangement it does mean I need to consider what is the best solution for the backyards. I'll have to give that a bit of thought.
As an update to this post I eventually came up with solutions for the backyards and walls. You can see how I did those in these two posts Getting ready for the Many Rivers to Cross campaign and in Getting ready for the 29, Let’s Go! campaign .
Lovely work Mark.
ReplyDeletecheers John
Thanks John, always good to try to lift these MDF models to another level.
DeleteThose buildings look so much better with your improvements, well done indeed.
ReplyDeleteThanks, I always think it's worth the effort to give a table a bit more character.
DeleteExcellent tutorial, with lots of good ideas, thanks
ReplyDeleteThanks Will, glad you found it useful.
DeleteWonderful looking row of houses. Looking forward to see them featured in your next AAR.
ReplyDeleteThanks, it was actually a forthcoming game in the Westwind campaign that got me started as I just needed a row of houses, so a few of these will turn up in an AAR quite soon (given it's supposed to be in East Prussia it will be the least French looking of them!).
DeleteBrilliant tutorial end exceptional work !!
ReplyDeleteNicely done on those buildings. They came out looking fantastic! Great post! 😀
ReplyDeletenice look !!!
ReplyDeleteAbsolutely stunning! How long did it take you to do these?
ReplyDeleteActually not as long as you might think. The most time consuming was doing the tiles for the roof and even they didn't take that long. I'm very happy with the way the chimney pots came out considering how simple they are, so happy in fact I intend going back to some of my earlier MDF buildings and adding them.
DeleteBrilliant 👍 consider that idea knicked.....well,not knicked but borrowed 😉
ReplyDeleteRealistic and lovely buildings, great details and great tuto!
ReplyDeleteGreat stuff as usual! What color did you use for the base coat was it terracotta?
ReplyDeleteThe buildings were base coated with Dulux acrylic emulsion Deep Bamboo, it’s a sort of brown/stone colour. I used Terracotta for the chimneys and the exposed brick work in the damaged house.
DeleteMany thanks - I'm about to try the same build and I did like the color you ended up with.
Delete