
So, do you have an opinion on sabot bases? Sure, they are very functional, I get that, but how do they look on the table? I don't mean those that are not painted or flocked, let's not even go there. No, it's more the floating platform look where it appears as if all the units are performing on their own individual stages in a surreal historical recreation of a modern Olympic opening ceremony.
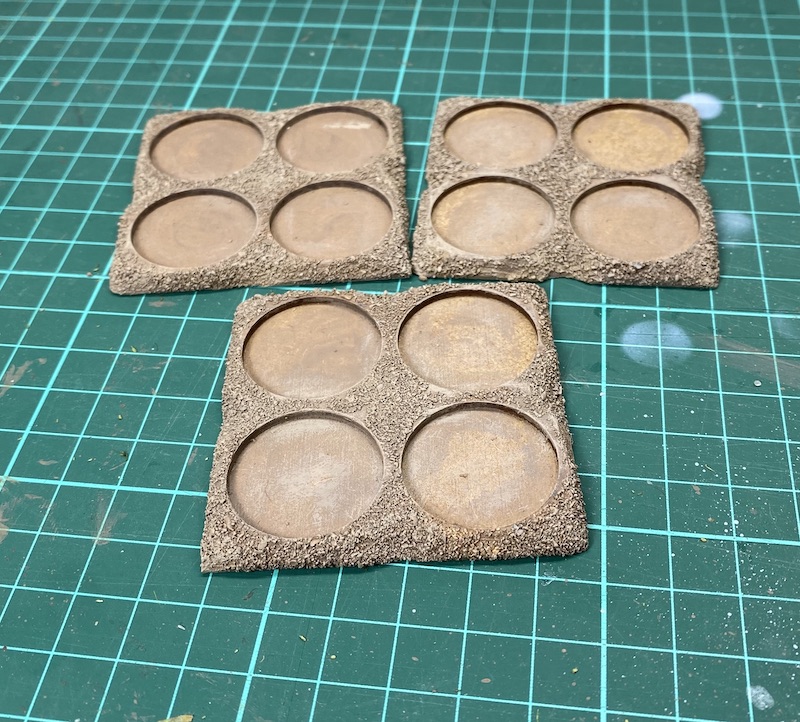
Consider a sabot base made from 3mm MDF. It has two layers, so the base is 6mm high. With 28mm miniatures that's a scale height that approximates to about 12" (300mm). Even a base made from 2mm MDF puts the figures at a scale height close to 8" or 200mm above ground level. When they are used with 20mm or 15mm figures the accentuated height becomes even more pronounced. That may not bother many people but at that stage I stop seeing a game of miniatures and start to see a board game with wooden blocks as counters.
To be fair this is a broad hobby that can accomodate everyone and who am I to judge what's acceptable or not? If it bothers me, then it's my problem. I hear you.
So having had my little rant I'll share with you how I've tried to find a solution that keeps the sabot bases functional (which they undoubtedly are) but also a little less obvious. In fact the aim if possible is to make them invisible so they don't break the immersion and so maintain our suspension of disbelief.
For me there's a simple enough solution which is to bevel the edges using the sanding attachment on my Dremel rotary tool.


The next steps are to add texture and paint in exactly the same way as I do the figure bases. These were created for my colonial era games set in the Sudan. In the case of the desert they don't even require any flock, just the odd tuft.


In the case of a region like North America the same technique is used except I've added the same flock to the sabot base as I used with the individual figures.


The blanks are quick and easy enough to make and I think well worth the effort. Of course eventually the entire sabot can be removed from the table once the number of casualties increases.


Between the casualty figures, shock markers and empty flocked bases it's easy enough to maintain the visual illusion while adding to the narrative that unfolds during a game.


Individual sabot bases like the ones below come with a single layer of 2mm MDF and a layer of thin greyboard on the base, so while they don't need to be bevelled in the same way they can be textured to match the bigger bases. In these cases I've made these up for leaders for Sharp Practice and marked the bases accordingly so they are easy to identify.


As a leader can be wounded in the course of a game rather than make an additional marker to place on the table I made use of suitable figure to represent the wound. Like I said, it's all about the narrative.....


A vast improvement and no mistake.
ReplyDeleteThanks Phil, I think so.
DeleteSimple, but very effective.
ReplyDeleteBill.
Thanks!
DeleteAlways match my sabots to figure bases (so can’t generally use the same sabots for different theatres), but it never occurred to me to shamfer the edges, what a simple but brilliant idea. Have to take issue with the height thing though; my minis are all based on ferrous bases of some sort (with holes for 5mmx2mm magnets in the centre of each space in the sabot), all around 2mm thick, so a 4mm sabot only increases the height by 2mm as the figure base sits inside the top layer.
ReplyDeleteRegards, BobC
Thanks, I think what inspired the blog post was actually seeing pictures online of a game with 6mm sabot bases where the edges weren’t painted which only emphasised the height even more. I’ve seen much better solutions like yours that haven’t required bevelled edges.
Delete100% agree with all this, I've done all this on my sabots too. I just used a Stanley knife to remove the sharp edges and also whilst at it made the straight edges a little less regular by adding knicks and curves.
ReplyDeleteThanks. Agree, I think even the most simple scrape with a blade to take off the sharp edges can make a difference.
DeleteA great article and pictures. I've used sabot bases for my 15mm French Foreign Legion stuff and you're right, they do look very tall. I'll be grinding the edges off forthwith (well, before my next game certainly!)
ReplyDeleteThanks Lee (and thanks for the retweet too!). Hope I haven’t caused you too much additional work, but it certainly makes a difference and well worth it in my opinion.
DeleteGreat idea, the worst thing about sabot bases is that bloody figures fall out of them which defies the whole object!
ReplyDeleteLOL. Some sort of system with magnets seems to be the solution to that.
DeleteSome great ideas and the results look fantastic - although personally, I have never used sabot bases, so don't need to worry about disguising them!
ReplyDeleteI do have mixed feelings about them myself and have friends who refuse to use them. I guess it’s that balance between functionality and aesthetic.
DeletePersonally, I really dislike sabot bases. That said your bevelling of the edges certainly helps and the replacement casualty or grass bases are a massive improvement. I guess my remaining quibble is that with figures on round bases they always end up fairly widely spaced, certainly if they are close order troops. But as you say it's all a personal aesthetic preference and this is a broad church.
ReplyDeleteI think they are a mixed blessing. For participation games and demonstrations I’ve found them very useful. It helps players visualise their units and speeds up play. On the other hand there are issues with the size of a unit’s footprint and spacing as you mention. I don’t always use them but when I do, especially at a demonstration game I want the table to look good.
DeleteI am planning to use 2mm deep sabot bases but replace the lower level with thick paper. I hope this will look good with bevelling as well.
ReplyDeleteGood idea!
DeleteI never really minded he straight edges of sabot tray, makes them easier to grab when there are 10 miniatures on it like my dark ages trays have.
ReplyDeleteBut I'm like you in that i really dislike the empty holes, so a styled blank or dead guy or whatever is a big improvement versus what looks like a random sink hole. 😁
Ease of picking up is the biggest argument against bevelling the edges and I understand that, mine are not as easy to pick up (but not that difficult either!). The empty random sink hole is such a horrible think I really had to find a solution, to be honest, it’s probably more offensive to my eye than the straight edge/height issue.
DeleteAmazing look . Neat improvement.
ReplyDeleteThanks!
DeleteFantastic results from those changes. It is amazing the difference the beveled edge seems to make in the height.
ReplyDeleteYes, it really does, doesn’t it? Like I say, it’s almost like an optical illusion.
DeleteNot a fan of sabots but I must admit your solution works really well, they look grand.
ReplyDeleteThey’re a mixed blessing - functional but not always attractive.
DeleteI confess to being the odd one out here, I actually like sabots for the convenience of picking things up by bases and not having to move figures individually. But visually, you have got this looking good.
ReplyDeleteDefinitely convenient and functional, no disagreement from me there, it’s only the visual side that bugged me.
DeleteLook great as per usual for your stuff!
ReplyDeleteMy main issue with Sabot bases is how far apart the infantry are. They space figures out too much for my tastes. I use magnetic sheet cut into 20 by 20 mm squares to base the figures then use a galvanised steel sabot to put them on. It's 1 mm thick and painted in a similar style to the bases (though is not textured) so when figures are removed it is just green below.
Yep, spacing is certainly an issue. I like your solution, I think it solves that issue nicely.
DeleteVery nice!
ReplyDeleteThanks!
DeleteVery innovative, yet simple idea to enhance the aesthetic.
ReplyDeleteHow do you create the dice sabots? I see them all over the place but have not yet come across a tutorial for them.
They are called dice frames usually and can be bought from several MDF suppliers. I bought mine from Mini Bits at Pendraken and Knights of Dice (who are no longer trading sadly).
DeleteAh. Very cool. I had no idea where to find these. Thank you!
DeleteYours look good. I haven't used any myself yet - for Warhammer miniatures I have been using thin sheet metal trays with magnets in the base of my miniatures - I got the trays from Shogun Miniatures: http://shogunminiatures.com/
ReplyDeleteI have been thinking of using the same trays but with an overlay of sabot basing slots in mdf for some of the bases that require re-sizing with the new version of the game. Bases that stand out is a bit less of an issue Warhammer though - for historical miniatures I will probably use something more similar to your system.
I like the metal sheets idea, I definitely want to explore that as it allows figures to be placed closer together which is more appropriate for many periods and formations.
DeleteYes I agree - it depends what look you are going for but often the sabot bases leave quite a bit of room between figures which would look wrong on, for example, a Greek phalanx. If you don't mind small gaps between the bases you can also put round bases straight into the metal trays and then they can be ranked up right next to each other, especially if they are on small (20mm or 25mm rounds bases).
DeleteGreat idea! I wouldn’t like a 6mm stack at all.
ReplyDeleteThat looks great - especially when you fill the empty spaces like that. Have you also considered rounding off the corners? I think that might improve the visual appeal.
ReplyDelete(I've never liked the way square or rectangular bases look on the tabletop_
- HeadHunter (posting from work, can't sign into Blogger)
Thanks. The only issue with rounded corners is when putting groups in formation, ironically it actually draws your eye to the sabot base because the rounded corner breaks the continuity of the formation’s base. You can’t win!
Delete