I don't normally do this, but with more time on my hands than usual I thought I'd write up my thoughts on the Osprey game
Undaunted: Normandy, a two player, platoon level World War Two wargame.
This is a low level, skirmish style game where each player commands a platoon of either American or German infantry fighting in Normandy. The clearly written rules take up barely a few pages and are both quick to learn and easy to teach. However that's not to say it is simple, those straightforward rules underpin a game with a fair degree of nuance.
What makes it so novel and interesting is the combination of a fairly traditional counter and map game environment with a card driven mechanism which relies on careful deck building. I was intrigued by the concept, although I wasn't sure how well those mechanisms would work representing this level of warfare.
The game contains twelve scenarios, which can be played individually or put together to form a campaign. There are eighteen full colour tiles that are printed on both sides and these form the terrain pieces that make up the play area. There are sets of round counters which will be used on the map to represent the units for each side and a deck of cards that will drive the action of those counters. The scenarios define the configuration of the tiles, the available units, the initial placement of counters and objectives for both sides.
Each platoon is made up of three squads. The squads have three teams - 'Scouts', 'Riflemen' and 'Machine gunners', all led by a Squad Leader. The teams are represented by individual counters but the mechanism that is used to drive them is a deck of cards.
What is interesting is that the counters on the map do not represent a fixed number of men, it will be up to you to decide whether to call men forward as the tactical situation develops. Below is a picture of the counters and map tiles of a game in progress.
The binocular counters represent a tile that has been 'scouted' by their respective side (other than Scouts, a squad's counters cannot enter a tile if it has not been previously scouted). The brown, numbered flags indicate victory points awarded for control of that tile (as defined by the scenario).
While the teams are represented by counters on the map, the real interface that the player has with these units is through the deck of cards. Each platoon has a deck and each squad is represented by a squad leader card, three Scout cards, five Riflemen cards and three Machine gunner cards. These cards are both a command and control mechanism and a way of reflecting the relative strength of each team.
I was a little bit disappointed to see that both the German and American squads were basically the same and showed no national difference in structure or equipment. This is particularly notable given this is the Americans and the Germans, as I presume the German machine gun team are equipped with an MG34 or MG42, while the American team has a BAR. Distinctly different weapons and it would be good to have explored what differences they create. That said, there's absolutely no reason why later variations of the game could not do that, or alternatively players create their own. It's a small quibble but something that could have added rather nice historical chrome.
Below are the cards for the respective members of US squad 'A' (each platoon's squads are noted by either A, B or C).
The platoon also includes a Platoon Sergeant, a Platoon Guide and additional support units such as a light mortar team and a sniper (each scenario will define what if any of these are available). You will see that the bottom portion of each card lists a number of actions, the controlling player chooses which one of these to undertake when they play that card. The actual actions themselves are performed by the counter on the map, but they are driven by the play of the cards. These actions are all described in more detail on a one page quick reference sheet, but to be honest there are not many and after a few games you will find you don't need to refer to it.

The game also features 'Fog of War' cards. Essentially these are of no use, the more you have in your hand during a turn the less you will be able to do. Weeding those cards out of your deck but adding them to your opponent's is one of the roles of the Scouts. It's a nice little mechanism for abstracting the limited intelligence available to each commander.
The chosen scenario will tell you which of these teams is represented by a counter on the map and which of those cards will start in your
deck (your available cards) and how many will be in
supply. Supply represents those men who are not yet committed to the fight and await deployment onto the map. How and when that happens will be very much up to each player.
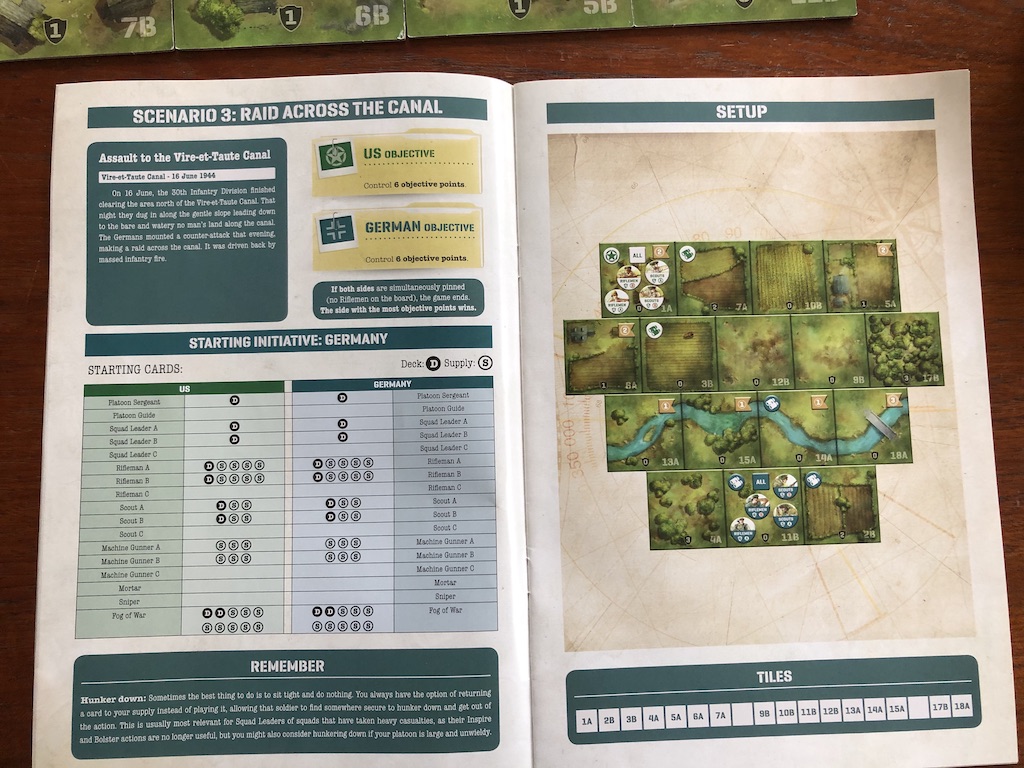
In the picture above from one of the scenario sheets, you will see that in the list for the starting cards some cards are marked with a D and others with an S. Those marked with a D will start in the player's
deck, those marked S in
supply. For this scenario the US player will not have available the platoon guide, squad C, the mortar team or the sniper. What you can see is that the US player's starting
deck includes the platoon sergeant and both squad leaders, but only one rifleman and one scout from each squad and none of the machine gunners. It will be up to the player to decide when and how to use the sergeant and squad leaders to bring those riflemen, scout and machine gunner cards out of
supply (in effect to call men forward) and into the
deck. The
deck is the pile of cards from which you will draw a
hand of four cards with which to play out each turn (more on that in a minute).
This was about the only issue I have with the rules and it's a minor one but it's important to understand that cards can be in one of three places. This can be a little confusing at first.
Your
hand describes the four cards you draw at the start of every turn. The
deck describes the pile of available cards from which you can draw your
hand.
Supply describes those cards that are available for the scenario but are not yet in the
deck.
If we use the example of those Machine Gunner teams for US squads A and B in the scenario sheet above. All are marked S, which means none of them will start in the
deck for the US player, they are all in
supply. The counters representing those Machine Gun teams are also off the map. They will only be placed at a later point in the game if the US player decides to deploy them and to do that he will need to add the machine gunner cards to his
deck from
supply before that can happen.
So a game begins with the map tiles configured according to the scenario sheet and with the relevant counters placed on the map. The cards that start in your
deck are placed face down. The cards in
supply are placed face up on one side of the playing area.
This brings us to the key driver of the game. Each turn both players draw four cards from the top of their
deck. As these cards are face down neither player knows what has been drawn and they are kept secret from the opponent. Initiative for each turn is decided via a secret bid using one of those cards. Once initiative is determined the cards used to make the bid will join the player's discard pile, leaving each player with three cards for the turn.
The bid for initiative at the start of each turn offers the first dilemma, how much do you want initiative and what are you prepared to trade off to have it? The more useful the card the higher its bid value. You can bid with a Fog of War card, but with a bid value of 1, chances are you simply remove it from your hand rather than gain initiative.
The remaining three cards left in your
hand will be used during the current player turn. The initiative player selects a card and plays it face up, carrying out one of the actions available to that type of card. With only three cards (and the chance one or more may be a useless Fog of War card), turns are brief and so the game flows quickly with little down time for either player.
The Scout, Rifleman and Machine Gunner cards will be used to activate their respective counters on the board. The squad leaders and the platoon sergeant carry out more abstract functions such as to call forth more men to their units (Bolster), to inspire (allow a card just played to be used again) or, in the case of the platoon sergeant, add two cards to your hand which can be used immediately (Command).

This limited number of cards introduces both friction, fog of war and a limited ability to perform actions. Much like the command dice in Chain of Command, each turn (or phase) a player must decide how best to use the limited command options available. By using a deck building mechanism Undaunted: Normandy allows you to try to control what some of those outcomes might be. How so? Knowing you will only have three cards to use per turn it's important that you keep your deck refined down to the key units you want to use at any given time, you also want to weed out the Fog of War cards (and ideally try to seed your opponent's deck with as many of these as you can).
How and when you add cards from
supply into the
deck is the key deck-building element of the game and a major component of command and control. A small
deck that contains only the key cards for the activity you want to carry out in the upcoming turns will allow those cards to appear in your
hand with greater frequency. For example early in a scenario you may want to push your Scouts forward to reconnoitre tiles, but once they've done that, you may then want to put the emphasis on your machine gun teams laying down suppressive fire, in which case you won't want a lot of Scout cards appearing in your
hand when you no longer have a need for them. Time to have those men take cover somewhere by having them Hunker Down (returning the card to
supply).
If you look at the example with the US machine gun teams that start the scenario in supply, if you decide that you don't need those teams right now, then there's no point adding those cards to the deck just yet. On the other hand if you can foresee a time in the near future when you might need them then you might want to start the process of adding them sooner rather than later. The reverse also applies and players can choose to Hunker Down, which returns a card to supply.
I like the narrative this sets up. The squad leader or platoon sergeant has identified an issue on the battlefield and needs the LMG team to move up and come into action. In effect he needs to go back himself or send a runner to make that happen. How and when they actually turn up is a little bit fluid and that adds a sense of battlefield friction to proceedings. In a similar way if you have too many cards in your deck, you have stretched the command structure beyond its ability to function at its most effective. Better to have squads A and B leading the action and keep C in reserve to be called up when needed than try to overstretch your command ability.
That is the traditional challenge of deck building games, how well that represents the challenge of command at platoon level is another matter. In one sense you can justify it as the extent to which a commander can focus his attention, but then we know that units can and will operate under their own initiative or simply continue following their orders even without the presence of their commander. This is where Undaunted: Normandy becomes more of a game than a wargame. Given I see this as a lighter, filler game I'm more than happy to accept this as a compromise to keep the game simple and playable. I think you can justify it as a simplified mechanism to reflect the need for the commander to stay focussed on the mission and the resources needed to have it completed.
The mechanics for movement and firing are very straightforward. Let's say the US player plays one of the cards for Rifleman A. The card offers three choices:
 Move (1)
 - this allows a movement of one tile.
Attack (1) - this allows the unit to fire rolling one fire dice.
Control - this allows the counter to take control of the tile it currently occupies (often the key to scenario victory).
A Move is very straightforward. As long as the tile has been scouted by his side the counter may move one tile. There are no terrain restrictions to movement, it's basically an area move into a new location.
Attack allows the counter to fire. There are no line of sight restrictions (a bit odd, I know), the counter may nominate any enemy counter on the map and fire at it. In the rifleman's case you roll one D10. Each counter has a defence number (4 in the case of Riflemen). This is added to the defence value of the tile the target occupies (a number between 0 and 3 that is printed on each map tile). Finally the number of tiles from the firer to the target is added to this total (while nothing blocks line of sight completely, this range in tiles goes some way to suggesting hinderances between firer and target). So let's say we want to fire at an enemy Riflemen counter in defence terrain of value 2 that is three tiles away. That gives us the sum of 4 (the Riflemen's inherent defence value) + 2 (the terrain defence value of the target tile) + 3 (the range in tiles) = 9. In order to score a 'hit' the firer needs to roll 9 or more on a D10.
A hit represents a man out of action and requires the defending player to permanently remove a corresponding Rifleman card (for the relevant squad). This is where the distinction between
hand,
deck and
supply is important. In the first instance the card must come from the current
hand, so if you are the non-initiative player you could potentially lose a card you were intending to play in your turn. One good reason to hold the initiative and act first. If there is no card in your
hand, or you have already had you turn, then remove one from the discard pile. If there is no card there remove it from your
deck. If there is no corresponding card in any of these three then the player must remove the counter from the board (in other words all the men it represented have been lost as casualties). If there is a corresponding card in
supply, this is not removed (as the soldier had not deployed and so wasn't in the line of fire).
Any cards in
supply can be added to your deck (using a leader's Bolster action) and when played from your
hand you can return the counter to the map (but back at an initial deployment point, not to the tile from which it was removed). In other words if all the men you have in action (the cards you have in your deck) are casualties (you have no card available in your deck), then the team is no longer on the map. Of course if you have some of those cards in supply you can call those men forward to form the team, but as they are coming from the rear that's where they are going to start.
Once again this is where the deck building element becomes important. If you have a single Rifleman from squad A in your deck then the only time you will be able to activate the counter for that team is when that card cycles back into your hand for a given turn. Having the cards for all five Riflemen from squad A in your deck make that occurence much more likely. It also makes that counter much more resilient to combat casualties.
If you look at the Machine Gunner card above you will see that it has Attack (2), in other words it will roll 2D10 when it fires, so as you might expect it can be a more effective weapon. Alternatively it has the action Suppress (4). This is unique to machine guns and means the firer rolls 4D10 and any hit suppresses the target. In this instances no cards are removed for the hit, instead the target counter is flipped over to its reverse side. It can take no further action until the controlling player plays a corresponding card. This returns the counter to normal but allows no further action for that card play.
A suppressed unit is a good example of where the squad leader cards come into their own. Let's say you have a suppressed riflemen counter and in your hand for this turn you have one of the corresponding rifleman cards; the squad leader card for that squad, and a fog of war card. You could play the rifleman card first and this would return the suppressed counter to normal. By then playing the squad leader card and choosing the Inspire action you can immediately return the rifleman card to your hand. Now that the counter is no longer suppressed you can then play the rifleman card again but this time choose to use one of the actions like Move or Attack. The Fog of War card is of course useless and goes to the discard pile, so ending the player's turn.
Incidentally the discard pile is also the place where a card is put when it is moved from supply to your deck. Only when you can no longer draw four cards from your deck at the start of each turn do you shuffle the discard pile to become your new deck. The bigger your deck the longer it will take to work through it and the longer it will take a card brought from supply to the discard pile to make its way into your hand.
It only takes one game to get a decent handle on the rules and mechanics, but it takes several more to really get to grips with how to play it well. I think the classic line 'easy to learn, hard to master' probably applies. I've also found it plays very well solo. I don't use any special rules, I simply played each side to the best of my ability. The random nature of the card play makes this very easy to do.
Undaunted: Normandy is a nice twist on a number of game concepts and mechanics and I think it succeeds at what it sets out to do. With most scenarios playing out in about 45-60 minutes it also makes the perfect game when you don't want to take up a whole evening or afternoon. I like it far more than I expected I would.