Showing posts with label Afghanistan. Show all posts

Tuesday, 6 January 2026

2025 - a gaming year in review

Well, it seems 2025 was a particularly productive year, something I hadn't quite realised until I started putting a retrospective together. Followers of the blog will know it was only a week ago that I posted a review of my Chain of Command related activities, but looking back at other rules and periods it dawned on me that there was more than enough to warrant a second post. Excuse the indulgence! 

The biggest new painting project for the year was undoubtedly the German tribes for Infamy, Infamy. I didn't buy the figures during the year, which is partly why they became a 2025 project, they were long overdue painting. The vast bulk are from the Victrix plastic range, with shield transfers from Little Big Men Studios.

The few metal figures in the collection are from Wargames Foundry, like this group of wailing women.

As mentioned, the spur to paint the figures was to play games using Infamy, Infamy. My regular opponent Dave has quite a Roman collection and they were just awaiting suitable opponents. I wrote up a detailed report of one of our first games, which you can find in this post

The figures also featured in a number of games at the club.


I needed to add a small group of slingers to the German force and adapted those from a set of Gripping Beast Dark Age Warriors that I had lying around. Little did I know, but that decision would then lead me down a completely different rabbit hole. One thing led to another and within very little time I had a Saxon warband. A long story, but one you can follow in more detail in this post

This was inspired in part by our Dux Britanniarum campaign Warriors of the Old North. We played the first game at the tail end of 2024 and it continued into the first half of 2025 with another three games. 

All the figures came from Dave's collection, so there has never been a need for me to create an additional warband for this campaign. Well there you go, sometimes this hobby can lead you down all sorts of unexpected paths. 

When it came to basing those Saxons I did it with a number of rule sets in mind. That started me thinking about how I could use some of my existing figures for other periods for different rule sets. 

I have a number of Hundred Years War figures that were created with Lion Rampant in mind. While those rules were fine for a casual game at the club, I was keen to do something on a grander scale. I'd played my first game using Midgard in April. That was a big, multiplayer scenario set during the Trojan War and was very enjoyable. 

When I saw that James Morris had compiled lists for the Hundred Years War I looked to see if I had enough figures to put together a French and English force. I was close, but not quite close enough. What I did have, were a number of Perry plastic sprues that would provide me with enough figures. For a reasonably small investment of time I could add the various crossbow men, archers and men-at-arms to make up the numbers needed. 

The only other additional work was to make up a handful of suitably based figures to represent both French and English heroic leaders.


All that remained was to create suitably sized sabot bases of the standard 120mm Midgard width that would hold up to eight figures per unit.

Our first game used the lists for Agincourt. We decided to see how the rules would play out if we created a scenario that tried to mirror the actual battle. Anyone familiar with Agincourt will know that is likely to create a game with a decidedly English bias. Nonetheless, we thought it might be a good way to test out how well the rules replicated the historical situation. True to that narrative, the French struggled across the muddy ground to confront the English. Those that did make it across came to grief in front of the stakes set up by the archers. French courage was not lacking and their heroic leaders racked up a significant number of reputation points leading charges. While few fell in combat, the same cannot be said for the men they were leading, which ultimately assured English victory. 


That was a satisfying result, in so much as we felt the rules were able to give a plausible historical outcome. That inspired a second game, using the 'defend the hill' scenario in the Midgard rulebook. That delivered a more satisfying game, where the opportunities for victory were more evenly balanced and with the outcome only decided toward the very end. 

As it happens, the sabot bases also work for another set of medieval rules Blood and Horse Droppings by Rob Jones. I've played these before and as Rob is a medieval historian there's no surprise that these do a good job of focussing on the challenges of command in the period. Given I had the figures and bases it made sense to give the rules a run out again at the club.

Much comes down to decisions made by commanders as they enter or continue to fight in melee. As always with the period (and in common with Midgard), leadership and heroic deeds count for much. By the way, the rules are free and available as a pdf download from Rob's website Historian in Harness.

Having played a giant Trojan War game using the Midgard rules, our host also wanted to try doing something similar, but this time using Hail Caesar (or, as the detractors at the club like to call it 'Fail Caesar'). These were my first games using those rules and I have to say, they didn't grab me. Despite the game looking quite spectacular with hundreds of 28mm figures, I found the rules rather vanilla and the games not as engaging as Midgard.


O Group was a rule set that consumed many of my evenings at the club. We managed to play through both the France 1940 and the 1941-43 Eastern Front supplements. For these we used my opponent's large 15mm collection and terrain, most of which was amassed for Flames of War, but has since been repurposed for O Group

It's not a complex set of rules, but it does have a lot of nuances. We found it really benefited from repeat play and without keeping too long a gap between games.


We like the system, but we do have one gripe. That's with the scenarios and in particular the victory conditions. Despite setting objectives that can be captured, any game can also be won by inflicting a number of casualties on your opponent. As a result, we've often found the game coming down to our ability to pick off low hanging fruit to rack up those casualties, rather than a focus on capturing key objectives.


More recently we started playing the scenarios from the Normandy supplement, which was an opportunity to use my 12mm collection which I had created with O Group in mind. 

The 12mm collection also saw use at the club playing Crossfire, where I introduced the rules to a gamer I have known since my Advanced Squad Leader days.  


Despite the disparity in the size of their respective rule books, he found much to like about Crossfire's elegant simplicity. Talking of which, I've been using the elegantly simple 2'x2' introductory scenarios designed by friend of the blog Dick Bryant. It's been a very useful tool for taking people through the rules, whether they be new players, or those just inquisitive to discover how the rules play out. For those games I've been using my 20mm terrain and the multi-based figures I still have in 20mm for playing Crossfire (more about those here).

Playing games set during the American War of Independence using the Sharp Practice rules is of particular interest, but 2025 saw very little of that. Sadly, there's only so much game time available each year. However, that period was not entirely neglected. I was able to paint up three groups of ragged Continentals, a lovely set from Eureka Miniatures.

There was only a solitary game using Sharp Practice and that was set during the Peninsular War, not in the rebellious American colonies. However, there were no complaints from me. Once again, our host supplied a magnificent table and an equally magnificent selection of figures.


John Savage, the author of What A Cowboy, very kindly shared a draft version of his modern variant of those rules entitled What a Cartel (these have since been published in the 2025 Lard Magazine). It was an opportunity to dig out my rarely used figures and terrain for Afghanistan and we ran a simple extraction scenario, where a team of private military contractors attempt to save a downed helicopter crew.


Whilst not miniatures, I also played through the whole of an Undaunted: Stalingrad campaign with a good friend. He's an avid historian of the war and an equally enthusiastic player of board games, but any attempt I've made to entice him over to playing miniatures has failed. I've long since given up hope of bringing him over to the dark side, but that doesn't mean we don't continue enjoying gaming together.

So, another full year of gaming. It's funny really, because that's not how I felt about the year when I was first reflecting back. For some reason my mind focussed on the lost opportunities and disruptions. In hindsight these now seem minor and while a year with even more gaming would have been great, it would be churlish to complain. Huzzah for 2025.

Wednesday, 13 October 2021

Making rocky outcrops for arid terrain

The arid terrain mat I made for the Sudan project using caulk and canvas was a first attempt at a homemade mat. Despite a few bumps along the way I ended up happy with the result. The next job was to create pieces to add as terrain and scatter to dress the table for a game. Looking at period paintings and sketches the terrain in the Sudan looks generally flat but is broken up with distinctive rocky outcrops and it was some of these that I wanted to make first.

I've seen railway modellers using cork bark to make cliffs and thought I would try my hand at something similar. I looked for bark at local garden centres and found a bag of pine bark pieces that were about 25-30mm long and appeared as though they would make a good starting point for boulders.

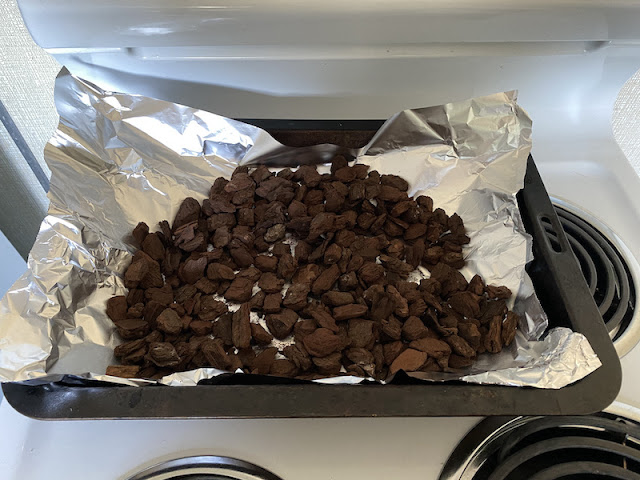
As it comes the bark needs some treatment before it can be used for terrain making. From the warmth and condensation in the bag it was fairly obvious that there was living matter at work, after all, the bark is intended to decompose and provide fertiliser to plants. The best solution I could find was to dry it out in a very warm oven for an hour or so which seemed to do the trick. 

Each terrain element would need a base and so several pieces of MDF were cut to irregular shapes and their edges bevelled with a Dremel rotary tool to give a natural look. 


Next I sifted through the bark looking for pieces that best resembled rocks and boulders. I tried to find shapes that would work well grouped together. In some instances I intended to build up the rocks in layers, in others I would use single pieces.


I made up two pieces initially, really as a proof of concept and to be sure the method would work. I was really impressed how once painted the bark takes on the appearance of rocks. The layers of bark look remarkably similar to layers of sedimentary rock and that looks just right at 28mm scale. 


The only issue I had was with the colour of the rocks. I'd been extremely unimaginative painting them grey, a bit like always painting water blue it seems grey is a natural default for the colour of rocks. While they didn't look bad, they didn't look quite at home on the new game mat either.


Photographs of the Sudanese desert show a much darker colour to the rocks and one from the same colour palette as the sand (no surprise really given the sand is probably no more than the eroded residue of the rocks themselves). 

So I tried painting them a darker brown colour followed by a dark wash. These looked much better and with that I settled on the colour scheme before beginning the more ambitious pieces.


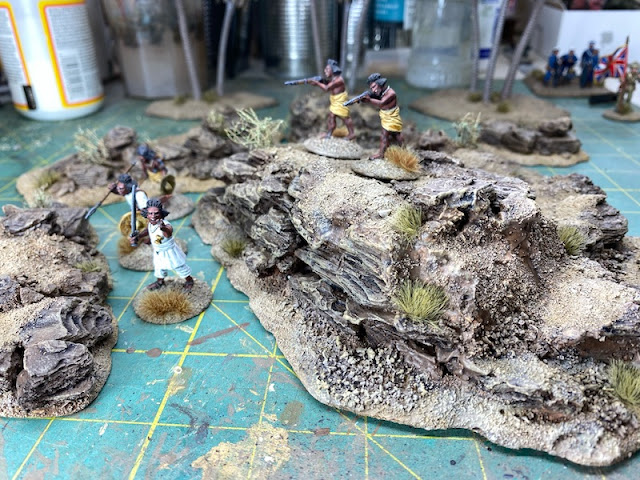
The first of those was a larger rock outcrop or small hill. I was aiming for a look that showed the rocks aged and layered over time, as if they had been exposed slowly by erosion. The basic shape was cut out of insulating foam and stuck onto the MDF with a hot glue gun. I then built up the bark in layers around the edges, trying to make sure the grain in the bark was always running in a similar direction. 


Most of the sand you see in the picture is loose, where there was large gaps in between the piece of bark I poured sand onto the exposed glue that was between each rock. Once dry the loose sand you see was shaken off.


The impression I was after was of layers of exposed rock and so I wanted them to appear as though they had emerged through the surface of the desert. To achieve that effect the top area was left free of rocks and was filled with household filler and then textured with sand.


Once the sand had dried additional texture was added using cat litter to represent smaller clusters of fallen and eroded rock.


The whole piece was then sealed in diluted PVA glue prior to painting. I do this for two reasons. Firstly I find that the PVA forms a thin plastic layer over the whole terrain piece and that makes it much easier to paint. The paint flows easier and is not absorbed by the sand or filler so you find that you don't use anywhere near as much paint as you would if it were unsealed. Secondly, despite drying out the pine bark in the oven, I thought it would do no harm to further seal it against damp or any other infestation.


Once the glue had dried the whole piece was painted a base coat of Dulux acrylic emulsion. I buy sample pots from the local hardware store, a 250ml pot costs about the same as a 17ml dropper bottle of Vallejo acrylic. As it comes the paint is too thick to use at this scale (it fills in a lot of small detail) and so I dilute it at about 2:1 with water which also helps it flow easier. This base colour is the very suitably named Brown Land. Well, of course it is.


Once the paint was dry the first thing to do was to wash the rocks (ie the pine bark) with Agrax Earthshade to bring out the texture. 


Next the top surface layer of earth and sand was painted using a mix of Dulux Scarab and Deep Bamboo.


Once dry it was dry-brushed with Arava, careful not to get any on the pine bark rocks.


The rocks themselves are then dry brushed, but this time with the base colour used for the sand and earth.


That completes the painting at which point you could leave them as they are, however vegetation has the ability to emerge in even the most inhospitable places and looking at images of the Sudan desert that's certainly the case.


I wanted to add a few pieces to break up the monotony of the colour and add more character. For that I used two things. One was to make a few plants myself using rubberised coconut fibre.


The other was to use a few ready-made tufts from the Army Painter.


I tried to place these in small crevices and those areas where moisture might collect or flow.


I did this quite sparingly, just enough to give a hint of vegetation.


With that the pieces were complete and ready for the table. For a sense of scale and how they work with figures here they are with a few of the Perry 28mm Beja.


While Palm trees seem like a bit of a cliche for the desert and more of a Hollywood trope they do grow along the banks of the Nile and so are not totally out of place for a game set in the Sudan. As it happened I had several palm trees left over from my 20mm Pacific project for the Second World War and they were just about tall enough to pass muster for a 28mm table.

The trees were bought cheap on eBay and were painted first. You can follow how I did this in this post about making the palm groves for the Pacific.


I made a few simple bases textured with sand and painted to match the other desert terrain.


It was then just a matter of drilling holes and attaching the tree trunks before adding a few tufts to finish them off.


If you've found this post useful and would like to Buy Me a Coffee to help cover some of the costs of running the blog you can click through at the link or on the tab in the right hand column of this page.