Chain of Command v2 introduces a couple of new mechanics that need marking on the table - the Replen Point and Mission Objectives. So, it goes without saying, my mind immediately started ticking over, thinking about how I might want to represent these. Aside from the fact that I just enjoy making stuff, I see them bringing a strong narrative element to the table. What more excuse did I need?
Replen Points, once placed, remain in that location. They can supply the first unit that calls for them immediately, plus they can also supply another two types of ammunition to other units. In the meantime they run the risk of capture if contacted by the enemy. As a result, their position needs to be recorded. It just calls out for suitably themed markers. Once again, it was a chance to sift through the spares box and give unused figures a new lease of life.
I had in mind something not dissimilar to the way many people theme their jump-off-points. To differentiate them, I used a small square shape rather than the 40mm rounds I use for my jump-off-points. The figures and ammo boxes all came from the spares box. In the case of the Germans this is a figure from the Plastic Soldier Company heavy weapons set, for the British it is an AB Figure carrying 2" mortar rounds.
The American figures below are both from Wartime Miniatures (now Simon's Soldiers) and are part of a set of supply figures. I had used them for a jump-off-point originally, but decided they're better suited to this sort of marker.
The US 60mm mortar has a Replen Point automatically assigned to it, in effect giving it an initial six rounds of ammunition (assuming it doesn't move away from the Replen Point before needing to replenish). I had a spare figure from an M1 81mm mortar set and, although he's equipped with ammo for that mortar, I felt he would come close enough to what I needed. Given this sees the 60mm mortar with more ammo than most similar support weapons I thought it might be easier to keep track of ammo use by including a small mini-dice on the base.
I gave the die a repaint to match the colours on the mortar rounds. Hopefully that make it a little more discrete, while keeping it easy to see.
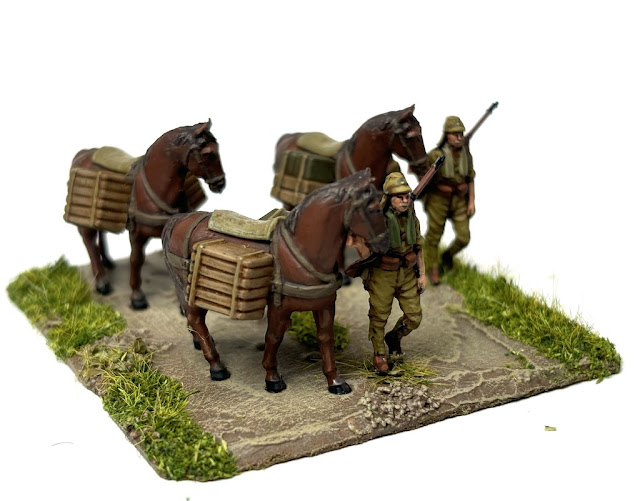
For the Japanese I've used more of the Airfix figures that came with their Jungle Outpost set. They were sitting in the spares box until I thought a few of them would work well together to make a Line of Communication marker (see more below). It wasn’t much more of a stretch to see how a single figure with pack horse would work equally well for a Replen Point.
When it comes to Misson Objective markers there's a lot of scope and much depends on the situation you are gaming. The objective is usually on a key piece of terrain, like a crossroads or a bridge. You could easily use a wrecked vehicle or something similar.
Another option could be a supply dump of some sort.
The only issue that needed a bit of thought was how best to deal with confined spaces, particularly inside buildings. Chances are the defender will want to garrison this key terrain, so I needed a marker that wouldn't demand a lot of space. The idea that sprang to mind was a map, the sort of map the attacking commander may well have consulted when setting objectives for the platoon.
There are several web sites with 1:50000 period maps, particularly of Normandy. I found these below showing the area around Caen and thought they would be perfect. I reduced them in size, before printing and then mounting them on squares of MDF.
I went with two different sizes to give me flexibility with placement. I think these might be a good solution when space is at a premium. They achieve one of my key aims of not taking up too much space, there's no reason why figures cannot be placed directly on top of them, if need be.
While not a specific feature of the Chain of Command v2 rules, the CoC Far East Handbook includes Line of Communication markers, which serve as potential objectives for attackers in that theatre. I covered these in an earlier post, but thought it worth including them here again given their link to the new objective marker rules in CoC v2.
While playing the Driving Charge campaign set in Malaya, we represented the British Line of Communication marker with a model of a truck.

That worked well enough, but I thought it could benefit from a few figures to add more life and so I repurposed a few AB Figures desert tank crews.

Given that normally the LoC marker is placed on a road, it made sense to base the figures to match.

Generally, the Line of Communications markers are more a feature of the early part of the war, to reflect the way the heavily mechanised allied forces were so dependent on roads. However, that changes as the war progresses and the allies shift to the offensive. That’s when the need for Japanese LoC markers arise.
The first one I created featured a team of pack horses. These are a blast from the past for me, as they are figures from the old Airfix Jungle Outpost set. I thought they might also come in handy as a target for Chindit raids on Japanese communications. While the poses of both horses and soldiers is repetitive, I think they make for quite an atmospheric group.


I built a Hasegawa model of an Isuzu TX40 fuel truck for use as scatter terrain, or another objective for Chindit raids, but it will also work well as a LoC marker. The addition of a figure adds more to the narrative and brings the setting to life. This figure comes from the Orion Japanese tank crew set.


Together with my recent attempts to created
new game markers I've enjoyed putting these together. No doubt a few will make an appearance in our ongoing Scottish Corridor campaign.


