Sunday 28 June 2020

Teddy Bear fur terrain

Miniature gamers are a creative bunch. If you're anything like me you can't walk through a craft shop or hardware store without keeping one eye out for potential terrain elements. I don't know who had the idea or when, but teddy bear fur has become a very popular foundation for terrain pieces like fields of tall grass, crops or tropical kunai grass. I can't claim any particular skill or talent but I thought I'd run through what I've experimented with and what I've learnt.


The fur can be bought in craft shops and fabric suppliers. It comes in many colours, but conveniently for us terrain builders teddy bears tend to come in different shades of brown - a more than suitable base colour. You can buy the stuff by the metre/yard and it's reasonably priced.


I prefer the golden brown colour as it needs the least work to create fairly natural looking colours. You could use it in this state but I think the colour is too uniform and the shiny fibres have an artificial look. A bit like plastic aquarium plants and model trees, they look so much better with the colour toned down to something more natural looking, as has been done with the plastic plants below.


Based and painted, they not only look more natural on the table but if other plants are painted in a similar style, they all blend in well together. You can see more about how I made these in this post about making jungle terrain.


As it comes the fibres in teddy fur are too uniform in length and often too long to fit the scale of my games. To make it more appropriate for my needs the two key areas to work on are cutting the fibre and colouring it. I've tried a few methods for cutting. One is to use hair clippers. I've tried these and while they do a reasonable job they have their limitations, so what I tend to do is give it an overall cut with the clippers to get it close to the length I want, but then go back with a pair of scissors and make lots of random cuts to break up the even length of the fibres. It really is a matter of experimenting to get the overall look that you want.

The next thing is how to colour it. I've tried a few different options, including spray paints, but what I have found best is to manually apply diluted household emulsion paint. I buy Dulux sample pots from the hardware store. The one issue to try to avoid is having the paint clump the fibres together and there is a simple way that you can avoid this. First, I dilute the paint with water so that it spreads easily, it's far too thick as it comes out of the pot. Then I spread the paint by hand over the fibre (rubber gloves come in handy here), rubbing it in to the material. What comes next is critical to getting this right and that is to then spread the wet paint evenly using a comb. The comb is very effective and I've found it's best to do this in small areas before the paint can dry. While the paint is wet I comb it through the fibres making sure they are not clumping together. The trick here is to have just the right amount of paint. Enough to cover the fibres but not so much that they stick together.


If the base colour of the teddy fur is a natural shade, like this golden brown, then it doesn't matter if the paint doesn't entirely cover the fibres, in fact I think it adds to the overall look.


The other tip is to avoid using a single colour. I mix in a lighter, yellow shade just to break things up a bit. Below is an example of one of my first attempts which I made to represent patches of scrub and long grass for the Russian steppes for the Chain of Command Kursk campaign Storming the Citadel.


I then experimented making larger pieces to create fields of kunai grass for games set in New Guinea and the Solomon Islands.


The same fields were versatile enough that I could use them for European settings.


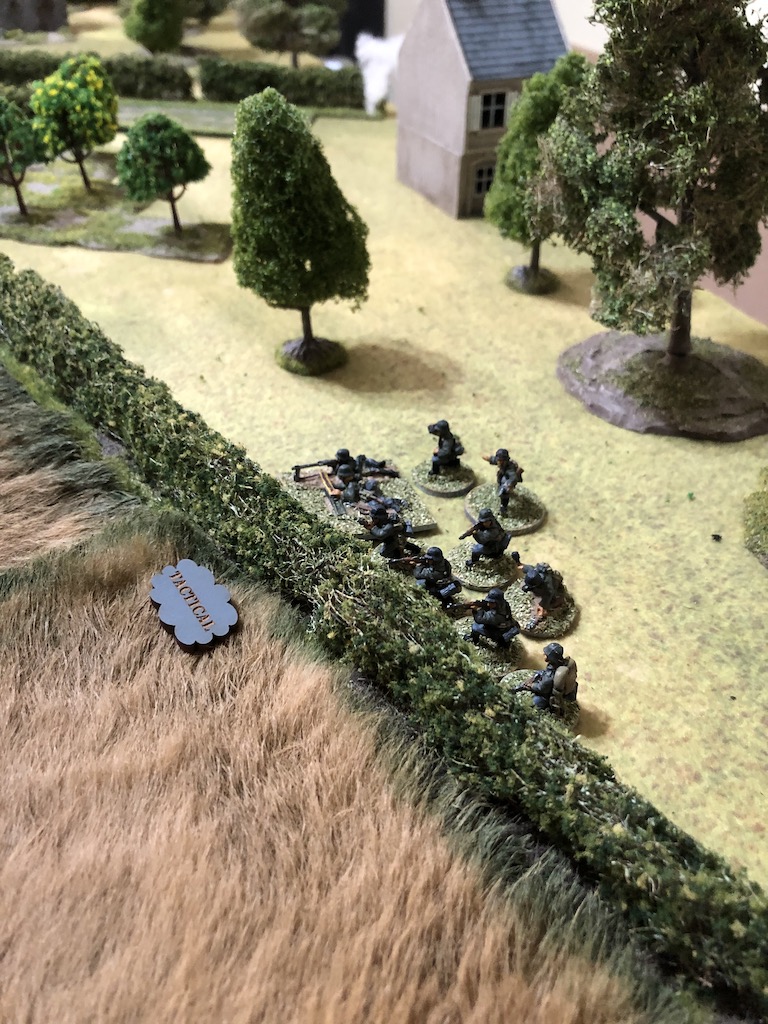
My Second World War games are played in 20mm but I found these patches of very tall grass for my 20mm figures work well as longish grass for my games in 28mm. Much like model trees, what is a very large tree to a 20mm figure is simply a more modest size to a 28mm figure. I've used these fields to represent terrain from places as far apart as Afghanistan and North America.


Next I tried my hand at fields of crops in different colours. Like many others, I've been using variations of door mats to represent these, but I've never been that happy with the way figures float above the top of them.


I've made up a few that show the crops trodden down so that the figures aren't floating and they work fine, but I also wanted to be able to create much larger expanses and I thought the fur could do this very effectively.


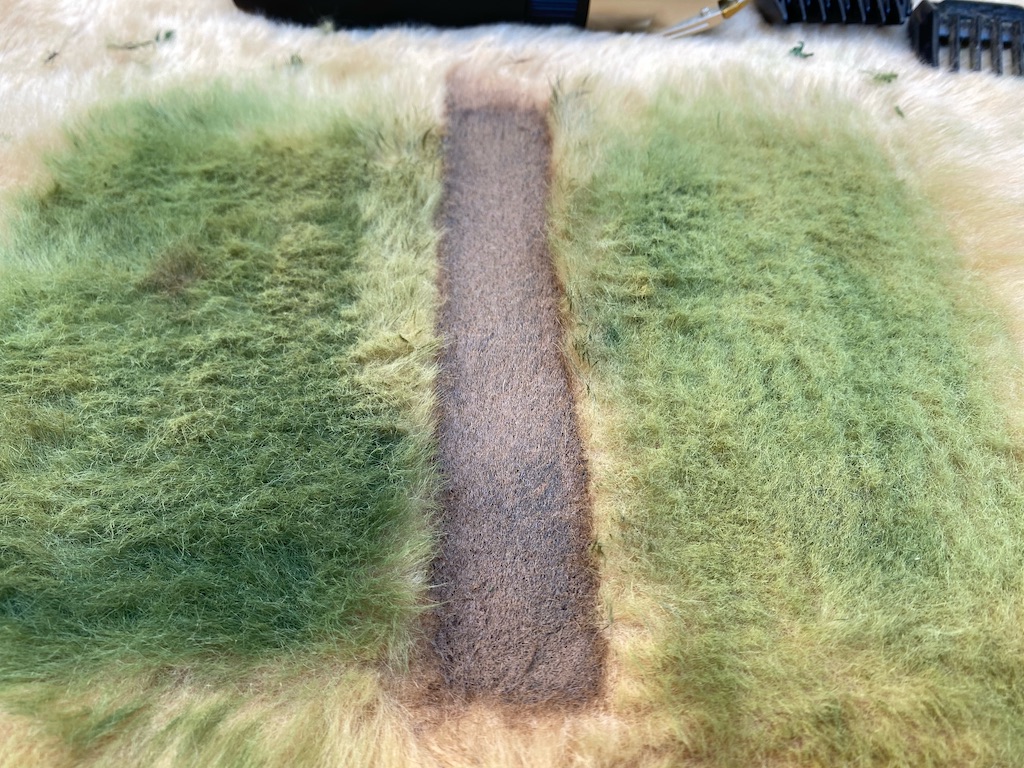
Using lighter colours I created a range of different sized grain fields. One thing that is also apparent is that the fields work better when they have a border - a road, hedge row or similar. However I also thought I could try and create a border by using different coloured paint to represent grass surrounding the fields.


By creating these in different colours and shades I've been able to use them in a variety of locations. Most recently they were used in the Taking the Gembloux Gap campaign for Chain of Command.


A lot of this is simply trial and error. I'm still not perfectly satisfied I've got this right but I learn something with every piece. One of the issues I've faced is the length of the fibres, I still feel these early versions work well to represent crops or long grass but not necessarily right for all types of fields. As mentioned I've tried cutting the fibres with hair clippers and scissors but have since found that human hair clippers are not designed for this sort of job but pet grooming clippers are perfect. I picked up a cheap pair from Amazon (AU$18) and they work extremely well.


I've experimented using different clipper attachments to see what can be achieved and what works best with different scales of figures. The other thing I've been doing is applying the paint more diluted and in much smaller quantities to try to prevent the fibres clumping together. I'm still using the comb method to spread it, but just being a lot more sparing with the paint.


Recently I've begun collecting 12mm figures and vehicles for Second World War games at company level and higher and so that's required a bit of a rethink on my terrain needs. Cutting the fibres shorter has made a difference. Here the fibres cut on a 9mm setting look much too long for the 12mm figures:


On the other hand that length of fibre works very well with these 28mm Perry figures:


On a shorter 3mm setting the 12mm Victrix figures look more at home:


But there's no reason why the 28mm figures can't be used on the same piece:


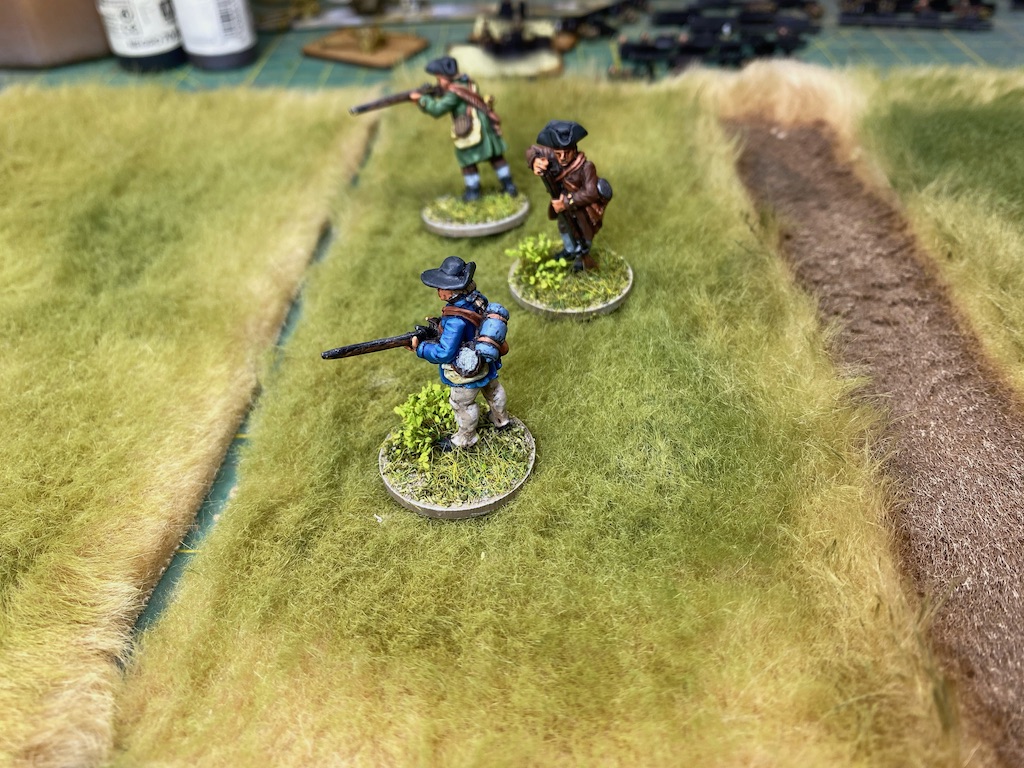
As an aside, it's interesting comparing the two pictures above and how we can create a sense of scale and space. The 12mm figures look like a group of men in a fairly large field and yet the 28mm figures on the exact same piece of fur and shot from a very similar angle make the same patch look like a small strip of short grass. With careful planning and thought there is no reason why the teddy fur can't be made to work across a number of scales.

I think I'm getting much closer to how I want this to look and I'm now very tempted to try something more ambitious and work on a single piece that can be used as a game mat for a 6x4 table. 

Friday 19 June 2020

Sarissa 20mm Colonial House

For my Far East project I need a selection of buildings more suited to towns or cities. In particular I'm thinking of Rangoon, Singapore, Hong Kong or Shanghai. While I have several village huts which are perfect for more rural settings, I didn't have anything suitable to represent urban buildings or the homes of the more affluent merchants and colonial officials.

Sarissa's colonial range includes several buildings with a number of features that would not look out of place in Rangoon or Singapore. They appear to be designed with a North African theme but they are consistent with a European style of colonial architecture that could be found in India and the Far East. Perhaps the key difference is that in those places like Singapore where heavy rain is common they are more likely to have tiled, sloped roofs rather than a flat roof. Otherwise they play the part extremely well.


I've bought several from the Sarissa range, but before embarking on the larger buildings I wanted to trial some ideas on the smaller two storey house.


Looking at period pictures the shuttered windows are a major feature, as are balconies, so I wanted to make sure I made a feature of these.


As with all the Sarissa kits they assemble quickly and easily.


The balcony is an atmospheric feature, but is rather basic and chunky in its current form. I also wanted to add a few more external elements to give the building more character. Using cork sheet I made a lintel for the windows.


A few years ago I bought some shaped cocktail sticks thinking that they could come in useful for a terrain project. Until now they have sat in a drawer unused.


The top ends are perfectly shaped for colonial style balustrades and by sheer coincidence, perfectly scaled for 20mm. I knew I bought them for a reason, even if I had no idea what that reason was at the time. I removed the original balcony balustrades from the Sarissa model and replaced them with the shaped ends of the cocktail sticks.


Next I filled all the joins in the MDF with all purpose household filler. Even though the parts fit well together there were still a few small gaps and some of the tell tale signs of the joins that so distinguish an MDF model.


A light sanding smoothed this off to the levels of the walls.


Inspired by the balustrades I decided to use the toothpicks for another feature. Many colonial style buildings have columns on the outside but anything too wide wasn't going to work with this particular house and so I thought the cocktail sticks would fill that role without taking up too much space.

To cut the cocktail sticks I use "The Chopper" one of my favourite terrain making tools. It makes cutting lots of pieces to the same size incredibly easy (not to mention fast).


Once cut to size these were attached to the front corners of the house. As I need to remove the upper level for gaming purposes I've done this in two halves, one for the upper and one for the ground level.


Plain MDF walls always lack texture but as these are buildings that are normally rendered I didn't want anything too heavy or rough. One coat ceiling paint has a thick consistency and must contain some sort of filler, so is perfect for this particular job.


I applied it using a sponge roller and dabbing with a paintbrush to try to tease out a bit more texture.


The next job was to paint. The first coat was Dulux emulsion Deep Bamboo, followed by a dry brush of Arava to pick out the texture.


I final light dry brush of Warm Neutral was then followed by a dry brush of a darker Burnt Umber into the recesses and corners to give a more three dimensional look.


The doors, window frames and shutters are all produced on grey board. A rather nice design feature is that you don't need to remove the window frames or doors from the grey board, the whole piece simply slots into the model at the appropriate place. Not only quick and easy it also ensures everything is perfectly aligned without the need to fiddle around. I wanted the look of slightly faded paintwork and so used Vallejo Grey Blue and brushed that lightly over the various features.


The faded blue works well against the main colour of the walls and once they are all in place the building really starts to take on some character of its own.


I find it's often the small details that can really lift a model. The house represents that of a local merchant or colonial administrator and I felt it needed more decoration to reflect the relative affluence of the owner.

I used Milliput to sculpt some simple plant pots and containers. While I was at it I made a number of small balls to use as door handles.


Once painted I want to have the pots positioned around the house entrance complete with flowers and plants.


The tall windows let in a lot of light but made the building look a little like it had been abandoned. I wanted to give the place a more lived-in feel and played around with ideas for dressing on the windows. Rather than curtains, which had the danger of becoming a complex job, I settled on the idea of rolled cloth window blinds. The most simple solution was to use pieces of the absorbent paper towels that I use to clean my brushes. They already have texture and would require little work.


While I was thinking how best to tackle those window blinds I set to work painting the plant pots and adding tufts of Gamer's Grass shrubs.


The door handles were attached and I couldn't helping thinking how such a simple touch could transform the look of the doors.


I then cut the paper towel into strips to match the windows. I thought they needed some colour and so soaked them in a mix of paint and diluted PVA glue. Once they were wet it was easy to roll them from one end to simulate blinds and then while still wet attach to the interior of the windows.


With the plant pots in place I was calling this finished. I'm very happy with the result. As always it's the attention to small details and touches that can make such a difference.


The other pots I placed on the roof to add a bit more character to an otherwise featureless part of the building.


Overall I'm happy with the result. Along the way it's given me a lot of ideas for what I can try to do with the larger buildings, so I'm looking forward to getting to work on those in the not too distant future.