Showing posts with label O Group. Show all posts

Friday, 31 December 2021

2021 A gaming year in review

Well, we said goodbye to 2020 happy to put a wild year behind us, little did we know 2021 was going to deliver more of the same. Just when Australia was lulled into a false sense of security the Delta variant reared its ugly head and 2021 was another year disrupted by a lengthy lockdown. Despite all that, looking back it's been a fairly busy and productive period.

I’m not someone who makes detailed plans or who keeps a record of figures acquired and figures painted, I tend to go where the mood takes me. That said, I’m not a typical wargaming butterfly, but every now and then I’ll be inspired and find myself wandering into a rabbit hole. This is all of way of saying that until I put this review of the year together I didn’t really have a good idea of what the year had produced.

The lockdown meant a three month interruption to face-to-face gaming but looking back I still managed to squeeze in quite a few games. Chain of Command was always going to play a big part in the gaming year and we started in February with the Bloody Bucket campaign. That turned into a ten game epic, the longest campaign we've played.

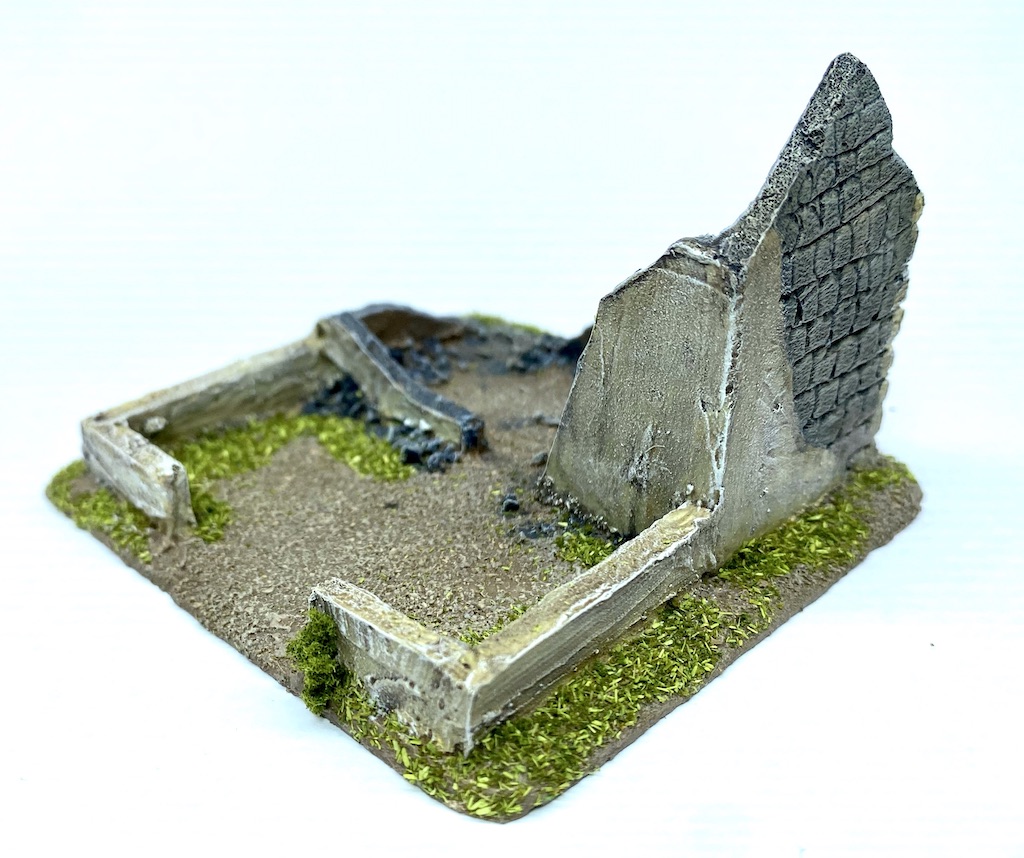
While it is set during the winter of 1944, no snow was present at the time, which saved me contemplating creating snow terrain. However I did think it would be useful to build new terrain that would work for the colder months without snow. With that in mind I made up leafless hedges and deciduous trees. 

It's surprising how effective something as simple as this can be at changing the look and feel of the table.

I also added groups of conifers. Aside from their use in the Ardennes these should also come in useful for settings like East Prussia and parts of Russia.

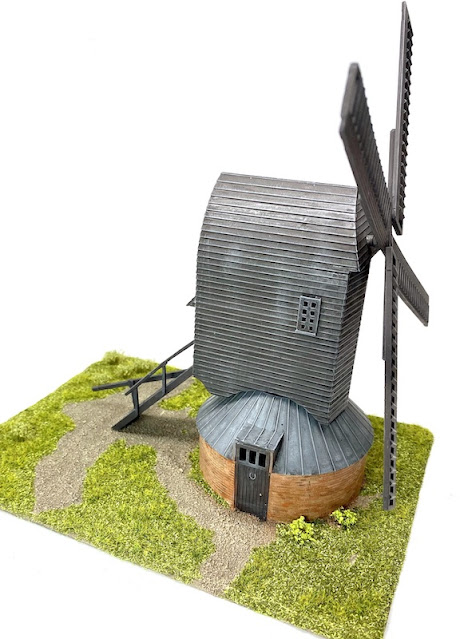
The plan had always been that after the Bloody Bucket campaign we would take a break from Chain of Command and play a few other rules and periods. The intention being that we would return to CoC later in the year to play the campaign 'There are Many Rivers to Cross'. Taking place during the German blitzkrieg of May 1940 this can be set anywhere in the Low Countries and we had chosen Holland so that Dave could use the Dutch platoon he had recently painted. While events meant we ran out of time to get that one started I did make use of the lockdown to make a few preparations. 

Nothing says Holland quite like a windmill and I made up the Dapol HO/OO post windmill that was once an old Airfix mould. The kit stands up remarkably well considering its age.

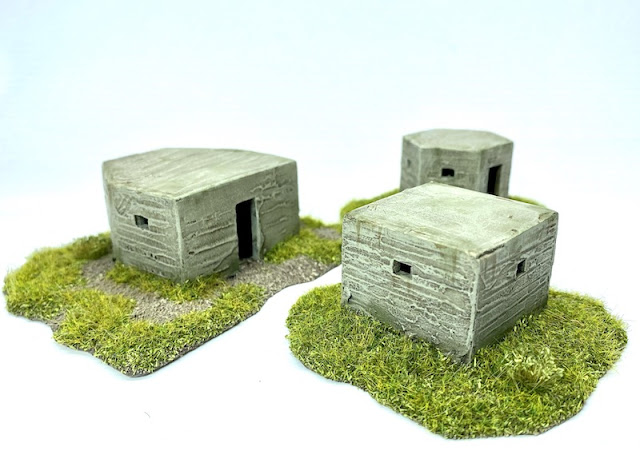
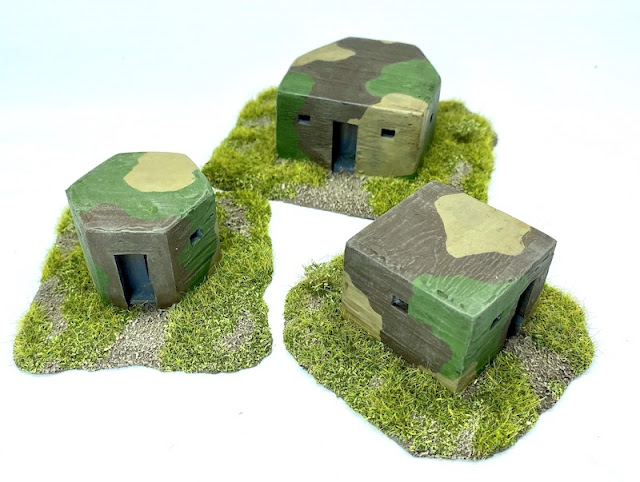
The Dutch kazemat pillboxes are also a feature of the campaign and something missing from my collection. The closest things I could find were MDF versions from Blotz that are based on various British designs. Research showed the Dutch designs were often very similar. These kits are fairly basic and so I made a number of embellishments which I cover in this post

Originally I had planned to do these in plain concrete but part of my research showed that many were painted and from what I could gather there was no proscriptive painting style, that being left to the individual garrison units. So I painted one set as unadorned concrete and one camouflaged.

One of the projects planned for the break was a campaign set during the American War of Independence using Sharp Practice. Dave tried his hand at creating one and the result was 'I'll Take Manhattan' featuring five linked games set around New York in 1776. It's taken us a little while to really come to grips with Sharp Practice but we felt we'd reached a point where we were ready to try something more involved than a single game. Happily we were able to play the campaign right through to its conclusion and very enjoyable it was too. You can find all the game reports on the Sharp Practice AWI page.


In between the campaigns we explored a few other rule sets. Dave bought the Barons War skirmish rules (written by Andy Hobday and published by Warhost) and was keen to give them a run out with his Medieval collection. Dave has played a few more times than I and he took me through an introductory scenario.


It's not dissimilar to Lion Rampant, in the sense that it's a fairly straightforward skirmish level game with a medieval theme. The depth of the rules appears to be in building a retinue and the rule book has a lengthy section on a vast array of traits that can be added to the various groups that will make up your force. It's clearly the sort of thing that appeals to those who like to use lists to build an optimum force, but unfortunately I'm not one of those. If nothing else it did look like it required a lot of record keeping to maintain track of which group had which traits and what that meant in terms of game performance. I let Dave create two opposing retinues, so avoided having to actually do any of that work myself. Other than that it played smoothly enough.

Given our interest in the American War of Independence we also tried Muskets & Tomahawks (2nd Edition). I have mixed feeling about Studio Tomahawk's rules. On the plus side, they have a number of interesting and often innovative mechanics and there's no doubt the rules are extremely well written and presented. However I'm not sold on how well they reflect their historical period, they always strike me as more game than wargame. I had two particular issues with this set. 

Firstly the card activation, while innovative, didn't seem to bear any relation to a real world situation. Why exactly do all the 'Regulars' activate at the same time when the 'Regulars' card is played? What does that actually represent given it doesn't require a commander to coordinate the activity and assumes units on different parts of the table can suddenly all act in unison?

Secondly, I was at a complete loss to understand their interpretation of British Light Infantry, who are treated purely as skirmishers rather than a fast, elite unit. The worst case being their 'Aggression' rating (which is used to determine their effectiveness in hand to hand combat) - it's the same as American militia, which leaves me mystified and means you cannot use the light bobs as they would have been used historically. I can't help feeling that's a serious flaw and makes me wonder how well the authors understand the period they are writing about.

On a more positive note, they have tried to do something interesting with volley fire, where its primary effect is on morale rather than causing casualties. I thought this was at its most effective when reflecting the way irregulars or militia might react in the face of a volley. There is certainly a good idea buried in there but I'm just not certain they have it right in the final execution. So, all up, a very playable set of rules that make for a decent enough game, but not great history.


Having painted up figures for the colonial period during lockdown I wanted to try out The Men Who Would Be Kings (Daniel Mersey's colonial rules, published by Osprey), to see if it was a set we would want to explore further.


The rules have a good following but they left us a bit underwhelmed. I like Lion Rampant, Mersey's rules for the medieval period, there's a degree of friction and uncertainty that make for a challenging and entertaining game, but it strikes me these rules have filtered out the best of those elements to make a much more predictable sequence of play. This is because every unit type has a number of specific actions that they are guaranteed to be able to carry out when activated. Those tend to be the actions you would most want them to do (for example, firing for British regulars, or, moving for tribal groups). I felt this took a lot of the spark out the game and the sequence of play became much more predictable. 

The rules talk a lot about the importance of leadership and personalities and yet, while there are mechanics that add a lot of colour and variety to the types of leaders, I didn't feel they drove the actual play in the same critical and engaging way they do in a rule set like Sharp Practice. They probably deserve a chance to be played again but they didn't grab us at the first outing.

Dave and I joined a new club in the middle of last year. They meet on Wednesday evenings and going there has become part of a regular gaming routine. While Dave and I have many gaming interests in common we each have a few rules or periods where our enthusiasm is not equally shared. This is where the club has been great, as it's given us outlets to pursue these other interests without trying to inflict them on each other. It's also been something of a gaming laboratory, where we can try out different rules and systems. The benefit of doing this weekly is that if a game or rule set doesn't work for you it's no great loss, you can try something else the next week. This is a marked contrast to our old club, which only meets monthly, and if a game doesn't work out you really feel like it has been a wasted opportunity. 

Ironically, given Dave and I enjoy many of the Lardy's rule sets, there are some at the club with a real dislike for them. They are fairly vocal about it too, however it's good natured and we are invariably on the receiving end of a bit of banter. 

Looking back over this year the club has enabled me to have the opportunity to try a number of different games. Including:

Sam Mustafa's Rommel, a divisional level Second World War set, where we played a western desert scenario in 15mm. There's much to like about the system but as someone quite comfortable playing board games I'm not sure this needs to be played with miniatures, in fact I suspect it might make for a much better experience as a board game. Where as I can handle any level of abstraction in a board game to me something breaks the immersive experience when a game of miniatures strays too far from a one-to-one visual representation. Perhaps it would feel different in a much smaller scale?


A first game of Studio Tomahawk's Congo, a skirmish level colonial set with a distinctly pulp flavour. Unlike Muskets & Tomahawks you are under no pretence that it's historical and when taken in that context is a very enjoyable set of rules. 


Crossfire, Arty Conliffe's Second World War company level rules, was what got me back into miniatures and I still enjoy playing games using them. One of the club members was eager to try something very different and we played a North West Frontier game set in the interwar years.
 

My first ever game using Muskets & Tomahawks was actually at the club and Dave and I joined in a game set during the war of 1812. It was our first opportunity to try and get a handle on the rules. 


We convinced our opponents to try a game of Sharp Practice, which they had played before but weren't completely sold on. We chose a scenario from the 2019 Lard Magazine 'The Magistrate's Daughter' which is nicely designed to ensure there is lots happening on the table.  


There was much discussion after the game about how it might play out using Muskets & Tomahawks and so we decided to play the exact same scenario two weeks later but using those rules. It was an interesting exercise to compare and contrast, but left me convinced that Sharp Practice offers the better historical game with much greater nuance and subtlety.
 

I've never really gamed anything earlier than the medieval period and so ancients is foreign territory for me. One benefit of the club is that it has allowed me to dip my toe into the water. Playing at a skirmish level I tried Clash of Spears. It has several interesting mechanics that allow for a lot of interplay between players and makes for a good dynamic interaction. That said, their downfall is that they require a fair degree of on-table record keeping, to the point that at one stage we had more tokens and markers on the table than we had miniatures. To be honest I think that could be addressed by a few creative approaches to how those event are marked.

Jumping from 28mm to 15mm and from skirmish to mass battle I then tired Sword and Spear, a set of rules very popular with a few of the club members. It's a fairly straightforward set but it demands careful decision making on your use of resources. To some degree it's an abstraction of command and control difficulties although I'm not totally sure what exactly it's abstracting. Nonetheless the rules allow for a mass battle to be played out in a couple of hours, so ideal for a midweek evening game on a club night.

While my own First World War project has come together very slowly, there are a couple of members of the club who have a large collection. Ironically one of their preferred rulesets is Through the Mud and Blood from Too Fat Lardies. They have a large, modular trench system and it was good to get a feel about what might be possible once I have my own project completed. 

I've been working on creating forces in 12mm for O Group, the battalion level Second World War rules by Dave Brown. Using those I ran two games at the club that were very well received. Unfortunately for the blog I was so engaged in running and playing the games that I didn't take any pictures. Enthusiasm for the rules ran high and we managed to squeeze in the first scenario from the recently released France 1940 supplement before the end of the year. The latter we played in 15mm as I don't have an early war force in 12mm. It was interesting to make a comparison in how the rules play out in a slightly larger scale. Despite a relatively small difference we felt 10/12mm had a much better feel than the larger 15mm. I think it's highly likely O Group will become a regular set used at the club and so I expect to post more on the blog (and pictures!) in 2022.

Given the lockdown it was no surprise I managed to get a fair amount of figure painting completed. 

The slow burning First World War project came nearer to completion thanks to the inspiration garnered from playing Through the Mud and Blood at the club. I have a four section British platoon finished and I've made progress with the German platoon. 


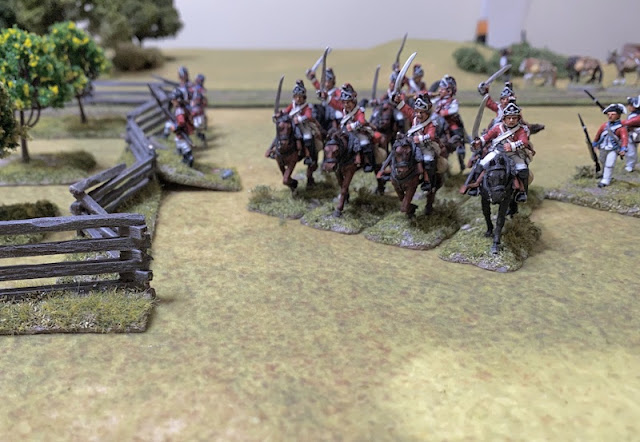
Our American War of Independence campaign was inspiration to add more to the collection. This included a reworking of my British deployment point and a new movable deployment point for the Americans. 


While I struggled with the painting at the time I was particularly pleased with the end result with this group of light dragoons from Perry:


I began work on a force of loyalists using the Perry plastic Continentals as the basis for the figures and adding hats from the British set. I've put these in the colours of the New York Regiment.


It seems you can never have enough militia and with that in mind I've added a command group, in this case metal figures from Perry:


I like the idea of having some of my regular commanders on horseback. If nothing else, it makes it easy to know to which command card the figure corresponds.

Finally getting around to figures I had bought several years ago for a Sudan project became something I tackled during lockdown. In a productive period I managed to paint 80 plastic Beja Mahdists from Perry and a box of 36 British infantry. 


A Perry metal Gardner Gun with a naval brigade crew added a bit of colour to the British contingent.


The Beja I based using a mix of multiple and single basing that would allow for a more irregular look to their units but also allow for the removal of casualties.


These in turn were the incentive to attempt to make my own arid terrain game mat using caulk. This was the first time I had tried anything like this and while there were a few ups and downs along the way I think I got there in the end. I did a step by step tutorial for the blog that you can find here.

As 20mm Second World War is never far from my mind it was no surprise I found time to add more to the collection. A Plastic Soldier Company Panther in a late war ambush camouflage scheme. 


Another Plastic Soldier Company model, this time a PzIVH.


I went to town on a Revell PzIVH to which I added a metal barrel. It's much more of a modeller's kit than a wargame model but I like the finer details on the schurzen they look a lot less clunky than the PSC kits (although not as sturdy).


Missing from the late war Far East British force has been a Sherman and so that was made good this year with a M4A4 from the Plastic Soldier Company.


The Bloody Bucket campaign had me finally get around to finishing off a Bofors kit from Zvezda with the addition of a lovely set of crew figures from AB.


As mentioned, 12mm Second World War has also been a feature of the year in preparation for the O Group rules but also with an eye on trying out I Ain't Been Shot Mum from Too Fat Lardies. My initial aim was to gather what was need to play the introductory scenarios in each of those rules books, both of which are set in Normandy between British and German forces. The majority of the collection so far is based on the new Victrix plastic sets with a few gaps filled with Pendraken and eBay finds. This has now given me a battalion for each nationality plus a good range of support units. I have based the figures in a way that they can serve as a section for O Group (2 or 3 figures to a 20x20mm base) or at one-to-one for company level for IABSM (with additional bases made up with single figures to allow for casualty removal).


Naturally the project has required additional terrain pieces and initially I have gone about creating buildings by scratch building them from foam core.


Talking of terrain there were also a few additions in larger scales. In 28mm I set about making a barn using coffee stirrers. There is something very satisfying about making a building from scratch and I was very pleased with the outcome here.


I was so happy with the way the coffee stirrers created the look of real wood that I was immediately inspired to make a bridge as we needed one for the Sharp Practice campaign. I kept this one fairly simple and can see it working just as well in 28mm in the American War of Independence as I can in 20mm in the Far East or Russia.


Much like hedges and walls it seems you can never have enough rail fencing when playing game set in North America and so three half finished stone walls were retrieved from the work bench and made up into bases for more rail fencing. 


A Sarissa MDF house became the basis for further embellishment with an added chimney breast and tiled roof.


So, despite the disruptions that Covid continue to bring to our lives overall it's been quite a busy and productive year. In many ways it's been very fortunate to have a hobby that can continue in one form or another despite those disruptions. It's helped to keep me sane, that's for sure. That just leaves it for me to wish all of you and your families a very happy new year and all the best for 2022. I’ve enjoyed sharing my little part of the hobby with you, thanks for posting comments or just following along.


Tuesday, 15 June 2021

Making buildings in 12mm

A new scale has called for new terrain. In several instances I've considered how I can use my existing terrain which was initially created with 20mm in mind. While a few elements might be usable in 12mm there are certain things, like buildings for example, that clearly will not work for a smaller scale.

For me buildings have to be practical for gaming. I like to be able to put my figures inside, which means the roofs have to come off and the building dimensions need to be such that the figures and their bases can fit. Having looked at what is commercially available for 10/12mm and not seen anything that will work for me I've decided to begin by scratch building what I need. 

There are a few reasons for this. Firstly, I can build the terrain to fit the specifications and basing size I am using and secondly, I can ensure the building interiors are accessible. I like the way the O Group rules abstract the use of buildings so that a given area is classified as a Built Up Area (BUA) and as long as figures are anywhere within that area all that matters is the direction they are facing. It's assumed the men will take up the best available positions and it doesn't need you to micromanage the placement of figures to windows and doors. In many ways this is similar to the way Crossfire treats what it calls Building Sectors. After all, if you are supposed to be playing the battalion commander it should be safe to assume that an order to a platoon or company to 'hold the village' will see the commanders of those units do the job of assigning their units to the best defensive position for the job.

This allows for a bit of creativity in the way the BUAs are made. The way I've approached it is to consider the base size as representing the entire footprint of the BUA, so that as long as a unit is placed on that base it is considered 'in the building/s' or taking advantage of the cover they offer.

I thought 3mm foam core would work well for this job and constructed a quick test building as a proof of concept. Rather than make detachable roofs I've taken the lazy option and decided all my buildings will be ruins. The test building worked well and the base size was sufficient to house my figures on their 20mm square bases.


With that decided I set about making a selection of buildings to represent farms or sections of a village. For the bases I used pre-cut MDF coasters that are sold in craft shops and the first thing I do is take my Dremel and roughly chamfer the edges to give a more natural look.


The building dimensions are created to fit my figures and bases. These are marked out on the foamcore and then cut out with a craft knife.


The pieces are glued into place with PVA, all the while checking to make sure the dimensions will work with the figure bases. As you can see the buildings do not have to fill the entire base, you can create walls and gardens as additional features to give each base an individual character.


Foamcore is easy to work and you can cut out pieces to represent the damaged walls (which serves the additional function of making it easier for clumsy, fat-fingered wargamers to place figures during a game). By stripping back the paper and exposing the foam in the core you can then score it with a blade or similar tool to make brickwork.


Here I've used strips of greyboard to add external features. You'll note that I have not cut windows at ground level on any of the buildings. It's tricky to do at this scale without weakening the foamcore and I've decided to add shuttered windows made from thin card once the buildings are textured and painted.


Pieces of cork, cut from cork floor tiles, are useful for making extra features.


The next task is to bind everything together with a coat of filler that also adds texture to the exterior and fills any gaps in the foamcore joins.


You can use this to create the effect of flaking and broken plaster around the carved brick work.


Once the filler has dried the bases are textured using PVA and sand.


Once everything has dried the entire base and buildings are given a coat of dark brown acrylic paint as a primer and base coat. At this stage you begin to see the buildings come together and start to look the part.


The next job is to paint the bases and buildings as you would normally. I put down base colours, give the buildings a wash and then dry brush to pick out the highlights.

At this point you can bring out the features like the carved bricks and the nice thing about using the broken plaster effect is that it doesn't matter if this looks roughly done, as that is part of the effect you are looking for anyway.

The shutter windows are cut from a thin piece of card and added after the walls had been painted.


Despite saying I wasn't going to make roofs this hasn't been completely true. I liked the idea of a farmhouse with an adjacent barn. This roof, made from corrugated cardboard, is not detachable and the barn itself too small to fit a base of figures, however the entire building base is large enough to take the number of figure bases needed. I simply wanted to add diversity to the types of buildings and their appearance.


The last stage was to add flock to the bases.


A late addition was an advertising sign for Dubonnet. This was inspired by a post on Twitter. It involves adjusting an existing jpeg image to the correct size and flipping it to the reverse. Print it out on an inkjet printer and glue it face down to the building exterior with watered down PVA glue. Once the glue has started to dry wet the paper and slowly rub it away with your finger to reveal the image on the wall. It won't look perfect but gives the aged look that you see here. It's a very effective technique that makes the sign look like it has been painted on and gives it a pleasing weathered appearance.


As I mentioned earlier, the only key requirement for the placing of units in a built up area for the O Group rules is that they face in a particular direction. It's not necessary for all bases to be inside the buildings just as long as it's clear that they are occupying the built up area.


The two other terrain types that need to be created are trees and hedgerows. I'm hoping I can do those in a way where they might also work as small items of 20mm terrain and so be as versatile as possible. With most of my miniatures now painted and based it's only a matter of finishing off the final terrain pieces before I can start to play. I'm getting there!